Administrator’s Guide for the VSX Series
Trademark Information
About This Guide
Administrator’s Guide for the VSX Series
Contents
Configuring Network Use
Customizing the VSX System
Managing the System Remotely
System Usage and Statistics
Diagnostics and General Troubleshooting
Administrator’s Guide for the VSX Series
This guide covers instructions for the following models
VSX Models
Name Component Description
VSX 3000 and VSX 3000A Desktop Systems
VSX 5000 system includes the following components
VSX 5000 Set-top System
VSX 6000 and VSX 6000A Set-top Systems
VSX 7000 and VSX 7000s Set-top Systems
VSX 7000e includes the following components
VSX 7000e Component System
Setting Up the VSX 7000e System
VSX 8000 system includes the following components
VSX 8000 Component System
Breakthrough Video Quality
Key Features
Rich Conference Experience
Industry-Leading Audio Quality
Enhanced User Experience
Easy Installation
Remote Management
Security
System Back Panel Views
VSX 3000 and VSX 3000A Connector Panel
Conference link
Power connector For power supply
Power switch VGA output from system
VSX 5000 Back Panel
VSX 6000 Back Panel
VSX 6000A Back Panel
Video output Audio output from system
From system For main monitor
VSX 7000 Back Panel
Power switch Conference link
VCR/DVD output from system
VSX 7000s Back Panel
VCR/DVD input to system
VGA output from system For VGA monitor
Network interface bay
VCR/DVD input to Camera 1 control System Connector
VSX 7000e Back Panel
Line level audio Analog phone Port Input to system
Input to Balanced audio System
VSX 8000 Back Panel
VCR/DVD input Analog phone To system Port Camera 1 control
IR sensor
Positioning Desktop Systems
Positioning the System
Positioning Set-top Systems
Positioning Component Systems
Connecting to the LAN
Connecting to Other Networks
Connecting Desktop Systems to the Isdn BRI Network
VSX system Network interface module Additional device
If your network is You will need
Serial
35/RS-449/ RS-530
Connecting Cameras to Component Systems
Connecting Cameras
Connecting Document Cameras to Desktop Systems
Connecting Cameras to Set-top Systems
Using a Desktop System as the Monitor for a Computer
Connecting Monitors and Projectors
Connecting Monitors to Set-Top Systems
VSX System Main Monitor Second Monitor
Connecting Monitors to Component Systems
About Polycom Microphones and the SoundStation VTX
Connecting Microphones or a SoundStation VTX
Administrator’s Guide for the VSX Series
Setting Up Your System Hardware
Placing Polycom Microphones to Send Stereo from Your Site
One Microphone Two Microphones
This is valid This is not valid
Not used Left
Connecting Speakers to Component Systems
Connecting Speakers
Connecting Speakers or Headphones to Desktop Systems
Connecting Speakers to Set-top Systems
Placing Speakers to Play Stereo from Far Sites
Connecting VCR/DVDs
Connecting Content Sharing Equipment
Points to note about Visual Concert VSX
Connecting a Visual Concert VSX to Set-top Systems
Or 10 ft 3 m 2457-20910-002
Connecting Computers to Component Systems
Connecting an ImageShare II to Component Systems
Connecting Control and Accessibility Equipment
Connecting Closed Captioning Equipment
Connecting Touch-Panel Controls
VSX 3000 and VSX 3000A systems have three power switches
Powering On
Connecting IR Sensors to VSX 8000 Systems
Powering On the VSX 3000 or VSX 3000A Desktop System
Powering On Set-top and Component Systems
Getting the Network Ready
Configuring Network Use
Network Connectivity Checklist
Should be provided by
This information Your
Configuring with the Setup Wizard
Configuring LAN Properties
Go to System Admin Settings LAN Properties
Configure these settings
Select and configure these settings
Configuring IP Network Support
Specifying H.323 Settings
Go to System Admin Settings Network IP H.323 Settings
Gatekeeper IP
Setting Description Use Gatekeeper
Authentication
Available when Use Gatekeeper is set to Specify with PIN
Setting Description Use
PathNavigator for
Multipoint Calls
Configuring Integration with Avaya Networks
Select two or three times and configure these settings
Configuring Network Use
Go to System Admin Settings Network IP SIP Settings
Specifying SIP Settings
Integration with Microsoft Live Communications Server LCS
Show My Offline Contacts
Setting Description Display Contacts
Go to System Admin Settings Network IP Quality of Service
Specifying Quality of Service
Configuring the System for Use with a Firewall or NAT
Go to System Admin Settings Network IP Firewall
Setting Description Fixed Ports
UDP Ports
Setting Description TCP Ports
Setting Description Enable
Traversal NAT Configuration
Service Provider
Enterprise Location a IP Network
Enterprise Location B
Configuring Isdn Support
Configuring the BRI Network Interface
Go to System Admin Settings Network Isdn
Protocol Isdn Voice
Setting Description Isdn Switch
Configuration
Setting Description Area Code
Configuring the PRI Network Interface
Restore Defaults
Setting Description Line Signaling
Switch Protocol
Setting Description Numbering Plan
Line Termination PRI E1 only
Go to System Admin Settings Network V.35/RS-449/RS-530
Configuring the Serial V.35/RS-449/RS-530 Network Interface
Hangup
Setting Description
Delayed DCD
Answer on DSR
Enable People+Content
Setting Description Crypto Resync
Use RTS Signal for
Setting Description Enable Broadcast
System Telephone
Configuring Telephony with the SoundStation VTX
Go to System Admin Settings Network Telephony
Setting Description Room Telephone
Go to System Admin Settings Network Call Preference
Configuring Call Preferences
320
Enable Voice
Enable Analog
Setting Description Preferred Dialing
Make sure the system is registered with a gatekeeper
Configuring Dialing Order Settings
Configuring the Directory Server Settings
Configuring the Global Directory
Setting the Dialing Rules
Go to System Admin Settings Global Services Dialing Rules
Directory Server. You can enter up to five addresses
¾ Go to System Diagnostics System Status
Placing a Test Call
Checking System Status
Keeping your Software Current
Designing Video Behaviors
Customizing the VSX System
Go to System Admin Settings Cameras
Configuring Camera Settings and Video Quality Options
Out Always On
Setting Description VCR/DVD Audio
Format to Composite. VSX
Go to this screen Configure these settings Cameras
Camera Settings
Set the RS-232 Mode to Sony PTZ camera
Disable the Enable Polycom StereoSurround setting
Points to note about using automatic camera tracking
Go to System Admin Settings Monitors Monitors
Configuring Monitors
Activation
Setting Description Monitor
Output upon
Screen Saver
VCR
Display Icons
Setting Description Zoom Video
Timeout
To Fit Screen
VGA Out
Visual
Concert VGA
Out
Near site presses PIP
Setting Up
Select Dual Monitor Emulation Using in a Call
Call connects
Go to System Diagnostics Video
Set Output upon Screen Saver Activation to Black
Configuring Content Display
Configuring Content Display with People+Content IP
To enable People+Content IP on a VSX system
Select Horizontal Position, Vertical Position, or Phase
Go to System Admin Settings Monitors Graphics VGA
Select two times and configure this setting
Select and select where to display Content
Configure this setting
Go to System Admin Settings Audio Audio Settings
Configuring VCR/DVD Player Settings
Adjust the VCR/DVD In Level for
Audio I/O Set Line Inputs to VCR
Record Source
Go to this screen Configure these settings Monitors
Adjust the VCR/DVD Out Level if
Enable VCR/DVD Audio Out Always
VSX Alerts you to incoming calls VSX 3000A
Configuring General Audio Settings
On the microphone or on the remote control
Designing Audio Behaviors
Select and enter VCR/DVD settings for the VSX 7000e system
Select and enter line input settings
Select and enter VCR/DVD settings for the VSX 8000 system
Select and enter speaker settings
Configuring StereoSurround Settings
Points to note about StereoSurround
Audio Levels Set Subwoofer Speaker to Off
Speaker Test
Configuring VSX Systems for a Polycom Vortex Mixer
Go to this screen Configure these settings Mic Placement
Mic Identity
Set Input type to Line Input
Configuring Microphones Connected to Audio Inputs
Disable Echo Canceller
Serial Ports Set RS-232 Mode to Vortex Mixer for
Select Enable Phantom Power to supply
Go to this screen Configure these settings Audio Input
Enable Echo Canceller
Select Echo Canceller
Setting Description Baud Rate
Configuring RS-232 Equipment
Configuring for Use with a Touch Panel Control
Go to System Admin Settings General Settings Serial Port
Configuring for Use with a Modem
Managing User Access to Settings and Features
Designing the User Experience
To maintain this You can allow users to Security level
Go to System Admin Settings General Settings Security
Go to System Diagnostics Reset System
Select Reset System
Screens that Require the Room Password for Access
PIP
Auto-Answer Multipoint Mute Auto-Answer Calls
Setting Passwords and Security Options
Using Security Mode
Enabling AES Encryption
Points to note about Security Mode
Configuring Call Settings
Recent Calls
Setting the Call Answering Mode
Setting Description Display Time
Call Detail Report
Configuring Multipoint Calling
Go to System Admin Settings General Settings Options
Enter the multipoint option key
Go to System Admin Settings Monitors Multipoint Setup
Setting Description Auto-Answer
Multipoint Mode
Page
Including More Than Three Other Sites in a Cascaded Call
Configuring Directory Settings
Associated with your system number
Setting Date, Time, and Location
Go to System Admin Settings General Settings Location
Setting Description Date Format
Select and configure these settings
Advanced Users
Infrequent Users Kiosk Mode
Customizing the Workspace Appearance
New Users
164 Directory
Setting Description Dialing Display
Contact List
Call Quality
Local Date
IP or Isdn
Information
My Information
Displaying Contacts on the Home Screen
Click Utilities Screen Saver and enter
Adding a Screen Saver Logo
Changing System Appearance
Select a tone, as desired
Using Customized Camera Names and Icons
Configuring Remote Control Behavior
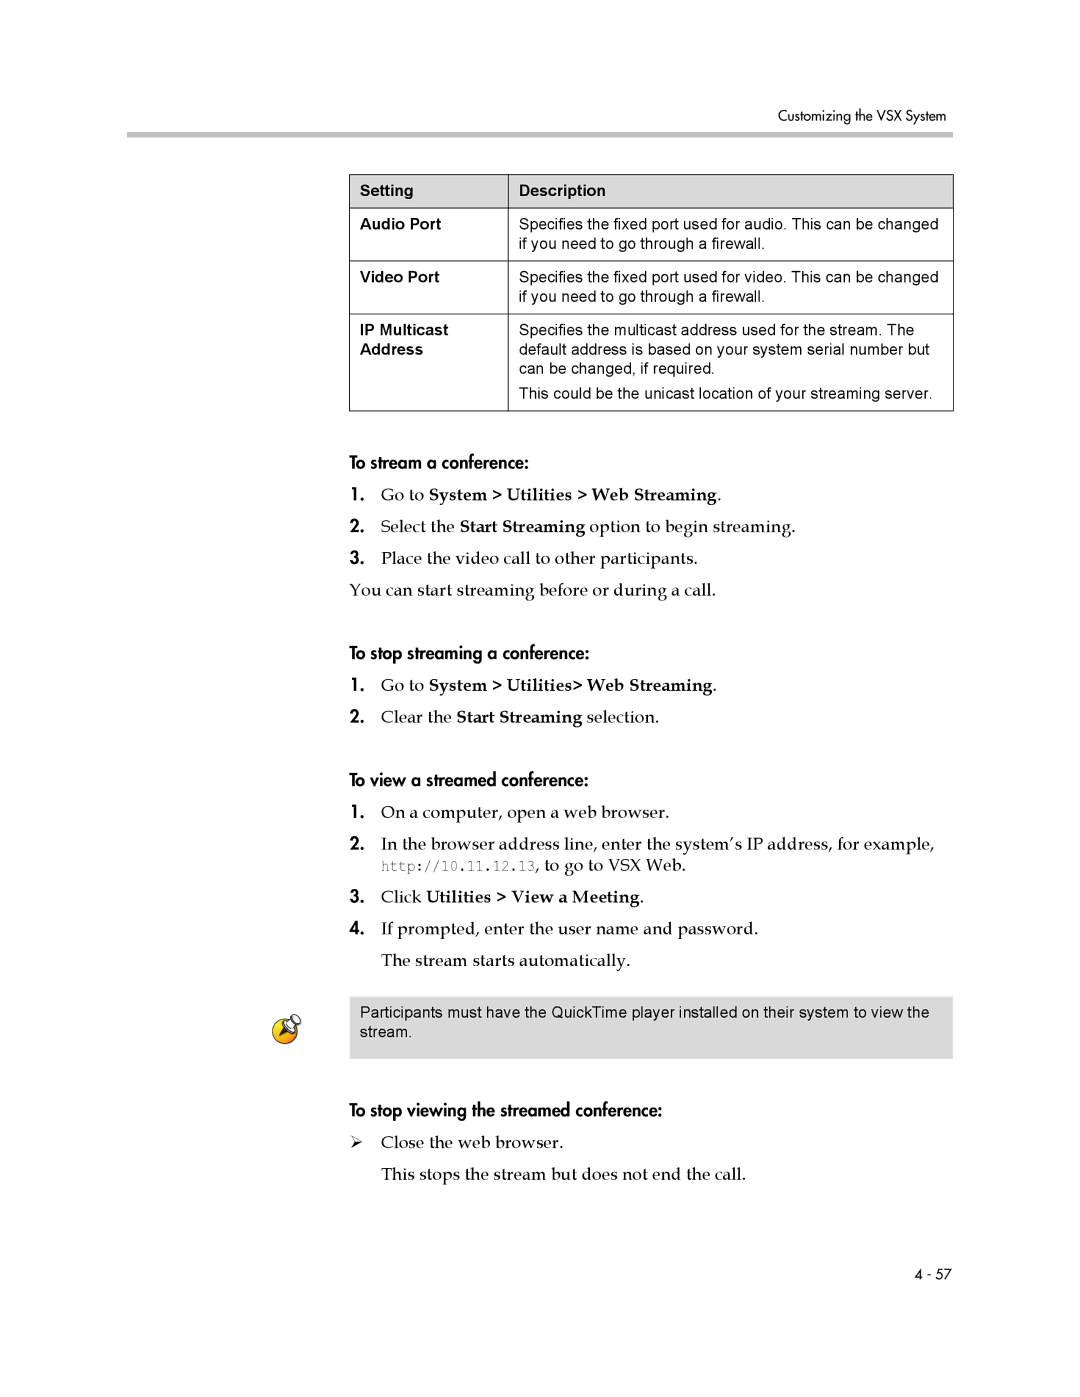
Go to System Admin Settings Network IP Streaming
Configuring Streaming Calls
Go to System Utilities Web Streaming
Clear the Start Streaming selection
Click Utilities View a Meeting
Audio Options for Closed Captioners
Configuring Closed Captioning
Providing Closed Captions for Conferences
Via the System’s Serial RS-232 Port
Go to Utilities Closed Caption
On a computer, open a command line interface
Helping Users Get Started
Accessing VSX Web
Using VSX Web
Monitoring a Room or Call with VSX Web
Tools Remote Monitoring
Go to Admin Settings General Settings System Settings
Creating a Localized System Name with VSX Web
Go to Utilities Web Director
Managing System Profiles with VSX Web
Implementing Basic Mode with VSX Web
Go to Utilities Profile Center
Managing Directories with VSX Web
Go to Utilities Import/Export Directory
Go to Utilities Import/Export Directory Click PC VSX
Go to Place a Call Directory
Configuring Global Services
Viewing the Management Servers List
Requiring an Account Number for Calls
Adding My Information
Go to System Admin Settings Global Services My Information
Your request for help has been acknowledged
Click Download MIB and follow the onscreen instructions
Setting Up Snmp
Go to Admin Settings Global Services Snmp
Downloading MIBs
Configuring for Snmp Management
Administrator’s Guide for the VSX Series
Go to System Diagnostics Call Statistics and then select
Call Summary
Four
This screen Displays this information
Call Statistics
Recent Calls
Content Statistics
Go to System Diagnostics Call Statistics
Call Status
Call Detail Report CDR
¾ Go to System Admin Settings Network Recent Calls
Information in the CDR
Following table describes the data fields in the CDR
Data Description
SIF
Close your FTP session
Call Detail Report Archives
Administrator’s Guide for the VSX Series
Click System Setup
Go to Diagnostics Send a Message
Sending a Message
This choice Presents this information or capability
Diagnostic Screens
¾ Go to System Diagnostics
System Screens Quick Reference
Following diagnostic screens and tools are available
Select Utilities Call Detail
Select Enable Basic Mode Call Preference
Select Enable Basic Mode
Call Detail Report screen
35/RS-449/RS-530 Serial Status
Select Network Ping
Select Network Trace Route
Click Trace Route
Audio Meter test
Select Diagnostics Video
Select Diagnostics Audio
Click the Speaker Test icon
Delete System Settings
On the Diagnostics screen Select Diagnostics Reset
Select Reset System
Click the Reset System icon
General Troubleshooting
VSX 7000, VSX 7000s
Power and Start-up
Symptom Problem Corrective action
VSX 3000, VSX 3000A, VSX 5000, VSX
Controls
Access to Screens and Systems
On the system, go to Admin Settings General
Settings Security
Dhcp Client is on and no
Calling
Use the Ping test System Diagnostics
Symptom Problem Corrective action
Codes on page Appendix-11
Go to Admin Settings Network Call
Preference and select
Call Speeds screen
Displays
Go to Admin Settings Network IP Firewall
Ensure that NAT Configuration is Off
Settings Monitors Monitors screen
Select Backlight Compensation
Go to Admin Settings Monitors Monitors
Otherwise, go to Admin Settings Cameras
Video or Composite
Diagnostics Call
Go to Admin Settings Network IP Quality
Go to System Admin Settings Cameras
Cameras
Clear the Enable Polycom StereoSurround
Selection on the Admin Settings Audio Audio
Settings screen
Symptom Problem Corrective action
Make sure that Midrange Speaker and Subwoofer
Output using the Speaker Test under Diagnostics
Go to System Admin Settings Audio Settings
Audio
Go to System Admin Settings Network Isdn
Audio Meter screen under Diagnostics Audio
Change the Isdn Voice Algorithm selection aLaw
Mute
Go to System Admin Settings Audio Audio
Settings. Select Enable Polycom Microphones if it
Audio Meter screen under Diagnostics Audio to
VCR Far and Near Audio Or VCR Audio Out Always
Internal Ringer option
Settings Audio Settings screen
Canceller selection on the second Admin Settings
Audio Settings screen
Polycom Mic but no
Audio Meter screen
Error Indications
Model When the VSX system It means
System Lights
System lights are located on the front of your VSX system
When the BRI network interface It means
When the PRI network interface It means
Network Interface Lights
How to Contact Technical Support
Video Source Output Examples for Multiple Monitors
Appendix
Select this To see this
Near video
Select this To see this
Select this To see this
Select this To see this
Multipoint Dialing Speed Information
Port Function
Port Usage
Following table shows other VSX port usage
Following table shows Global Management System port usage
Web Telnet
Changing the Security Mode setting
Actions that Cause the System to Restart
Connect to My LAN Host Name
Code Cause Definition
Cause Codes
Status Inquiry
Code Cause Definition
If this error occurs systematically, report it to your
Isdn
PathNavigator Error Codes
Following table lists PathNavigator error codes
Code Cause Description
Code Cause Description
Code Cause Description
Regulatory Notices
Important Safeguards
License Restrictions
Warranty Information
Warranty Information
Regulatory Notices
Part 15 FCC Rules
Part 68 FCC Rules
Industry Canada IC
Administrator’s Guide for the VSX Series
Plug Acts as Disconnect Device
Special Safety Instructions
Installation Instructions
Regulatory Notices Underwriters Laboratories Statement
Administrator’s Guide for the VSX Series Regulatory Notices
Index
Index-2
Index-3
Index-4
Index-5
Index-6
See also NAT and security Fixed Ports setting
Index-8
Isdn
Index-10
NAT
Index-12
Index-13
Snmp
Index-15
VCR/DVD
Index-17
Administrator’s Guide for the VSX Series Index-18