Chapter 11 Taking advantage of the VS-880 (ideas and examples)
Using external effect units
This section gives two examples of using external effect devices. Refer to these explanations when you wish to use your own effect devices.
■Applying an effect during
playback
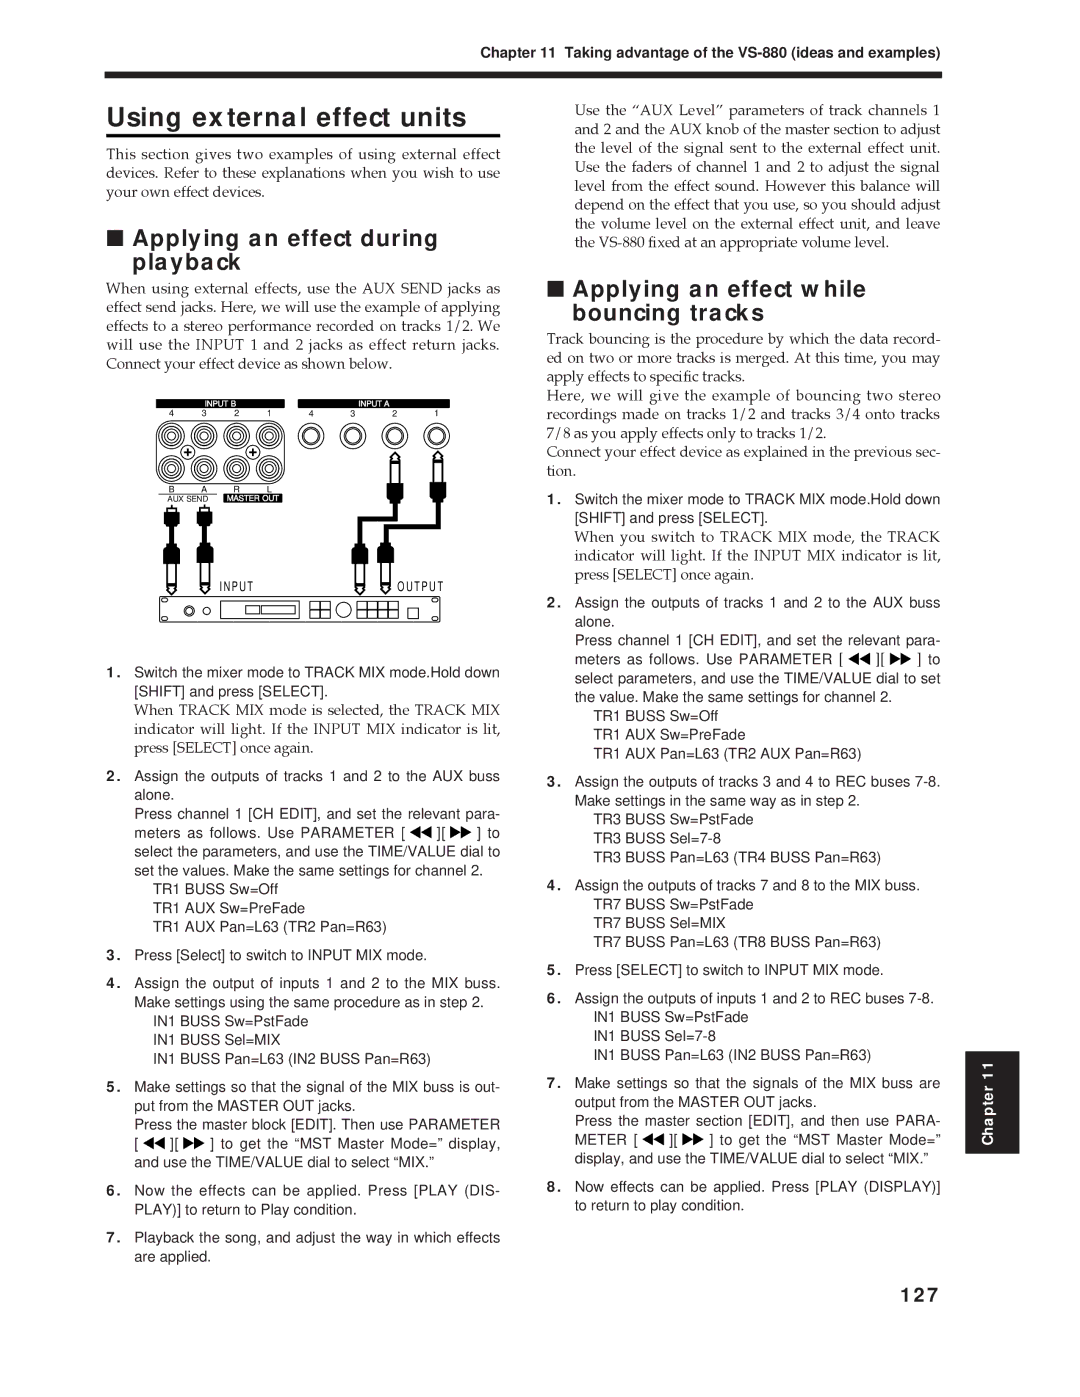
When using external effects, use the AUX SEND jacks as effect send jacks. Here, we will use the example of applying effects to a stereo performance recorded on tracks 1/2. We will use the INPUT 1 and 2 jacks as effect return jacks. Connect your effect device as shown below.
| INPUT B |
|
|
| INPUT A |
| |
4 | 3 | 2 | 1 | 4 | 3 | 2 | 1 |
B | A | R | L |
|
|
|
|
AUX SEND | MASTER OUT |
|
|
|
| ||
Use the ÒAUX LevelÓ parameters of track channels 1 and 2 and the AUX knob of the master section to adjust the level of the signal sent to the external effect unit. Use the faders of channel 1 and 2 to adjust the signal level from the effect sound. However this balance will depend on the effect that you use, so you should adjust the volume level on the external effect unit, and leave the
■Applying an effect while
bouncing tracks
Track bouncing is the procedure by which the data record- ed on two or more tracks is merged. At this time, you may apply effects to specific tracks.
Here, we will give the example of bouncing two stereo recordings made on tracks 1/2 and tracks 3/4 onto tracks 7/8 as you apply effects only to tracks 1/2.
Connect your effect device as explained in the previous sec- tion.
1.Switch the mixer mode to TRACK MIX mode.Hold down [SHIFT] and press [SELECT].
I N P U T | O U T P U T |
1.Switch the mixer mode to TRACK MIX mode.Hold down [SHIFT] and press [SELECT].
When TRACK MIX mode is selected, the TRACK MIX indicator will light. If the INPUT MIX indicator is lit, press [SELECT] once again.
2.Assign the outputs of tracks 1 and 2 to the AUX buss alone.
Press channel 1 [CH EDIT], and set the relevant para-
meters as follows. Use PARAMETER [ ![]()
![]() ][
][ ![]()
![]() ] to select the parameters, and use the TIME/VALUE dial to set the values. Make the same settings for channel 2.
] to select the parameters, and use the TIME/VALUE dial to set the values. Make the same settings for channel 2.
TR1 BUSS Sw=Off TR1 AUX Sw=PreFade
TR1 AUX Pan=L63 (TR2 Pan=R63)
3.Press [Select] to switch to INPUT MIX mode.
4.Assign the output of inputs 1 and 2 to the MIX buss. Make settings using the same procedure as in step 2.
IN1 BUSS Sw=PstFade IN1 BUSS Sel=MIX
IN1 BUSS Pan=L63 (IN2 BUSS Pan=R63)
5.Make settings so that the signal of the MIX buss is out- put from the MASTER OUT jacks.
Press the master block [EDIT]. Then use PARAMETER
[ ![]()
![]() ][
][ ![]()
![]() ] to get the “MST Master Mode=” display, and use the TIME/VALUE dial to select “MIX.”
] to get the “MST Master Mode=” display, and use the TIME/VALUE dial to select “MIX.”
6.Now the effects can be applied. Press [PLAY (DIS- PLAY)] to return to Play condition.
7.Playback the song, and adjust the way in which effects are applied.
When you switch to TRACK MIX mode, the TRACK indicator will light. If the INPUT MIX indicator is lit, press [SELECT] once again.
2.Assign the outputs of tracks 1 and 2 to the AUX buss alone.
Press channel 1 [CH EDIT], and set the relevant para- meters as follows. Use PARAMETER [ ![]()
![]() ][
][ ![]()
![]() ] to select parameters, and use the TIME/VALUE dial to set the value. Make the same settings for channel 2.
] to select parameters, and use the TIME/VALUE dial to set the value. Make the same settings for channel 2.
TR1 BUSS Sw=Off TR1 AUX Sw=PreFade
TR1 AUX Pan=L63 (TR2 AUX Pan=R63)
3.Assign the outputs of tracks 3 and 4 to REC buses
TR3 BUSS Sw=PstFade TR3 BUSS
TR3 BUSS Pan=L63 (TR4 BUSS Pan=R63)
4.Assign the outputs of tracks 7 and 8 to the MIX buss. TR7 BUSS Sw=PstFade
TR7 BUSS Sel=MIX
TR7 BUSS Pan=L63 (TR8 BUSS Pan=R63)
5.Press [SELECT] to switch to INPUT MIX mode.
6.Assign the outputs of inputs 1 and 2 to REC buses
IN1 BUSS
IN1 BUSS Pan=L63 (IN2 BUSS Pan=R63)
7.Make settings so that the signals of the MIX buss are output from the MASTER OUT jacks.
Press the master section [EDIT], and then use PARA-
METER [ ![]()
![]() ][
][ ![]()
![]() ] to get the “MST Master Mode=” display, and use the TIME/VALUE dial to select “MIX.”
] to get the “MST Master Mode=” display, and use the TIME/VALUE dial to select “MIX.”
8.Now effects can be applied. Press [PLAY (DISPLAY)] to return to play condition.
