INPUT SENS
Copyright 1996 ROLAND CORPORATION
MASTER OUT
MIXER MODE
For the USA
IMPORTANT SAFETY INSTRUCTIONS SAVE THESE INSTRUCTIONS
GROUNDING INSTRUCTIONS
For the U.K
Before using this unit, make sure to read the
Chapter 3 Basic operation as a replacement for a tape MTR
Introduction
About the package contents
How this manual is organized
Chapter 4 Editing a recorded performance track editing
Chapter 8 Using the internal effects
Chapter 10 Overall settings and status checking
Chapter 5 Use with MIDI devices
Chapter 2 Before you start VS-880 terminology
Contents
Chapter 1 Trying out the expanded functions
Chapter 3 Basic operation as a replacement for a tape MTR
Chapter 4 Editing a recorded performance track editing
Chapter 10 Overall settings and status checking
Chapter 7 Use with a DAT recorder DAT backup
Chapter 8 Using the internal effects
Chapter 5 Use with MIDI devices
Chapter 11 Taking advantage of the VS-880 ideas and examples
Appendices
Digital audio workstation
Main features
A full complement of connectors
Easy-to-operate controls
Placement
Important notes
Power Supply
Maintenance
Disclaimer of liability
Additional Precautions
Concerning copyright
Important notes
Chapter
Front and rear panels
Mixer section
Recorder section
Front and reat panels
Display section
Rear panel
Mixer-related
Chapter 1 Trying out the expanded functions
Using auto mix
Master Block
Recording the mixer settings, method 3 Realtime
Recording the mixer settings, method 1 Snapshot
Recording the mixer settings, method 2 Gradation
Preparations for auto mix
Erasing the auto mix
If you do not wish to record top panel settings Mask Fader
Playing back the auto mix
A.Mix Snap Auto Mix Snapshot Mode
About “!!! Lack of EVENT !!” display
Using the 3-band equalizer in INPUT MIX/TRACK MIX
EQ Switch equalizer switch
Turning the equalizer on/off
Using the 3-band equalizer
Adjusting the level of each track Track Level
Causing top panel fader and pan knob operations to take
Mixing in a stereo source Stereo In
Creating a master tape which disables digital copying
When the Recording mode is set to Mastering
When a digital signal with emphasis is input
D.CpyProtect Digital Protect Switch
Newly added algorithms
Newly added preset patches
Effect related
Reverb
SCH Space Chorus
Space Chorus
EQ Equalizer
Chapter
Lo-Fi Processor
LFP Lo-fi processor
NS Noise suppressor
4-Band Parametric Equalizer
RMF Realtime modify filter
LNK Link
EQA/EQB Graphic equalizer channel A / channel B
10-Band Graphic Equalizer
LNK Link
Chapter
HC Hum canceller
Hum Canceler
Vocal Canceller
VC Vocal canceller
VOC Vocoder
Vocoder
EQ Equalizer
Chapter
VT Voice transformer
Voice Transformer
CHO Chorus
FE Fader edit
MID MIDI control
REV Reverb
Chapter
MCA/MCB Mic converter channel A / channel B
Mic Simulator
LNK Link
BCA/BCB Bass cut filter channel A / channel B
Adjusting the send level and balance for all effects
LMA/LMB Limiter channel A / channel B
DSA/DSB Distance channel A / channel B
Inserting an effect
Chapter
EFFECT1 Effect 1 switch
Recording while an effect is inserted
Inserting two effects into one channel
EQ/EffPreIns Equalizer/effect pre-insert switch
EFF1 INS Sw Effect 1 insert switch
Inserting in stereo
Holding the level meter peaks
PeakHoldSw Peak hold switch
Display related
Checking the remaining disk capacity
Checking the reliability of a disk
To halt during the procedure
Disk drive related
Checking that a disk is not damaged
If the display indicates “ Err”
To stop during the procedure
If the display indicates “No Err”
Cluster Info. Cluster information
Synchronization related
When using the sync track
RecoverResult Recovery result
Assign mark points according to the tempo
CV Convert
Generating the tempo map from the sync track
Creating the sync track automatically
CV Convert
Generating a tempo map from mark points
Using the tempo map
Adding an offset to the sync track/tempo map
Gen Sync generator
Using control change mes sages to control effects
Using program change mes sages to select scenes
Using program change mes sages to select effects
MIDI related
Example procedure when switching the mixer mode
Using the numeric keys NUMERICS
Example procedure when NUMERICS Type=Up
Example procedure when NUMERICS Type=Dwn
Chapter
Easy time adjustment
Example procedure when modifying a Locate Point
Sources, tracks, and channels
Chapter 2 Before you start VS-880 terminology
Signal flow busses
Doing everything in the digital domain Digital Studio Workstation
Chapter
Where a performance is recorded Song
Chapter 2 Before you start VS-880 terminology
About mixer modes
Frequency Resonance Boost or Cut Selector Switch
Mixer section
Input Sources
TRACKS
INPUTS
1 2 3 4 L R
KEY TO KNOBS
Equalizer
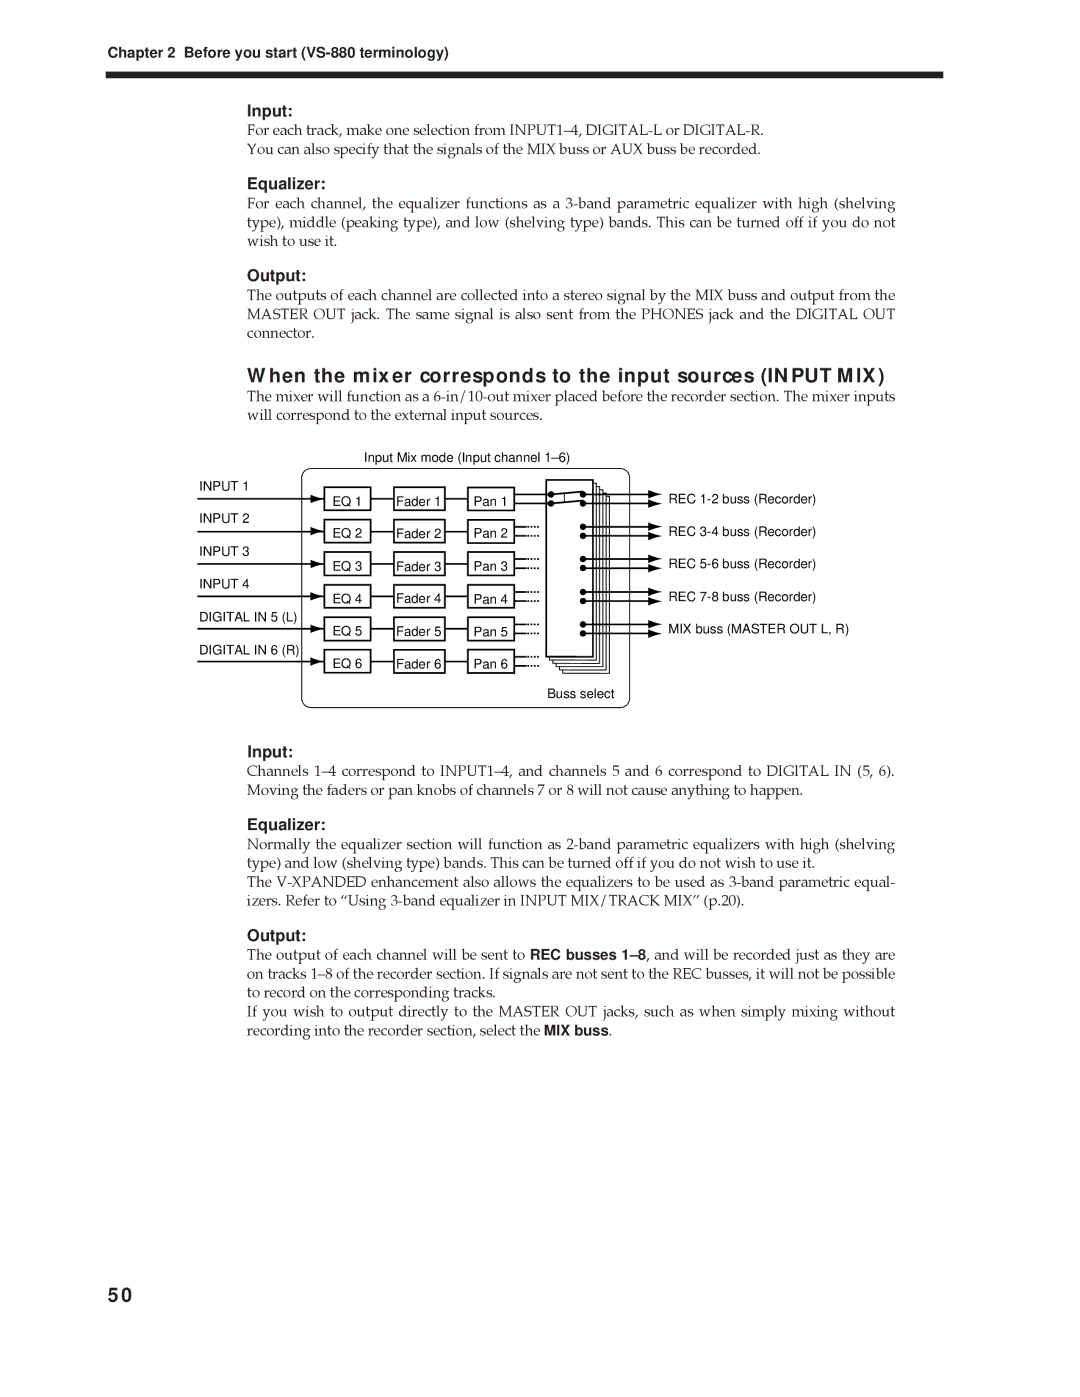
When the mixer corresponds to the input sources INPUT MIX
Input
Output
Recording the current condition of the mixer Scene
Switching the mixer mode
When the mixer corresponds to recorded tracks TRACK MIX
Input
Recalling a scene
Storing the current mixer settings
Clearing the settings of a scene
Recalling a scene without affecting the current fader values
Number of tracks that can be recorded/played simultaneously
Recorder section
Differences with a tape-type MTR
Virtual tracks provided for each track V-tracks
VS-880 operation
Switching conditions
Effects section
About the effect expansion board VS8F-1
Selecting the operation menu
Modifying the value of settings
Switching the track status Track Status
Selecting parameters
Moving to the beginning of the performance Song Top
Changing the current time
About the current time display
Moving to the end of the performance Song End
Changing the Locate Bank
Storing a time location, method 1 Locate Point
Storing a time location
Chapter
Deleting a stored time location
Moving to a stored time location
Modifying a stored time location
Moving to a marked time location
Storing a time location, method 2 Mark Points
Marking a time location
Adding a Mark Point to the current time
Clearing a Mark Point
Modifying a marked time location
Clearing a mark
Clearing all Mark Points
If a hard disk containing a demo song was installed
Chapter 3 Basic operation as a replacement for a tape MTR
When you turn the power on
If an un-initialized hard disk was installed
Naming the song Song Name
Making a new recording
Specifying the recording mode Song New
Connect the instruments
General procedure for multi- track recording
Switching V-tracks
Record a performance onto a
mance Overdubbing
Using the record button
Recording additional tracks while listening to the perfor
Re-recording only your mistakes Punch-in/out
Using locate points
Recording procedure
Using the foot switch
Using mark points
Using mark points
Recording procedure
Using locate points
Repeatedly recording over the same area Loop recording
Combining the performances of two or more tracks into
Adjusting the tone Equalizer
MIX Sw mix switch
another track Track bouncing
EQL equalizer low
EQ Switch equalizer switch
EQM equalizer middle
EQM F equalizer middle frequency / Q
MIX Level
Adjusting the volume and pan Level/Pan
Applying effects Loop
MIX Pan MIX Bal Mix balance
Each channel settings
EFFECT 1 Effect 1 switch
EFF1 INS Sw Effect 1 insert switch
Master block settings
EFFECT 2 Effect 2 switch
EFF2 INS Sw Effect 2 insert switch
If you are using a DAT
Connecting digital devices
If you are using a cassette tape
Digital recording
Turn off the Vari-pitch function
When digital recording is not possible
Selecting digital input as the source
MasterClk Master clock
Preventing accidental erasure of your performance Song Protect
Before you finish operations
Saving the performance to disk Song Store
Protecting a performance
Selecting a song Song Select
Turning the power off Shut Down
Re-starting the VS-880
If the display asks “STORE Current?”
Using TO and FROM
Chapter 4 Editing a recorded performance track editing
What is editing?
Finding the location where the sound begins example
Adjusting the scrub length
Basic procedure
Finding the location where sound begins example
Scrub Len Scrub length
About the bar display
Re-using part of the perfor- mance Copy
Example 3 Copying using the “Frm” setting
Example 1 Copying twice to the same track
Modifying the organization of the performance Move
Chapter
End end point Specify the ending time of the move source playback data
Chapter
Erasing part of a performance Erase
Exchanging performance data between tracks Exchange
Inserting blank space into a performance Insert
Deleting a portion of a performance Cut
Chapter
To cancel the operation, press CANCEL NO
MIDI connectors
Chapter 5 Use with MIDI devices
What is MIDI
MIDI implementation chart
Synchronizing with a MIDI sequencer
Using MIDI to switch the track status
Using MTC
MTC Type
Synchronizing to the VS-880 Master
Gen Sync generator
Chapter
Source Sync source
ErrLevel Error level
Synchronizing to a MIDI sequencer Slave
Gen Sync generator
TimeDispFmt Time display format
Using the tempo map
What is the tempo map?
Ofs Offset
Synchronized operation
MIDIThr MIDI thru switch
Creating a tempo map
Tempo
Gen Sync generator
Using the sync track
Changing the tempo during the per- formance
Chapter
Recording MIDI clock messages
When you experience prob- lems with synchronization
MIDIThr MIDI thru switch
Synchronized operation
Initializing the disk Drive Initialize
Chapter 6 Use with a Zip drive
Connecting a Zip drive
Select the Zip drive as the recording destination Drive Select
Playable
Saving performance data on a Zip disk Song Copy
Saving on a single disk Playable
Archive
When the data cannot be saved on a single disk Archive
Procedure for saving on multiple disks Store In
Chapter
If you have problems saving the data
Procedure for loading from multiple disks Extract
Chapter
Chapter 7 Use with a DAT recorder DAT backup
Saving performance data to a DAT recorder Backup
Backup Wait
Loading performance data from a DAT recorder Recover
Bak backup
Tape Len Tape length
Chapter
Checking the names of the per- formance data that was saved Name
Checking the storage status of performance data that was saved Verify
EFFECT 1 Effect 1 switch
Chapter 8 Using the internal effects
MIX Sw mix switch
Examples of how the effects can be used
EFF1 RTN to Effect 1 return to
EFFECT 1 Send Effect 1 send level
EFFECT 1 Pan Effect 1 pan
EFF1 RTN Lev Effect 1 return level
BUSS Sel buss select
BUSS Sw buss switch
Applying reverb as you record Loop
EFFECT 1 Send Effect 1 send level
EFFECT1 Effect 1 switch
BUSS Sw buss switch
EFFECT 1 Pan Effect 1 pan
EFF1 RTN Lev Effect 1 return level
Applying a vocoder while you record Insert
EFF1 RTN to Effect 1 return to
EFF1 Bal Effect 1 balance
EFF1 InsSend Effect 1 insert send level
EFFECT1 Effect 1 switch
EQ/EffPreIns Equalizer/effect pre-insert switch
EFF1 InsRtn Effect 1 insert return level
Applying reverb while bouncing tracks Loop
MIX Sw mix switch
EFFECT1 Effect 1 switch
Input input select
EFFECT 1 Send Effect 1 send level
EFFECT 1 Pan Effect 1 pan
EFF1 RTN to Effect 1 return to
If the effect does not sound as you expect
EFF1 Bal Effect 1 balance
Sounding the metronome
Chapter 9 Other convenient functions
Using an external MIDI sound source to play the metronome
MetroOUT Metronome output
Stopping automatically Marker stop
Using a foot switch to play- back/stop
FootSw Foot switch assign
Marker Stop
VariPitch
Changing the pitch during playback Vari-pitch
Listening only to a specific channel Solo
Chapter
Recording/editing operations which can be undone Undo
Simultaneously adjusting a stereo source Channel Link
Undoing a recording or editing operation
Canceling only the last-per formed operation
When the disk has little remaining space
Canceling the last-performed Undo Redo
Deleting only unneeded perfor mance data Song Optimize
Adjustment procedure
Chapter 10 Overall settings and status checking
Switching the contents of the display Bar Display
Adjustment procedure
Gen Sync generator
Displaying measures/beats
Checking the size of a recorded performance
MetroOut Metronome output
IDE Drv IDE drive
Restoring the mixer settings to the initial state
If there is no internal hard disk
Recording multiple sources to one track
BUSS Sw buss switch
Chapter 11 Taking advantage of the VS-880 ideas and examples
BUSS Sel buss select
Collecting just the sections that you like
Chapter 11 Taking advantage of the VS-880 ideas and examples
Chapter
Copying an 8-track MTR performance to the VS-880
FadeLength Fade length
Controlling the mixer from a MIDI sequencer
Correspondence between MIDI chan- nels and controller numbers
Recording mixer operations
CtrLocal Mixer control local switch
Preparations
Performing a compu-mix
Operating the VS-880 from another device MMC
Settings for the master VS-880
MIDIThr MIDI thru switch
Synchronizing the operation of two VS-880 units
CtrType Mixer control type
SysEx.Tx System exclusive transmit switch
MMC MMC mode
Source Sync source
DeviceID Device ID
Settings for the slave VS-880
SysEx.Rx System exclusive receive switch
MMC MMC mode
SysEx.Rx System exclusive receive switch
Make settings for the VS-880
MIDIThr MIDI thru switch
Operating the VS-880 from an MMC-compatible device
MTC Type
If you have problems with synchronization
Make settings for the sequencer program
Applying an effect while bouncing tracks
Using external effect units
Applying an effect during playback
Chapter
Use the track channels 1 and 2 ÒAUX LevelÓ and the master section AUX knob to adjust the signal level sent to the external effect unit. Use the faders of input chan- nels 1 and 2 to adjust the signal level from the effect. However this will change depending on the effect device that you use, so it is best to adjust the volume level on the external effect device, and fix the VS-880 at an appropriate volume level
Appendices
Connectors and cables
Using an external disk drive About SCSI
Connecting a disk drive
Terminators
Partitions
Using an external disk drive About SCSI
SCSI ID numbers
Appendices
No sound
Troubleshooting
Problems with sound
Specific channel does not sound
Other problems
Disk drive problems
Synchronization problems does not synchronize
When synchronizing a MIDI sequencer to the VS-880
Arbitration Fail Busy Status Check Condition Status Error
Error messages
Aborted Command Illegal Request
Can’t Communicate Drive Time Out Message Error Phase Mismatch
Write Protected
SCSI ID Error
Memory Full
No Effect Board
CH EDIT buttons
Special key operations
MIXER MODE buttons
EDIT CONDITION buttons
Special key operations
Other
Appendices
INPUTTRACK Mode
Parameter list
Mixer Parameters channel
INPUT MIX Mode
Parameter list
Equalizer/Effect Pre-Insert Switch
TRACK MIX Mode
System
System Parameters
Master Block
A-, -B-, A+B, 1-2, 3-4, 5-6
Sync/Tempo
MIDI
Disk
Sync Track Convert
Drive Select
Scene/Auto Mix
Auto Mix Erase
Drive Initialize
Date Dec. 12
MIDI Implementation Chart
Digital Studio Workstation
Model VS-880
INPUT MIX mode and TRACK MIX mode
Mixer section block diagram
INPUTTRACK mode
S/P DIF
Glossary
COSM
SMPTE time code
Connectors
Specifications
Signal Processing
Power Supply
LOCATOR buttons
About the V-XPANDED sticker
Channel faders
SELECT Select button
Special key operations
About the included sticker
Index
Index
Protecting a song from erasure Song Protect
Re-using part of a track Track Copy
Creating a new song Song New
Moving to the end of a song Song End
Track sheet
CLASS B
FEDERAL COMMUNICATIONS COMMISSION
RADIO FREQUENCY INTERFERENCE STATEMENT
CLASSE B
Information
01129434 97-1-C3-21T