Chapter 3 Basic operation (as a replacement for a tape MTR)
■Combining the performances of two or more tracks into
another track (Track bouncing)
The
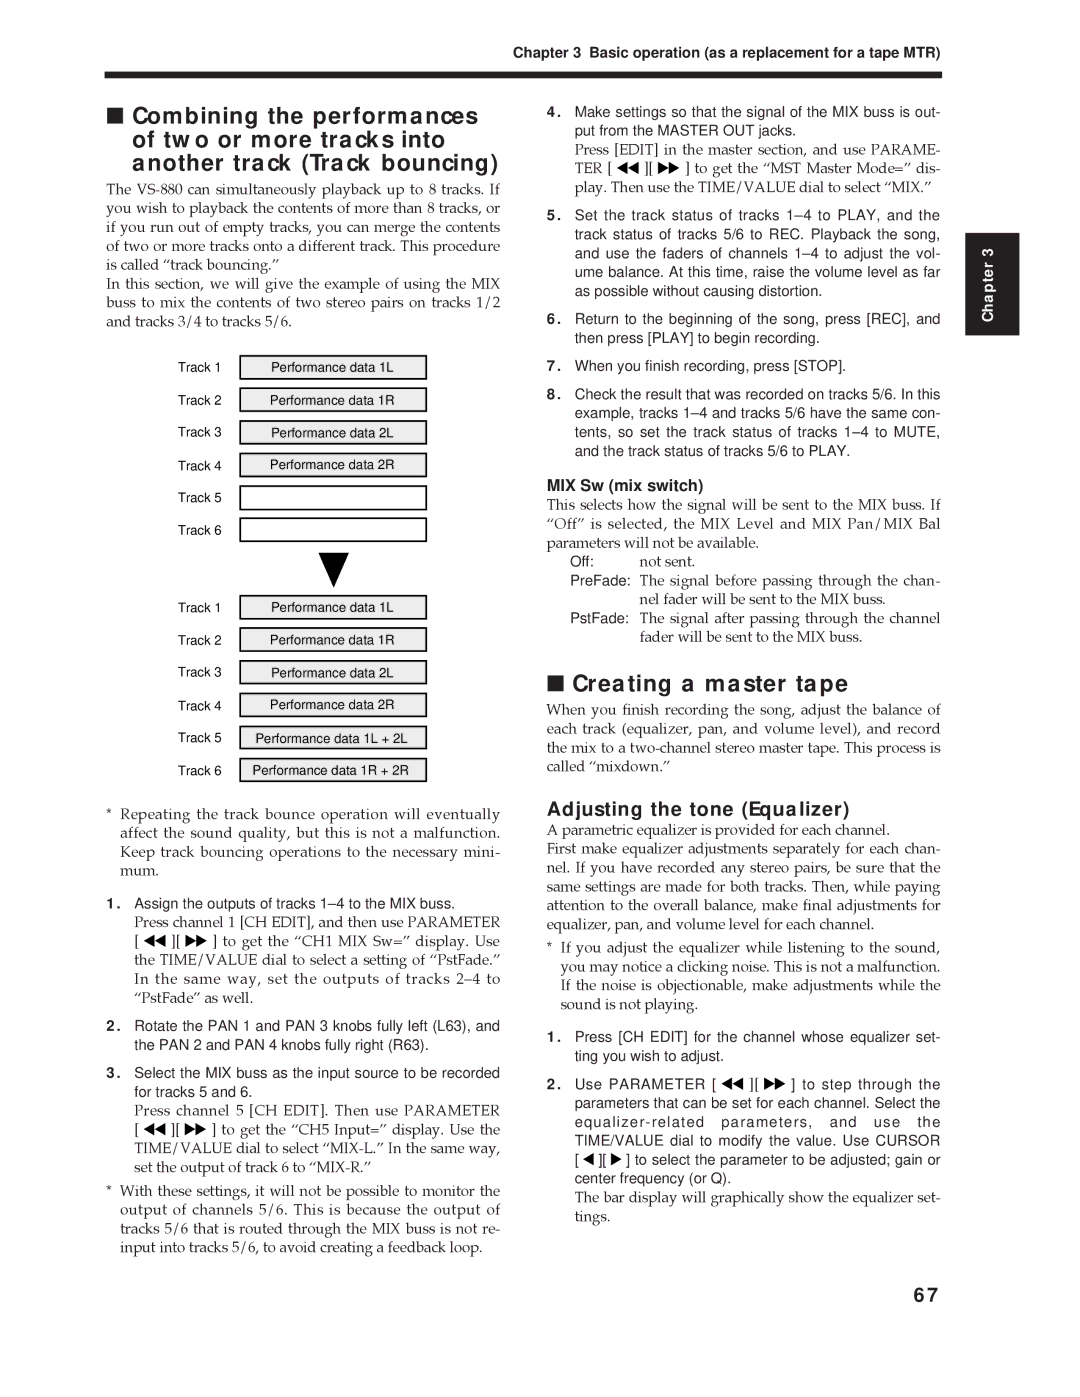
In this section, we will give the example of using the MIX buss to mix the contents of two stereo pairs on tracks 1/2 and tracks 3/4 to tracks 5/6.
4.Make settings so that the signal of the MIX buss is out- put from the MASTER OUT jacks.
Press [EDIT] in the master section, and use PARAME- TER [ ![]()
![]() ][
][ ![]()
![]() ] to get the ÒMST Master Mode=Ó dis- play. Then use the TIME/VALUE dial to select ÒMIX.Ó
] to get the ÒMST Master Mode=Ó dis- play. Then use the TIME/VALUE dial to select ÒMIX.Ó
5.Set the track status of tracks
6.Return to the beginning of the song, press [REC], and then press [PLAY] to begin recording.
Chapter 3
Track 1 | Performance data 1L | 7. | When you finish recording, press [STOP]. | |
|
| 8. | Check the result that was recorded on tracks 5/6. In this | |
Track 2 | Performance data 1R | |||
| example, tracks | |||
|
|
| ||
Track 3 | Performance data 2L |
| tents, so set the track status of tracks | |
|
|
| and the track status of tracks 5/6 to PLAY. | |
Track 4 | Performance data 2R |
|
| |
|
|
|
|
Track 5
Track 6
Track 1 | Performance data 1L |
|
|
Track 2 | Performance data 1R |
|
|
Track 3 | Performance data 2L |
|
|
Track 4 | Performance data 2R |
Track 5 |
|
Performance data 1L + 2L | |
|
|
Track 6 | Performance data 1R + 2R |
|
|
*Repeating the track bounce operation will eventually affect the sound quality, but this is not a malfunction. Keep track bouncing operations to the necessary mini- mum.
1.Assign the outputs of tracks
Press channel 1 [CH EDIT], and then use PARAMETER [ ![]()
![]() ][
][ ![]()
![]() ] to get the ÒCH1 MIX Sw=Ó display. Use the TIME/VALUE dial to select a setting of ÒPstFade.Ó In the same way, set the outputs of tracks 2Ð4 to ÒPstFadeÓ as well.
] to get the ÒCH1 MIX Sw=Ó display. Use the TIME/VALUE dial to select a setting of ÒPstFade.Ó In the same way, set the outputs of tracks 2Ð4 to ÒPstFadeÓ as well.
2.Rotate the PAN 1 and PAN 3 knobs fully left (L63), and the PAN 2 and PAN 4 knobs fully right (R63).
3.Select the MIX buss as the input source to be recorded for tracks 5 and 6.
Press channel 5 [CH EDIT]. Then use PARAMETER [ ![]()
![]() ][
][ ![]()
![]() ] to get the ÒCH5 Input=Ó display. Use the TIME/VALUE dial to select
] to get the ÒCH5 Input=Ó display. Use the TIME/VALUE dial to select
*With these settings, it will not be possible to monitor the output of channels 5/6. This is because the output of tracks 5/6 that is routed through the MIX buss is not re- input into tracks 5/6, to avoid creating a feedback loop.
MIX Sw (mix switch)
This selects how the signal will be sent to the MIX buss. If ÒOffÓ is selected, the MIX Level and MIX Pan/MIX Bal parameters will not be available.
Off: not sent.
PreFade: The signal before passing through the chan- nel fader will be sent to the MIX buss.
PstFade: The signal after passing through the channel fader will be sent to the MIX buss.
■Creating a master tape
When you finish recording the song, adjust the balance of each track (equalizer, pan, and volume level), and record the mix to a
Adjusting the tone (Equalizer)
A parametric equalizer is provided for each channel.
First make equalizer adjustments separately for each chan- nel. If you have recorded any stereo pairs, be sure that the same settings are made for both tracks. Then, while paying attention to the overall balance, make final adjustments for equalizer, pan, and volume level for each channel.
*If you adjust the equalizer while listening to the sound, you may notice a clicking noise. This is not a malfunction. If the noise is objectionable, make adjustments while the sound is not playing.
1.Press [CH EDIT] for the channel whose equalizer set- ting you wish to adjust.
2.Use PARAMETER [ ![]()
![]() ][
][ ![]()
![]() ] to step through the parameters that can be set for each channel. Select the
] to step through the parameters that can be set for each channel. Select the ![]() ][
][ ![]() ] to select the parameter to be adjusted; gain or center frequency (or Q).
] to select the parameter to be adjusted; gain or center frequency (or Q).
The bar display will graphically show the equalizer set- tings.
67