AD68-01230V
Charge Coupled Device
CCD-Bildsensor
Owner’s Instruction Book
ContentsInhalt
Contents Inhalt
Setting the AV In/Out
Recording Copying a TV Programme or Video Tape onto a Disc
AV-Eingang/Ausgang einstellen AV E/A
102
100
101
103
Wichtige Informationen und Sicherheitshinweise
Hinweise zum Drehen des Displays
Hinweise zu Display, Sucher und Objektiv
Hinweise
Do not use benzene, thinner, detergent, alcohol or anti
Wichtige Informationen und Sicherheitshinweise
Hinweise zur Reinigung und Handhabung der Disks
Kann dadurch zu Fehlfunktionen der Disk kommen
Servicing & Replacement Parts
Hinweise zum DVD-Camcorder
Features
Leistungsmerkmale
Learning available Discs and Their Features
Informationen zu Disk-Formaten und deren Funktionen
Videomodus
Case of Video mode DVD player
Bei Aufnahme im
Bei Aufnahme im VR
How to use the DVD Camcorder easily
So verwenden Sie ganz einfach den DVD-Camcorder
You may edit only in DVD-RW VR Mode. page
Standardzubehör
Accessories Supplied with the DVD Camcorder
Mit dem DVD-Camcorder geliefertes Zubehör
Optionales Zubehör
Ansicht Vorderseite und linke Seite
Ansicht Linke Seite
Ansicht Rechte Seite und Oberseite
Rear & Bottom View
BATT. Release Switch
Ansicht Rückseite und Unterseite
Schalter BATT. Release
DC175Wi/DC575WB/DC575Wi
Fernbedienung nur VP-DC172W/DC173i/DC175WB
Display page /Skip Stop Play/Still
Using the Hand Strap & Lens Cover
Handschlaufe und Objektivschutz verwenden
Lithium Battery Installation
Preparation Vorbereitung
Lithiumbatterie einsetzen
OFF
PreparationVorbereitung
Charging, Recording Times based on Battery Type
Ambient temperature How often the Zoom function is used
Lade- u. Aufnahmezeit je nach Akkutyp
Akkuladestandanzeige
Battery Level Display
Battery Pack Management
Handhabung des Akkus
Maintaining the Battery Pack
Der Akku muss fest an den Camcorder angeschlossen sein
Stromversorgung herstellen
Connecting a Power Source
Using a Household Power Source
An Steckdose anschließen
About the Operating Modes
Camera Mode Player Mode Cam Mode
Using the Joystick
Über die Betriebsmodi
Using the Q.MENU
Quick-Menü verwenden Q.MENU
Bildschirmanzeigen im Cam-Modus/Player-Modus
Battery Level page
DIS page Program AE page White Balance Mode page
Wind Cut page
Turning the OSD On Screen Display On/Off
OSD in M.Cam Mode
OSD in M.Player Mode
Bildschirmanzeigen ein-/ausschalten
System , then press the Joystick
Camera or
Player
Clock Set , then press the Joystick
Hinweis
Set the Power switch to Camera or Player
Steuerung durch Fernbedienung aktivieren Fernbedienung
Press the Menu button The menu list will appear
Sie können den Signalton ein- und ausschalten
Signalton einstellen Signalton
Setting the Beep Sound Beep Sound
Camera or
Foto-Klickton Verschl.-ger. einstellen
DC175WB/DC175Wi/DC575WB/DC575Wi only
Selecting the OSD Language Language
Sprache der Bildschirmanzeige festlegen Language
Viewing the Demonstration Demonstration
Demo-Funktion verwenden Demo-Funktion
Adjusting the LCD Screen LCD Bright/LCD Colour
Displaying the Date/Time Date/Time
Datum und Uhrzeit anzeigen Datum/Uhrzeit
Voreinstellungen Menü ‘Display’ Anzeige verwenden
LCD Bright LCD Colour Date/Time
Drücken Sie die Taste Menu Das Menü wird angezeigt
Hinweis
TV Display Move
Sucher verwenden
Using the Viewfinder
Using the LCD Enhancer
LCD-Optimierung verwenden Taste LCD Enhancer
Various Recording Techniques
Verschiedene Aufnahmetechniken
You cannot open the disc cover while loading
Inserting and Removing a Disc
Disk einlegen und entnehmen
Inserting a Disc
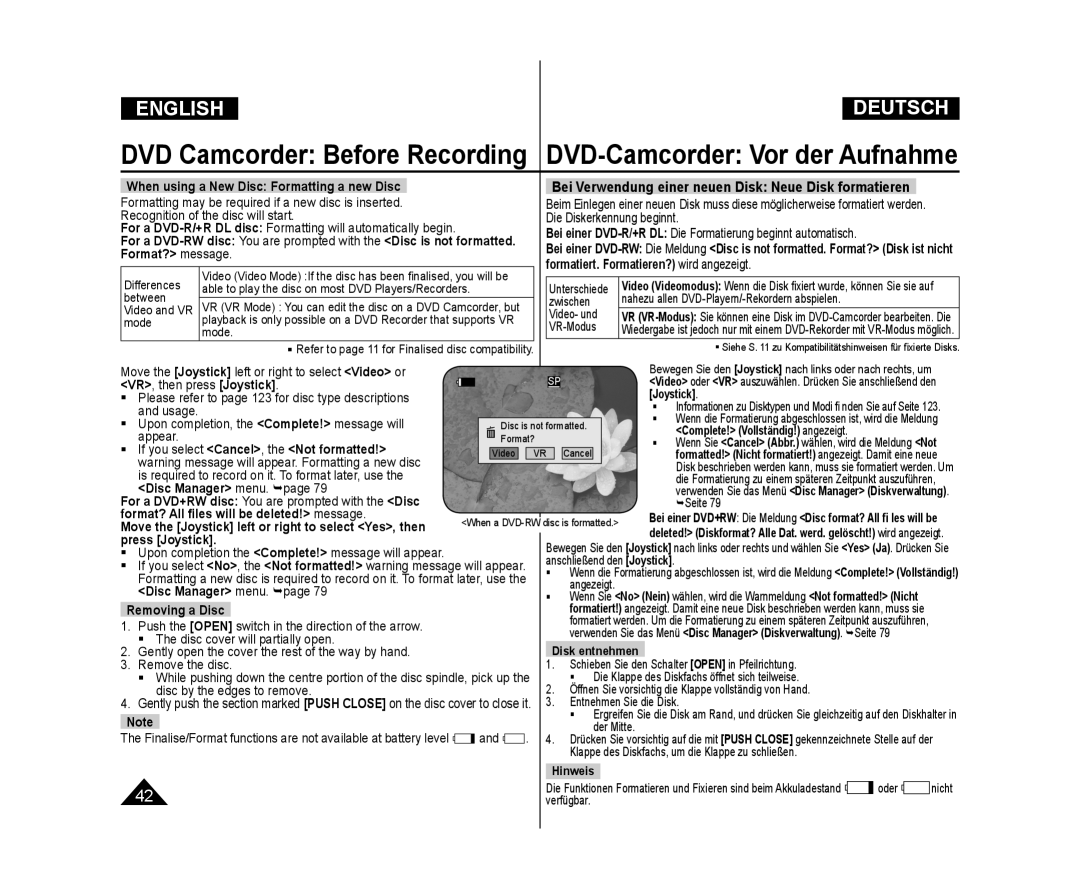
Bei Verwendung einer neuen Disk Neue Disk formatieren
When using a New Disc Formatting a new Disc
If you select Cancel, the Not formatted
VR, then press Joystick
Rec Mode, then press the Joystick
Camera or Player
Record, then press the Joystick
Lighting conditions
DVD-Camcorder Grundlegende Aufnahmefunktionen
DVD Camcorder Basic Recording
Making your First Recording Ihre erste Aufnahme
Tip
Unavailable buttons during operation
Recording with Ease for Beginners EASY.Q Mode
Aufnahmen im EASY.Q-Modus
Menu button Nite button
Zooming In and Out
Zoomfunktion verwenden
To Stop Recording
To Start Recording
Aufnahme starten
Aufnahme beenden
Cam Mode. page
Camera, then press the Joystick
Color N /25, Color N /13 Color N /13 und Off Aus nur VP
Using the Colour Nite
Aufnahmen mit langer Belichtungszeit Colour Nite
Emboss2 and Pastel2
DVD-Camcorder Grundlegende Aufnahmefunktionen
Color N /13 appears
Vorsicht
DVD-Camcorder Weiterführende Aufnahmefunktionen
Den Joystick
Exposure, then press the Joystick
Recommended Shutter Speeds When Recording
Adjusting the Exposure When Recording
Für Aufnahmen empfohlene Belichtungszeiten
Auto Focus / Manual Focus
Fokus automatisch oder manuell einstellen AF/MF
Belichtungsprogramme verwenden Belicht.prog
By using the Q.MENU button. page
Setting the Program AE Belichtungsprogramm einstellen
When the Auto mode is selected, no icon is displayed
Mode
Setting the White Balance White Balance
DVD-Camcorder Weiterführende Aufnahmefunktionen
Weißabgleich einstellen Weißabgleich
Setting the Custom White Balance
Benutzerdefinierte Einstellung für den Weißabgleich
Set White Balance will blink
Applying Digital Effects Digital Effect
Digitale Effekte verwenden Digitaler Effekt
Digitalen Effekt auswählen
Emboss2, or Pastel2 mode
Selecting the Digital Effects
Relief2 und Pastell2
Camera , then press the Joystick
Off Aus
DIS menu to Off
Colour Nite, Mosaic, Mirror
Function.
Digitalen Zoom verwenden Digitaler Zoom
Zooming In and Out with Digital Zoom Digital Zoom
Digitalen Zoom wählen
What is the Thumbnail Index?
Was ist der Miniaturindex?
DVD-Camcorder Miniaturindex und Wiedergabeliste
Adjusting the Volume DVD-RW/+RW/-R/+R DL
DVD Camcorder DVD-Camcorder
00 to
Wiedergabe/Pause
Playback/Still
Skip Playback Forward/Reverse
Überspringen vorwärts/rückwärts
Picture Search Forward/Reverse
DC575WB/DC575Wi only
Bildsuchlauf vorwärts/rückwärts
Deleting a Title Scene Delete DVD -RW/+RW
Select All Deletes all title scenes
Partial Delete screen will appear
Teil eines Titels löschen Teilw. lösch. DVD-RWVR-Modus
Atitle scene can be partially deleted
Formatiert werden. Seite
DVD Camcorder Playlist
Creating a New Playlist New Playlist DVD-RWVR mode
Set the Power switch to Player
DVD-Camcorder Wiedergabeliste
Playing the Playlist DVD-RWVR mode
DVD Camcorder Playlist DVD-Camcorder Wiedergabeliste
Wiedergabeliste löschen Lösch. DVD-RWVR-Modus
Or Select All , then press the Joystick
Adding Scenes to Playlist Scene-Add DVD-RWVR mode
Your choice, then press the Joystick
Change, then press the Joystick
Also a bar next to the scene will appear
Wish
Szene-Lösch.DVD-RW VR-Modus
Message Delete? will appear
Selected scenes will be deleted
Scenes inside the playlist will appear
Use the Joystick to select the playlist which
Contains the scenes to be partially deleted, then
Move the Joystick up or down to select Partial
Joystick again
DVD Camcorder Disc Manager DVD-Camcorder Diskverwaltung
Disc Information Disc Info DVD-RW/+RW/-R/+R DL
Press the Menu button to return to Disc Manager menu
DVD-Camcorder Diskverwaltung
Disc Manager , then press the Joystick
Disc Format , then press the Joystick
Complete! will appear
Disk fixieren Disk finalis. DVD-RW/-R/+R DL
Disc Finalise , then press the Joystick
Disc without unfinalizing it after it is finalised
Playing Back on a PC with DVD drive
Wiedergabe auf einem PC mit DVD-Laufwerk
Playing back a finalised disc on a DVD Player/Recorder
Manager, then press the Joystick
DVD Camcorder Disc Manager
Unfinalizing a Disc Disc Unfinalise DVD-RW
Unfinalise, then press the Joystick
AV In/Out function works only in Player Mode. page
DVD Camcorder Connection DVD-Camcorder Anschließen
AV-Eingang/Ausgang einstellen AV E/A
To exit, press the Menu button
Playing back on a TV Monitor
Viewing Recordings on TV
Aufnahmen mit einem Fernsehgerät wiedergeben
Wiedergabe mit einem Fernsehgerät
Connecting to a TV that has no Audio/Video Input Jacks
Anschluss an ein Fernsehgerät ohne AV-Eingang
Stellen Sie den Betriebsart-Wähler auf Player
When Copying is Complete
Copying a Disc onto a Tape
Eine Disk auf Kassette kopieren
Voice Plus
Using the Voice Plus Nachvertonung verwenden
Player mode. page
Start/Stop button again
When Recording Copying is Complete
To record from a VCR
To record from a TV
Digital Still Camera Mode VP-DC173i/DC175WB
Bildformat
Digital Still Camera Mode VP-DC173i/DC175WB
DC175Wi/DC575WB/DC575Wi only
Einzelbilder
Bildqualität auswählen
Bildqualität einstellen Fotoqualität
Selecting the Photo Quality Photo Quality
Seite
Fotogröße einstellen nur VP-DC575WB/DC575Wi
Stellen Sie den Moduswahlschalter auf Card
Menüpunkt Memory Speicher aus
Joystick Menüpunkt File No. Datei-Nr. aus
Aufgenommen werden
On the Memory Card. page Speicherkarte speichern. Seite
Der Ton kann bei der Aufzeichnung von Einzelbildern nicht
Insert the Memory Card. page
Einzelbild anzeigen
Viewing Photo Images Jpeg
Einzelbilder Jpeg betrachten
Diashow anzeigen
Schutz vor versehentlichem Löschen Schützen
Taste Menu Das Schutzsymbol wird angezeigt
Protection from accidental Erasure Protect
Card, No file! is displayed
Protected image cannot be deleted
Einzelbilder und Videoclips löschen Lösch
Deleting Photo Images and Moving Images Delete
Geschützte Bilder können nicht gelöscht werden
Die Meldung Delete all? Alle löschen? wird angezeigt
Alle gespeicherten Bilder löschen
The message Delete all? is displayed
Protect Print Mark Format Move OK Select Menu Exit Photo
The Format? All files will be deleted! message will appear
Speicherkarte formatieren Formatieren
Formatting the Memory Card Format
Achtung
Saving Moving Images onto a Memory Card
Recording Moving Images Mpeg on a Memory Card
Videoclips auf der Speicherkarte speichern
Recording time available on a Memory Card
Image icon
To increase or decrease the volume
Playing the Moving Images Mpeg on a Memory Card
You want to play, then press the Joystick
Stored on the Memory Card. page
Hinweise
This function works only in Player Mode. page
Stellen Sie den Moduswahlschalter auf Disc
Einstellen
Bilder für den Druck markieren Druckmark
Marking Images for Printing Print Mark
All Files Alle Dateien Von jedem gespeicherten
Druckmarkierung entfernen
Removing the Print Mark
To remove all Print Marks, select All Off
Connecting To a Printer USB Connect
Connect , then press the Joystick
Anzahl der Abzüge einstellen
Bilder drucken
Druckvorgang abbrechen
USB Connection Speed depending on the System
Using USB Interface
USB-Schnittstelle verwenden
System Requirements
USB Streaming requires Video Codec, DV Driver and DirectX
Computer or Printer, then press
USB-Gerät auswählen USB-Verbind
Connect, then press the Joystick
Joystick USB Connect USB-Verbind., und
Installing DV Media PRO Program
DV Media PRO Software installieren
Zum Bearbeiten von Fotos benutzen Sie Photo Express
Video Codec
An einen PC anschließen
Connecting to a PC
Disconnecting the USB Cable
USB-Kabel entfernen
Camera function is max 12.5 fps
Using the PC Camera Function PC-Kamerafunktion verwenden
Can participate in a video conference
Zoomregler verwenden
Als Wechseldatenträger verwenden
Using the USB Streaming Function
Using the removable Disk Function
USB-Streaming-Funktion verwenden
Stromnetz
Power sources
Colour system
Farbsystem
Fehleranzeigen in den Modi Cam-Modus/Player-Modus
Troubleshooting
Fehlerbehebung
Self Diagnosis Display in Camera/Player Modes
Wie gehe ich vor?
TroubleshootingFehlerbehebung
Was ist mit Kondensation gemeint?
Wann kommt es zu Kondensation?
Symptom Explanation/Solution
Turned on, a blue
Work Mode
Check the Manual Focus menu
Screen appears
Open switch
Symptom Erklärung/Abhilfe
VP-DC171i/DC171Bi/DC171Wi/DC173i/DC175Wi/DC575Wi only
Setting menu items
Menüoptionen einstellen
Main Sub Menu Functions
VP-DC173i/DC175WB/DC175Wi/DC575WB/DC575Wi only
Trademark Acknowledgements
Marken anderer Hersteller
VP-DC172W/DC173i/DC175WB/DC175Wi/DC575WB/DC575Wi only
You must format a new disc before recording on it
Disc Type Description
Disktyp-Beschreibung
Dass die Disk wiederverwendet werden kann.
LCD Screen/Viewfinder
Connectors
System
General
100
86,88
79,99
28,29
Deutschland
Schweiz
Österreich
Samsung Electronics Austria GmbH Tel -SAMSUNG
Contact Samsung World Wide
Kontakt zu Samsung
RoHS compliant
RoHS-konform