ViewPoint
Page
Limited Warranty and Disclaimer
Page
Table of Contents
Designing Touch Panel Pages
Rssi
Touch Panel Program Reference
Rssi
161
133
183
169
173
179
ViewPoint Models
Overview
Features
What’s New
What’s in this Manual
Introduction
Application
Connections, Cleaning, Charging
Multiple ViewPoints in an Installation
Connectors
ViewPoint Rechargeable Battery
Cleaning the Touch Overlay
VPA-CHG FastCycle Battery Charger for VPA-BP
Power Supply
Page
ViewPort Docking Station
Rear view
Battery Charging
Installation
Touch Panel Basics
Standard Buttons
Touch Panel Pages
General Buttons
Keypad buttons
Adjustment buttons
Selection buttons
Information buttons
Status buttons
Decision buttons
Operation bars
Touch to Continue buttons
Touch Panel Basics
Activating the Edit button
Designing Touch Panel Pages
Firmware version
ViewPoint Wireless Touch Panels Designing Touch Panel Pages
Main page with Edit button
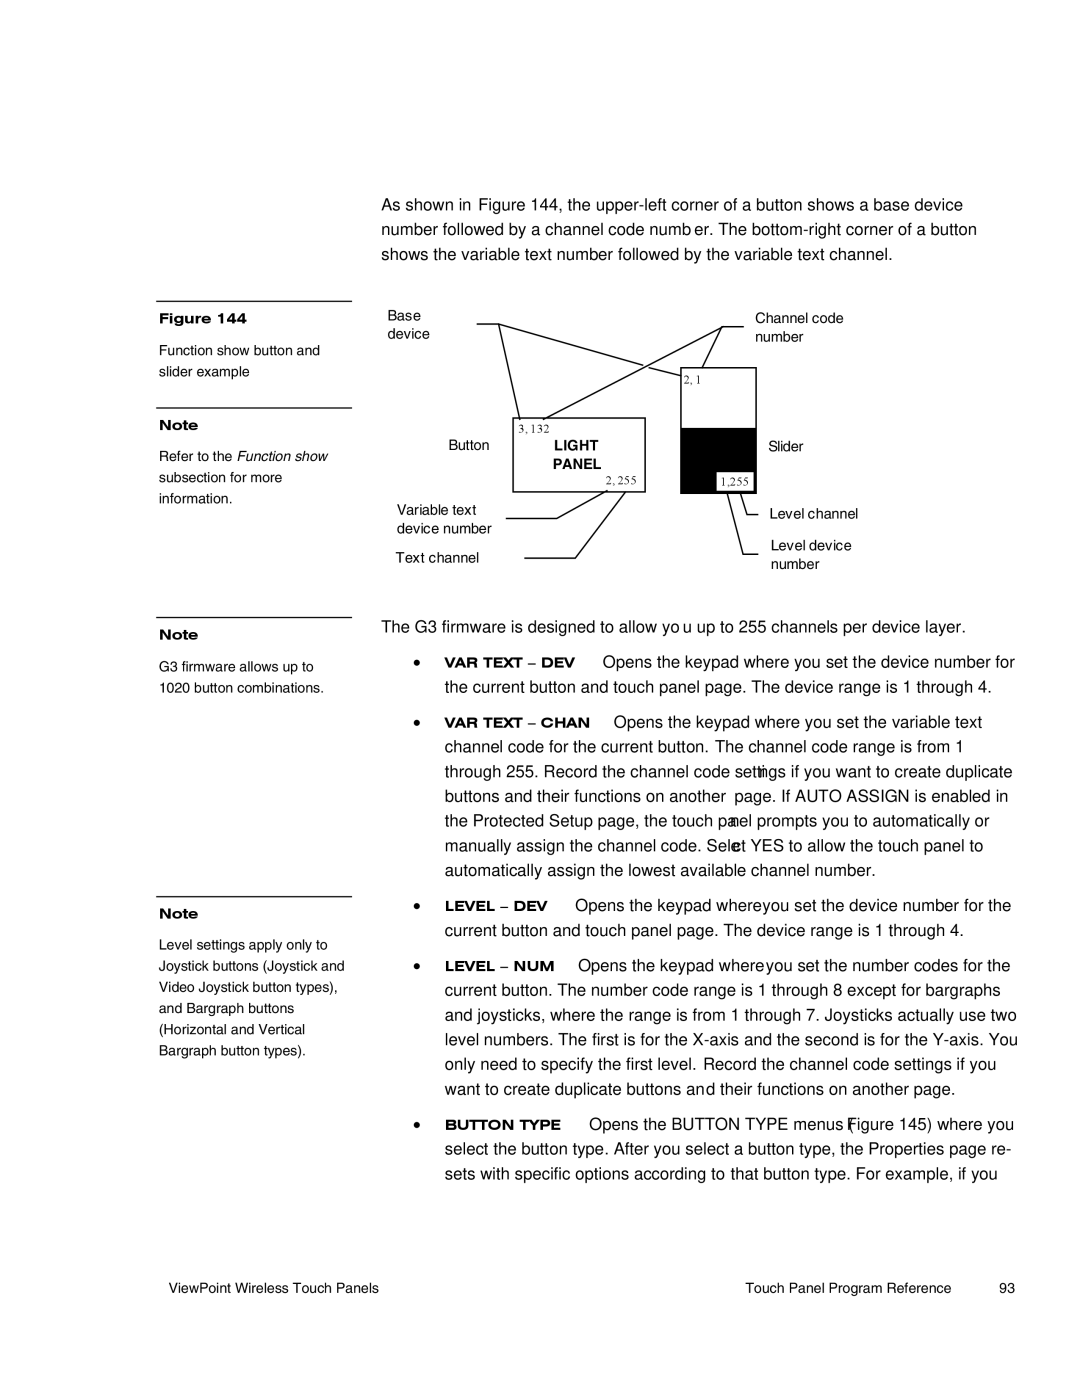
Adding a
Creating a
Setting the page color
Adding a button
Creating a Button
Resizing a button
Button Properties
Setting the button properties
Setting the button border
Setting the button type
Setting the channel code
Setting the variable text code
Setting the page flip
Color palette appears
Setting the button colors for channel-off conditions
Adding text to a button
Adding an icon to a button
Adding a bitmap to a button
Bitmaps menu example
Using TPDesign3 to Download Bitmaps, Icons, and Fonts
Sample Download To Panel dialog box Actions tab
Creating an IR Macro Button
Button Properties for External Pushbuttons
Device
Pulse command
Wait command
VCR
IR codes and functions
What happens when the example macro executes
Adding a joystick to a
Creating a Joystick
Setting the joystick properties
Button Properties page for Joysticks
Setting the level code
Color palette VPT-GS will display gray shades for selection
Creating a Bargraph
Adding a bargraph to a
Setting the bargraph properties
Setting the level code
Linking the New Page to the Main
Active page button
Flip Type button Flip to Page button Flip buttons
Exiting Edit Mode
Setup
ViewPoint Wireless Touch Panels Designing Touch Panel Pages
Designing Touch Panel Pages
Touch Panel Program Reference
Setup
Beep
Display timer
Set time and date
Setting brightness
AXlink, output resolution, vX.XX, and serial number
Double beep
Protected setup
Show palette
Wireless status optional WAV-PK
Waves
Rechargeable battery in the SMT-PK
Wireless status optional SMT-PK
Wireless settings for VPT-CP and VPT-GS
Wireless Status for VPW-CP and VPW-GS
Network Eff
Wave-Pak not locked
Module version
Server version
Device range
Protected Setup
Server devices
Device base
Baud
Power up
Setup password
Device used
Auto assign
Wake up message
Power up message
Password
Calibrate
Press the System page button to open the System page Figure
System
Page
More
Editor
Sleep message
Tracking
Function show
Light Panel
Wireless Settings for VPW-CP and VPW-GS
Wireless settings optional SMT-PKM
Optional SMT-PKM
Edit button
Page
Add
Edit Bar Button Menu Options
Move
Copy image
Resize
Text/image
Delete
Text/Image
Char Caps
SET Text Alignment Sets the text alignment on a button
Properties
Name Style
Border names and styles
Protected Setup Page Device
Light Panel
Button Option General menu Touch Panel Program Reference
Touch Panel Program Reference
Flip Previous
Appears in the String button. Press Abort to close the menu
Save
Save default
Paste
Button Types
Set default
Put on top
Properties Page Button Types
General
Button Properties page for a General button
Blink
Select a popup page to close
Joystick
Page
Vertical Bargraph
Horizontal Bargraph
Bargraph Display
Sets the bargraph as a vertical indicator for
Brightness
110 Touch Panel Program Reference
Time
Date
Keypad
Keyboard
Setup
Video Setup
Video Joystick
Video Window
Page
RGB Setup
Protected
Properties Page External Buttons
External buttons
122 Touch Panel Program Reference
Setting external button properties
Menu Options
Copy
Color
Rename
Popup on
Go to
Popup on menu
Popup off
Snap grid
Move edit
Edit Bar Quit Editor option
Page
132 Touch Panel Program Reference
PC to ViewPoint Connections
Axcess Programming
Programming the ViewPoint Axcess Programming Changes
Affected SendCommands
System SendCommands
System SendCommands
Sendcommand TP,CONT-12
Sendcommand TP,AKEYR
Sendcommand TP,BEEP
Sendcommand TP,BRIT-5
Dbeep
Sendcommand TP,DBEEP
Sendcommand TP,PAGE-MAIN
Sendcommand TP,PKEYP-1988
Sendcommand TP,SETUP
Qbeep Reset Setup Sleep
Sendcommand TP,QBEEP
Sendcommand TP,RESET
Definevariable
Sendcommand TP,TPAGEOFF
Sendcommand TP,TPAGEON Definedevice
Tpageoff Tpageon
System SendCommands
Sendcommand TP,ZAP
Sendcommand TP,WAKE
Sendcommand TP,XMTO
Sendcommand TP,XMRT
Colors and programming numbers
Colors/Shades of Gray and Programming Numbers
Font Styles and Programming Numbers
Border Styles and Programming Numbers
Sendcommand TP,@CBN,2,78
Shorthand Send Commands
Shorthand SendCommands
Sendcommand TP,@CBF,1,0
Sendcommand TP,@CFN’,1,30
Sendcommand TP,@CFF,1,72
Sendcommand TP,@IDP
Sendcommand TP,@CTF,1,48
Sendcommand TP,@CTN’,1,72
Sendcommand TP,@IDF
Shorthand SendCommands
Sendcommand TP,@PWD-1988
Sendcommand TP,@PPX-POP VCR2
Color SendCommands
Color/Gray Scale SendCommands
Sendcommand TP,CBON1-48
Sendcommand TP,CBOFF1-0
Sendcommand TP,CFOFF1-72
Sendcommand TP,CTON1-72
Sendcommand TP,CFON1-48
Sendcommand TP,CPAGE48-MAIN
Sendcommand TP,CTOFF1-48
Sendcommand TP,BTON,128
Variable Text Send Commands
Variable text SendCommands
Sendcommand TP,BTOF,255
Sendcommand TP,!F,1,6
Sendcommand TP,!C,1,6,6,VCR Play
Sendcommand TP,FONT,1-6
Sendcommand TP,TEXT2-VCRPLAY
Shorthand Variable Text Commands
Sendcommand TP,ICON,25-6
Sendcommand TP,!T,1,VCR Play
Shorthand variable text commands
Sendcommand TP, @FON,56,32
Sendcommand TP,@ENA,128,1
Sendcommand TP, @JUS,9,5
Sendcommand TP,@ICO,16,12
Sendcommand TP,@SHO,128,0
Sendcommand TP,@TXT,2,VCRPLAY
Buttons String Commands
Buttons string commands
Button Macro Commands
$SL
Macro Commands
160 Axcess Programming
Loading Infrared IR Files
Pathway to IR Library Database List IR Library Files listing
Loading an IR File
Communications settings
Creating Database Irlib Database
DCU
IR Memory Check
Device reports 168 Loading Infrared IR Files
Upgrading the Firmware
Downloading the Firmware
Configuration
Firmware
Page
ViewPoint specifications
Specifications
VPT-CP/VPW-CP
VPA-BP ViewPoint Rechargeable Battery specifications
VPA-BP ViewPoint Rechargeable Battery
VPA-CHG Fast-Cycle Battery Charger for VPA-BP
VPA-CHG Fast-Cycle Battery Charger for VPA-BP Specifications
ViewPort Docking Station specifications
Sales and Support Teams
Sales and Technical Support Teams
AMX International Offices
AMX International Offices
Technical Support
Other AMX contacts
Technical Support
Lists the contact numbers for Technical Support
182 Contacting Sales and Technical Support
Index
153
LEVEL-DEV LEVEL-NUM
VAR TEXT-CHAN VAR TEXT-DEV
VPA-CHG
Forestgate Drive 972/644-3048 800/222-0193 Dallas, Texas USA