Conductivity/Resistivity Analyzer/Controller
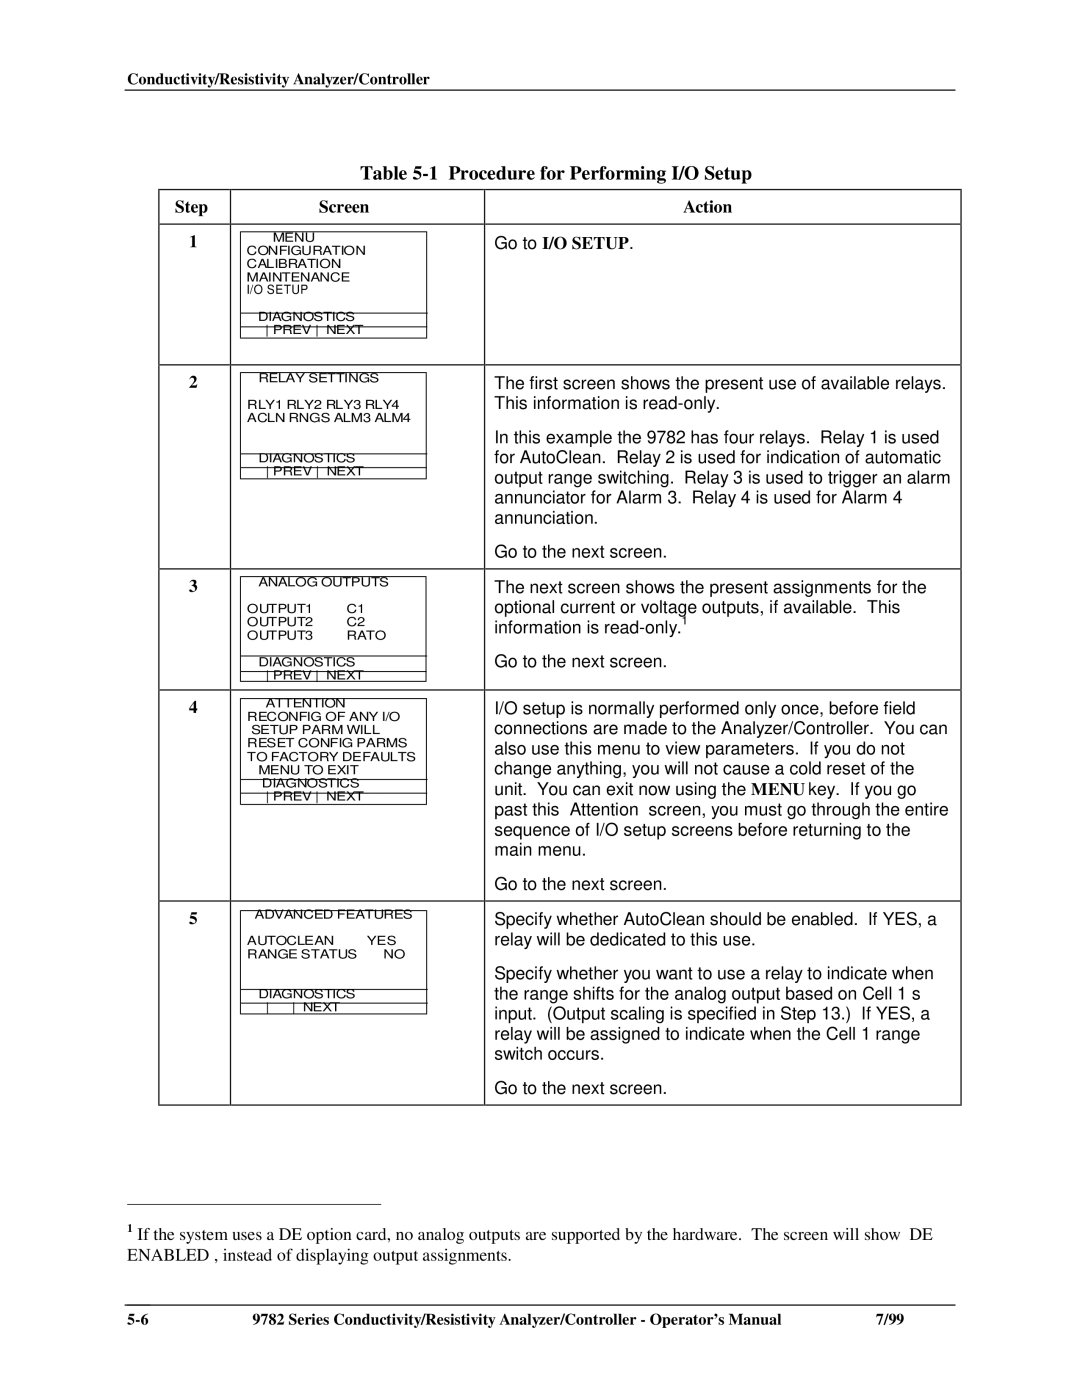
Table 5-1 Procedure for Performing I/O Setup
Step
1
Screen
MENU
CONFIGURATION
CALIBRATION
MAINTENANCE
I/O SETUP
DIAGNOSTICS
PREV NEXT
Action
Go to I/O SETUP.
2
3
4
5
RELAY SETTINGS
RLY1 RLY2 RLY3 RLY4
ACLN RNGS ALM3 ALM4
DIAGNOSTICS
PREV NEXT
ANALOG OUTPUTS
OUTPUT1C1
OUTPUT2C2
OUTPUT3RATO
DIAGNOSTICS
PREV NEXT
ATTENTION
RECONFIG OF ANY I/O
SETUP PARM WILL
RESET CONFIG PARMS
TO FACTORY DEFAULTS
MENU TO EXIT
DIAGNOSTICS
PREV NEXT
ADVANCED FEATURES
|
| AUTOCLEAN |
| YES |
|
|
| RANGE STATUS |
| NO |
|
|
|
|
|
| |
|
| DIAGNOSTICS |
|
| |
|
| NEXT |
| ||
|
|
|
|
|
|
The first screen shows the present use of available relays. This information is
In this example the 9782 has four relays. Relay 1 is used for AutoClean. Relay 2 is used for indication of automatic output range switching. Relay 3 is used to trigger an alarm annunciator for Alarm 3. Relay 4 is used for Alarm 4 annunciation.
Go to the next screen.
The next screen shows the present assignments for the optional current or voltage outputs, if available. This information is
Go to the next screen.
I/O setup is normally performed only once, before field connections are made to the Analyzer/Controller. You can also use this menu to view parameters. If you do not change anything, you will not cause a cold reset of the unit. You can exit now using the MENU key. If you go past this “Attention” screen, you must go through the entire sequence of I/O setup screens before returning to the main menu.
Go to the next screen.
Specify whether AutoClean should be enabled. If YES, a relay will be dedicated to this use.
Specify whether you want to use a relay to indicate when the range shifts for the analog output based on Cell 1’s input. (Output scaling is specified in Step 13.) If YES, a relay will be assigned to indicate when the Cell 1 range switch occurs.
Go to the next screen.
1If the system uses a DE option card, no analog outputs are supported by the hardware. The screen will show “DE ENABLED”, instead of displaying output assignments.
9782 Series Conductivity/Resistivity Analyzer/Controller - Operator’s Manual | 7/99 |