Plain Paper Facsimile OPERATOR’S Manual
EPA Energy Star
Toshiba America Business SOLUTIONS, INC
Canada
Toshiba of Canada Limited
Laser Safety Information
Contents
112
158
170
171
187
RDC Remote Diagnosis Configuration Service 240
229
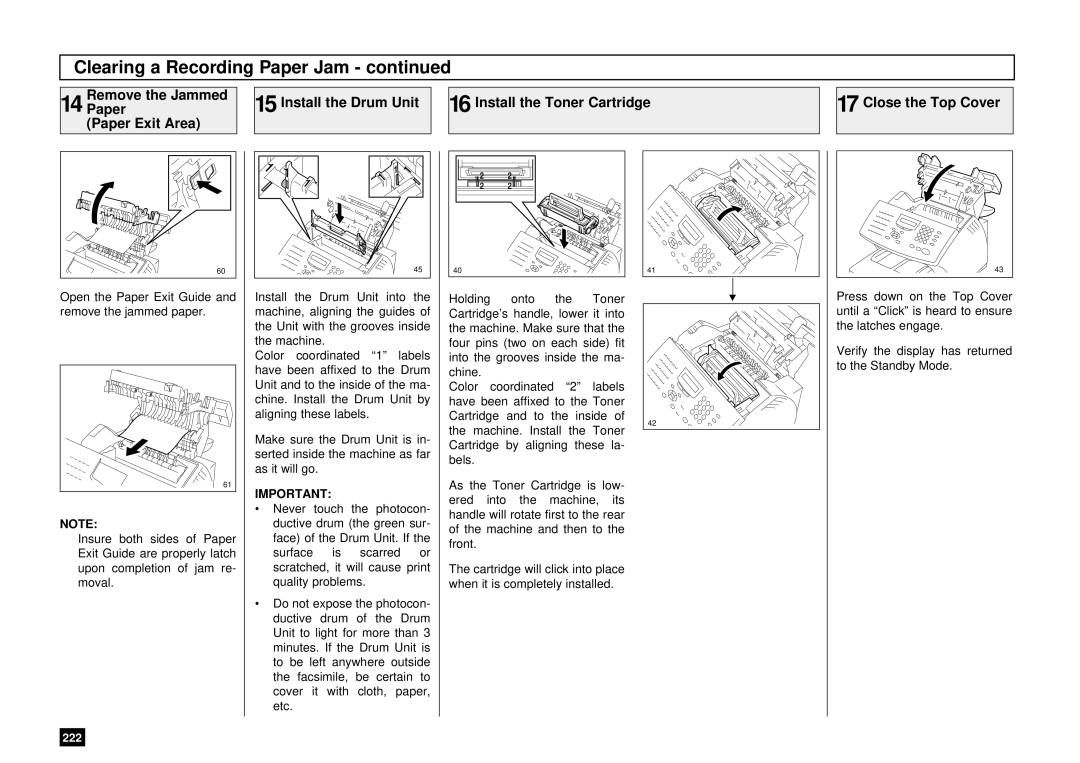
239
241
Features
Care and Maintenance
About Power for the Unit
When a Power Failure Occurs
Other Remarks
Introduction Facsimile Unit Descriptions
Front View
Rear View
Lower Recording Paper Tray Optional Upper Recording
When Optional Recording Paper Tray is Installed
With Optional Recording Paper Tray Installed
Operation Panel
Mode Key and FINE, U-FINE, Halftone Lamps
Menu Keys , , , Keys
Enter Key
JOB Status Key
Function Keys
Direct Send
Setup Unpacking
Unpack the Carton Make Sure All Items are Enclosed
Select a Desirable Location
Facsimile Machine Installation
Connecting Your Toshiba Facsimile
Bypass Tray
Document Support
Document Exit Tray
Initial Printing Supplies Installation
Recording Paper Installation Recording Paper Tray
Pull Up the Document Exit Tray Remove the Bypass
Tray Guides
Install the Recording Paper
Adjust the Paper Guides
Return to the Standby Mode
Select the Paper Size
Recording Paper Installation Bypass Tray
Recording Paper Installation Optional Recording Paper Tray
Replace the Optional Insert the Optional
Press to return to Standby Mode
Drum Unit and Toner Cartridge Installation
Close the Top Cover
Printing Supplies Replacement
Toner Cartridge Replacement
Open the Top Cover Remove the Toner Prepare a New
Cartridge
Install the New Toner Cartridge Close the Top Cover
Drum Unit Replacement
Open the Top Cover Remove the Toner Cartridge and Drum Unit
Reset Drum Count 2.NO YES
Press
Transmitting Receiving
Quick Start
Terminal ID
Keys Used in Menu Operation
User Interface Operation
Menu Operation
Keys Used in Character Entry
Entry Procedure
Character Entry
Character Correction
Inserting Characters
Deleting Characters
Replacing Characters
Initial Setup
Initial Setting Summary
Configuration Menu
Select the Desired Initial Setting
Display Select the Desired Language Menu
To display the Setup menu, press
Language Selection
Date and Time Setting
Select the time format For 24-hour format
Terminal ID Setting
Select Another Setup Item, or
Dial Type Setting
Select the Desired Configuration Setting
Device Configuration
Configuration Summary
Enter the Desired Volume Value
Ringer Volume Adjustment
Display the Ringer Volume Menu
Alarm Tone Volume Adjustment
Display the Alarm Volume Menu
Key Touch Tone Volume Adjustment
Touch Volume
Display the KEY
Menu
Monitor Volume Adjustment
Power Saver Operation
Enable or Disable the Printer Power Saver function
Department Code Setting
Enable/Disable the Department Code
Display
Department Code
Enter the Department Code Password
Department Code Code Address Option
Department Code Maintenance
Department
Department Code Maintenance
Select the Function
Account Codes Setting
Account Code
Line Monitor Default Setting
Setup Item, or
Receive Interval Setting Operation
ECM Default Setting
Sort Copy Setting
Display the Sort Copy Menu
Select the Desired Option
With Sort Function on With Sort Function OFF
Redial Counter
Setting Redial Interval and Counter
Redial Interval
Display the Reception Mode Menu
Reception Mode Default Setting
Select the Desired Reception Mode
Enter the FAX Ring Delay Enter the FAX Monitor Time
Copy Reduction Setting
Select the Copy Select Another Reduction Setup Item, or
Basic Functions Automatic Telephone Dialing
Abbreviated Dialer Registration
Information
Change the ABB. Information Enter the Telephone Number
5a Delete the ABB. Dial
Transmission Report Default=off
Line Monitor Default=off
Fax Speed Default=off
Sub Address Default=none
Hour format
Password
Select Communication Options
9f Fax Speed 9g Sub-Address Communication
Sub-Address Transmission
Assign the Abbreviated Dial Number to a One Touch Key
Touch Keys Menu Location
When a Preset One
One Touch Dialer Registration
Change One Touch Information Enter the Telephone Number
Enter the Telephone Number
Hour format
Select Communication Options
To enter a SUB type Sub Ad- dress, press
Group Number Registration
Display the Group Enter a Group Number
Example
Complete Group Station Entries Assign a One Touch Key
To skip assigning this group to a One Touch key, press
Transmit Configuration
Document Specifications
Document Loading
Scan Resolution Setting
Fine
Contrast Setting
Darker
Default Setting for Document Mode Resolution and Contrast
Document Mode
Recording Paper Size
Copying
Paper Size for Copying
Copying Procedure
Thick Paper 2.OFF
One Touch Key Dialing
Dialing Methods
One Touch Key Dialing
Abbreviated Dialing
Alphabet Dialing
Press the Start Key
Keypad Dialing
Enter the Facsimile Number
File Number and Residual Memory
Transmitting
Memory Transmission
Memory Transmission Procedure
Direct Transmission as Default Setting
Direct Transmission
Document Transmission Complete the Transmission
Temporary Direct Transmission
On-hook Transmission Monitor Speaker Dialing
Off-hook Transmission Optional Handset Dialing
100
Load the Document
Dial on the External Press The Start
Telephone Key
Pick Up the Handset
Redialing
Automatic Redialing Manual Redialing Direct Transmission
Press the Monitor Key
Press the Redial Key
Manual Redialing Jobs in Memory
Automatic Reception Mode
FAX/TAD Switching Mode
Caller in Automatic Facsimile Transmission Mode
Receiving
Caller in Manual Facsimile Transmission Mode
TEL/FAX Auto Switching Mode
Manual Receiving Mode
Selecting the Reception Mode Recording Paper Size
Telephone Handset Operation Optional
On-hook Dialing
Tone Output
Press the Monitor Press the Redial
Or Pick Up
Handset Key
Press the JOB Continue or Cancel Select YES or no
Communication Status
Current Job Status
Status Key Job
Cancelling a Communication JOB
Display the JOB Cancel Menu
Previous Job in the List
Advanced Functions MULTI-ADDRESS Transmission Broadcasting
Group Broadcast Transmission
Multi-Key Quick Broadcast Transmission
4a Cancel the Existing Number
4b Retain the Existing Number
What is a Relay Transmission?
What is a Relay-Relay Transmission?
Relay Transmission
Relay Transmission, Relay-Relay Transmission Overview
Relay Transmission Originating Procedure
Display the Mailbox Menu
Select the Relay Request
Enter the Box Number
117
Polling Reservation Polling Reception
Polling & Mailbox Communications
Polling & Mailbox Overview
Bulletin Board Box
Open Mailbox ITU-T Compatible
Confidential Box
Simple & Security Polling Reservation
Polling Menu Select Polling Select Poll Once
Reserve BOX
Digit Security Code
ADD +
Complete Procedure
Select the Security Option 6a Select Security Code
Select Polling Select Multi Poll
Multi Mailbox Polling Reservation
Polling Reserve
123
Simple & Secure Polling
Enter the Security Code Complete Procedure
Multi-Address Polling
Display the Polling Menu Select Polling Press the Multi Key
Select the Security Code Option
Turnaround Polling
Polling Menu Select Turnaround 4 Select on Poll
Select the security code option
Continuous Polling
Enter the Security Code
Type
Setting Up a Mailbox
Delete Setup
Enter the Mailbox number max digits Then press
Deleting a Mailbox
Delete
Enter the Password Select Another Setup Item, or
Sending a Document to a Mailbox Remote Hub
To reserve the document to a Bulletin Board Box, press
Dial the Remote Hub Unit Complete Procedure
Select Send to Mailbox Enter the Box Number
Reserving a Document to a Mailbox Local Hub
Select Store to Mailbox Enter the Box Number
Retrieving Polling a Document from a Mailbox Remote Hub
Select Poll from Mailbox
Retrieving a Document from a Mailbox Remote Hub
Printing a Document from a Mailbox Local Hub
Mailbox
Enter the Box Number Enter the Password Complete Procedure
Cancelling Documents in a Mailbox Local Hub
To delete the contents of a Bul- letin Board Box, press
Enter the password to access Confidential Box
Department Code Access
Procedure
Advanced Transmission Functions
Dept Code
Account Code Entry
Pause Signal
Chain Dialing
Display the Chain Dial COMM. Menu
Enter the Dial Number
Default Setting for Memory Transmission
Select Select Another Transmission Mode Setup Item, or
Default Setting for Security Transmission
Select the Desired Select Another Option Setup Item, or
Cover Sheet Registration
Image Area
Time
Setting Recovery Transmission
Recovery
TTI Transmit Terminal ID Print
Display the TTI Menu
Select the TTI Print Option
Send after Scan Default Setting
Document Length Setting
Document Length
PIN Mask
Security Code
Secure Reception Access Code Setting
Advanced Reception Functions
159
Secure RX Activation Period Setting
161
Select the Memory Reception Option
Memory Reception Setting
Display Memory RX Menu
Reception-Reduction Setting
Reception-Discard Setting
Reverse Order Printing Setting
Reverse Order
Select the Privileged Reception Option
Privileged Reception
Privileged RX
Select the RTI Print Option
RTI Remote Terminal ID Print
Display the RTI Menu
Setting Separator
Separator
Secure RX Temporary Stop
Stop
Advanced PC Function
Letter Head Paper Setting
Select the Tray Select Another Option Setup Item, or
Select the Option Enter the Facsimile Number
Transmission Options
Security Transmission
Select the ECM Option
Disabling ECM Temporarily
Display the SET ECM Menu
Dialing with Sub-Address
Load the Document Display the SUB
Address Comm
Menu Select the Option Enter the SUB Address
174
Enabling or Disabling Send after Scan Temporarily
176
Attaching or Printing a Cover Sheet
Attaching or Printing Cover Sheet
Enter the Sender’s
Name Number
Enter the Facsimile
Delayed Communication Time Designation
Delayed Comm
Load the Document Display
Enter the Time and Date Enter the Facsimile Number
Priority Transmission
Sending Recovery Transmission
Select the Cancel Option
Select a Speed Enter the Facsimile Number
Low Speed Transmission
Load the Document Display the FAX
Line Monitor
Setting the Page Count
Communication Report Print
Lists and Reports List and Report Options Setting
Reception Journal Settings
Display Select the Journal
Journal Menu Option Options
Auto Print
Direct Transmission Report Setting
Display the TX Report Menu
Select the Option for
TX Report
Memory Transmission Report Setting
Memory TX
Menu Select the Option for Set the Option for
Memory TX Show First
Multi-Address Report Setting
MULTI-ADD
Report Menu Select the Option for MULTI-ADD Report
Set the Option for
Multi Poll Report Options
Multi-Polling Report Setting
Multi Poll
Relay Originator Report Setting
Reception List Settings
Reception List
Menu Select the Job for
Local Mailbox Remote Mailbox Reception List
List and Report Print Format and Printing Procedure
Printing Procedure
Transmission/Reception Journal Communication Journal
Transmission Journal
Transmission Report
Transmission Report
Memory Transmission Report
Memory Transmission Report
Manual Print
Reservation List
Reservation List
Multi-Address Transmission Report
Multi Transmission Report
Multi-Polling Report
Multi Polling Report
Relay Send Originator Report
Relay Send Originator Terminal Report
Mailbox ITU-T Compatible F-code Communication List
Mailbox Open List
Department Code List
Department Control List
Preset Dialing Number Lists
All of Lists
Abbreviated Dial Number List
Abbreviated TEL Number List
One Touch Number List
ONE Touch Number Information
Group Number List
Group Number Information
Address Book List
Address Book
Function List
Function List
Menu List
Menu List
Power Failure List
Power Failure List
Troubleshooting
Error Messages
Error Message
Cause / Solution
Check Telephone Line Device Error
Paper Jam Error Codes
Error Codes Printed on Reports
Transmission Problems
Problem Cause Solution
Reception Problems
Paper Empty
Clearing a Document Jam
Remove the Bypass
Clearing a Recording Paper Jam
Paper Bypass Tray
Open the Top Cover
Remove the Jammed Paper Optional Recording Paper Tray
Paper Feed Area
Remove the Jammed Paper Fuser Area
222
Return the Document Exit Tray, etc
If there is any received document stored in memory
Examples of print problem
When the Recorded Image is not Clear
Document Scanner Cleaning Procedure
225
Recording Unit Cleaning Procedure
Wipe the Bottom Side of Paper Guide
Display the Test Select the Auto Completed
User Test Mode Automatic Test Mode
Mode Menu Test Menu
Individual Test Mode
Individual Test Summary
Individual Test
01-07
ADF Test
ADF Test
ADF Test
KEY Test
KEY Test
Select the LED Test Menu Check the LCDs
LED Test
Select the LCD Test Menu Start the LCD Test
LCD Test
Speaker Test
Volume Option
Check the Speaker
Sensor Test
Check the Top Cover Check the Paper Tray
Sensor Test
Sensor Test
Print Test
Test Result
Printing a Test Result
Remote Service RDC Remote Diagnosis Configuration Service
RDC Remote Diagnosis Configuration
Automatic Supplies Order Setting
Automatic Supplies Order
Specifications
Optional Paper Tray FU-18L HandsetHD-18
Supplies
Hardware Options
Memo
OPERATOR’S Manual
License Agreement
Wordcraft International Limited
246
247
248
249
Introduction
Computer Requirements
Installation and Device Configuration
Configuration of the CD-ROM
Installing the Toshiba Viewer
Type D\Toshiba Viewer\Setup.exe Start the Installation
Installation
Insert the CD-ROM Select Language
Choose the Destination Location Start the Copy
Device Setup
Default System Device Name and Descriptive Device
254
255
Uninstalling the Toshiba Viewer
Select Unimessage Pro
Toshiba Viewer alert dialog appears
Double click Add/Remove Programs
Description of the Functions
Description of the Main Welcome Menu
Changing the Device Configuration
Browse Folders
Open the Device folder
Application
259
3b Load a set file on your hard disk
Change the Device settings
3a Edit the device configuration
Change the Device settings 3c Copy the device configuration
Click on Setup
4b Save as a file on your hard disk
Create the new settings file Save new settings
4a Save within Toshiba Viewer
Add/Edit Phonebook contacts on the DP80F/DP85F
Open the Devices folder Change the settings
2a Edit the phonebook
264
Open the Device folder Create the new phonebook file
Saving the Phonebook
Save new phonebook 3a Save within Toshiba Viewer
3b Save as a file on your hard disk
Images folder
Order
Creating a Routing Rules
Finding items stored in Toshiba Viewer folders
Click Find icon
Define a new search
Select a folder where you want to create a
Folder
Type a name for the new folder
Creating Folder
Select the Twain Scanner Set the scanner settings
File Scan
Click File Scan on Main Welcome Menu
Click Scan
271
Printing from Toshiba Viewer UniPad
Changing the Device Configuration on
Toshiba Viewer GDI Printer
Click Printer
Printing from Other Application
Set print settings Select Print in File menu
Click OK Setup dialog is closed
DP80F/DP85F