VR800 Owner’s Manual (Recording to a Metronome Sound)
SETUP
SYSTEMMIDI
CURRENT SCENE STATUS
| KEY MODE |
ROUTING/ | PAIR/ |
PHASE | GROUP |
| MMC SEND |
| CHANNEL/ |
CH VIEW | METER |
|
|
|
|
|
| METER |
|
|
|
| |
|
|
|
|
|
|
| OL |
|
|
|
|
|
|
|
|
|
|
|
|
|
|
| |
|
|
|
|
|
|
|
|
|
|
| |
|
|
|
|
|
|
|
|
|
|
| |
|
|
|
|
|
|
|
|
|
|
| |
|
|
|
|
|
|
|
|
|
|
| |
|
|
|
|
|
|
|
|
|
|
| |
|
|
|
|
|
|
|
|
|
|
| |
|
|
|
|
|
|
|
|
|
|
| |
|
|
|
|
|
| L | R |
|
|
|
|
|
|
|
|
|
| ST BUSS/SOLO |
|
|
|
| |
|
|
|
| PAGE SELECT |
|
|
|
|
|
|
|
|
|
|
|
|
|
|
|
| |||
EQ/LO |
|
|
| EQ/HI |
| SELECTED EQ |
| EFF EDIT | |||
GAIN |
| GAIN |
| GAIN |
| GAIN |
|
| EQ ON | EFF1 | EFF2 |
|
|
|
| FREQ |
| FREQ | Q |
| EQ LIBRARY |
| EFF LIBRARY |
FREQ | Q | FREQ | Q | Q | RECALL | STORE | RECALL | STORE | |||
PAN | PAN | PAN | PAN | PAN | PAN | PAN | PAN |
|
|
|
|
EQ EDIT | EQ EDIT | EQ EDIT | EQ EDIT | EQ EDIT | EQ EDIT | EQ EDIT | EQ EDIT |
|
|
|
|
|
|
|
|
|
|
|
|
| REC BUSS | SCENE MEMORY | |
SOLO | SOLO | SOLO | SOLO | SOLO | SOLO | SOLO | SOLO | SOLO | SOLO | RECALL | STORE |
ON | ON | ON | ON | ON | ON | ON | ON | ON |
|
|
|
|
|
|
|
|
|
|
|
| +1/ | |
|
|
|
|
|
|
|
|
| EXIT |
|
+10 | +10 | +10 | +10 | +10 | +10 | +10 | +10 | 0 |
| DATA |
0 | 0 | 0 | 0 | 0 | 0 | 0 | 0 |
|
| |
|
| |||||||||
|
|
|
|
|
|
|
| ENTER |
| |
|
|
| ||||||||
|
|
|
|
|
|
|
|
|
| |
|
|
| ||||||||
|
| |||||||||
- | - | - | - | - | - | - | - | - |
|
|
10
OPTICAL |
|
ACCESS |
|
OL |
|
0 |
|
6 |
|
12 |
|
24 |
|
1 2 3 4 5 6 7 8 | A SYNC |
RECORD TRACK
1 | 2 | 3 | 4 | 5 | 6 | 7 | 8 |
|
| AUTO RTN |
| CLIPBOARD |
|
| |
| AUTO PUNCH |
|
|
| EXIT | EXECUTE | |
START | IN | OUT | END | IN | OUT | / NO | / YES |
|
|
| PREVIEW |
|
| EJECT |
|
HOLD/ | STORE | EDIT | UNDO / REDO | DISP SEL | SETUP |
|
|
PGM SEL |
|
|
|
|
|
|
|
|
| AUTO RTN |
|
|
|
| JOG |
| VARI PITCH | AUTO PLAY | LOCATE | TIME BASE SEL | SCRUB |
| SHUTTLE |
SHIFT | P.EDIT |
| LOC MEM |
|
|
|
|
RECORD |
| STOP | PLAY | REW | F FWD |
|
|
AUTO |
| CLIPBOARD PLAY |
|
|
|
| |
PUNCH |
| LOCATE ABS | 0 |
|
|
|
|
LOCATE REC END
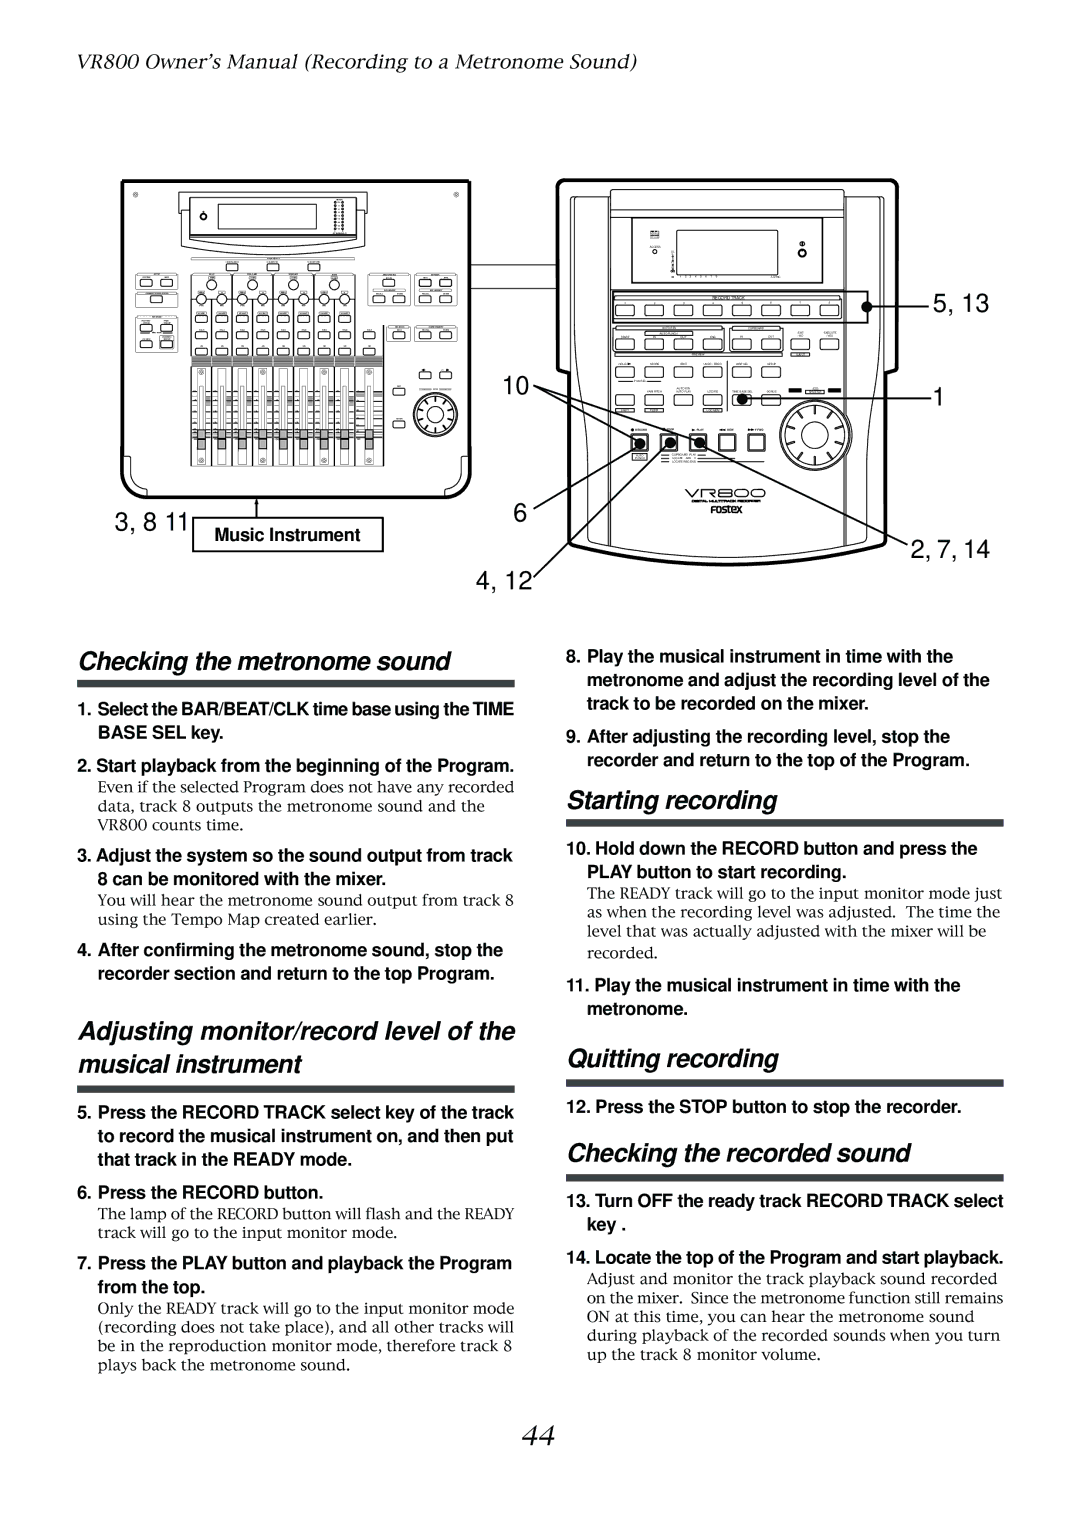
5, 13
1
3, 8 11
Music Instrument
6
2, 7, 14
4, 12
Checking the metronome sound
1.Select the BAR/BEAT/CLK time base using the TIME BASE SEL key.
2.Start playback from the beginning of the Program.
Even if the selected Program does not have any recorded data, track 8 outputs the metronome sound and the VR800 counts time.
8.Play the musical instrument in time with the metronome and adjust the recording level of the track to be recorded on the mixer.
9.After adjusting the recording level, stop the recorder and return to the top of the Program.
Starting recording
3. Adjust the system so the sound output from track 8 can be monitored with the mixer.
You will hear the metronome sound output from track 8 using the Tempo Map created earlier.
4.After confirming the metronome sound, stop the recorder section and return to the top Program.
Adjusting monitor/record level of the musical instrument
5.Press the RECORD TRACK select key of the track to record the musical instrument on, and then put that track in the READY mode.
6.Press the RECORD button.
The lamp of the RECORD button will flash and the READY track will go to the input monitor mode.
7. Press the PLAY button and playback the Program from the top.
Only the READY track will go to the input monitor mode (recording does not take place), and all other tracks will be in the reproduction monitor mode, therefore track 8 plays back the metronome sound.
10.Hold down the RECORD button and press the PLAY button to start recording.
The READY track will go to the input monitor mode just as when the recording level was adjusted. The time the level that was actually adjusted with the mixer will be recorded.
11.Play the musical instrument in time with the metronome.
Quitting recording
12. Press the STOP button to stop the recorder.
Checking the recorded sound
13.Turn OFF the ready track RECORD TRACK select key .
14.Locate the top of the Program and start playback.
Adjust and monitor the track playback sound recorded on the mixer. Since the metronome function still remains ON at this time, you can hear the metronome sound during playback of the recorded sounds when you turn up the track 8 monitor volume.
44