VR800 Owner’s Manual (Names and Functions)
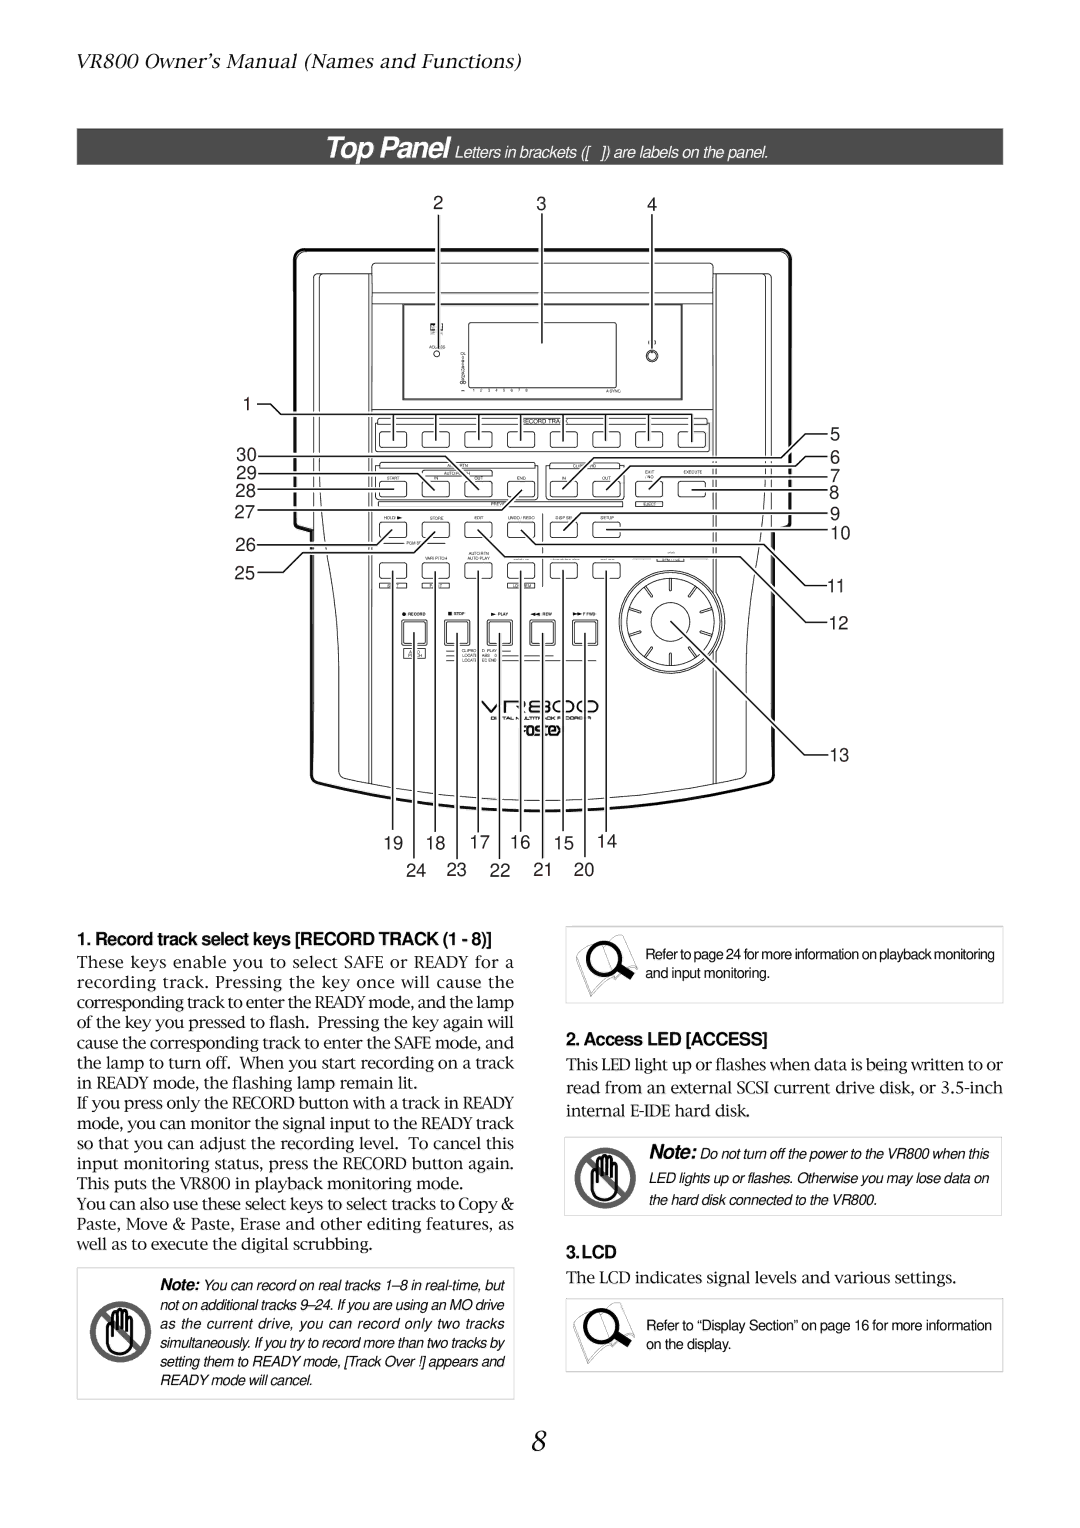
Top Panel Letters in brackets ([ ]) are labels on the panel.
234
1
30
29
28
27
26
25
OPTICAL
ACCESS
OL 0
6
12
24
1 2 3 4 5 6 7 8A SYNC
RECORD TRACK
1 | 2 | 3 | 4 | 5 | 6 | 7 | 8 |
|
| AUTO RTN |
| CLIPBOARD |
|
| |
| AUTO PUNCH |
|
|
| EXIT | EXECUTE | |
START | IN | OUT | END | IN | OUT | / NO | / YES |
|
|
| PREVIEW |
|
| EJECT |
|
HOLD/ | STORE | EDIT | UNDO / REDO | DISP SEL | SETUP |
|
|
PGM SEL |
|
|
|
|
|
|
|
|
| AUTO RTN |
|
|
|
| JOG |
VARI PITCH | AUTO PLAY | LOCATE | TIME BASE SEL | SCRUB |
| SHUTTLE | |
SHIFT | P.EDIT |
| LOC MEM |
|
|
|
|
RECORD |
| STOP | PLAY | REW | F FWD |
|
|
AUTO |
| CLIPBOARD PLAY |
|
|
|
| |
PUNCH |
| LOCATE ABS | 0 |
|
|
|
|
LOCATE REC END
5
6
7
8
9
10
11
12
13
19 18 17 16 15 14
24 23 22 21 20
1. Record track select keys [RECORD TRACK (1 - 8)]
These keys enable you to select SAFE or READY for a recording track. Pressing the key once will cause the corresponding track to enter the READY mode, and the lamp of the key you pressed to flash. Pressing the key again will cause the corresponding track to enter the SAFE mode, and the lamp to turn off. When you start recording on a track in READY mode, the flashing lamp remain lit.
If you press only the RECORD button with a track in READY mode, you can monitor the signal input to the READY track so that you can adjust the recording level. To cancel this input monitoring status, press the RECORD button again. This puts the VR800 in playback monitoring mode.
You can also use these select keys to select tracks to Copy & Paste, Move & Paste, Erase and other editing features, as well as to execute the digital scrubbing.
Note: You can record on real tracks
Refer to page 24 for more information on playback monitoring
and input monitoring.
2. Access LED [ACCESS]
This LED light up or flashes when data is being written to or read from an external SCSI current drive disk, or
Note: Do not turn off the power to the VR800 when this LED lights up or flashes. Otherwise you may lose data on the hard disk connected to the VR800.
3.LCD
The LCD indicates signal levels and various settings.
Refer to “Display Section” on page 16 for more information
on the display.
8