8550, 8550N, 8550DN, 8550GN, 8550MFP Printer
User Guide
Warranty
Copyright Information
Online Services
HP Customer Care
World Wide Web
America Online
Obtaining software utilities and electronic information
HP Service Agreements
HP direct ordering for accessories or supplies
HP Service Information
North and Latin America
Asia-Pacific Countries/Regions
Customer support options worldwide
In-country/region support numbers
Page
HP Customer Care Centers
Asia Pacific Countries/Regions
North & Latin America
Europe, Middle East, and Africa
Page
Page
Contents
Common Printing Tasks
Printer Messages 129 Using the Printer Online Help System
112
Supported DIMMs 207 Installing DIMMs
Hewlett-Packard Limited Warranty Statement 229
Features
EIO
Accessories
Configurations
Printer Information
HP Color LaserJet 8550MFP
Locating the Printers Parts
Locating Printer Consumables in chapter
Optional Paper Handling Accessories and Status Lights
Light Tray Multi-Bin Mailbox
26 1 The HP Color LaserJet 8550 Printer
Using the Printer Control Panel
Overview
Printer Control Panel Keys and Indicator Lights
Cancel Job
Menu
Display
Ready Indicator green
Data Indicator green
Select
When to Use the Printer Control Panel Menus
Using the Printer Control Panel in Shared Environments
Resetting the Printer
To reset the printer to factory defaults
Factory Defaults
Menu Factory Default
Paper Handling Menu Tray 1 Type = Auto Tray 1 Size =
34 2 Using the Printer Control Panel
Seconds
36 2 Using the Printer Control Panel
Printing Menu Maps
To print menu maps
Changing Settings in the Printer Control Panel
Configuring Menu Selections
To configure menu selections in the printer control panel
Auto Continue
Tray 1 Auto
Configuring Media Type and Size
To configure the input trays
Selecting an Output Bin
Setting Media Type and Size Overrides
To select an output bin
To set the media override
Selecting the A4 Override
To select the A4 override
Selecting Toner Low Response
To select the toner low response
Setting the Power Save Mode
To set the Power Save mode
Selecting Parallel Advanced Function
Selecting the Default Printer Personality
To select the parallel advanced function
To select the printer personality
Setting the I/O Timeout
To set the I/O timeout
Locking the Printer Control Panel
Selecting the Display Language
To select the display language
Printing Internal Pages
To print an internal
Interpreting the Configuration
Color Adjust-Lists the number of pages since the last color
Axis Adjustment
Duplex Registration
Repeat to verify that the lines on the front and back
Accessories, Options, and Related Products in chapter
Managing Memory
Configuring the Printer for the Network
Resource Saving
58 2 Using the Printer Control Panel
Ordering information, see Accessories, Options, and Related
Selecting Media
Supported Media Weights and Sizes for Input Trays
Selecting Media
62 3 Common Printing Tasks
Selecting Media
64 3 Common Printing Tasks
Supported Media Weights and Sizes for the Optional Duplexer
66 3 Common Printing Tasks
Selecting Media
Preprinted Forms and Letterhead
Recycled Media
Envelopes
Transparencies
Heavy Paper Stock
Labels
Colored Media
Media to Avoid
Controlling Your Print Job
Changing Page Orientation
Printing from Tray
To load media into tray
Printing Envelopes from Tray
To load envelopes in tray
To print envelopes from tray
Type of Address Left Margin Top Margin
Printing Tips for Tray
Orienting Media
Orienting Media in Tray
Orienting Media for All Other Trays
Media Orientation for Printing Prepunched Paper
Printing from Trays 2 some printer models only
To load media into trays 2
Orienting Media for All Other Trays later in this chapter
To print from trays 2
Printing Tips for Trays 2
Preprinted Forms and Letterhead earlier in this chapter
Printing from Tray 4 some printer models only
To print from tray
Printing Tips for Tray 4 some printer models only
Advanced Printing Features
Using the HP TonerGauge
Information. See Resetting the HP TonerGauge on
Printing by Type and Size of Paper
Benefits of Printing by Type and Size of Paper
To print by type and size of paper, do the following
From the software or printer driver, select the desired type
Different First
Printing Multiple Pages on One Sheet of Paper
Creating and Using Quick Sets
Quick Sets are available only for Windows
Quick Sets Printer Driver Procedure Using Quick Sets
Quick Copying a Job
Printing Additional Copies of a Quick Copy Job
Deleting a Stored Quick Copy Job
Proofing and Holding a Job
Printing the Remaining Copies of a Held Job
Deleting a Held Job
Page
Printing a Private Job
Specifying a Private Job
Releasing a Private Job
Deleting a Private Job
Storing a Print Job
Printing a Stored Job
Deleting a Stored Job
Variable Data Printing
Booklet Printing
Print on Backside of Heavy Media
HP JetSend Communications Technology
How the JetSend Communications Technology Works
Networked Devices
Managing Fonts and Forms on Disk
HP LaserJet Resource Manager Windows
HP LaserJet Utility Macintosh
108 4 Advanced Printing Features
Controlling Color Output with Printer
Drivers
Using Color
ColorSmart
Manual Mode
ICC/CMS
Black and White
Automatic PANTONEMatching
Cmyk Ink Set Emulation
Adjusting the Print Color and Quality Settings
Objects
Selecting Colors
Pantone Colors
Color Swatch
Using Digital Cameras
Using Scanners
Adjusting the Color Balance
To adjust the color balance
Print the color adjust
Page
Page
Reprint the color adjust
Page
Making Room for Printer Maintenance
Maintaining the Printer
Replacing Printer Consumables
Locating Printer Consumables
Frequency for Replacing Printer Consumables
Approximate Time
Consumable Printer Message Count Perioda
Printer Control Panel Messages
Resetting the HP TonerGauge
Recycling Consumables
128 6 Maintaining the Printer
Using the Printer Online Help System
Printer Messages
Message Description Recommended Action
= EIO Slot Number
Configuring Media Type
Media Type and Size
= Description
Installation
ZZ Error
Hardware Type
Hardware Device
Not operate the printer
This condition or the printer
Can be damaged
Service. Do not operate
= Fan Type
Printer in this condition or
Printer can be seriously
YY Description
Nvram
Cleaning the Density Sensor
Cleaning the Transfer
Printer senses a media Open the lower left door
Printer senses a media Detach the multi-bin mailbox
Printer senses a media Open the upper right door. Lift
Printing from Tray 1
Selecting the Display
Continuous configuration Press Cancel JOB to exit
See Selecting Toner Low
Printer has detected an Open the lower left door
Options, and Related
Toner cartridge is either Insert the cartridge or make
Printer has detected that Install the imaging drum
Mailbox on the multi-bin Remove all media from
Printer is requesting a Load the requested media
Stacker Bin is full Empty the Stacker Bin Alternates with
Printer hard disk is new Press Select to reformat
Printer is printing the font No action is required
Using the Printer
Control Panel
Not shake the toner
Cartridge in attempts to
Extend the cartridge life. For
Toner Low Response
Printing Tasks
Size that is not currently Specified on the printer control
Fuser is warming up No action is required Printer Messages
160 7 Printer Control Panel Messages
Solving Printer Problems
Performing Basic Troubleshooting Steps
Working with Toner
Media Jam Locations
Page
Media Handling Problems
Problem Cause and Solution
Weights and Sizes for Input Trays in chapter
Panel
Problem Cause and Solution
Capacity, see Supported Media Weights and Sizes for
Type and Size in chapter
Problem Cause and Solution
Configuring Media Type and Size in chapter
Some printer models only in chapter
Capacity, see Supported Media Weights and Sizes for
Media Weights and Sizes for Input Trays in chapter
Current media is damaged or in poor condition
Printer Response Problems
Problem Cause and Solution
Problem Cause and Solution
176 8 Solving Printer Problems
Messages
Option Copy /B filename PRN or Copy
Printer Control Panel and Configuration Problems
Problem Cause and Solution
Application Problems
Problem Cause and Solution
Incorrect Printer Output
PCL Technical Reference Manual for specific
Color Printing Problems
Sensor as described in Cleaning the Density Sensor
See Adjusting the Color Balance in chapter
Information, see Accessories, Options, and Related
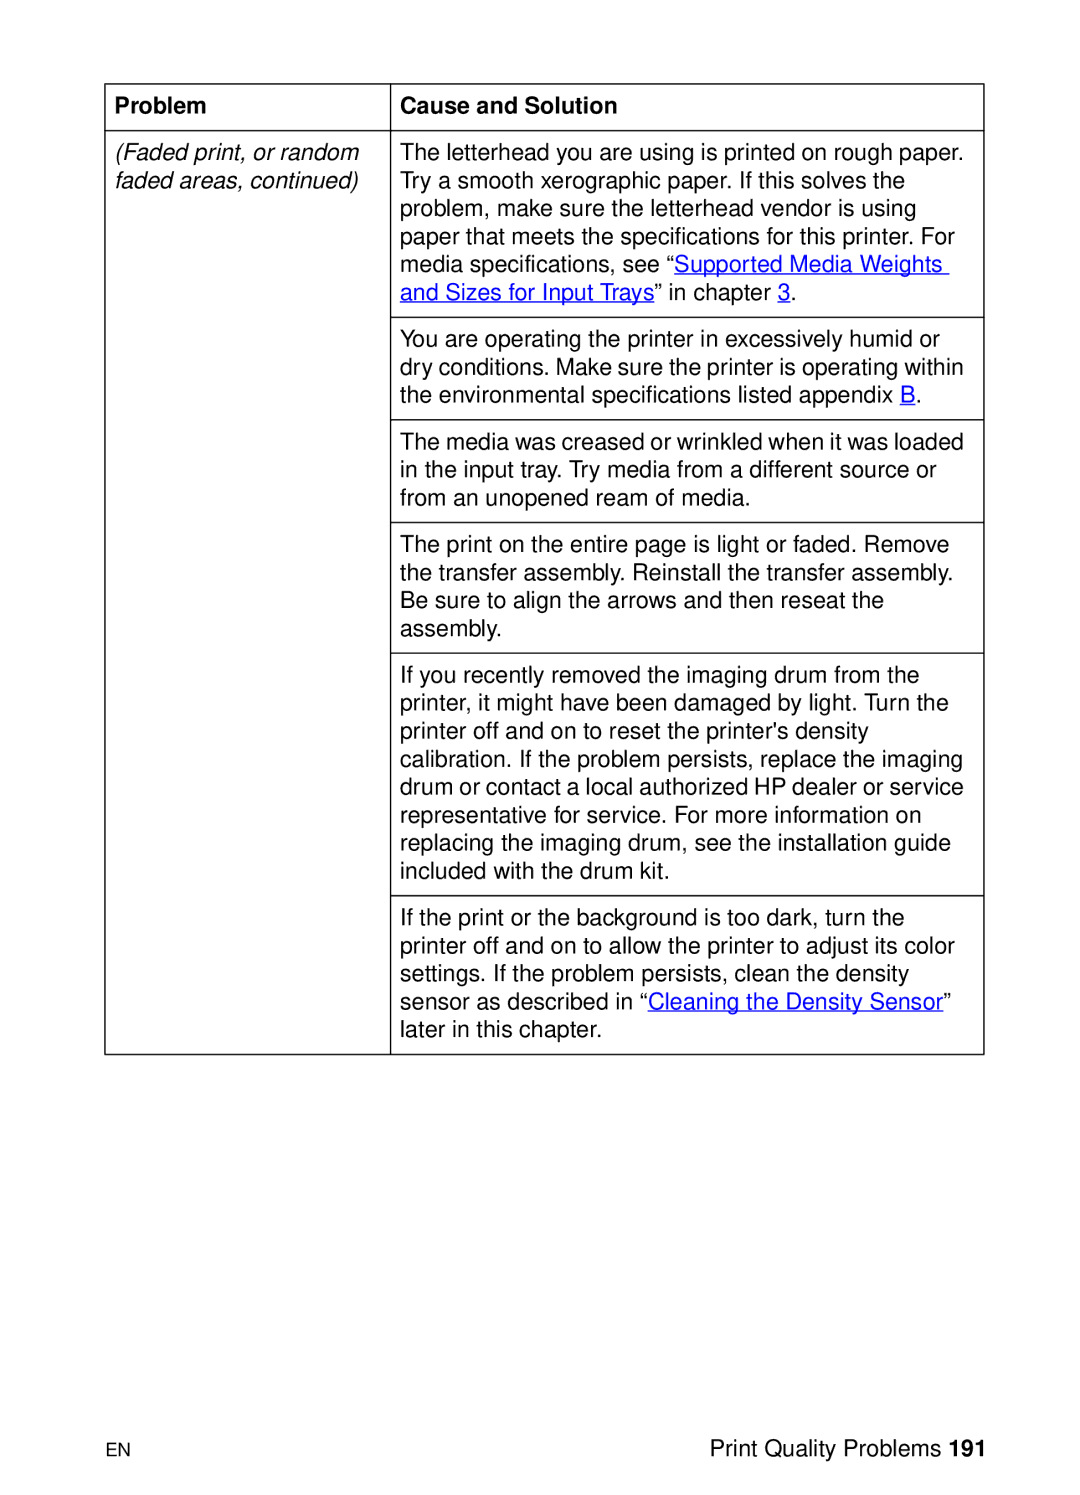
Print Quality Problems
Problem Cause and Solution
Cartridge in attempts to extend the cartridge life
If you use the Manually Print on 2nd Side setting
Sensor as described in Cleaning the Density Sensor
Problem Cause and Solution
Input tray, see Configuring Media Type and Size
There is a wave or ripple in the background when
Problem Cause and Solution
See Cleaning the Transfer Charger later in this
Cleaning the Density Sensor
To clean the density sensor and erase lamp
Cleaning the Transfer Drum
To clean the transfer drum
Page
Page
Cleaning the Post Charger
To clean the post charger
Cleaning the Transfer Charger
To clean the transfer charger
Accessories, Options, and Related Products
EIO Accessories
Accessories
Part Number Type / Size Memory
Part Number Type / Size Printer Supplies
Cables
Media
Part Number Type / Size Reference 5010-6394
Materials
5021-0337 PCL/PJL Technical Reference Packagec
Installing DIMMs
Supported DIMMs
To install a Dimm
Page
Page
Electrical Specifications
Operating Environmental Specifications
Temperature
Humidity
Altitude
Environmental Product Stewardship Program
Protecting the Environment
This HP LaserJet printer design eliminates
This HP LaserJet printer design reduces
HP LaserJet Printing Supplies
Paper Usage
Plastics
HP Toner Cartridges/Photoconductive Drum
US Returns
Paper
Material safety data sheet
Regulatory Statements
FCC Regulations
Canadian DOC Regulations
Conforms to the following Product Specifications
Declaration of Conformity
For regulatory topics only
Specifications
Guadalajara, Jalisco México May
Cispr 221997 / EN 550221998 Class B1
Regulatory Statements
Vcci Statement Japan Korean EMI Statement
Safety Information
Laser Safety
Product Information Sheet
Laser Statement for Finland
Luokan 1 laserlaite
Varning
Specifications
Warranty Information
Hewlett-Packard Limited Warranty Statement
Warranty Information
Index
231
232
233
234
235
236
237
238
239
240
241