InterForm400
User’s Manual for InterForm400
User’s Manual for InterForm400
Table of Contents
General Description of Auto Forms Control Sub-system 132
116
122
126
155
Work with Active Subsystem Autoform 133
134
136
221
Split Definitions 173
181
241
Administering InterForm400 Environment and Users 266
230
238
298
278
292
292
329
319
323
325
380
Appendix B Attaching Printers to the iSeries
374
378
435
426
430
480
459
461
477
How the manual is organized
About This Manual
Important information
Trouble Shooting L
User’s Manual for InterForm400
What is new in the 2006 version
What is new in this manual
ZPL Module
Modules of InterForm400
Basic InterForm400 package
InterForm400 Classic package
InterFax400 Module
InterWord400 Module
Preparation
Installation
Getting Started
InterForm 400 version 2004.M01
INS0121
Press F10 to complete the installation
ZEBRA203 ZEBRA300
Setting Up the System
Enter 2. Configure InterForm
APF101D
= Legal = Monarch = Executive
= Letter
=*EXCLUDE
APF101D
Remote Writer TCP/IP LPD
Work With Overlay/AFC Sample
Printer Writer Twinax, or TCP/IP TN5250E or Raw Socket
Trouble Shooting L
Work with the Getting familiar with overlays section
About The Print Results
User’s Manual for InterForm400
You will then be presented with the InterForm400 main menu
Menu Structures and General Operation
User’s Manual for InterForm400
Creating a new overlay
Design Overlay
Selecting an existing overlay
F10=Copy from another AS/400
Copy Overlay from Another Overlay
F9=Copy from another file set
Extra blank
Global settings of an overlay
Extra Left
Paper Size
Extended Def
Drawer
255
Forced front
Duplex options
Copy
Duplex
F13 Set view/print parameters
Function keys for display of a spool file
Prefix
Overlay Selector
Overlay Name
Primary
Secondary Set
View
Code
Form type
Copies Drawer
Label length/width
Considerations for Zebra overlays
Especially Zebra related parameters are
TIP J
Extended Page Definition
Copy Management
F18=DSPSPLF F19=DSPPFM
Source Drawers for Copies
Stapling
Orientation of design elements
Measuring Methods
Design Screen
Copy definitions into this overlay
Service Options
Move the placement on
Move definitions to another sequence number
Print overlay definitions
Delete lines
Resequencing
Control
Overlay Element Selection Filters
Use this overlay element on all copies of the Primary set
Copy Management
Overlay elements
Inch.pel Repetition Horizontal line
Color
F4=List
Thickness Pels
From Top Edge
From left
Lower end
Text
Global settings for the overlay From left
Rotation
HPGL/2 compatible printer
Value Prints out
=Print-info Print information
Examples on use of Ink
=INK fill pattern for succeeding sequence lines
Color
Black Ink Slash / Ink Ink followed 0 Ink By Ink/ / Ink
See above
Input Position
=TABULATOR Paragraph tabulation
Window
Input Line
Condition
Adjustment
Underline
Punctuation
Refund Ears 100,00 Total 000,00
=REMAP Window re-mapping text areas
Mickey Mouse 1.100,00 refund Ears -2.100,00 Total 1.000,00
100,00
Left
Upper edge
From left edge
Ignore Blank Lines
Blank original
Adjustement
Right margin
Escape
Reverse Image
Administration menu. Refer to page 319 for details
Image name
Image imported under 8. Work with Images
?=IF...THEN conditional nesting of overlays
Vertical cursor repositioning
Overlay
Number
Lines to remap
Reposition related to previous non blank input line
Position related to actual position
=PCL-FILE
Value, will cause a movement to the left. e.g ,120- for
Inches, pels vertical position of the HP-GL/2 file is made
½ negative movement
PCL file is added to this value. Adding a minus after
=SUBOVERLAY
0005
0001
Demoimage
0003 Recepient Frame
If..Then
How the sequence lines in overlay design are executed
User’s Manual for InterForm400
It is recommend that you have
Getting Familiar With Overlays
Chapter requires you have
F9=Copy from another overlay
Making a Work Copy of the Overlay IF400DEMO
Sample
InterForm 400 Samples
Copy from another overlay
We select file-set Sample and press Enter
Now we select overlay IF400DEMO and press Enter
NO, *YES
Make a Test Print of the Overlay+Spool Data
Enter menu 3. Merge spool entry with overlay
073534
We select the file with option 1 and press Enter
DSP010700
Peter
Entering the Design Window
Print out a list of the definitions by pressing F5
Printing the Overlay Definition List
Adding Round Corners to the Address Field
Having to leave the design window
Merge spool entry with overlay
Edit Subject Text
Re. Your new MateSert/400 driver
File
Qprint
END
06-011 pos
10,0
Formatting the body text
Making Equal Distance Between Column Headers
14,0
13,0
28 28 Position 26
000004
Making Equal Distance between Item Line Columns
We press F5 and we select option 1. Move the placement on
Defining the Column Headers White on Black
11,1
NW NE SW SE
Defining the Item Line Bars
17,1 7 Ink
Black
We measure the bottom edge to be around 7½ 7,120
Defining the 5 Item Coloumn Frames
150
Defining the logo as a water mark
Top 01,100 Left 04,180 0002 Image
IF400DEMO
Defining the Copy Management
Defining the Copy Symbol as Watermark
7001
We now proceed by entering type 5 for Text
120
Light
Defining the Relatively Positioned Sub-form
Intermate A/S
060
30,0 ?
Position Is = N
Cleaning the Overlay for Remaining Text
Result
User’s Manual for InterForm400
Example of Advanced use of Sub-overlays Random text lines
Creating the Main overlay
Search for the footer
Creating the sub-overlay for formatting item groups
1653
Position 1
040
080
1351
Creating the sub-overlay for formatting the footer
Result
User’s Manual for InterForm400
User’s Manual for InterForm400
Copies
Main Menu Local Environment Setup
Drawer Overwrite the global drawer settings of the overlay
Test Print Overlay
APF730D
Merge Spool Entry with Overlay
Media type
Print mode
Out each label
Select File set
Hardware
=Cut requires hardware cutter normally cuts the media for
System SYSTEM850 SYSTEM852 ASCIIR8
Select Output Queue and Printer Type
Work with actual Output Queue
Hpiii Hpiiid Hpiiip HP4 HP4D HP4PJL
APF3812/APFWRKOUTQ
Press F6 to create a new Overlay Selector
Working with Overlay Selectors
Interma
Selection Criteria Entries
Compare Value
Print Line
Oper
User’s Manual for InterForm400
IF400DEMO
Getting Familiar with Overlay Selectors
Placing overlays in One File set
F9 = copy from another file-set F12=Cancel
Page/Line 1/15
Examining Spool Entry Selection Criteria
AA BB
Entering the Selection Criterias in the Selector
Enter
Myselect
Testing the Selector
Menu appears like this
General Description of Auto Forms Control Sub- system
User profile
Job description
Work with Active Subsystem Autoform
This menu item is a shortcut to the command
Start Autoform subsystem
End Autoform subsystem
Demo
Overview of AFC Main Definitions
AFC305D
Hold Spooled File
User’s Manual for InterForm400
AFC302D
Auto Forms Control Definitions
Entering queue and job names to an AFC definition
AFC300D
Printer Type
Default Output Output Queue and Printer Type
Job name
Auto Start
Additional parameters
AFC Definition Entries
Library APF3812 Seqnbr Funct Form type
Find overlay
=Merge with Overlay
Merge overprint
PRI PRI, *SEC
Output spooled
Each label
Archive
=Send Network Spooled File
Hold output
Save output
Address Refer to the above
=Transform Afpds to *USERASCII
=Move Spooled File
=Copy Spooled File
File name Char File number
=Hold Spooled File
=Delete Spooled File
=Call Program
User data
=Exit
=Change attributes
Example
Finishing Definition
=Split spooled file
= Prepare for Finishing
Indicate that a spool entry has been processed
NameThe Sort definition name
=Sort Spooled File
Sort Definition
=Change Writer
For archiving both PCL and *SCS spooled files see
=Archive to MultiArchive/400
=Archive in InfoStore/400
PRI
= Comment
Convert SAP spool entries datatype *IBMSCS
Generating multiple copies in input spool entries
SAP spool entries datatype *IBMSCS2
User’s Manual for InterForm400
Checking if Auto Forms Control is running
Example 1, Using Separate queues for Input and Output
Getting Familiar with Auto Forms Control
Checking the Writer
AFCINPUT1 Afcoper BCH PGM-AFC700
Entering Auto Forms Definition AFCINPUT1
Autoform Qsys SBS
Defining move of print jobs with type *STD
APF3812
DEFAULT, *USER
Defining move of Print jobs with Formtype Demo
AFCINPUT2 DEFAULT, *USER
Testing new functions in AFCINPUT1
Example 2, Using same Queue for Input and Output
ASCII850
Creating the AFC Definition
AFCINPUT2
AFCOUT2
Outq
Restricting the writer to process type *STD jobs only
Preventing following AFC functions to process type *STD
Defining the Overlay Merge
Default
PRI
We press Enter to save this AFC definition
Cleaning up processed jobs
Activating the AFC job AFCINPUT1
Testing the new AFC definition AFCINPUT2
Template
Using a Template AFC defintion
Input
Merged
NONE, *DEFAULT, Nummer
AFC310D
Form Type Table
Overlay selection entry field
User’s Manual for InterForm400
User’s Manual for InterForm400
Shipping
Split Definitions
Split Definition Entries
Press F6 to create a new split definition
Compare with
Split detail Description
Description of the pages selected by this detail line
SPL310D
Calling a User Exit Program with the extracted spool pages
INPUT, *NO, *YES
INPUT, *USER, *JOBNAME
Ifletter
Example Using Split
21 29 EQ InterMate
Iflet
Iflet
Split, definition Ifletter
Testdef
Finishing Definitions
PRS310D
Our first Prinserter definition
Defining Print Order of Sorted Groups
Pages per envelope
Example 2, Sorting in Ascending Weight
Example 1, Non sorted
Example 3 , Sorting in Franking groups
Defining PFE MailPrinter Pre-process Definition
YES NO, *YES
PRI *SEC
Example 1, Non sorted
Example 3 , Sorting in Franking groups
Defining Stapling Pre-process Definitions
= IBM
03 = Böwe OMR
Defining Insertion Pre-process Definitions
Order The output order of the entire print job is reversed
Placement of optical marks
Print Sequence
Pages in reverse
If YES to the above
What to do if more than max. pages to a recipient
Can there be code for outsorting in the printout
E-mail/Fax Finishing Definition
How to distribute E-mails and faxes in InterForm400
Find in spooled file
How to find E-mail address / Fax number
By key
MAI310D
Key definitions
MAI305D
Definition variables
Definition E-mail text / Cover page text
Definition recipient-ID
PRS330D
Press F6-Create to add a new E-mail address or fax number
Mail addresses and fax numbers
MAI350D
Senders E-mail address
=Use fixed sender
MAI380D
Encryption and Signature
=Use owner of spooled file as sender
Here is the explanations of the fields to fill
Organisation
User access limitations
Personal Certificate
Work with E-mail senders
Variable Definitions
File Naming Finishing Definition
Receipient Key Definition
Number of digits to use
Spooled print info
Spoolfile attribute
Auto numerator
Parm 1 KEY1-3, *VA-9
Name, *NONE
Library, *LIBL
KEY1
Selections and Document breaks
PNM365D
Receipient ID Information
Closing User-Exit
Encryption and Signature
Selection Criteria
Define Level Break Conditions for Finishing
We enter 1 for the first Finishing Recipient-ID definition
Qprint Display Spooled File
Example 1, Level Break on Page Counter
Operators used are standard Query operators
Character string case sensitive or numeric value which
Example 2, Level Break on Change in Customer Info
Find Recipient ID in the Following Positions
Att Martin Merman
Example 3, Level Break on Customer ID and Attention Person
Pfeready
Using the Finishing Definition with Auto Forms Control
Activate the Finishing pre-process definition
PFEDEF1
Finishing
Merge with pre-processed Finishing spool entry
Distribute E-mails with Auto Forms Control
Save email
TIP J
RFM300D
Reformat finishing definition
Head
Below each of the elements are described
Definition name Demorefor
Select this option and you will get to the screen below
User exit program
Detail lines
Lines between 2 detail lines
1st page per level break
Following pages
Maximum number of blank
Number of lines to Handle
Length
Compare type
Occurrence
= Text constant
Totals
Foot
Just after the last detail line
If 2 total pages, first total
Footer
Insert reformatting in production
If only 1 total
User’s Manual for InterForm400
Sort Definitions
Insert separator page if break
Insert Pages before
Values. This means that e.g. the which has Ebcdic value
Selection criteria
Find sort fields in the following positions
Boolean operator relating to the compare value
Examples Using Sort
Example 2. Sort by Type, MateSert/400 letters first
Example 1. Sort by Type, InterMate400 letters first
Example 4. Sort by Customer ID and type
Example 3. Sort by Type and Customer ID
Sort, def Sortdemo outq *DEFAULT &form type Sortdone
1001 InterFor
Seperator
BOOKMRK1
When you press Enter/F3/F12 you will see this screen
BMK310D
Finreport
BMK330D
User’s Manual for InterForm400
Demospool
Level-1 Field Prefix Print line Position
Filnvnqprint SPLNBR*LAST Bmkdefdemospool OUTTYPE*VIEW
KSE HP5SI Qusrsys PDC PRT01
User Output Queue
AFC315D
User’s Manual for InterForm400
General Description of OSC Output Schedule Control
If the subsystem is started, it will look like this
Start Oscctl subsystem
End Oscctl subsystem
Work with Active Subsystem Oscctl
Describing the OSC definition lines
Specify grouping and separator
Specify placement of input spool file attributes at output
Specify input spooled file priority
Define sort fields
Output Queue Spool file
Principle of OSC Output Schedule Control
Spool file
User’s Manual for InterForm400
OSCOUTQ01
Getting Familiar with OSC Output Schedule Control
OSC100D
Specify input spooled file priority
Specify placement of input spool file attributes at output
Selection criteria
Define Sort Fields
OSC330D
OSC335D
Define resulting output queues
Specify Grouping and separator
Qsysopr
Specify automatic start scheduling
Specify automatic start options
Archive
Specify output queue for processed spooled files
Specify job priority
Compose Joint Report
Working with Joint Reports
Reports in this file-set
Designing a Report Composition
Descriptive text for the report you wish to make. This text
Is used solely in connection with the displaying of a list
= Overlay with index
=Empty Overlay front
Font, page no
=Overlay + spool entry
Indention, page no
Font, text
Link name
Test Print Report Overlays
Test Print Report, 1 Page per Overlay
Print Report
Corresponding print-out
F12
User’s Manual for InterForm400
Administering InterForm400 Environment and Users
Appoint InterForm 400 Administrator
Appoint Administrator
Hpiiip HP4 HP4D HP4PJL HP4DPJL
Configure InterForm
Hpii Hpiid Hpiip Hpiii Hpiiid
Executive
Letter
= Ledger
Legal = Monarch
Do you want to use DDM to InterForm files on other AS/400
These output queues
Work with InterForm400 Users
Work with file sets
Connect Users with Overlay File Sets
User profile Peter
Press F3 when all required file sets have been assigned
User’s Manual for InterForm400
Resident Fonts
Working with Fonts
Description of Additional Fonts
Work with Fonts
APF370D
Override spacing
Example of Defining a Resident Printer font
=Propotional spaced
Font 7001 Other fonts
Work with soft fonts for PCL
Import a True Type Font
Place into flash
F4=List F3=Exit F12=Cancel
File transfer HP SFP Font files from a PC
Auto download Soft Fonts
Allways Allways *PRI *SEC *NEVER
Hpiiship
HP4
Support of barcodes is described on
Create barcode soft font
InterForm400 Predefined Soft Fonts
PGR332D
Micr Soft Font Font ID
Ocra Soft Fonts
Ocrb Soft Font Font ID
User’s Manual for InterForm400
Calculating barcode height
Barcode Support
Code 128 and EAN128
Create bar code soft font
Code
Extended code
Line separator
Interleaved 2
EAN8, EAN13 and UPC-A
Postnet Barcode
GEN
Assigning Font ID’s to Barcode Softfonts
Datamatrix barcodes
Code39 can be defined in the font ID interval
Downloading a Barcode Soft Font
Example of editing a font ID for Code39 barcode
User’s Manual for InterForm400
FNT431D
Installing the Arial True Type Font
Getting Familiar with Soft-fonts and Barcodes
ARIAL.TTF
Creating the Code128 Barcode
Define auto-download of fonts Arial and Ocrb
Create font ID for the Arial soft-font
PCL
Enter 6=update output queues for the Printer group *PCL
5001 F4=List
Arial
CODE128AAA
0003
Testing the Barcodes in an Overlay
Testfont
Qprint Peter
HLD Demo
44A9032
Page/Line 1/28
44A2971
Zebra flash memory’
Work with Zebra fonts
Description of Zebra fonts
CG Triumvirate
Datamatrix barcode
Dot matrix
Defining barcodes for Zebra printers
Columns/Rows To encode
Special Edcdic
Using soft fonts for printing on Zebra
Height The height of the font
Relative width
Logofont
Work with Zebra soft fonts
Frutboce
Frutbowe
Zebra Qusrsys Courier
Work with fonts in Zebra flash memory
Download a soft font into flash memory
Zebra Qusrsys
Substitution Zebra internal fonts
Delete a soft font from flash memory
This screen is shown
Initiate Zebra flash memory and reload fonts and images
Initiate Zebra flash memory and reload fonts and images
User’s Manual for InterForm400
Work with images
PRO1.TIF
Working with black and white images
Importing black and white images
PP.TIF
BMP100D
Working with color images
Import color images
Newlogo
Work with Zebra images
Work with Zebra images
Logo
Zebra Qusrsys Logo
Work with images in Zebra flash memory
Work with PCL Files
Cebit
PCL100D
Press F6 to load a PCL file into InterForm400
Import PCL file
User’s Manual for InterForm400
PAL100D
Work with palette
Change the definition of the colors
User’s Manual for InterForm400
Hpii Qusrsys PRT01
Work with paper control options
Paper type to PCL-drawer conversion
Defining an Output Sorter Bin for a User
Output Sorter Bin Support
To 11 can be defined for a HP5Si
Default output bin
Output queue holding the HP5Si or Lexmark Optra printer
Sorter Type
Qsecofr
PRT02
008
Overlay
User profile Binno
009
Import Certificates
Create Demo Spool Entry
Service Functions
Save spooled file to the folder APF3812
Display All Displayable Characters
Print Resource X-reference
Print Saved Spooled File from the folder APF3812
Work with Journaling
Copy resources to export library
Export of InterForm400 resources
EXP600D
Work with resources in export library
Work with distribution
This option is used to create a distribution file
Work with resources in import library
Import of InterForm400 Resources
EXPORT.001
Transfer resources to the production library
Importd
=Rename file-set
Working with resources in import library
Exists
GO DCA400/INTERWORD
Install/upgrade InterWord
Apply PTF from folder APF3812
PTF100D
Prepare server to support InterForm Designer
Install Swiftview at drive C
Install InterForm Designer on your PC
User’s Manual for InterForm400
Vrsion PRI PRI, *SEC
Kartset
Kliche
Selnam
Fromadr
PRT *PRT, *DSP
BCC
User’s Manual for InterForm400
APF3812Mail/MergeLog APF3812Mail/OutBox
APF3812Mail/Log
User’s Manual for InterForm400
User’s Manual for InterForm400
License Codes
Appendix a Installation
First Time Installation
System Requirements
Release Update
Testaut KSE
INS0104 InterForm Version 2006M01
INS0121 InterForm Version 2006M01
INS0123 InterForm Version 2006M01
Relations to Other Applications
Upgrade remote sites
Processing
Performance
Printing
User’s Manual for InterForm400
Attaching through a Twinax Protocol Converter
System Configuration by Auto Configuration
Appendix B Attaching Printers to the iSeries
Attachment Methods
From 5219 to
Configuring a Printer Device Manually
Start the printer writer with the following command
Attached controller CTL01
Make a note of the Port Number 2, the Switch setting 3
Now you must vary off the device by the following command
Changing Device Description from 5219 to
Attaching through a 5250 Terminal
Attaching through a TCP/IP Raw Socket Port 9100/3700
Attaching through a PC Printer Port
Client Access/400 for Windows 95/NT
Following CL command will enable host print transform
Start the printer writer again by the following command
Remote Printer Queue
Enter the following command to change the queue
Attaching through a TCP/IP LPD Printer Server Remote Writer
Remote System
Attaching through a TN5250E Print Client
Remote Writers
Testing the Connection
Trouble Shooting
Printer Writers
User’s Manual for InterForm400
Black and white printer types
Appendix C Printer Types
To use page range on the merged spooled file see tip above
Color printer types
Zebra printer types
HP4
Selecting drawer by drawer number
Select Drawer using Paper Type
Cassette Mapping Drawers
User’s Manual for InterForm400
Appendix D Interfaces Protocol Converters
WS31N, WS347N
Country Ebcdic Codepage Euro codepage
Appendix E Codepage Support
User’s Manual for InterForm400
IBM 3812 font-ID Information
Appendix F Font-ID Information
110
IBM Compatible Font List
Font Name
Font-ID
252
230
229
245
Font number Description
Shipped Zebra Fonts
Font Description Typeface Number
Typefaces known by PCL-Printers
User’s Manual for InterForm400
Following are rules given for the Light version
Appendix G Limitations of the Light Version
User’s Manual for InterForm400
Command line Overview
Appendix H Commands in Spooled Files
VAN
TXT
FNT
PCL
BLA
BMK
Example of using Escape Commands in the Data Stream
040 1/240 of an inch *INPUT Rotation
User’s Manual for InterForm400
Change Netserver Attributes Command
NetServer Commands
Add Netserver File Share Command
Add NetServer Printer share Command
Start Netserver Command
Save/Restore and Export/Import Commands
End Netserver Command
Remove NetServer share Command
Save Library to Folder Command
Import Chart Command
Restore Library from Folder Command
Link Joint Report Command
Joint Report Commands
Clear Link to Joint Report Command
Apflnk command which contains the following parameters
AFC and OSC Commands
Print Joint Report Command
End Auto Forms Control Job Command
APF3812 Overlay Merge Command
Start Auto Forms Control Job Command
Start OSC Job Command
Transform *AFPDS print Command
Builder Spooled File Command
Copy CPI Spooled File Command
Each of the Data fields are defined like this
PageBuilder program that the command is to call for each
Minimum/maximum line
Find string
String length
Return length
Value from the Appidparm keyword
Convert PCL Spooled File Command
JOB
Crtpbsplf call option STR, PAG or END
Select *LABELS if the media contains of separate labels
Merge Spooled File ZPL Command
Print mode Printmode
Labels / Continuous Mediatrack
Media type Mediatype
Print Ascii File Command
Split Spooled File Command
Spooled File Inspector SFI
Last ANY, *FIRST, *LAST
Zip Stream Files Command
Error
SFI110D
From stream
Other Utility Commands
Edit Print Command
Current
Tooutq
APF Work Output Queue Command
Filnvn Select
Fromoutq
Display Black/White image Command
Noedit
HP Macro Command
Defines the name of the file-set, in which you have defined
Into the Hpmacro command
Pages *YES or only when called from a macro definition
MACROnnnnn, where nnnnn is the macro ID. The description
Refer to page 477 for more information of this command
Import InterForm400 Resources Command
PCL-file from folder to Member Command
Print Tiff File Command
Print PCL-member Command
Work with Profile Jobs Command
Print X-Ref List Command
Send Mail Commnd Work Mail addresses Command
Work with Stream File Locks
TIF-file from folder to member Command
User’s Manual for InterForm400
Downloading the overlay as a macro
Merging with OfficeVision jobs with limited overlay features
User’s Manual for InterForm400
Appendix K Forms Server for non-AS/400 environments
Qprint Display Spool File
Adding overlays to *ASCII PC printjobs PCL
Defining a Virtual printer in Client Access
User’s Manual for InterForm400
Requirements for running SwiftView
Command for 10. Work with actual output queue is
PCL viewing
SwiftView licenses
Use the command
Setting up Client Access Express, enabling PCL-viewing
Setting up a SwiftView user
Share the folder system as Qdls with this command
NetServer commands
Add NetServer Printer Share
Troubleshooting problems using SwiftView
NetServer share commands
Add NetServer File Share
User’s Manual for InterForm400
Appendix M InterForm400 charts
Work with Charts command, Wrkcht
BAR, *LINE
Press F6 to create a new chart
Mybar
Define general layout
CHA300D
Define layout of the X-axis
MON
Define X-axis points and X-axis groups
CHX100D
Text font/color
Work with X-axis points
Seq number
Axis point ID
Values font/color
Define layout of the Y1 and Y2-axis
CHS100D
For charts with type *LINE the screen looks like this
Pattern color
Use Y1/Y2-axis
Line type
Line width
CHS200D
Marker Description
Command examples
&&CHA Chart commands
General format of the &&CHA commands
General description of the &&CHA commands
Delete internal chart Dlic
Create/delete internal chart commands
Create internal chart Cric
Load external chart Loec
Load commands
Desciption
General layout commands
Define general layout Gnlo
Define X-axis layout Xalo
Axis commands
Define Y1-axis/Y2-axis layout Y1LO 01/Y2LO
Y1-/Y2-axis commands
Define Y1-axis/Y2-axis layout Y1LO 02/Y2LO
Deletes a X-axis group
Axis group commands
Add/change X-axis group layout Xglo
Axis point commands
Delete observation set Dlos
Observation set commands
Add/change observation set layout Oslo
Clear observation set data Clos
Add/change data by ID Osda
Data commands
Print chart Prch
Print chart commands
Print sample chart Prsm
Any sequence Pos 20-30 = Keyword
Setup of Smtp
END
Combining Smtp and Domino/400 on the same machine
Requirements for the network
Requirements for the Graphical Designer
Requirements for the iSeries AS/400
Requirements for the PC
Limitations of the Graphical Designer
Installing the Graphical Designer
Installing Java Environment
Service Port number Microsoft-DS 445
Start designing an overlay
Starting the Graphical Designer
Open a Spooled File
Create a new overlay
Edit an existing overlay
Other Design preferences
Settings and tools for the design
Changing the displayed size
Previewing the result in Acrobat reader or SwiftView
Designing for 203 or 300 DPI For Zebra overlays only
Decide the sort key for the font listing
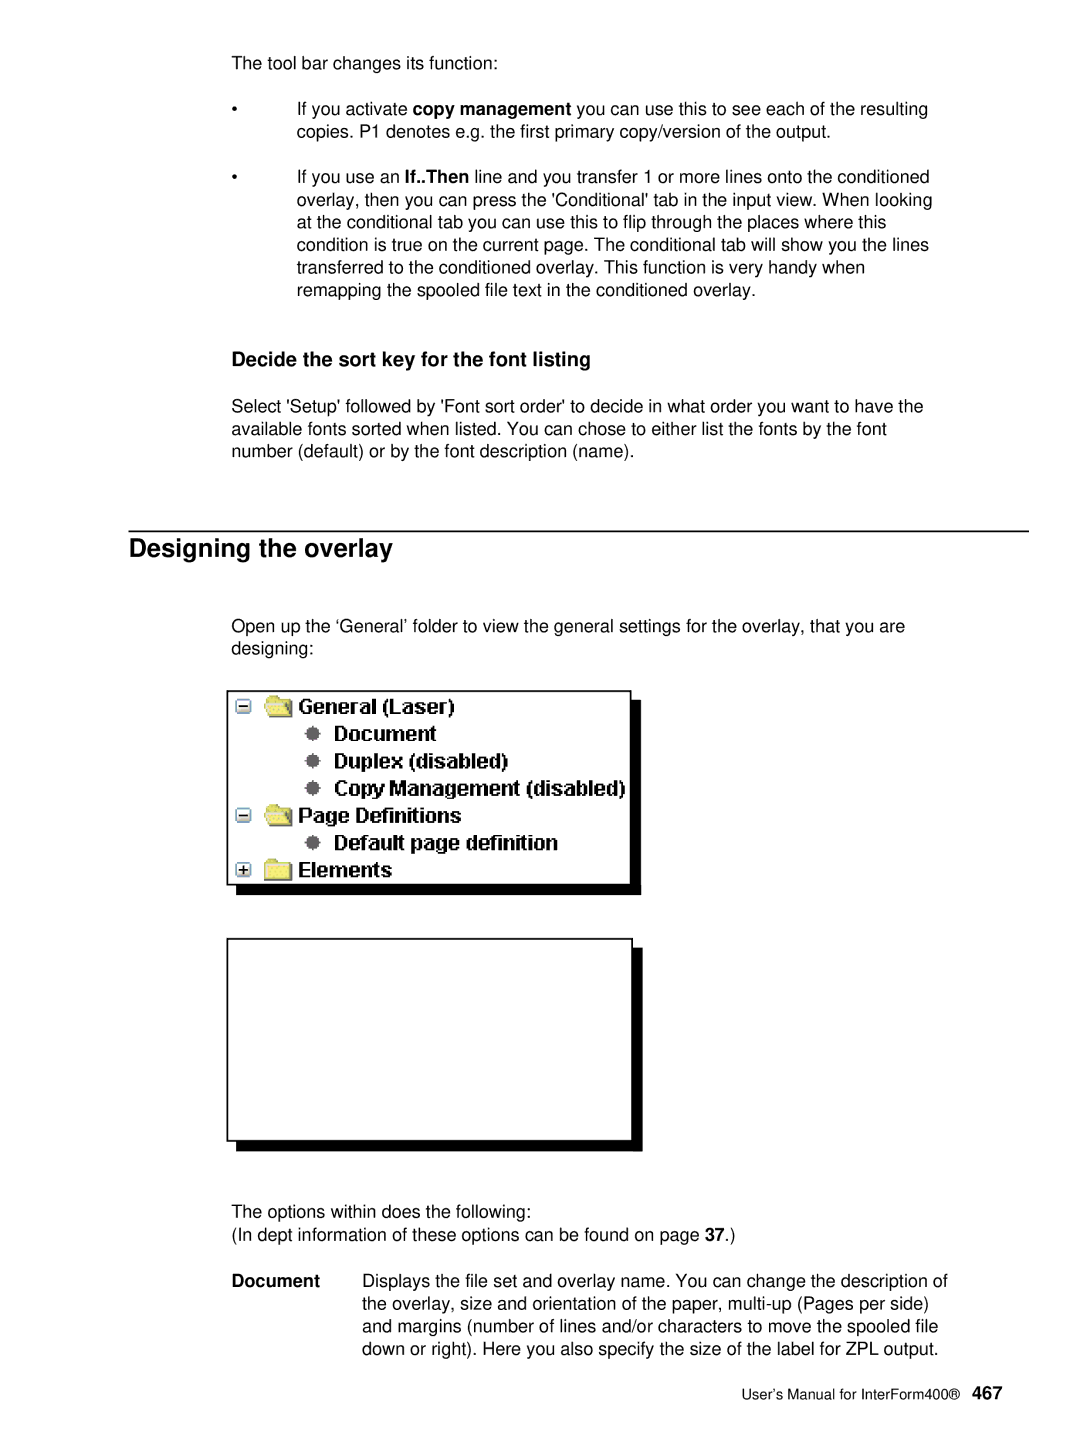
Designing the overlay
Copy Management
Temperature
Activate duplex if needed. Not available for ZPL output
Zebra
Spool view
Result view
User’s Manual for InterForm400
Inserting design elements
User’s Manual for InterForm400
Movement of elements in the result view
Local save in the designer
You can ungroup the elements in these manners
Grouping and ungrouping elements
User’s Manual for InterForm400
Activation/deactivation
Multiple Export Libraries MEL feature
Import InterForm Ressources Impapfrsc command
Description
Examples
Restrictions
Parameters
Escape messages
Sample scenario of using MEL and the Impapfrsc command
Error code Description
Base
Crypto Access Provider 128-bit for AS/400
Refer to
Technical details
Import Certificates
E-mail finishing definition
Public
CER302D
Comp COMP, *ORG, *PERS
Recommendations related to Java Performance
Maxact for the *BASE pool
OS/400 Subsystem settings
OS/400 System values
User’s Manual for InterForm400
Index
APF3812/PCLTOMBR
PCL
Outq
Strnetsvr