User Guide
Page
Introduction
Welcome to the MAX
Optional accessories
Optional features
Conventions
Typeface Symbol Description Bold
About this guide
Bold An operation that could cause injury to them
Introduction Customer support
Safety notes
Organization
Compliance information
About this guide
Customer support
Service
Supplies
EME Compliance in Canada
Compliance information
FCC Compliance in the USA
Conformité EEM
USA
It’s illegal
Canada
Safety notes
Maintenance safety
Ozone safety
Table of contents
How to make copies
Stored jobs 162
Scanner interface optional 275
Getting to know the MAX Scanner
Front
Rear
No. Name Function
Printer
Manual feed tray
Touch screen
Components
How do I know if a feature or option is available?
Scanner control panel
Upper components
Lower components
Stored jobs button
Procedure Press the information button
Information button
Introduction
Custom presets button
Meter check button
Review button
Procedure Press the review button
Stop document button
Clear all button
Clear button
Check/repair button
Stop copy button
Interrupt button
Power save button
Scanner document feed panel
Auto mode panel
Printer control panel
Messages
Folder Relatch fuser
Diagnostics
Message On condition Remove output from
Replace fuser web
Printer diagram
Indicator Function lamp
Color On condition Green When the printer is running
Top indicator lamps
Buttons
Manual feed panel
IconFunction
WindowFunction
Message Function
RFC panel
Icon Function
Window Function
Cut sheet panel
Media series panel tray
Media type and series panel
Name Function
MAX 200 power
Switching the power-on
Switching the power off
Printer ground fault
Ground fault protectors
Scanner ground fault
Power save
Auto power-off mode
Warm-up
Media How to handle unusable documents
How to store cut sheet media
How to store roll media
RFC drawer and manual feed tray
Media type and weight charts
Cut sheet tray tray
RFC drawer
Media size charts
Selection of switch Size Supports
Tray
Maximum print length
Maximum scan length
Width
From the R/E, media, cut touch screen
How do I know when tray 5 or a drawer is empty?
From the auto mode panel
From the RFC panel
How to load roll media
Press the offline button. The printer is online
How to load cut sheet media
Auto cut
How to cut roll media
Auto cut
Manual cut
Manual cut
Heater
Humidifier optional
How to make copies Before making copies
Auto mode
Auto R/E
Auto 100%
Cut roll media
Select the desired additional features. If needed, refer to
Manual mode
Basic feature group screen displayed
Select R/E media cut R/E media cut screen is displayed
Basic
Off Fan Sorter Stamper Folder
Helpful hints
With the manual feed tray
Select manual feed Manual feed screen is displayed
Select nonstandard or standard
Change setup screen is displayed
With the manual feed tray
Basic touch screen features
Media cut, Image density, Document image type, Print color,
Media cut mode
Select media cut mode Select Synchronized
Media cut
Normal R/E
Select normal R/E Normal R/E screen is displayed
100.0 %
By L&W
Select R/E by L&W R/E by L&W screen is displayed
100 %
Normal R/E calculator
Select R/E auto calc R/E auto calculate screen is displayed
Enter document length from the numeric pad Press Scroll
By L&W calculator
Enter document length Ver from numeric pad Press Scroll
Variable
Paper length adjustment
Long copy
Length
Paper length adjustment Standard
Ready to copy Selected
Synchronized
Paper length adjustment Synchronized
Ready to copy Selected Load documents face down
Long copy
Paper length adjustment Long copy
Paper length adjustment Variable length
210
Image density
Image density screen is displayed
Background
FeatureFunction
Document image type
Suppression
Line/picture
Line
Picture
Photo
Print color
One color black or red
Two color black and red
Select black/red Scanned color screen is displayed
Image quality feature group screen is displayed
Image quality touch screen features
Scan color sensitivity,
Sharpness
Normal Select to achieve normal sharpness
Scan color sensitivity
Scanner sensitivity screen is displayed
Additional feature group screen is displayed
Additional touch screen features
Image location,
Image location
Image location screen is displayed
Marker editing
Feature Function Overall editing
Editing
Coordinate
Option Function Fill
Basic Procedure
Overall editing
Select overall editing
Contrast reversal, Mirror image,
Select fill type
Overall editing Fill
100
Select fill area
102
Select fill density Fill density screen is displayed
Overall editing Contrast reversal basic
104
Select mirror image
Overall editing Mirror image
Color drop basic
Select color drop Color drop screen is displayed
Overall editing Color drop basic
106
Marker editing
Select 4 dots area or closed area
Select marker editing Marker editing screen is displayed
108
Trimming/masking,
Select outside area or inside area
Color exchange,
Select trimming/masking Trimming/mask screen is displayed
Procedure Closed area inside screen is displayed
Marker editing Trimming/masking
110
Marker editing Fill
112
Additional touch screen features 113
Contrast reversal
Marker editing Contrast reversal
Marker editing Mirror image
Procedure 4 dots Area Inside screen is displayed
Procedure Closed area inside or outside screen is displayed
Color drop
Marker editing Color drop
Select color exchange Color exchange screen is displayed
Marker editing Color exchange
118
Contrast reversal
Coordinates editing
Inside Outside Trimming/masking
Mirror image
Select outside or inside area
120
Inside or outside area screen is displayed
Coordinates editing Trimming/masking
122
Coordinates editing Fill
124
Image area
Solid painting
126
Coordinates editing Contrast reversal
Coordinates editing Mirror image
128
Finishing touch screen features
Finishing feature group screen is displayed
Collated
Feature Function Off not collated
Sorter
Program
Off uncollated
Collated
E-sorter collated screen is displayed
01/04
When all the documents are scanned, select done
E-sorter program screen is displayed
Program
E-sorter program number screen is displayed
New program number screen is displayed
Stamper
Numbering
Feature Function
Stamp location
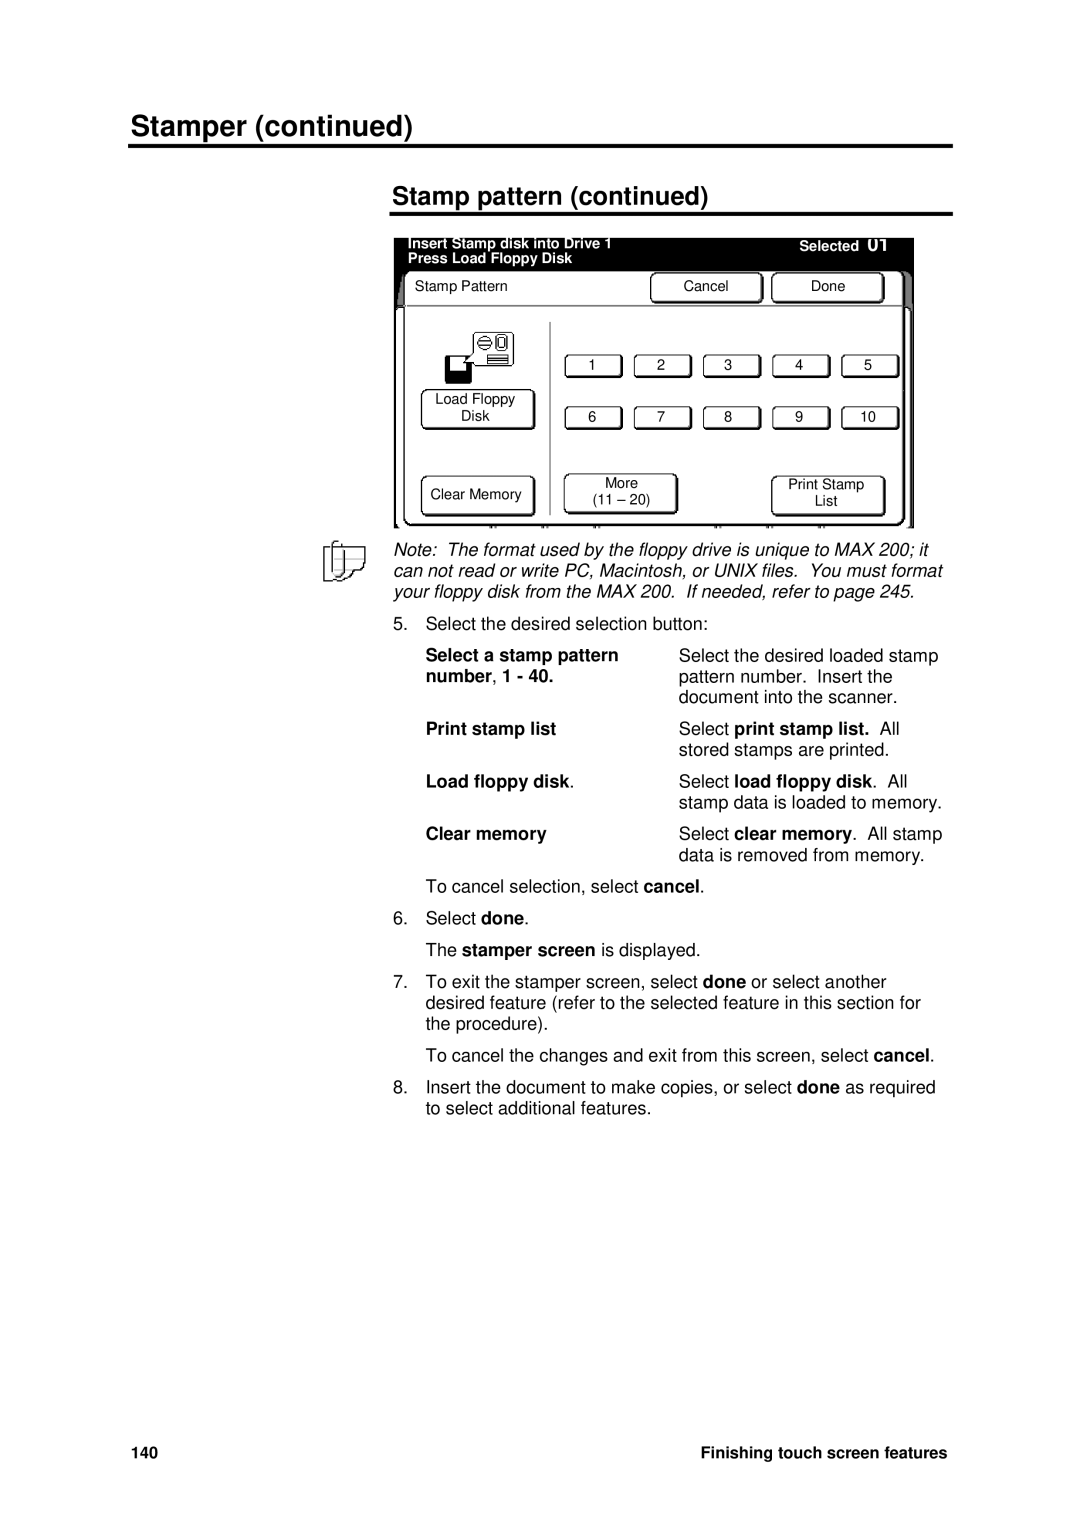
Stamp pattern
Introduction Stamp pattern feature allows you
Select stamp pattern Stamp pattern screen is displayed
Print stamp list Select print stamp list. All
Select a stamp pattern
Number , 1
Load floppy disk Select load floppy disk . All
Numbering
Numbering stamp Option Function Fixed
Numbering Fixed
Select numbering
Alphanumeric keypad screen is displayed
Numbering Sequential
Finishing touch screen features 145
146
Option Function Manual
Stamp location
Auto
Stamp location Manual
Select stamp location Stamp location screen is displayed
Select enter X coordinate
Select enter Y coordinate
Stamp location Auto
152
Date stamp
Date Stamp Option Function Current
Date stamp Current
Select date stamp Date stamp screen is displayed
Finishing touch screen features 155
Date stamp Variable
Variable date screen is displayed
Stamp color
Select stamp color Stamp color screen is displayed
Cross fold
Folder
Fan fold
No fold
Punch tab
Binding margin
Reinforce
Paper exit for machines with no folder
Paper exit screen is displayed
Stored jobs
How to store, recall or delete a job
Press the stored job button
Stored jobs 163
Store jobs log
Job number Stored job description
Job feature log
Stamper
Copy feature Programmed feature Sorter
Additional feature
Folder
How to customize the MAX
Feature Feature description and options
Identifying the system features
Inch
How to customize the MAX 169
Identifying the copy features
Mm, 10 mm
Must be enabled in system features-additional
Levels Level
Identifying the storage/disk manager features
How to enter custom presets
System features, Copy features, Storage/disk manager,
Press Custom Presets to return to Previous screen
Time & date
How to change the system features
Select the system features tab
Time & date screen is displayed
Auto power off
Auto power off screen is displayed
Auto power save
Auto power save screen is displayed
Auto clear/backlight off
Auto clear/backlight off screen is displayed
180
Document width screen is displayed
Document width
Select 8.5 inch or 9 inch
Normal
Introduction Procedure
Alarm
Ready to
Set delay time to copy mode Folder
Plotter setup
Set default time to plot
Plotter setup screen is displayed
Plotter setup Set default time to plot
Select the desire time 10 seconds, 1, 3, 5, 10, 20 minutes
Plotter setup Set delay time to copy mode
186
Plotter setup Folder
Machine to the other fold
How to customize the MAX 189
Loading stamp data
Loading stamp data screen is displayed
How to customize the MAX 191
Additional setting
Additional setting system feature screen is displayed
How to customize the MAX 193
Reduce/enlarge presets
How to change the copy features
Reduce/enlarge presets screen is displayed
How to customize the MAX 195
Media type and width for auto mode
Media type and width for auto mode screen is displayed
How to customize the MAX 197
Stamp location Auto
270 o Procedure
Stamp location and orientation
Stamp orientation Normal
How to customize the MAX 199
200
Date stamp format
Date stamp format screen is displayed
202
Folder setup
Folder terminology
Folder setup Folder terminology
Folder setup screen is displayed
Fold program screen is displayed
How to customize the MAX 207
Output processing is displayed
Binding margin screen is displayed
Punch tab & reinforce screen is displayed
Select no holes or add holes
How to customize the MAX 211
Auto/manual mode
Auto/manual mode screen is displayed
How to customize the MAX 213
Media cut mode and document orientation
Media cut mode and document orientation screen is displayed
How to customize the MAX 215
Lead/trail edge default for synchronized
Lead/trail edge default for synchronize screen is displayed
How to customize the MAX 217
Variable length default
Variable length default screen is displayed
How to customize the MAX 219
Background suppression level default
Background suppression level default screen is displayed
Select default 1 or default
Adjust the fixed default level using the arrow buttons
Press Custom Presets to return to Previous screen
Image density
Document image type
Document image type screen is displayed
Scan to print color default
Scan to print color default screen is displayed
Color recognition range
Color recognition range screen is displayed
Color recognition wheel screen is displayed
Color recognition range Color Recognition wheel
Marker area recognition
Marker area recognition screen is displayed
230
Additional setting copy feature screen is displayed
232
How to change the storage/disk manager features
Stamp creation/deletion
Stamp creation/deletion How to create a stamp
Procedure First set of measurements
Second set of measurements
Third set of measurements
Fourth set of measurements
Select the storage/disk manager tab
Stamp creation/deletion screen is displayed
Select create/store Stamp create/store screen is displayed
Scanning setup screen is displayed
Select when the background of the stamp image
Test print
Store
Stamp creation/deletion Stamp deletion
Stamp deletion screen is displayed
244
Duplication
Disk manager format/duplication
Format
Disk manager screen is displayed
Disk manager format/duplication Format
Select format disk Format disk for screen is displayed
Disk manager format/duplication Duplication
Disk manager format/ duplication screen is displayed
Select copy disk Copy disk for screen is displayed
Sorter program settings
Document Print
E-sorter program settings screen is displayed
How to customize the MAX 251
Sorter program settings Store
Enter number of copies using numeric
Select done, to exit the above screen
Sorter program settings Change
Sorter program settings Delete
Care Cleaning the scanner platen glass
Ordering supplies
Problem solving chart
Problem solving
Problems Suggested solutions
Problem solving
Clearing a scanner jam
Clearing a printer jam
Indicator lamps 1
Indicator lamp
Indicator lamps 6 or
Carefully, pull out any cut sheet media on
Problem solving 265
266
Problem solving 267
268
Problem solving 269
Indicator lamp 11 or
Replacing the toner cartridge
272
Relatch the fuser
Calling for service
Scanner interface optional Overview
Ready to Scan Operate from external device
Plotter interface optional Overview
How to enter copy mode from plot mode
Select copy mode Basic feature group screen is displayed
Floor space requirements
Technical data Printer specifications
Physical characteristics
Printer Depth Width Height
Scanner specifications
System requirements
Electrical
Environmental data
Media specifications
System capability
Material safety data sheet Msds information