MFX-1300/1700
Welcome
Energy saving
Trademarks
Copyright
Copyright 2002 by Muratec America, Inc, Allrights reserved
Avoid extreme high / low temperature
Before using your Muratec fax machine
Where to set up your fax machine
Follow these guidelines when setting up your fax machine
Do not share an extension cord connector with other plugs
Power requirements
General Precautions
It can cause electrical shock
Direct sunlight Dusty conditions
Causing serious injury
Storing and handling toner and drum cartridges
Don t stack boxes or furniture around the outlet
This page intentionally blank
Elcome to your Muratec fax machine
Find your serial number and write it down
Table of Contents
Changing the default settings
Just in case
Appendix and index
Getting started
Packaging contents
When you use the optional RS-232C interface kit
Where you plug in the a C power cord
Where you plug in the optional handset
MFX-1300/1700 or as an upgrade afterward
Control Panel Overview
Glows when the machine is in the Copy mode
Glows when the machine is in the Fax mode
Document into its electronic memory
Key
Setting up the machine
O M Press to turn on or offthe Z O O M light
Or key
Power tips
Setting up
Pick an installation spot
Unlocking the mirror carriage
Installing the printing supplies
AI.2 Toinstall these supplies
Unpack the drum cartridge from its carton
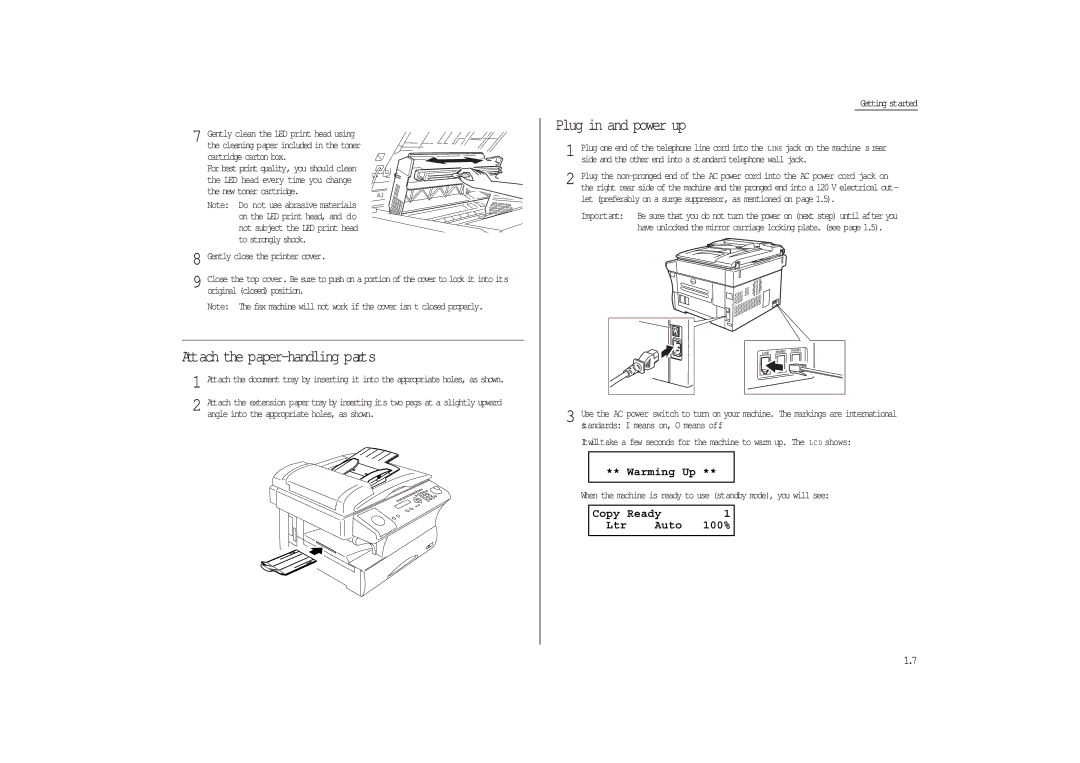
Warming Up
Plug in and power up
Attach the paper-handling parts
Copy Ready Ltr Auto 100%
Turning off the transport mode
Adjust the monitor speaker s volume
Loading paper
Adjust the paper guides to fit the size of paper
Setting of the Paper Size
Click when it s properly in place
Attach the paper size sticker on the cassette sfront
Appears. In this example, we ve chosen Ltr
Bypass Tray Ltr Enter
Loading paper in bypass tray
Then push back the flapper release lever
Operating tips
Turning off the power
How to operate the machine
Changing modes
Your Name Lower
Entering characters
Your Name Upper
Your Name Code
Press the Program key
Searching the functions using the cursor key
Press Enter to entry the function setting
Until your desired item appears
Function table
Off Combine On/Off setting to combine
User Settings Fax Settings Scan Parameters
You can set the margin for copying 24 mm Auto Reset Time
Off Security Rx
Enter your message for the cover Department Code
On/Off setting for Department code activation
Off Journal Line Up
Store Document
Department code Code Box List Print a list of F-Code boxes
NIC Status*5 Print the NIC network interface card settings
Print a list of the blocked numbers Cover Print a cover
Batch Box List Print a list of Batch boxes Batch Doc. List
Getting started
Clearing stored settings
Entering initial settings
Language English Enter
Your Fax Number
Sleep Mode Timing 001-240 005 min
Daylight Saving On Enter
Your Fax Number 9725555525
Basic Operations
Guidelines
How to set the document
Sending faxes
Acceptable document sizes
Reviewing resolution and grayscale
Resolution, grayscale
Mixing resolution and contrast in a multiple
Dialing pause
Memory overflow message
Memory Overflow Start Or Cancel
Memory transmission
Quick memory transmission
Document Ready Mem100%
Sending a fax using the ADF
== Command01 ==
Press Start
Press Start 919725552009
Sending a fax using the FBS glass
== Command01 ==
919725552009 Ltr NextDoc Mem100%
Tel Mode
Redialing
View Redial History
No Command
Reviewing or canceling commands
C015552009 Cancel
To redial a voice call manually using the optional handset
5550388 Cancel
Printing a delayed command list
C01Broadcast Cancel
Printing a stored document
Tx001ABC OK 10/12
Communication Result Comm.Cancel/Enter
View the result of fax transaction
Printing all result of daily fax transactions
Receiving faxes
Answering calls manually
Reception modes
Fax Ready Enter
How to select the fax reception mode
Ifthepaper runs out while fax reception
Fax/Tel Ready Enter
Making copies
Your machine s copier features
Basic copy procedure
Single copy
Stacking multiple copies
Sorting multiple copies using ADF
Press Sort to turn the sort setting off
Enlarged or reduced copies
Go in, not film with any backing or strip
Using the bypass tray
Copy Ready Ltr Ltr 100%
Set the paper in the bypass tray
Ifthepaper runs out while copying
Making copy settings
Memory overflow message
Ltr 100%
Ings
Installed, the bypass tray and Auto select mode
Text Select this mode when copying letters
Taining photographs or drawings with letters
Nega/Posi Enter
Special copy function
Nega/Posi Off Enter
Copy Nega/Posi Ltr Auto 100%
Copy protection
On-hook dialing
Using your fax machine as a phone
Dialing a telephone number
Redial
Attaching an optional handset
Dialing in the event of a power failure
Call request
Attaching a second phone
Basic operation This page intentionally blank
Broadcasting
Delayed transmission Batch transmission
Special features Security features
Polling
Autodialer
Autodialer basics
Using one-touch keys
02Group No
02Group No 16,27
Erase One-Touch Complete
02Erase One-Touch Check Enter/Cancel
Select One-Touch
Plano Office A4 Normal
Enter Speed-Dial No
Using speed-dial numbers
Enter Speed-Dial No 001No Number Stored
0059-555-397-0123
005Group No
005Erase Speed-Dial Check Enter/Cancel
005Name Upper Lower West Coast Sales
005Group No ,17,30
Fax dialing via speed-dial
Plano Office S018
Phoning via speed-dial
Enter Group No
Call group dialing
Send a fax via call group
Printing a call group directory
If an EasyDial call fails
EasyDial directory dialing
ABC Company
If it was a fax call
Making changes to broadcasts
Delayed Enter Time 30/2215
Broadcasting
Press Start 03,S098,G12,9-555
Delayed transmission
Setting up a delayed transmission
Batch transmission
Creating or modifying a batch box
Printing a list of stored batch documents
Printing a list of batch boxes
Storing a document for batch transmission
Printing a document stored in a batch box
Erasing a document stored in a batch box
Erasing an empty batch box
Select Batch Box Document Stored
Regular polling
Delayed Enter Time 15/1705
Polling
Being polled
Limiting polling access to your fax machine
Passcode
Select Soft Key No Energy Saving
Special features
Soft Keys
3Combine Enter
Select Macro Key M1No Number Stored
Overwrite? Check Enter/Cancel
Macro keys
Select Macro Key M2No Number Stored
Include Start/Enter? Check Enter/Cancel
Upper Name Upper Delayed
Reserved ** Jun 01 2002
Select Macro Key
Erase Macro Check Enter/Cancel
Select Macro Key M1Activity journal
Erase Macro Complete
Setting the activity journal
Fax & Copy
Setting the reportsTCRs
Setting the printing order of the activity journal
Printing an activity journal manually
Cover
Cover Off Enter
Cover Enter
OneLine + distinctive ring detection
Ring Pattern
Talking first, then receiving a fax
Faxing/receiving first, then talking
Talking first, then sending a fax
Responding to a call request
OK Will Scan Soon
Power of QuadAccessfi
Code Boxes
Code an introduction
Select F-Code Box 01No Number Stored 01NY Branch Office
Select F-Code Box 03No Number Stored 03Muratec America
Box Type Bulletin
03Password 123456789*#
03Password 135*7#9
Rx Protect Off Enter
Enter Relay Number
Erase Tx Doc Off Enter
Code Doc Hold Time Hold Time 00-31
Enter Relay Number S001,G12
Select F-Code Box 01No Number Stored 01Murata Machinery
Using a bulletin box
Printing a list of F-Code boxes
Select F-Code Box 03Muratec America
03F-Code Document File No
03F-Code Document Enter I.D. Code
03F-Code Document Enter I.D. Code2345
03Select F-Code Box No Document Stored
Select F-Code Box No Document Stored
Using a security box
01Murata Machinery
03F-Code Document Check Enter/Stop No Document Stored
Select F-Code Box Box In Use
03F-Code Document Enter I.D. Code2345
03Erase F-Code Box Enter I.D. Code
03Erase F-Code Box Enter I.D. Code2345
Erase F-Code Box ** Complete
03Erase F-Code Box Check Enter/Cancel
Enter Password
Enter Sub-Address
Code polling
FA X to switch the machine to Fax mode
To delay it, go on to step
Press
Programmable one-touch keys
Using the power of programmable one-touch keys
Programming a delayed transmission
Select Program No P2No Number Stored P1Polling Document
Resolution Enter
Contrast Enter
Memory Tx Enter
Fax & Copy Enter
Report Enter
Cover Enter
Programming a broadcast / group
P2Fax#/Advan.Func 5558743
Delayed Enter Time 30/1705
Type Communication Enter
P2Fax#/Advan.Func G5,G7,01,S006,9-55
Cover
Fax & Copy
Programming regular polling
Important Do not press Enter
Advanced features Press ENTER.The LCD now shows either
Programming an F-Code transmission
For this operation to work, two things must be true
If you want to delay the transmission, press
Report
Contrast
Memory Tx
Programming F-Code polling
ENTER,ENTER
Resolution Enter
Programming a batch transmission
Contrast Enter
Select Program No P2No Number Stored P1Machine Settings
Programming printouts
Type List Print
One-touch
P2Machine Settings Enter
Programming a document storage operation
Press until the list you want appears
Select F-Code Box 01Murata Machinery
Type Store Document Enter
P2Polling Document Enter
Select F-Code Box 03Muratec America
Reserved ** Jun 29 2002
Select Program No P1Delayed
P2Erase P One-Touch Check Enter/Cancel
Select Program No P2Polling
Security reception
Security features
Passcode
Protect Passcode Old Passcode
Enter Passcode
Sec. Rx Active
Security Rx Doc Enter Passcode
Masking the PIN
Press Start 19725550911*123456
Performing batch transmission while using the PIN mask
Enter PIN Number
1Fax Number
To set Block Junk Fax
Setting Block Junk Fax
Off The feature isn t activated
If you selected either Mode2 or Mode3, go on to step
Enter Fax Number Select BlockJunk No 01555-2971
Clearing a number from the blocked numbers list
Printing a list of the blocked numbers
Using department codes
Select Department No 001 0011555
Dept. Protect Enter
Set Dept. Protect Enter Passcode
Dept. Protect Off Enter
Enter Dept. Code
Advanced features This page intentionally blank
Changing the default settings
ECM Mode Enter
Scan settings
Setting E C M
ECM Mode Off Enter
Quick Memory transmission
TTI transmission
Margin 00-85mm40
Settings for reception
Print settings
Margin 00-85mm38
Setting the number of rings
Image Rotation
Settings for dialing
Changing redial settings
Changing the dialing pause length
Settings for copying
Copy scan settings
Adjusting the copy print settings
Setting sort copy
Changing the copy auto reset time
Setting copy auto
Setting Negative/Positive
Combine
Setting combine
Combine Off
Copy Combine Ltr Auto 100%
Settings for operation
Setting the silent mode
Setting the paper source
Setting Sleep mode Energy saving mode
Primary mode
Setting 2-bin tray Option
Copy exit Upper Enter
Printing your settings
Printing a program list
Fax exit Lower Enter
Just in case
Common questions Glossary
Clearing paper jams
Open&Close ScanCover Reset Document
Reset Document Press Start Key
If an original document jams
To clear a printout jammed inside your machine
Reset the toner and drum cartridge
If a printout jams inside your machine
Open the side cover
Print quality problems
Printouts have toner smudges
Printouts have irregularities
Lines
Printouts have white spots
Command by using
Troubleshooting
Alarm
Just in case What it means/What to do
What you see on the LCD Document Full
What you see on the LCD Hang Up Phone
Other Key Setting
Transport mode is not turned off
Properly install the toner cartridge
Reset Document
Your drum cartridge doesn t work
Press Cancel to delete the extra numbers and then try again
Your drum will need to be replaced soon
Replace it
Kinds of error codes
Errors
Error reports
Specific errors
Fax machine timed out while waiting for the retrain signal
Reception errors
Transmission errors
Someone pressed STO P at the receiving fax machine
Wrong phone number reached
Just in case
Remote machine malfunctioned
Poor phone line conditions
Curing frequent jams in the ADF
Cleaning tips
Corrective cleaning
Always use good, copier-quality paper
Cleaning the LED print head
If you have unsatisfactory printout quality
Open the inner cover fully
General questions
Common questions
Re here to help you
Sending faxes
What sa default?
Reports
Can I transmit a document that s extra long?
Polling
Receiving faxes
Orking with your answering machine
How your fax machine works
Glossary
Polling operation
Document feeder
File number
Hub See Relay broadcasting
A5 = ″ ⋅ ″ 148 ⋅ 210 mm
Muratec fax machines
Touch of one key. See also Autodialing and Speed-dialing
A4 = ″ ⋅ 11.7″ 210 ⋅ 297 mm
Superfine
Normal
Fine
Polling is allowed to take place
Just in case This page intentionally blank
Appendix and index
Power consumption
Specifications
Power requirement
General
Printout
Miscellaneous
Regulatory information
Limited warranty
Obligations
Exclusions
Changing the default settings
Index
Group Initialsettings
Security reception
AI.8
Muratec America, Inc International Parkway Suite