Electronics
VP-M102/M105/M110
AD68-00814N
Sommaire Sommario
Getting Started Guida introduttiva
Mode Photo ModalitàPhoto ModeFoto
Sommaire Sommario
Mode Enregistreur vocal Modalità Registratore vocale
Divers
Entretien
Avvertenze e norme di sicurezza
Avertissements et consignes de sécurité
Avvertenze riguardanti il Copyright
Remarques concernant le camescope
Avvertenze riguardanti la formazione di condensa
Avvertenze riguardanti i marchi
Vérifiez que la batterie est insérée correctement
Remarques concernant l’écran LCD
Précautions relatives aux réparations
Avvertenze riguardanti la manutenzione
Avvertenze riguardanti il display a cristalli liquidi
Conoscere la Videocamera
Caractéristiques Funzioni
Accessoires fournis avec le camescope
Accessori forniti in dotazione con la Videocamera
Nom des pièces Nomenclatura delle parti
Vue arrière gauche Vista posteriore e sinistra
Built-in MIC LCD Monitor
Built-in Speaker
Battery insertion part Battery eject button
Lens Light
Flash Cavalletto Jack auricolari
Earphones and AV Input/Output Jack
Video Play Mode
Mode Enregistrement de vidéo
Nom des pièces Ecran LCD
Nomenclatura delle parti Display LCD
Photo Capture Mode
Photo View Mode
Mode Prise de photo
Mode Visionnage de photo
MP3 Play Mode
Voice Record Mode
Voice Play Mode
Installare/estrarre il gruppo batterie
Batterie Uso del gruppo batterie
Insertion/Ejection de la batterie
Entretien de la batterie
Manutenzione del gruppo batterie
Batterie
Come usare il gruppo batterie
Affichage du niveau de charge de la batterie
Durée de charge en fonction du type de batterie
Tempo di ricarica in base al tipo di batteria
Charge de la batterie RIcarica del gruppo batterie
Collegare il jack al caricatore
Inserire l’alimentatore CA nella
Presa
Premiers pas Guida introduttiva
Couleur de la diode
Il colore del LED
Fonction de réinitialisation du matériel
Exemple vous souhaitez sélectionner le mode Photo
Préparation du Camescope Operazioni preliminari
Touches de fonction Uso del tasto Funzione
Utilisation des différentes touches de fonction
Uso delle varie funzioni del tasto
Utilisation des touches Retour et Menu
Bouton Display Uso del tasto Display
Quando si preme il tasto Display
Appuyez sur le bouton Display
Premere il tasto Display
Réglages de l’écran LCD Regolazione del display LCD
Déplacez l’interrupteur / pour sélectionner
Struttura delle cartelle e dei file
Arborescence des dossiers et des fichiers
Durée maximale d’enregistrement vidéo
Tempo di registrazione video
Nombre de photos
Durée maximale d’un enregistrement vocal
Numero di immagini fisse catturabili
Tempo di registrazione vocale
Choix du type de mémoire Selezione del tipo di memoria
Insérez le Memory Stick voir p
Inserimento della Memory Stick
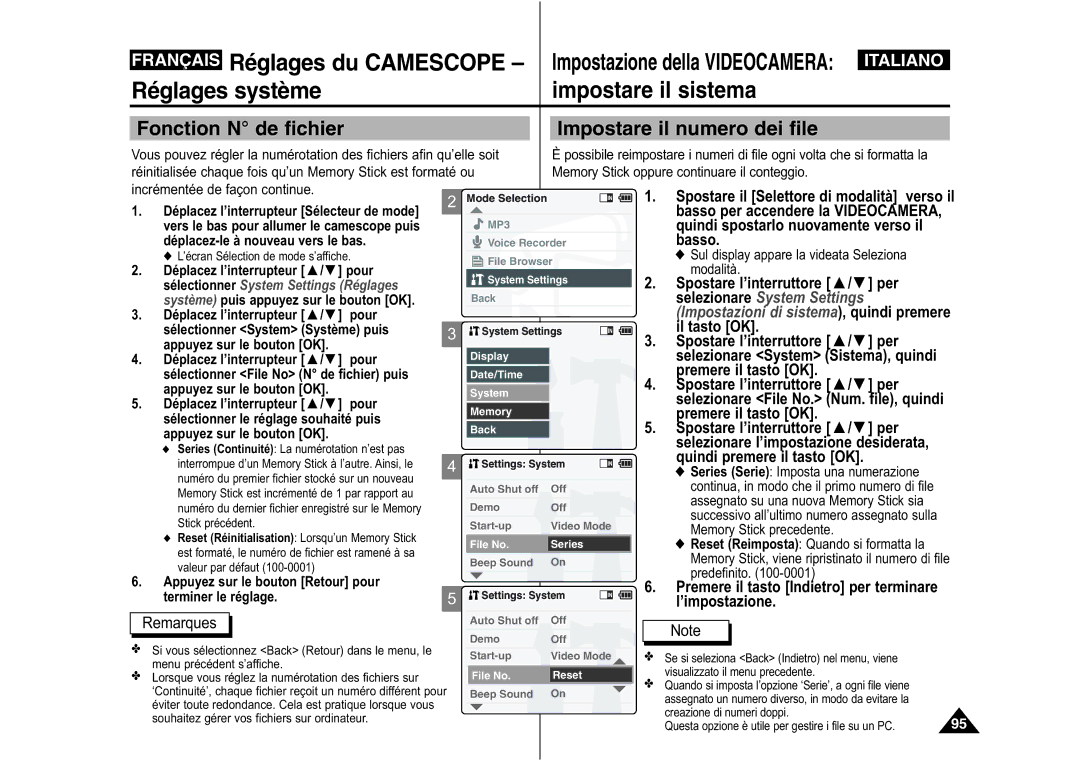
Spostare il Selettore di modalità verso il
Memory Stick Uso della Memory Stick
Insertion d’un Memory Stick Inserimento della Memory Stick
Ejection d’un Memory Stick
Sélection des modes et des menus
Selezione di modalità e menu
Mode Vidéo
Mode Vidéo -Enregistrement Modalità Video Registrazione
EnregistrementRegistrazione
Zoom in avanti e zoom indietro
Zoom
Mode Vidéo -Lecture Modalità Video Riproduzione
Lecture sur l’écran LCD Riproduzione sul display LCD
Réglage du volume sonore
Premere il tasto per diminuire il volume di ascolto
Regolazione dell’audio
Appuyez sur le bouton pour diminuer le son
Mode Vidéo -Options liées aux fichiers
Suppression de fichiers vidéo Cancellare file video
Modalità Video Selezione delle opzioni dei file
Remarque
Verrouillage de fichiers vidéo Proteggere i file video
Quindi premere il tasto OK
Copie de fichiers vidéo Copiare file video
Selezionare il file video da copiare
Premere l’interruttore / per
Selezionare Copy To Copia su
Cancel Annulla Annulla l’impostazione Opzione PB
Option PB lecture Impostare l’opzione PB
Premere il tasto Menu e spostare l’interruttore
Premere il tasto OK dopo avere selezionato Play Esegui
Modalità Video Impostazione delle varie funzioni
Selezionato Settings Impostazioni
Qualité des fichiers vidéo
Impostare la qualità dei file video
Selezionare Quality Qualità, quindi
Mise au point Regolare la messa a fuoco
Mise au point manuelle
Messa a fuoco manuale
EIS stabilisateur électronique dimage
Impostare lo stabilizzatore digitale delle immagini
Balance des blancs Impostare il bilanciamento del bianco
Impostare l’esposizione automatica programmata
Premere il tasto Menu per terminare l’impostazione
Remarques
Effets spéciaux Impostare gli effetti digitali
Premere il tasto Menu per terminare ’impostazione
Zoom numérique Impostare lo zoom digitale
Dell’immagine, in modo da riempire l’intera cornice
’immagine può risultare meno dettagliata e
Leggermente sgranata
Mode Photo
Mode Photo Prise Modalità Foto ripresa
Prise d’images Riprendere le immagini
Déplacez l’interrupteur Sélecteur de mode
Pour sélectionner le mode Photo
Vers le bas pour allumer le camescope puis
Déplacez-le à nouveau vers le bas. Zoom Out
Mode Photo Visionnage Modalità Foto visualizzazione
Visionnage des fichiers photo sur l’écran LCD
Premere il tasto OK per visualizzare la foto desiderata
Cancellazione di file di immagine
Delete Cancella , quindi premere il tasto
Suppression de fichiers photo
Tasto OK
Verrouillage de fichiers photo Proteggere le immagini
Basso per accendere la Videocamera
Quindi spostarlo nuovamente verso il
Selezionare la modalità Photo Foto
Stampare
Copie de fichiers photo
Copiare una immagine
Selezionare l’immagine da copiare
Impostare le dimensioni delle immagini
OK dopo avere selezionato Settings
Selezionare Size Dimensione, quindi
’interruttore / . Premere il tasto
Mode Photo Réglage des diverses fonctions
La torche vidéo Impostare il flash torch
Mise au point
Fuoco automatica
Vedere a pagina
VIDEOCAMERA, quindi spostarlo
Nuovamente verso il basso
Balance des blancs
Impostare l’esposizione automatica programmata
Dopo avere selezionato Settings
Selezionare BLC CCL, quindi premere il
Off Inattivo Annullare la funzione di
Attivo Attivare la funzione di
Memo
Explorateur de fichiers
MP3/Mode Enregistreur vocal
Copie de fichiers musicaux vers le camescope
Débranchement du câble USB
Scollegamento del cavo USB
Collegare la Videocamera a un PC mediante un cavo USB
Mode MP3 Lecture Modalità MP3 Riproduzione
Lecture de fichiers musicaux Riprodurre file musicali
Utilisation de
Uso dell’interruttore
Mode MP3 Options de lecture
Modalità MP3 selezione
Delle opzioni di riproduzione
Lecture répétée Impostare la funzione di ripetizione
Suppression de fichiers musicaux Cancellare file musicali
Selezionare Delete Cancella , quindi
Delle opzioni dei file
Premere il tasto OK
Spostare il Selettore di modalità verso
Quindi spostarlo nuovamente verso il
Basso
Selezionare la modalità MP3, quindi
Delle opzioni dei file
Selected Selezionato Copiare il file musicale selezionato
Modalità Registratore vocale
Registrazione
Enregistrement de voix Registrazione vocale
Mode Enregistreur vocal Lecture
Riproduzione
Lecture de fichiers vocaux Riprodurre file vocali
Premere il tasto OK per riprodurre il file vocale
Suppression de fichiers vocaux Cancellare i file vocali
Mode Enregistreur vocal Options
Selezione delle opzioni dei file
Liées aux fichiers
Verrouillage de fichiers vocaux Proteggere i file vocali
Selezionare la modalità Voice Recorder
Quando appare la videata Registrazione
Vocale, premere il tasto Menu
Mode Voice Recorder Enregistreur vocal puis
Copie de fichiers vocaux Copiare i file vocali
Cancellare i file o le cartelle
Cancellare. Premere il tasto OK
Explorateur de fichiers Gestione dei file
Selezionare la cartella o il file da
Verrouillage des fichiers Proteggere i file
Selezionare la cartella che contiene il file
Da copiare. Premere il tasto OK
Selezionato Copy To Copia su
Affichage d’informations sur les fichiers
Videocamera
Réglages du Camescope
Réglages de l’écran LCD
Regolare il display LCD
Impostazione della Videocamera
Couleurs de l’écran LCD Regolare il colore del display LCD
Réglage de la date et de l’heure
Réglage de l’heure Impostare l’ora
Regolare la data e l’ora
Regolare la data e l’ora
Réglage de la date
Impostare la data
Sélectionner Date Format Format
De la datepuis appuyez sur le
Sélectionner le format souhaité puis
Appuyezsur le bouton OK
Format de l’heure
Impostare il formato dell’ora
Sélectionner Time Format Format
De l’heure puis appuyez sur le
Réglages système
Impostare il sistema
Extinction automatique Impostare lo spegnimento automatico
Setting the Demo Function Impostare la funzione Demo
Selezionare Demo, quindi premere il
Selezionar l’impostazione desiderata
Premere il tasto Indietro per erminare
Mode Démarrage Impostare la modalità di avviamento
Fonction N de fichier Impostare il numero dei file
Selezionare System Sistema, quindi
Selezionare File No. Num. file, quindi
Premere il tasto Indietro per terminare
Signal sonore Impostare il suono bip
Affichage de la version
Réglages de la mémoire
Impostare la Memoria
Choix du type de stockage Selezionare il tipo di memoria
Premere il tasto Indietro per terminare l’impostazione
Formatage de la mémoire Formattare la memoria
Appuyez sur le bouton OK pour formater
Appuyez sur le bouton Back pour terminer le réglage
Premere il tasto OK per avviare la formattazione
Affichage de l’espace mémoire Viewing Memory Space
Mode USB
Français Réglages du Camescope
Usare la modalità USB
Memorizzare i file su dispositivi esterni
Configuration système Ambiente del sistema
Débit de la connexion USB en fonction du système
Utilisation en tant que Web camescope
Verrà visualizzata automaticamente la videata del menu USB
Raccordement du Camescope à une imprimante
Le nombre de copies voulu puis appuyez sur le
Divers
Raccordement du Camescope à dautres
De mode vers le bas pour
Raccordez le câble entrée/sortie
AV à la prise entrée/sortie AV du
Raccordez le câble vidéo/audio à
Divers Raccordement Miscellaneous Information
Du Camescope à dautres appareils
Collegare la Videocamera al VCR
Copiare file video su un nastro per
Videoregistratore
Insérez une cassette vierge dans le magnétoscope
109
Divers Installation des logiciels
Installare i programmi
Installation d’Image Mixer Installare Image Mixer
Informazioni varie
Macintosh
Per utilizzare ImageMixer, riavviare il PC
112
Divers Installation des logiciels Installare i programmi
Installare il driver Windows98SE solo per Windows98SE
Divers Raccordement du Informazioni varie
Camescope à dautres appareils
Débranchement du câble USB Scollegare il cavo USB
Divers Impression des photos
Stampare le immagini
Impression PictBridge
Stampare mediante la funzione PictBridge
Stampare le immagini con file Fosd
Impression de photos à partir de fichiers Dpof
Stampare file Fosd dalla Memory Stick
Quando si ripone la VIDEOCAMERA, seguire questa procedure
Manutenzione
Entretien Nettoyage et
Entretien du Camescope
Entretien Nettoyage et Manutenzione
Entretien du Camescope
Nettoyage du boîtier
Pile interne rechargeable
Entretien Nettoyage et
Manutenzione
Usare la Videocamera all’estero
Dépannage Risoluzione dei problemi
Auto-diagnostic Display di auto diagnosi
Dépannage
Settings
Menus Uso del menu
USB Mode
Spécifications techniques
125
Index Indice
Bianciamento del bianco
127
Pour la France uniquement
Pour toute information ou tout