MX-M550U MX-M620U MX-M700U MX-M550N MX-M620N MX-M700N
Page
Trademark acknowledgments
Page
Part 1 General Information
Page
Warranty
Installation Requirements
Battery Disposal
For North America
Laser Information
Contents
Chapter Convenient Copy Functions Specifications
Chapter
Original and paper sizes
Introduction
Meaning of R in original and paper size indications
Sided Copy See pages 4-10,4-13
Main Features
Exposure Adjustments
Sort
Margin Shift
Size Books or thick originals can be erased
XY Zoom
Dual Page Copy
Book Copy
Tandem Copy
Multi Shot See
Covers/inserts
Reverse
Tab Copy
Card Shot
Mirror Image
Confidential
Text See Staple sort mode
Document filing function
Inserter mode
Saddle stitch
Hole punching
Preheat mode
Energy saving features
Auto power shut-off mode
Exterior
Part Names and Functions
Interior
Other optional equipment
Operation panel
Touch panel
Using the touch panel
Selecting a function
Paper Empty in the job status display
Mode select key
Complete
Job list
FAX JOB key
Display switching keys
Print JOB key
Scan to key
When the fax option is installed
Turning the Power on and OFF
When the Internet fax option is installed
Enter your account number 5 digits with the numeric keys
Auditing Mode
Using the machine when the auditing mode is enabled
When the copy job is finished, press the key Logout key
Managing the Machine
Identifying the trays
Loading Paper
Loading paper in paper tray 1 tray
Loading paper in paper tray 1/tray 2 is now complete
Changing the paper size in paper tray 1 tray
Gently push tray 1-tray 2 into the machine
Set the paper type
Set the paper type and paper size
Push in the paper guide so that it locks into place
Changing the paper size in paper tray
Loading paper in paper tray
Pull out the tray and attach the guide
Loading tabbed paper
Loading transparency film
Take out the tabbed paper guide
Placetable. the paper in the centre of the paper
Specifications
Pull the tray out until it stops
Push the tray firmly all the way into the machine
Paper size display
Operation button / Indicator
Part names
Top cover
Place the paper on the paper table
Loading paper in the AR-LC7
Example
Loading paper in the bypass tray
Loading tabbed paper in the bypass Tray
Open the bypass tray
Important points when using the bypass tray
60 to 128 g/m2
Sharp
More information on plain paper
More information on special media that can be used
Paper that can be used for automatic two-sided printing
Setting the paper type and paper size
User type
Touch the OK key in the size setting screen
Touch the Type Name key
Programming and editing paper types
Touchkey. the Paper Type Registration
Select the paper type that you wish to program or edit
Trays 3 and the bypass tray
Setting the paper size when a special size is loaded
Inserter option
General procedure for system settings
System Settings
Touch the Clock key
More information on setting procedures
Touch the OK key To exit the settings, touch the Exit key
Touch the Date Format key
Total count
About the settings
Default settings
Paper tray settings
Insert the new toner cartridge
Open the front cover Remove the toner cartridge gently
Proper storage
Storage of Supplies
Supply and Consumables
Misfeed removal guidance
Misfeed Removal
Gently close the duplex unit
Misfeed in the transport area, fusing area, and exit area
Remove the duplex unit
Remove the misfed paper as shown in the illustrations below
Misfeed in lower part of unit
Misfeed in the duplex unit
Open the cover of the duplex unit Remove the misfed paper
Misfeed in upper part of unit
If paper is misfed in tray 1 left-side tray
Misfeed in the paper feed area
Misfeed in paper tray 1 tray
Gently close paper tray 1 tray
Close the lower cover on the left side of the machine
Misfeed in paper tray
Misfeed in the tray
Open the lower cover on the left side of the machine
Removetray. the misfed paper from the bypass
Misfeed in the bypass tray
Gently close the side cover Remove tray 1 tray
Open the side cover Remove the misfed paper
Misfeed in the tray 5 AR-LC6
Open the top cover and remove the misfed paper
Remove the misfed paper
Misfeed in the tray 5 AR-LC7
Open the side cover
Pull out tray 1 tray
Removing misfeeds from each location
Removing AN Original Misfeed
Opencover. and close the document feeder
Problem Check Solution or cause
Troubleshooting
Troubleshooting
Location and do not store paper in a location that is
Peripheral Devices
Lower cover
Specifications
Part names
Stapler compiler
AR-PN4A AR-PN4B*2 AR-PN4C*3 AR-PN4D*3
Supplies
SF-SC11
Finishing methods
Sort mode Offset mode
Group mode
Staple sort mode
Saddle stitch function only saddle stitch finisher
Hole punching only if a punch module is installed
Finishing modes and finisher functions
Out
Staple cartridge replacement and staple jam removal
Replacing the cartridge in the finisher
Open the front cover of the finisher
Open the lower cover of the saddle stitch finisher
Replacing the cartridge in the saddle stitch finisher
Close the lower cover of the finisher
Removing a staple jam in the finisher
Removing a staple jam in the saddle stitch finisher
Removing a misfeed
When a saddle stitch finisher is installed
11Remove the misfed paper
When a punch module is installed
Troubleshooting finisher/saddle stitch finisher problems
Inserter operation panel
Inserter
Paper tray
Paper guide
Manual operation of the inserter
Loading paper
Load paper in the inserter
Alarm display
Using the inserter
Press the desired mode key
Misfeed in the inserter
Misfeed removal
Troubleshooting inserter problems
Selecting a standard application
Standard application setup
Sharp OSA
Application Communication Module MX-AMX2
Touch the Sharp OSA key
Operation in OSA mode
If login fails
External account application setup
Operation in external account mode
External authentication mode
Page
Part 2 Copier Operation
Page
Making Copies
Acceptable originals
Automatic Document Feeder
Original size detection function
Adjust the original guides to the size of the originals
Placing Originals
Place the originals face up in the document feeder tray
Automatic copy image rotation rotation copying
Standard original placement orientations
Touch the desired original size key
Manually setting the scanning size
Checking the Size of a Placed Original
Touch the Original key
Touch the STORE/DELETE key
STORING, DELETING, and Using Original Sizes
Storing or deleting an original size
Touch the Custom Size key
Touch the 2-SIDED Copy key
Normal Copying
Making copies with the automatic document feeding function
Sided copies of 1-sided originals
Output
Select the desired output mode
To cancel copying
Use the numeric keys to set the desired number of copies
Sorting copies into sets
Copy output sort and group
Grouping copies by
Select the desired copy mode
Copying from the document glass
Ensure that the 1-sided to 1-sided copy mode is selected
Select9. the desired output mode. Press the Start key
Sided Copy Output File
Special Modes Sided Copy
Automatic two-sided copying from the document glass
Automatic exposure adjustment
Adjusting the Exposure
Touch the Exposure key
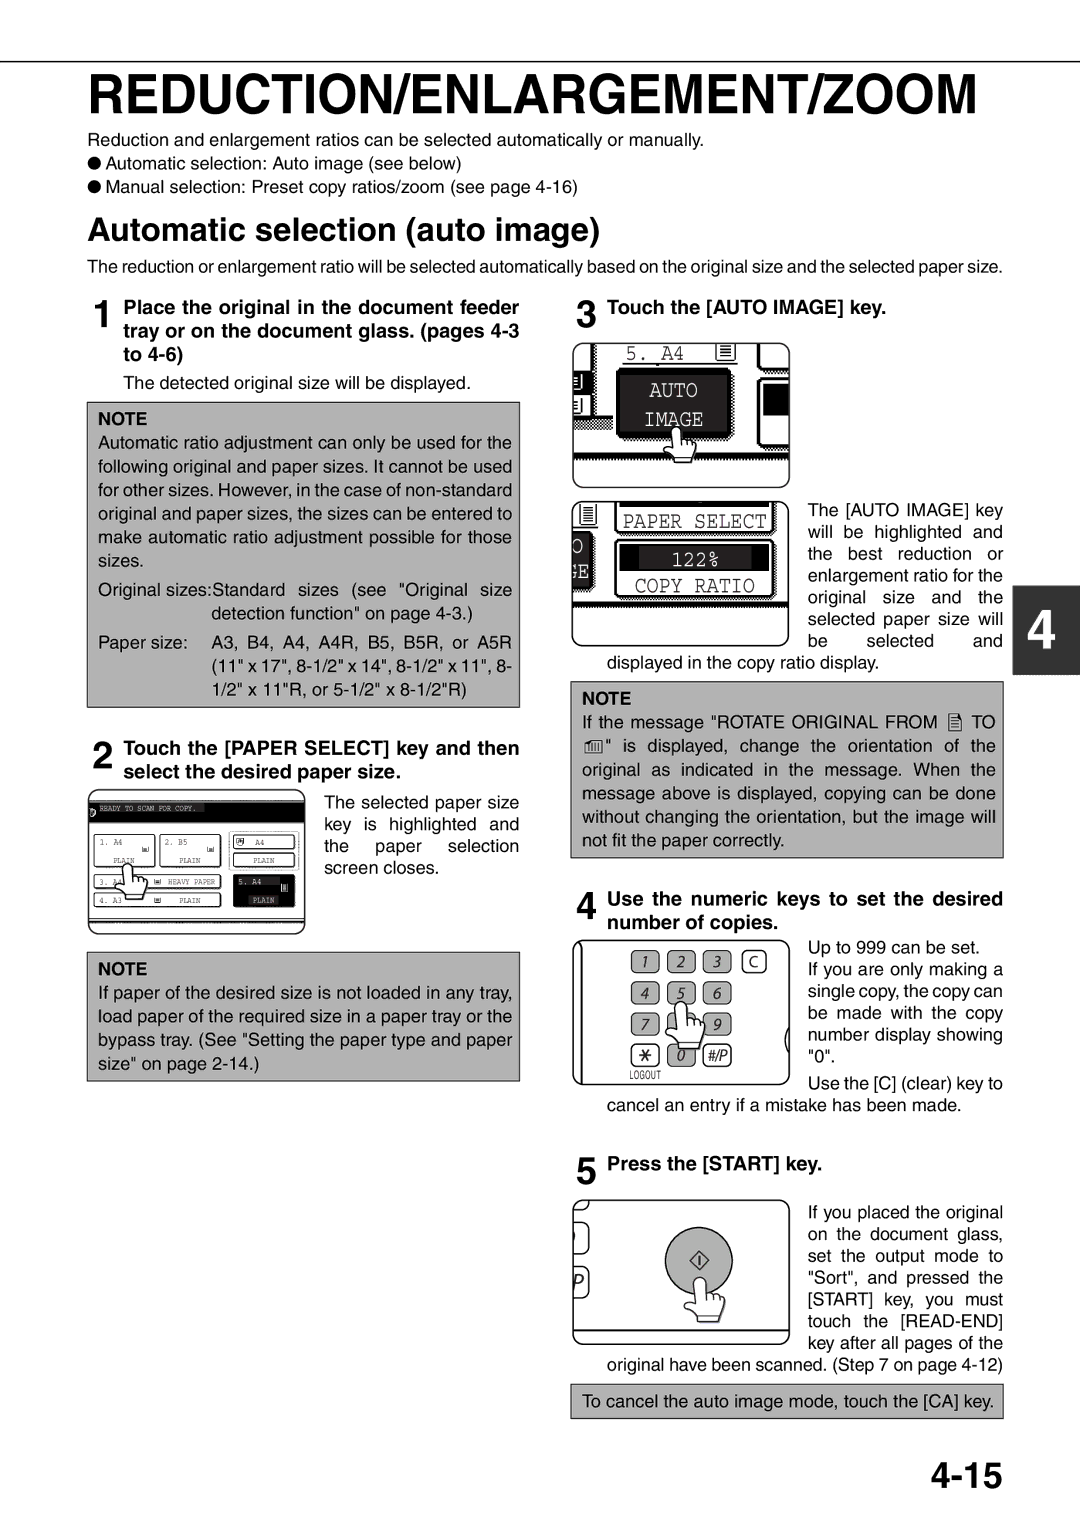
Automatic selection auto image
REDUCTION/ENLARGEMENT/ZOOM
Touch the Copy Ratio key
Manual selection preset copy ratios/zoom
To return the ratio to 100%
Touch the X key
Touch the XY Zoom key
Touch the Y key
To cancel an X or Y zoom setting
Set the type and size of paper loaded in the bypass tray
Special Papers
Load the special paper in the bypass tray
Touch the Paper Select key
Convenient Copy Functions
Touchmode. the key for the desired special
General procedure for using special functions
Special Modes
Touch the Special Modes key
Set the shift amount as needed and touch the OK key
Margin shift
Touch the Margin Shift key on the special modes screen
Select the shift direction
Touch the Erase key on the special modes screen
Select the desired erase mode
Adjust the amount of erase and touch the OK key
Erase
Place the originals on the document glass
Dual page copy
Paper
Pamphlet copy
12Whenfeeder using the automatic document
When using the document glass
Select the paper tray for the cover
Touch the JOB Build key on the special modes screen
Job build
JOB Build
Touch the Change key
Changing the copy settings for each set of originals
Server machine and client machine
Tandem copy
If an incorrect number of copies is set
Press the Start key
Covers/inserts
Preparations for using covers and inserts
About the explanations of covers and inserts
To cancel covers/inserts settings
Procedure for inserting front and back cover paper
Selectpaper. the tray used for the front cover
Select the tray used for insertion type a
Procedure for adding inserts
Tion
Set covers/inserts pages are shown
When you have finished checking the pages, touch the OK key
Checking, editing, and deleting cover/insert pages
Touch the page Layout key
Examples of covers and inserts
Symbols used for covers and inserts
Covers One-sided copying of one-sided originals
Covers Two-sided copying of one-sided originals
Covers One-sided copying of Two-sided originals
Covers Two-sided copying of two-sided originals
Inserts One-sided copying of two-sided originals
Inserts One-sided copying of one-sided originals
Loadtray. transparency film into the bypass
Transparency film with insert sheets
Touch the Transparency key
Set the insertion conditions for the insert paper
Multi shot
Touch the outer OK key in the screen of step
Select the layout
Touch the OK key in the special modes screen
Place the originals on the document glass.
Book copy
Tab copy
Load tabbed paper in the bypass tray
When performing tab copying with a right binding
Card shot
10Touch the READ-END key
Touch the outer OK key
Place the original on the document glass
Follow steps 4 through 5 of Copying from the document glass
Reverse
Mirror image
Numbering Text
Print menu
Date print
Stamp
Select the print menu
Common operation procedure for using the print menu
To display the special modes screen
Select the print position
Printing in combination with other special functions
To cancel print menu
Check the print layout if needed page 5
Check the date and format
To cancel a date print setting
Printing the date on copies
Select the date format
Printing a stamp reverse text on copies
To cancel a stamp setting
Select the stamp that you wish to print
If you selected 1/5, 2/5, 3/5
Printing the page number on copies
Select the page number format
Touch the Manual key
10Touch the OK key
To cancel a page number setting
Number printing during one-sided copying 5 originals
Examples of page number printing
Number printing during two-sided copying 9 originals
1st 2nd 3rd 4th 5th Setting
Printing entered text on copies
To cancel a text setting
Touchdelete.the text key that you wish to edit or
Storing text sequences
Editing and deleting stored text
Touch the Back key
Checking and changing the print layout
Touch the STORE/DELETE key Touch the OK key
STORING, Using and Deleting JOB Programs
Storing a job program
Press the #/P key
Touch the number key of the desired job program
Cancel
Calling up a job program
Deleting a stored job program
Touch the Interrupt key
Interrupting a Copy RUN
Interrupt
Machine Maintenance For Copying
User Maintenance
Troubleshooting
Page
Document Filing Function
Main Folder
Overview
Document filing function
Data flow
Attributes of saved files
Quick File folder
Main folder
Custom folder
Touch panel see the next
Mode select keys
Look at the operation panel
Saving files
Document filing icons
Quick File
Saving a Document Image File
Presspanel. the Start key on the operation
Touch the User Name key
Filing
13Touch the OK key
11Touch the Password key 15Touch the OK key
12Enterkeys. a 5-digit password with the numeric
16Presspanel. the Start key on the operation
Touch the key of the operation that you Wish to perform
Print jobs
Press the Document Filing key on the operation panel
Touch the key of the folder that contains the desired file
Touch the Scan to HDD key
Scan Save
Touch the File Information key
17Placekey. the original and touch the Start
11Touch the Resolution key
12Touch the key of the desired resolution
16Touch the OK key
Card Shot key see
Using special functions for scan save
Erase key see
JOB Build key see
Searching by user name
Calling UP and Using a File
Procedure for searching for a file
Searching for and calling up a saved file
To perform an operation using the file, go to on
Operation using the file, go to on
Touch the Start Search key
General procedure for using a saved file
Calling up and using a saved file
Touch the desired file key
Batch Print key
File keys
Back key
Select displayed files by job type
Print
Set the number of copies with the keys
If a password has been established, touch the Password key
Batch printing
To set the number of copies, touch the Change PRT.NO. key
Cancel OK
Send
SUB Address key or Address Entry key
Send Settings key
Property change
Touch the key of the desired attribute
Detail
Touch the Cancel key
Move
Delete
Touch the key of the desired file
Press the JOB Status key
To view information on the file, touch the Detail key
Touch the Complete key
Go to the page indicated below for the selected operation
Creating, editing, and deleting user names and folders
Programming a user name
Touch the Password key
Touch the Initial key
Editing and deleting a user name
Touch the Folder Name key
Creating a custom folder
Editing/deleting a custom folder
Entering alphabetical characters
Entering Characters
Enter the desired number or symbol
Entering numbers and symbols
Screen 1/2 Screen 2/2
Property
Page
Specifications
Automatic document feeder
Specifications
OPC
Specifications
Numerics
Index
Index
Part names
32 to
Page
Sharp Electronics Europe GmbH