9480 CARROLL PARK DRIVE SAN DIEGO, CA USA
TELEDYNE ADVANCED POLLUTION INSTRUMENTATION
MODEL 300E FAMILY CARBON MONOXIDE ANALYZERS
Operation Manual
Page
SAFETY MESSAGES
This page intentionally left blank
Safety Messages
WARRANTY POLICY 02024D
WARRANTY
CAUTION – Avoid Warranty Invalidation
COVERAGE
04288D DCN5752
This page intentionally left blank
instrument
ABOUT THIS MANUAL
Part No
Name/Description
2010 June
REVISION HISTORY
Document
Change Summary
Revision History
viii
Revision History
This page intentionally left blank
Table of Contents
TABLE OF CONTENTS
6. BASIC OPERATION
PART II – OPERATING INSTRUCTIONS
8. REMOTE OPERATION
7. ADVANCED FEATURES
9. CALIBRATION PROCEDURES
PART III – TECHNICAL INFORMATION
10. EPA CALIBRATION PROTOCOL
xiii
11. THEORY OF OPERATION
13. TROUBLESHOOTING & REPAIR
12. MAINTENANCE SCHEDULE & PROCEDURES
14. A PRIMER ON ELECTRO-STATICDISCHARGE
LIST OF FIGURES
LIST OF APPENDICES
TABLE OF CONTENTS
xviii
LIST OF TABLES
Table
This page intentionally left blank
TABLE OF CONTENTS
GENERAL INFORMATION
PART - GENERAL INFORMATION
Part
This page intentionally left blank
Part
GENERAL INFORMATION
1.1.M300E FAMILY OVERVIEW
1.INTRODUCTION
1.2.ADDITIONAL DOCUMENTATION
TABLE OF CONTENTS
1.2.1.USING THIS MANUAL
PART I – GENERAL INFORMATION
SPECIFICATIONS AND WARRANTY
APPENDICES
PART III – TECHNICAL INFORMATION
ADVANCED FEATURES OF THE M300E/EM ANALYZER
MAINTENANCE SCHEDULE AND PROCEDURES
Table 2-1:M 300E/300EM Basic Unit Specifications
2.SPECIFICATIONS AND APPROVALS
2.1.SPECIFICATIONS
2.2.EPA EQUIVALENCY DESIGNATION
2.3.TUV DESIGNATION
2.4.2.SAFETY COMPLIANCE
2.4.CE MARK COMPLIANCE
2.4.1.EMISSIONS COMPLIANCE
This page intentionally left blank
Specifications and Approvals
3.1.M300E/EM ANALYZER LAYOUT
3.GETTING STARTED
Figure
Front Panel Layout
Figure
Table 3-2:Inlet / Outlet Connector Nomenclature
Rear Panel Layout
SAMPLE
Figure 3-3:Internal Layout – M300E
Getting Started
Getting Started
Figure 3-5:Optical Bench Layout
Figure 3-6:M300E/EM Internal Gas Flow Basic Configuration
GENERAL SAFETY HAZARD
3.2.UNPACKING THE M300E/EM ANALYZER
power CAUTION – Avoid Warranty Invalidation
ELECTRICAL SHOCK HAZARD
3.3.ELECTRICAL CONNECTIONS
3.3.1.POWER CONNECTION
3.2.1.VENTILATION CLEARANCE
Do not defeat the ground wire on power plug
3.3.2.ANALOG OUTPUT CONNECTIONS
3.3.3.CONNECTING THE STATUS OUTPUTS
Analog Output Connector
Figure
Table 3-5:Status Output Signals
Figure 3-8:Status Output Connector
STATUS
REAR PANEL
Control Input Connector
3.3.4.CONNECTING THE CONTROL INPUTS
Table 3-6:Control Input Signals
Figure
3.3.6.CONNECTING TO A LAN OR THE INTERNET
3.3.5.CONNECTING THE SERIAL PORTS
3.3.7.CONNECTING TO A MULTIDROP NETWORK
3.4.PNEUMATIC CONNECTIONS
3.4.1.2.Span Gas
exhaust and supply gas lines
GENERAL SAFETY HAZARD
glass, stainless steel or brass
area or shelter surrounding the instrument
of the analyzer
3.4.2.1.Sample Gas Source
3.4.2.2.Calibration Gas Sources
3.4.2.3.Input Gas Venting
3.5.INITIAL OPERATION
3.4.2.4.Exhaust Outlet
using the procedures defined in Section
configuration and calibration data
3.5.1.STARTUP
System waits 3 seconds then
automatically begins its initialization routine
3.5.3.WARNING MESSAGES
3.5.2.WARM UP
Table 3-9:Possible Warning Messages at Start-Up
3.5.4.FUNCTIONAL CHECK
installed
3.6.INITIAL CALIBRATION OF THE M300E/EM
3.6.1.INTERFERENTS FOR CO2 MEASUREMENTS
If it is not, press
is set for SNGL
SINGL
ENTR
3.6.2.2.Dilution Ratio Set Up
3.6.2.3.Set CO Span Gas Concentration
STABIL= XXXX PPM
3.6.2.4.Zero/Span Calibration
STABIL= XXXX PPM
STABIL= XXXX PPM
3.6.4.CO2 SENSOR CALIBRATION PROCEDURE
3.6.3.O2 SENSOR CALIBRATION PROCEDURE
The M300E/EM Analyzer is now ready for operation
THANK YOU
4.1.FAQ’S
4.FREQUENTLY ASKED QUESTIONS
Description/Definition
4.2.GLOSSARY
Term
Description/Definition
Term
Description/Definition
Term
5.2.RACK MOUNT KITS OPT 20 TO OPT
5.OPTIONAL HARDWARE AND SOFTWARE
5.1.EXTERNAL PUMPS OPTIONS 10A-10E,11,
GENERAL SAFETY HAZARD
5.3.CARRYING STRAP/HANDLE OPT
5.4.CURRENT LOOP ANALOG OUTPUTS OPTION
Figure 5-2:Current Loop Option Installed on the Motherboard
5.6.CALIBRATION VALVES OPTIONS 50A, 50B, 50E, 50H
5.5.EXPENDABLES AND SPARES KITS OPTIONS 42A,
5.6.2.ZERO/SPAN VALVE OPTION 50A
5.6.1.1.Gas Flow Rate
Figure
5.6.2.1.Internal Pneumatics OPT 50A
5.6.2.3.Input Gas Venting
5.6.2.2.Pneumatic Set Up OPT 50A
5.6.2.4.Exhaust Outlet
SAMPLE GAS SOURCE
Figure
5.6.3.ZERO/SPAN/SHUTOFF VALVE OPTION 50B
5.6.3.1.Internal Pneumatics OPT 50B
SAMPLE GAS SOURCE
5.6.3.2.Pneumatic Set Up OPT 50B
CALIBRATION GAS SOURCES SPAN GAS
ZERO AIR
5.6.4.1.Internal Pneumatics OPT 50H
SAMPLE GAS SOURCE
5.6.4.2.Pneumatic Set Up OPT 50H
CALIBRATION GAS SOURCES SPAN GAS
ZERO AIR
Scrubber
5.6.5.1.Internal Pneumatics OPT 50E
SAMPLE GAS SOURCE
5.6.5.2.Pneumatic Set Up OPT 50E
CALIBRATION GAS SOURCES SPAN GAS
ZERO AIR
5.7.1.RS-232MODEM CABLE OPTION 60A
5.7.COMMUNICATION OPTIONS
5.7.2.RS-232MULTIDROP OPTION
Table 5-5:M300E/EM Modem Cable Options
Figure 5-12:M300E/EM Ethernet Card
5.7.3.ETHERNET OPTION 63A
5.8.1.OXYGEN SENSOR OPTION 65A
5.8.SECOND GAS SENSORS
5.7.4.ETHERNET + MULTIDROP OPT 63C
5.8.1.3.Pneumatic Operation of the O2 Sensor
5.8.1.2.Operation within the M300E/EM Analyzer
5.9.CARBON DIOXIDE SENSOR OPTION 67A
5.9.1.CO2 SENSOR RANGES AND SPECIFICATIONS
5.9.2.THEORY OF OPERATION
5.9.2.1.NDIR measurement of CO2
Figure 5-16 CO2 sensor Theory of Operation
5.9.2.2.Operation within the M300E/EM Analyzer
5.9.2.3.Pneumatic Operation of the CO2 Sensor
5.9.2.4.Electronic Operation of the CO2 Sensor
Figure 5-19:Concentration Alarm Relay
5.10.CONCENTRATION ALARM RELAY OPTION
CO Alarm 1 = 20 PPM CO Alarm 2 = 100 PPM
5.11.2.MAINTENANCE MODE SWITCH
5.11.SPECIAL FEATURES
5.11.3.SECOND LANGUAGE SWITCH
5.11.1.DILUTION RATIO OPTION
OPERATING INSTRUCTIONS
PART – OPERATING INSTRUCTIONS
This page intentionally left blank
OPERATING INSTRUCTIONS
6.1.OVERVIEW OF OPERATING MODES
6.BASIC OPERATION
MODE
EXPLANATION
Figure 6-2:Viewing M300E/EM Test Functions
6.2.SAMPLE MODE
analyzer’s inability to calculate it
Test Functions Defined
Table
MEANING
6.3.WARNING MESSAGES
The IR source may be faulty
Table 6-3:List of Warning Messages
currently selected reporting range EXAMPLES
6.4.CALIBRATION MODE
Primary Setup Mode Features and Functions
6.5.SETUP MODE
Secondary Setup Mode Features and Functions
instrument until the ENTR Key is pressed
6.5.2.SETUP ACAL: AUTOMATIC CALIBRATION
6.5.1.SETUP CFG: CONFIGURATION INFORMATION
Table
6.5.3.SETUP PASS: PASSWORD FEATURE
Password Levels
04288D DCN5752
Basic Operation
the required number code
6.5.4.1.Setting the internal Clock’s Time and Day
6.5.4.2.Adjusting the Internal Clock’s Speed
MODEL
Table 6-7:M300E Family Physical range by Model
RANGE
M300E
ANALOG OUT
6.6.2.ANALOG OUTPUT RANGES FOR CO CONCENTRATION
Figure 6-4:Analog Output Connector Pin Out
SNGL
6.6.3.REPORTING RANGE MODES
DUAL
AUTO
Page
The two ranges must be independently calibrated
concentrations
Basic Operation
Toggle these keys to
discards the new setting accepts the new setting
select the upper limit for the reporting range
computing the CO concentration
reporting units
Basic Operation
Pressure STP
sufficient
Using the dilution ratio option is a 4-stepprocess
This page intentionally left blank
Basic Operation
7.1.1.IDAS STATUS
7.ADVANCED FEATURES
LED STATE
IDAS STATUS
Table 7-2:iDAS Data Channel Properties
7.1.2.IDAS STRUCTURE
7.1.2.1.iDAS Channels
7.1.3.DEFAULT IDAS CHANNELS
Figure 7-1:Default iDAS Channel Setup
Continue pressing to view remaining iDAS channels
Channel No.: NAME: CONC TRIGGER EVENT: ATIMER
0 CONC: ATIMER, 1,
7.1.5.1.Editing iDAS Data Channel Names
7.1.5.2.Editing iDAS Triggering Events
Table 7-3:iDAS Data Parameter Functions
7.1.5.3.Editing iDAS Parameters
found in Appendix A-5
When the STORE NUM SAMPLES feature is turned on, the instrument will store how many
7.1.5.4.Editing Sample Period and Report Period
In AVG, SDEV, MIN or MAX sample modes see Section 7.1.5.3, the settings for the Sample Period and the Report Period determine the number of data points used each time the parameter is calculated, stored and reported to the COMM ports
7.1.5.6.Editing the Number of Records
7.1.5.7.RS-232Report Function
7.1.5.8.Enabling/Disabling the HOLDOFF Feature
7.1.6.DISABLING/ENABLING DATA CHANNELS
7.1.5.9.The Compact Report Feature
7.1.5.10.The Starting Date Feature
7.1.7.1.iDAS Configuration Using APICOM
7.1.7.REMOTE IDAS CONFIGURATION
attempting any iDAS changes
DEFAULT
7.2.SETUP MORE VARS: INTERNAL VARIABLES VARS
Table 7-4:Variable Names VARS
ALLOWED
accepts the new setting
setting
SETUP
SETUP
SIGNAL I/O
Table 7-5:Diagnostic Mode DIAG Functions
CONFIGURATION
DIAG I/O
7.3.1.ACCESSING THE DIAGNOSTIC FEATURES
Table 7-6:DIAG - Analog I/O Functions
7.4.USING THE M300E/EM ANALYZER’S ANALOG OUTPUTS
SUB MENU
OUTPUT
Page
RANGE NAME
Table 7-7:Analog Output Voltage Range Min/Max
RANGE SPAN
MINIMUM OUTPUT
04288D DCN5752
7.4.3.CALIBRATION OF THE ANALOG OUTPUTS
See Section
Manual calibration should be used for any analog output set for a 0.1V output range or in cases where
Page
The menu for manually adjusting the analog output signal level will only appear if the AUTO-CALfeature
Advanced Features
ground
GENERAL SAFETY HAZARD
Advanced Features
Voltage across
% FS
Resistor for 2-20mA
Resistor for 4-20mA
Page
Page
DESCRIPTION
TEST CHANNEL
ZERO
FULL SCALE
new setting
setting
SETUP
SETUP
7.4.7.AIN CALIBRATION
LIMIT SET POINT1
ALARM
STATUS
This page intentionally left blank
Advanced Features
8.1.1.RS-232DTE AND DCE COMMUNICATION
8.1.2.COMM PORT DEFAULT SETTINGS
8.REMOTE OPERATION
Figure 8-1:Default Pin Assignments for Back Panel COMM Port connectors RS-232DCE & DTE
8.1.3.COMM PORT BAUD RATE
8192
8.1.4.COMM PORT COMMUNICATION MODES
2048
1024
Remote Operation
8.1.5.COMM PORT TESTING
8.1.6.MACHINE ID
Table 8-2:Terminal Mode Software Commands
8.1.7.1.Help Commands in Terminal Mode
8.1.7.TERMINAL OPERATING MODES
8.1.7.3.Data Types
8.1.7.2.Command Syntax
X ID COMMAND <CR>
Table 8-3:Teledyne API’s Serial I/O Command Types
X DDD:HH:MM Id MESSAGE<CRLF>
8.1.7.4.Status Reporting
940331 is the default password
8.1.7.5.COMM Port Password Security
LOGON
V RS-232 PASS=NNNNNN
8.2.MULTIDROP RS-232SET UP
CALIBRATOR
Host
TAPI Analyzer
Last INSTRUMENT
Figure 8-5:CPU RS-485Setup
8.3.RS-485CONFIGURATION OF COM2
RX/TX RX/TX+
The DCE/DTE switch has no effect on COM2
Female DB-9COM2
Table 8-4:Ethernet Status Indicators
8.4.REMOTE ACCESS VIA THE ETHERNET
DEFAULT STATE
Table 8-5:LAN/Internet Configuration Properties
See your network administrator
PROPERTY
Remote Operation
∙Your LAN is not running a DHCP software package
SETUP
ON/OFF
PRIMARY SETUP MENU
SETUP
Moves the cursor one character to the left or
FUNCTION
right
Inserts a character before the cursor location
FUNCTION
8.4.4.CHANGING THE ANALYZER’S HOSTNAME
ENTR
EXIT
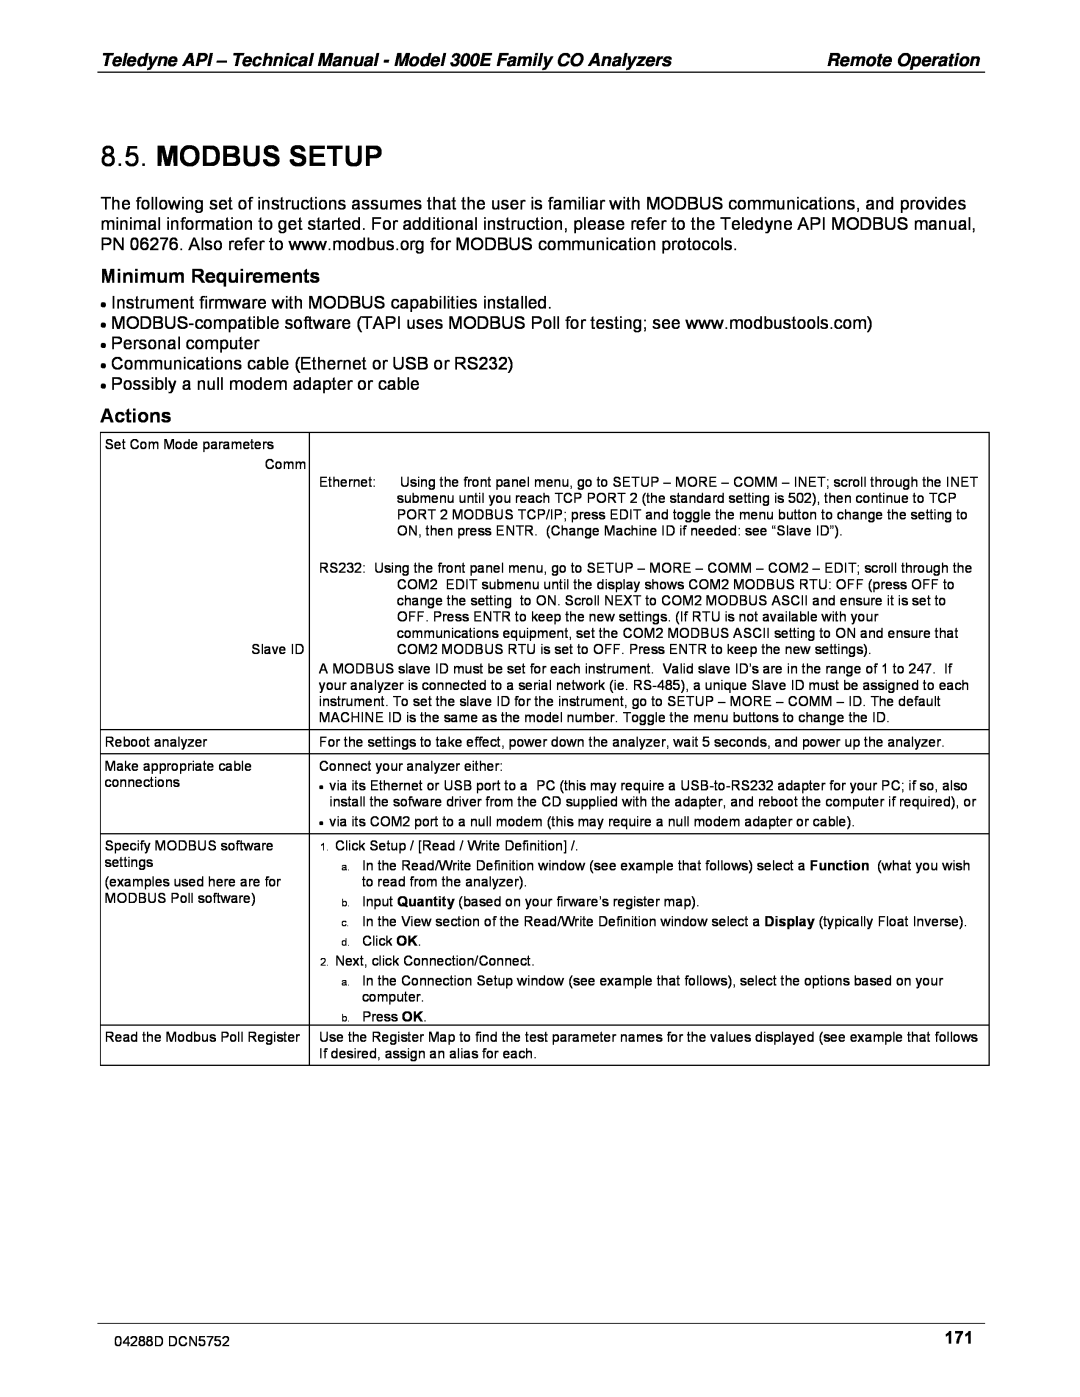
Actions
8.5.MODBUS SETUP
Minimum Requirements
8.5.1.REMOTE ACCESS BY MODEM
AT Y0 &D0 &H0 &I0 S0=2 &B0 &N6 &M0 E0 Q1 &W0
To initialize the modem press
Remote Operation
Protocol network
8.6.2.HESSEN COMM PORT CONFIGURATION
8.6.1.GENERAL OVERVIEW OF HESSEN PROTOCOL
8.6.3.ACTIVATING HESSEN PROTOCOL
8.6.4.SELECTING A HESSEN PROTOCOL TYPE
MODE ID
8.6.5.SETTING THE HESSEN PROTOCOL RESPONSE MODE
MODE DESCRIPTION
TEXT
GAS TYPE,RANGE,GAS ID,REPORTED
8.6.6.HESSEN PROTOCOL GAS LIST ENTRIES
CO, 0, 310, REPORTED CO2, 0, 311, REPORTED
O2, 0, 312, REPORTED
8.6.6.2.Editing or Adding HESSEN Gas List Entries
8.6.6.3.Deleting HESSEN Gas List Entries
Table 8-8:Default Hessen Status Flag Assignments
8.6.7.SETTING HESSEN PROTOCOL STATUS FLAGS
DEFAULT BIT
STATUS FLAG NAME
8.6.8.INSTRUMENT ID CODE
8.7.APICOM REMOTE CONTROL PROGRAM
Calibration Procedures
9.CALIBRATION PROCEDURES
SECTION 9.1 – BEFORE CALIBRATION
SECTION 9.5 – CO CALIBRATION QUALITY ANALYSIS
9.1.2.CALIBRATION GASES
9.1.BEFORE CALIBRATION
9.1.2.1.Zero Air
troubleshooting tips
9.1.2.2.Span Gas
9.1.3.DATA RECORDING DEVICES
9.1.2.3.Traceability
calibration
and alters the instrument’s Calibration
Calibration Procedures
allowed for a reliable calibration
9.2.2.PERFORMING A BASIC MANUAL CALIBRATION CHECK
See Section 12 for troubleshooting tips
the bottle
9.2.3.PERFORMING A BASIC MANUAL CALIBRATION
the SPAN gas
Calibration Procedures
9.2.3.2.Zero/Span Point Calibration Procedure
9.3.MANUAL CALIBRATION WITH ZERO/SPAN VALVES
9.3.1.SETUP FOR CALIBRATION USING VALVE OPTIONS
Figure 9-5:Pneumatic Connections – Option 51B: Zero/Span Calibration Valves
Calibration Procedures
the bottle
9.3.3.MANUAL CALIBRATION USING VALVE OPTIONS
the SPAN gas
9.3.3.2.Zero/Span Point Calibration Procedure
Table 9-2:AUTOCAL Modes
9.4.AUTOMATIC ZERO/SPAN CAL/CHECK AUTOCAL
MODE NAME
ACTION
TIMER ENABLED
Table 9-3:AutoCal Attribute Setup Parameters
ATTRIBUTE
ACTION
VALUE
MODE AND
COMMENT
ZERO-SPAN
from the display
SETUP X.X STARTING DATE: 04–SEP–08
for each
Table 9-5:Calibration Data Quality Evaluation
9.5.CO CALIBRATION QUALITY
FUNCTION
MINIMUM VALUE
SETUP
9.6.1.DARK CALIBRATION TEST
SETUP
DAS RNGE PASS CLK MORE
atmospheric pressure
9.6.2.PRESSURE CALIBRATION
9.6.3.FLOW CALIBRATION
9.6.4.ELECTRICAL TEST CALIBRATION
9.7.1.1.O2 Calibration Setup
9.7.1.O2 SENSOR CALIBRATION PROCEDURE
9.7.CALIBRATION OF OPTIONAL SENSORS
Figure 9-7:O2 Sensor Calibration Set Up
Set the expected O2 span gas concentration
9.7.1.2.Set O2 Span Gas Concentration
complete
9.7.1.3.Activate O2 Sensor Stability Function
To perform the zero/span calibration procedure
9.7.1.4.O2ZERO/SPAN CALIBRATION
9.7.2.1.CO2 Calibration Setup
9.7.2.CO2 SENSOR CALIBRATION PROCEDURE
9.7.2.2.Set CO2 Span Gas Concentration
Figure 9-8:CO2 Sensor Calibration Set Up
complete
9.7.2.3.Activate CO2 Sensor Stability Function
Calibration Procedures
9.7.2.4.CO2 Zero/Span Calibration
This page intentionally left blank
Calibration Procedures
10.1.CALIBRATION REQUIREMENTS
10.EPA CALIBRATION PROTOCOL
10.1.2.2.Spare Parts and Expendable Supplies
10.1.2.1.Data Recording Device
Page
10.1.5.LEVEL 1 CALIBRATIONS VERSUS LEVEL 2 CHECKS
10.1.4.CALIBRATION FREQUENCY
Q.A. Handbook1 Vol II, Part1, Section 12.3 &
10.2.ZERO AND SPAN CHECKS
10.2.2.PRECISION CHECK
10.2.1.ZERO/SPAN CHECK PROCEDURES
10.3.PRECISIONS CALIBRATION
10.3.1.PRECISION CALIBRATION PROCEDURES
10.4.AUDITING PROCEDURE
10.4.1.CALIBRATION AUDIT
10.4.2.DATA REDUCTION AUDIT
10.5.1.LINEARITY TEST
10.5.DYNAMIC MULTIPOINT CALIBRATION PROCEDURE
10.4.3.SYSTEM AUDIT/VALIDATION
∙Leaks ∙Correct flow
10.6.REFERENCES
TECHNICAL INFORMATION
PART – TECHNICAL INFORMATION
PART
This page intentionally left blank
Technical information
11.1.MEASUREMENT METHOD
11.THEORY OF OPERATION
11.2.MEASUREMENT FUNDAMENTALS
11.1.1.BEER’S LAW
Figure 11-2:GFC Wheel
11.2.1.GAS FILTER CORRELATION
Figure 11-1:Measurement Fundamentals
11.2.1.1.The GFC Wheel
11.2.1.2.The Measure Reference Ratio
Figure 11-6:Chopped IR Signal
11.2.1.3.Summary Interference Rejection
GENERAL SAFETY HAZARD
11.3.PNEUMATIC OPERATION
maintenance schedule, Table
over ambient pressure
11.4.1.1.Critical Flow Orifice
11.4.FLOW RATE CONTROL
11.4.3.PNEUMATIC SENSORS
11.4.2.PARTICULATE FILTER
11.4.3.1.Sample Pressure Sensor
11.4.3.2.Sample Flow Sensor
11.5.1.OVERVIEW
11.5.ELECTRONIC OPERATION
Figure 11-9:M300E/EM Electronic Block Diagram
PC 104 Bus
MOTHER
BOARD
FLASH CHIP
11.5.2.CENTRAL PROCESSING UNIT CPU
DISK-ON-MODULEDOM
11.5.3.1.Temperature Control
11.5.3.OPTICAL BENCH & GFC WHEEL
11.5.3.2.IR Source
11.5.3.3.GFC Wheel
SEGMENT SENSOR
Figure 11-10:GFC Light Mask M/R SENSOR
Figure 11-11:Segment Sensor and M/R Sensor Output
SCHMIDT TRIGGERS
11.5.4.1.Overview
11.5.3.4.IR Photo-Detector
M300E/EM Sync/Demod Block Diagram
11.5.4.2.Signal Synchronization and Demodulation
Figure
Table 11-2:Sync DEMOD Sample and Hold Circuits
11.5.4.3.Sync/Demod Status LED’s
11.5.4.5.Dark Calibration Switch
11.5.4.4.Photo-DetectorTemperature Control
Figure 11-13:Sample & Hold Timing
11.5.5.RELAY BOARD
11.5.4.6.Electric Test Switch
11.5.5.1.Heater Control
11.5.5.2.GFC Wheel Motor Control
STATUS LED’s
RELAY PCA PN
11.5.5.5.Status LED’s
DC VOLTAGE TEST
11.5.6.1.A to D Conversion
11.5.6.MOTHERBOARD
11.5.6.2.Sensor Inputs
11.5.6.3.Thermistor Interface
11.5.6.5.Internal Digital I/O
11.5.6.4.Analog Outputs
11.5.6.6.External Digital I/O
BENCH TEMPERATURE SENSOR
11.5.7.I2C DATA BUS
11.5.8.POWER SUPPLY/ CIRCUIT BREAKER
POWER UP CIRCUIT
GENERAL SAFETY HAZARD
Theory of Operation
Figure 11-15:Power Distribution Block Diagram
Figure 11-16:Interface Block Diagram
11.5.9.COMMUNICATION INTERFACE
Mother
Board
11.5.10.1.Analyzer Status LED’s
11.5.10.FRONT PANEL INTERFACE
11.5.10.2.Keyboard
Figure 11-17:M300E/EM Front Panel Layout
11.5.10.4.Keyboard/Display Interface Electronics
11.5.10.3.Display
I2C Interface
2 x 40 CHAR. VACUUM FLUORESCENT DISPLAY
KEY-DEPRESS-DETECTCIRCUIT
KEYPAD DECODER
I2C INTERFACE CHIP
DISPLAY POWER WATCH DOG
DISPLAY DATA DECODER
DISPLAY CONTROLLER
Figure 11-19:Basic Software Operation
11.5.11.SOFTWARE OPERATION
11.5.12.ADAPTIVE FILTER
11.5.14.MEASUREMENT ALGORITHM
11.5.13.CALIBRATION - SLOPE AND OFFSET
11.5.15.TEMPERATURE AND PRESSURE COMPENSATION
11.5.16.INTERNAL DATA ACQUISITION SYSTEM IDAS
This page intentionally left blank
Theory of Operation
12.1.MAINTENANCE SCHEDULE
12.MAINTENANCE SCHEDULE & PROCEDURES
GENERAL SAFETY HAZARD
QUALIFIED PERSONNEL
Maintenance Schedule & Procedures
ACTION
ITEM
FREQ
CAL CHECK MANUAL REQ’D
Maintenance Schedule & Procedures
Table 12-3:Predictive uses for Test Functions
12.2.PREDICTING FAILURES USING THE TEST FUNCTIONS
FUNCTION
CONDITION
12.3.1.REPLACING THE SAMPLE PARTICULATE FILTER
12.3.MAINTENANCE PROCEDURES
12.3.2.REBUILDING THE SAMPLE PUMP
Figure 12-1:Sample Particulate Filter Assembly
12.3.3.1.Vacuum Leak Check and Pump Check
12.3.3.PERFORMING LEAK CHECKS
12.3.3.2.Pressure Leak Check
GENERAL SAFETY HAZARD
12.3.6.CLEANING EXTERIOR SURFACES OF THE M300E/EM
12.3.5.CLEANING THE OPTICAL BENCH
12.3.4.PERFORMING A SAMPLE FLOW CHECK
GENERAL SAFETY HAZARD
13.1.GENERAL TROUBLESHOOTING
13.TROUBLESHOOTING & REPAIR
GENERAL SAFETY HAZARD
QUALIFIED PERSONNEL
CLR SETUP
13.1.1.FAULT DIAGNOSIS WITH WARNING MESSAGES
SAMPLE
BENCH TEMP WARNING
Table 13-1 Warning Messages - Indicated Failures
13.1.2.FAULT DIAGNOSIS WITH TEST FUNCTIONS
PRES SAMPLE FL SAMP TEMP BENCH TEMP WHEEL TEMP
INDICATED FAILURES
BOX TEMP
Table 13-2:Test Functions - Indicated Failures
PHT DRIVE SLOPE OFFSET
INDICATED FAILURES
Figure 13-2:Example of Signal I/O Function
13.1.4.INTERNAL ELECTRONIC STATUS LED’S
13.1.4.1.CPU Status Indicator
Motherboard P/N
CPU Status LED Figure 13-3:CPU Status Indicator
13.1.4.2.Sync Demodulator Status LED’s
JP4 Connector to Opto-Pickup
D1 – M/R Sensor Status
Board
STATUS LED’s
RELAY PCA PN
DC VOLTAGE TEST
POINTS
Relay Board Status LED Failure Indications
Table
Figure 13-6:M300E/EM – Basic Internal Gas Flow
13.2.GAS FLOW PROBLEMS
13.2.1.M300E/EM INTERNAL GAS FLOW DIAGRAMS
Figure 13-7:Internal Pneumatic Flow OPT 50A – Zero/Span Valves OPT 50A & 50B
Figure 13-9:Internal Pneumatic Flow OPT 51B – Zero/Span Valves with Internal Zero Air Scrubber
Figure 13-11:M300E/EM – Internal Pneumatics with O2 Sensor Option
13.2.2.1.Flow is Zero
13.2.2.TYPICAL SAMPLE GAS FLOW PROBLEMS
13.2.2.2.Low Flow
13.2.2.3.High Flow
13.3.1.MISCALIBRATED
13.3.CALIBRATION PROBLEMS
13.2.2.4.Displayed Flow = “Warnings”
13.2.2.6.Sample Pump
13.3.4.INABILITY TO ZERO – NO ZERO KEY
13.3.2.NON-REPEATABLEZERO AND SPAN
13.3.3.INABILITY TO SPAN – NO SPAN KEY
13.4.1.TEMPERATURE PROBLEMS
13.4.OTHER PERFORMANCE PROBLEMS
13.4.1.1.Box or Sample Temperature
13.4.1.2.Bench Temperature
13.4.1.4.IR Photo-DetectorTEC Temperature
13.4.1.3.GFC Wheel Temperature
ELECTRICAL SHOCK HAZARD
Hazardous Voltages are present during this test
13.4.2.EXCESSIVE NOISE
13.5.2.DC POWER SUPPLY
13.5.1.AC MAINS CONFIGURATION
13.5.SUBSYSTEM CHECKOUT
DC Power Test Point and Wiring Color Codes
13.5.4.KEYBOARD/DISPLAY INTERFACE
13.5.3.I2C BUS
DC Power Supply Acceptable Levels
Table
Table 13-8:Relay Board Control Devices
13.5.5.RELAY BOARD
FUNCTION
CONTROL
13.5.6.2.Electrical Test
13.5.6.SENSOR ASSEMBLY
13.5.6.1.Sync/Demodulator Assembly
13.5.6.4.GFC Wheel Drive
13.5.6.3.Opto Pickup Assembly
13.5.6.5.IR Source
Table
13.5.6.6.Pressure/Flow Sensor Assembly
13.5.7.2.Test Channel / Analog Outputs Voltage
13.5.7.MOTHERBOARD
13.5.7.1.A/D Functions
13.5.7.3.Analog Outputs: Current Loop
Table 13-12:Status Outputs Check
13.5.7.4.Status Outputs
13.5.8.CPU
13.5.9.1.General RS-232Troubleshooting
13.5.9.RS-232COMMUNICATIONS
13.5.7.5.Control Inputs – Remote Zero, Span
13.5.10.THE OPTIONAL CO2 SENSOR
13.6.1.REPAIRING SAMPLE FLOW CONTROL ASSEMBLY
13.6.REPAIR PROCEDURES
Figure 13-15:Opening the GFC Wheel Housing
13.6.2.REMOVING/REPLACING THE GFC WHEEL
Opto-Pickup
Figure 13-16:Removing the Opto-PickupAssembly
Figure 13-17:Removing the GFC Wheel Housing
Figure 13-18:Removing the GFC Wheel
Optical Bench
VR1 Adjustment Made Here
Housing Mounting Screws Sync/Demod PCA Housing
13.7.TECHNICAL ASSISTANCE
13.6.4.DISK-ON-MODULEREPLACEMENT PROCEDURE
Teledyne API, Customer Service
9480 Carroll Park Drive
Figure 14-1:Triboelectric Charging
14.A PRIMER ON ELECTRO-STATICDISCHARGE
14.1.HOW STATIC CHARGES ARE CREATED
14.2.HOW ELECTRO-STATICCHARGES CAUSE DAMAGE
14.4.BASIC PRINCIPLES OF STATIC CONTROL
14.3.COMMON MYTHS ABOUT ESD DAMAGE
14.4.1.GENERAL RULES
Figure 14-2:Basic anti-ESDWorkbench
Always wear an Anti-ESDwrist strap when working on the electronic assemblies of your analyzer. An anti-ESDwrist strap keeps the person wearing it at or near the same potential as other grounded objects in the work area and allows static charges to dissipate before they can build to dangerous levels. Anti-ESDwrist straps terminated with alligator clips are available for use in work areas where there is no available grounded plug
14.4.2.2.Working at an Anti-ESDWork Bench
14.4.2.1.Working at the Instrument Rack
4.Place the item in the container
∙DO NOT use pink-polybags
ESD Hazard
CAUTION – Avoid Warranty Invalidation
This page intentionally left blank
A Primer on Electro-StaticDischarge
Page
Page
Page
Page
Page
Page
Warnings,
This page intentionally left blank
Technical Manual - Model 300E Family CO Analyzers
APPENDIX A-1:SOFTWARE MENU TREES, REVISION L.8
MSG1
SAMPLE
TEST1
RNGE PASS
SAMPLE SETUP
CLK MORE
<TST TST>
ACAL1
Figure A-3:Primary Setup Menu DAS Submenu
APPENDIX A-1:Software Menu Trees, Revision L.8
APPENDIX A-1:Software Menu Trees, Revision L.8
O2, 312 REPORTED
SAMPLESETUP
CO, 310, REPORTED CO2, 311, REPORTED
APPENDIX A-1:Software Menu Trees, Revision L.8
Figure A-6:DIAG Menu A-7
Default Value
Setup Variable
Numeric Units
Value Range
Numeric
Default
Value
Units
Default
Setup Variable
APPENDIX A-2:Setup Variables For Serial I/O
Numeric
Default
Setup Variable
Numeric
Value
Default
Setup Variable
APPENDIX A-2:Setup Variables For Serial I/O
Numeric
Default
Setup Variable
Numeric
Value
Default
Setup Variable
Same settings as
Numeric
Default
Setup Variable
Numeric
Value
Default
Setup Variable
APPENDIX A-2:Setup Variables For Serial I/O
Numeric
Default
Setup Variable
Numeric
Value
Default
Setup Variable
APPENDIX A-2:Setup Variables For Serial I/O
Numeric
Default
Setup Variable
Numeric
Value
Default
Setup Variable
APPENDIX A-2 Setup Variables For Serial I/O
Numeric
Message Text
Name
Description
APPENDIX A-3:Warnings and Test Functions
Message Text
Name
Description
A-22
TEST FUNCTION NAME
A-23
MESSAGE TEXT
DESCRIPTION
STABIL_SAMPLES
A-24
APPENDIX A-3 Warnings and Test Functions
TEST FUNCTION NAME
A-25
MESSAGE TEXT
DESCRIPTION
Bit or Channel Number
Signal Name
APPENDIX A-4:Signal I/O Definitions
APPENDIX A-4:Signal I/O Definitions
Bit or Channel Number
Signal Name
Description
A-27
Number
Bit or Channel
Signal Name
Description
Bit or Channel Number
Signal Name
Description
A-29
APPENDIX A-4:Signal I/O Definitions
Signal Name
Bit or Channel Number
Description
Description
Name
APPENDIX A-5:DAS Triggers and Parameters
A-31
Description
Name
Units
A-32
Description
Name
Units
A-33
Table A-7:Terminal Command Designators
APPENDIX A-6:Terminal Command Designators
APPENDIX A-6:Terminal Command Designators
COMMAND
Register Address
MODBUS
dec., 0-based
MODBUS Floating Point Input Registers
MODBUS
MODBUS Floating Point Holding Registers
Description
Units
single-bit; read-only
MODBUS Discrete Input Registers
MODBUS
Description
single-bit;read/write
MODBUS Coil Registers
MODBUS
Description
04288D DCN5752
APPENDIX B - Spare Parts
This page intentionally left blank
Description
M300E Spare Parts List
Part Number
Reference: 05362J DCN5494
M300E Spare Parts List
Part Number
Description
Description
M300EM Spare Parts List
Part Number
Reference: 05424H DCN5494
M300EM Spare Parts List
Part Number
Description
6-10
M300EM Recommended Spare Parts Stocking Levels
11-20
21-30
Reference: 0096004C
M300E/EX Expendables Kit
ORIFICE, 13 MIL SAMPLE FLOW
000941000
009550500
ASSY, SOURCE
009560301
T300/T300M and M300E/EM
APPENDIX C Warranty/Repair Questionnaire
Email: api-customerservice@teledyne.com
Please complete the following table
Email: api-customerservice@teledyne.com
APPENDIX C Warranty/Repair Questionnaire
T300/T300M and M300E/EM
2v/DIV
04288D DCN5752
APPENDIX D – Wire List and Electronic Schematics
04288D DCN5752
This page intentionally left blank
Interconnect List, M300E/EU, SNs 100 and greater
FROM
FROM
This page intentionally left blank
Page
Sync Demod Page 1 03297k_1.sch
D C B A
Sync Demod Page 2 03297k_2.sch
Sync Demod Page 3 03297k_3.sch
Schematics for PCA 03296, Sync Demod
1. This schematics is for PCA
Signal
proper authorization
PREAMP_ENAB
Schematics for PCA 03296, Sync Demod
TV_ENAB
SYNC_10
proper authorization
Schematics for PCA 03296, Sync Demod
BIAS SUPPLY
17-Sep-2008
03632
PCA 03631, Isolated 0-20ma,E Series
19-Jul-2002
1 of
NOTES
1. This schematic is based on the
PWB PN, 03974 and applies to
PCA PN,
+15V
+15V
+15V
+15V
05703
ADDR=0x360 DEFAULT
Schematic for E Series Motherboard PCA
05703
TX for Com1
RX for Com2
+15V
J109
+15V
CONTROL INPUTS
D2 D3 D4 D5 D6 D7
SHDN
OPTO-INTERRUPTER
Schematics for PWB
and PCA
BENCH
Schematic, PCA 04135 Revision A, M300E Relay PCA
SPARE
NOTE: 1. Use PWB
NOTES
1. This schematic is based on
applies to PCA PN,
the PWB PN, 03974 and
04468
SCH, E-SeriesAnalog Output Isolator, PCA
1 A B C D 1
Not Used