Version 10/2005
HS-100 / HS-100W
Disclaimer
Copyright 2004 by ZyXEL Communications Corporation
Trademarks
Certifications
Information for Canadian Users
Online Registration
ZyXEL Limited Warranty
Customer Support
Table of Contents
III
11-1
Viii
27.1
Page
List of Figures
Xiv List of Figures
10-1
Xvi List of Figures
Xvii
Xviii List of Figures
List of Tables
List of Tables
20-3
Xxii List of Tables
User’s Guide Feedback
Related Documentation
¾ ZyXEL Glossary and Web Site
Graphics Icons Key
Syntax Conventions
Dslam
HomeSafe User’s Guide Preface Xxv
Part
Page
Physical Features
HomeSafe Features
Non-Physical Features
Getting to Know Your HomeSafe
Brute-Force Password Guessing Protection
Content Filtering
802.11b Wireless LAN Standard HS-100W only
Firewall
Universal Plug and Play UPnP
Packet Filtering
Call Scheduling
PPPoE
Upgrade HomeSafe Firmware via LAN
Dhcp Dynamic Host Configuration Protocol
Network Address Translation NAT
Traffic Redirect
Wireless Association List HS-100W only
Secure Broadband Internet Access via Cable or DSL Modem
Applications for the HomeSafe
HomeSafe Parental Control Gateway
Wireless LAN Application Example
Wireless LAN Application
Web Configurator Overview
Introducing the Web Configurator
Accessing the HomeSafe Web Configurator
Wlan Setup
System Administrator Password Setup
Set up your wireless LAN using the second wizard screen
Following table describes the fields in this screen
Access screen
Wlan Setup Basic Security
Essid
Following table describes the labels in this screen
Wlan Setup Extended Security
WEP
Ascii
Refer to the chapter on wireless LAN for more information
Internet Configuration Setup
Internet Access Setup
Internet Configuration Setup ISP Parameters
Dhcp
Internet Access Static IP Address Setup
Parental Control Wizard
Internet Configuration Setup Complete
Wizard Parental Control Wizard
Parental Control Time Setup
Parental Control Create or Edit a Profile
10 Wizard Parental Control Time Setup
11 Wizard Create or Edit a Profile
Parental Control Profile Information
12 Wizard Parental Control Profile Information
Parental Control User Group
Access rights
Administrator can decide each group’s
Parental Control Time Allowance
13 Wizard Parental Control User Group
Parental Control Application Blocking
15 Wizard Parental Control Application Blocking
Parental Control Account Summary
Allowance screen
16 Wizard Parental Control Summary
Parental Control Register for Content Filter
Checking Content Filtering Activation
Content Filtering with an External Server
If you click Register Later you will proceed to Figure
Content Filter Service Activation
Following screen appears after you click Activate in Figure
Content Filter Setup Complete
Accessing the Internet via the HomeSafe Gateway
25 Password Screen
Procedure To Use The Reset Button
Resetting the HomeSafe
HomeSafe Main Menu
Navigation Panel
Link TAB Function
17 Screens Summary
Firewall
Maintenance
Remote Mgmt Telnet
FTP
Page
Chapter Connection Wizard
Connection Wizard General Setup and System Name
Connection Wizard Overview
Domain Name
Connection Wizard Screen
Connection Wizard General Setup
Connection Wizard Wireless LAN Setup Basic Security
Ethernet
Connection Wizard Wireless LAN Setup Extend Security
Connection Wizard Ethernet Encapsulation
PPPoE Encapsulation
Connection Wizard PPPoE Encapsulation
Connection Wizard Pptp Encapsulation
Pptp Encapsulation
Private IP Address Ranges
WAN IP Address Assignment
DNS Server Address Assignment
IP Address and Subnet Mask
WAN MAC Address
ISP
Connection Wizard WAN Setup
Connection Wizard Finish
Basic Setup Complete
10 Connection Wizard Problems
HomeSafe User’s Guide Connection Wizard
System, LAN, Wlan and WAN
Chapter System Screens
Configuring General Setup
System Overview
Click System to open the General screen
Dynamic DNS
Configuring Dynamic DNS
DynDNS Wildcard
System Ddns
Configuring Time Setting
Configuring Password
System Time Setting
Daylight Savings
Chapter LAN Screens
Dhcp Setup
LAN Overview
Multicast
Any IP
Any IP Example Application
How Any IP Works
Click LAN to open the IP screen
Configuring IP
LAN TCP/IP
LAN Static Dhcp
Configuring Static Dhcp
LAN IP Alias
Configuring IP Alias
LAN IP Alias
Wireless LAN Overview
Wireless Configuration and Roaming
Ibss
2 BSS
3 ESS
Basic Service set
1 RTS/CTS
Wireless LAN Basics
Fragmentation Threshold
Configuring Wireless
RTS/CTS
Configuring Roaming
Roaming Example
Requirements for Roaming
All APs on the same subnet
Wireless stations must have the same Essid to
Allow roaming
Page
Wireless Security Overview
Chapter Wireless Security
WPA
WPA-PSK
Wireless Security Relational Matrix
Authentication
Security Parameters Summary
WEP Overview
Preamble Type
WEP Authentication Steps
Encryption field
Configuring WEP Encryption
Introduction to WPA
User Authentication
Encryption
WPA-PSK application looks as follows
WPA-PSK Application Example
If wireless station authentication is done
Configuring WPA-PSK Authentication
Using a Radius server, the reauthentication
Timer on the Radius server has priority
WPA with Radius Application Example
Wireless Client WPA Supplicants
WPA with Radius Application Example
Configuring WPA Authentication
802.1x Overview
Wlan Wireless WPA
Dynamic WEP Key Exchange
Configuring 802.1x and Dynamic WEP Key Exchange
EAP-MD5 cannot be used with Dynamic WEP Key Exchange
Configuring 802.1x and Static WEP Key Exchange
Wlan Wireless 802.1x and Static WEP
10 Wlan Wireless 802.1x and Static WEP
Wlan Wireless 802.1x and Static WEP
Reset
Configuring
MAC Filter
Wlan MAC Address Filter
Following table describes the labels in this menu
MAC
Introduction to Local User Database
Configuring Local User Database
10 Wlan Local User Database
Active Select this option to activate the user profile
Introduction to Radius
EAP Authentication Overview
Configuring Radius
11 Wlan Radius
15 Wlan Radius
HomeSafe User’s Guide
Page
Chapter WAN Screens
Configuring Route
WAN Overview
TCP/IP Priority Metric
Ethernet Encapsulation
Configuring WAN ISP
Screen shown next is for Ethernet encapsulation
PPPoE Encapsulation
WAN ISP PPPoE Encapsulation
WAN ISP Pptp Encapsulation
WAN IP Address Assignment
Configuring WAN IP
Selected Use Fixed IP Address
WAN IP
Server
Choose Both, None, In Only or Out Only
Choose RIP-1 , RIP-2B or RIP-2M
Configuring WAN MAC
RIP-1
Traffic Redirect
Traffic Redirect WAN Setup
WAN Traffic Redirect
Configuring Traffic Redirect
WAN Traffic Redirect
SUA/NAT and Static Route
Page
NAT Overview
Chapter Network Address Translation NAT Screens
NAT Definitions
What NAT Does
NAT Application
How NAT Works
Following table summarizes these types
NAT Mapping Types
SUA Server
Using NAT
SUA Single User Account Versus NAT
NAT Mapping Types
Default Server IP Address
Port Forwarding Services and Port Numbers
Services and Port Numbers
Services Port Number
Configuring Servers Behind SUA Example
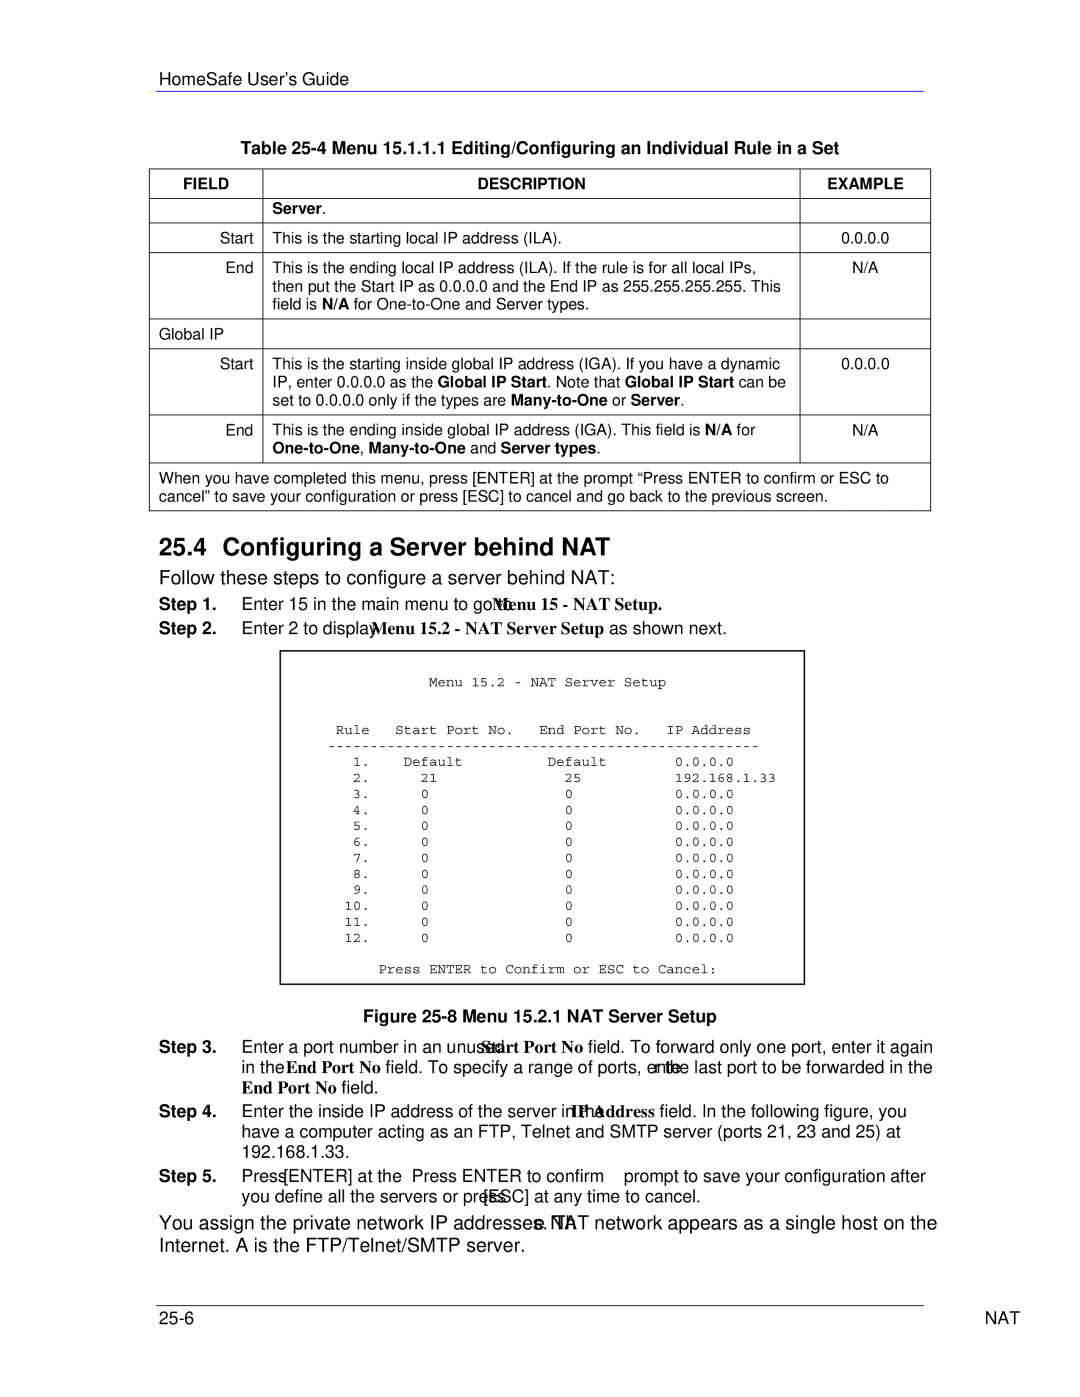
Configuring SUA Server
SUA/NAT Setup
Configuring Address Mapping
One-to-One and Server mapping types
Address Mapping
Trigger Port Forwarding
Configuring Address Mapping
Many-to-One and Server mapping types
Trigger Port Forwarding Example
Configuring Trigger Port Forwarding
Two Points To Remember About Trigger Ports
Following is an example of trigger port forwarding
Only one LAN computer can use a trigger port range at a time
Page
Chapter Static Route Screens
Configuring IP Static Route
Static Route Overview
Click Static Route to open the screen as shown next
Static Route Edit
Configuring Route Entry
NAT Screens 10-3
UPnP, Parental Control and Firewall
Chapter UPnP
How Do I Know If Im Using UPnP?
Universal Plug and Play Overview
UPnP and ZyXEL
Installing UPnP in Windows Example
Configuring UPnP
Click UPnP to display the screen shown next
Installing UPnP in Windows XP
Installing UPnP in Windows Me
Follow the steps below to install UPnP in Windows Me
Follow the steps below to install UPnP in Windows XP
Auto-discover Your UPnP-enabled Network Device
Using UPnP in Windows XP Example
Internet Connection Properties
Connections Select My Network Places under Other Places
Web Configurator Easy Access
UPnP 11-7
Page
Initial Configuration
Parental Control Logins
Chapter Parental Control
Parental Control Overview
Parental Control Application
Parental Administrator log
HomeSafe Parental Control Wireless Gateway Application
Configuring Parental Control
Parental Control
Content filtering activation
For content filtering to be activated. See Checking
Web site displays a registration successful
Web page. It may take up to another ten minutes
Reset Click Reset to start configuring this screen again
Content Filtering with an External Server
Parental Control Group Edit Filter
Parental Control Group Edit Configuration
Parental Control Filter
Parental Control 12-9
12-10 Parental Control
Parental Control 12-11
See the Customizing Keyword
How to set how much of the URL
Blocking URL Checking section for
HomeSafe checks
Parental Control Edit
Customizing Keyword Blocking URL Checking
Service Description
Services
PPTPTUNNELGRE0
RLOGINTCP513
RCMDTCP512
REALAUDIOTCP7070
Parental Control Edit
User access will be denied after the End
Access, you should select the unrestricted
If you want to allow twenty-four hour
Check box
Weekdays or Weekend boxes
Parental Control Bypass List
Parental Control 12-19
Page
Introduction
Chapter Firewall
Guidelines For Enhancing Security With Your Firewall
Firewall Settings
Firewall Settings Screen
LAN-to-WAN rules
Firewall, NAT and Remote Management
No Log
Log All log all LAN to WAN packets
WAN-to-LAN rules
Services
Firewall Service
Click Clear All to empty the Blocked Service
Remote Management
Page
Chapter Remote Management Screens
Only LAN only Neither Disable
Remote Management Overview
Remote Management Limitations
System Timeout
Configuring WWW
Remote Management and NAT
Telnet Configuration on a TCP/IP Network
Configuring Telnet
Remote Management Telnet
Configuring FTP
Remote Management FTP
Snmp
Snmp Management Model
Snmp is only available if TCP/IP is configured
Supported MIBs
Configuring Snmp
Snmp Traps
Snmp Traps
Remote Management Snmp
Remote Management DNS
Configuring DNS
Icmp
Configuring Security
Remote Management Screens 14-11
Page
HomeSafe User’s Guide VPN Screens 14-1
Logs and Maintenance
View Log
Chapter Centralized Logs
Settings, see section
Log Settings
Log Settings
Daily
When Log is Full
Weekly
Hourly
Maintenance Overview
Chapter Maintenance
Status Screen
System Statistics
Maintenance System Statistics
Dhcp Table Screen
Maintenance Dhcp Table
Association List
Any IP Table
16.6 F/W Upload Screen
Maintenance Firmware Upload
Upload Warning
Configuration Screen
Restore Configuration
Backup Configuration
Maintenance Restore Configuration
11 Configuration Restore Successful
Back to Factory Defaults
Restart Screen
14 Factory Defaults
SMT General Configuration
Page
SMT Introduction
Chapter Introducing the SMT
Navigating the SMT Interface
Main Menu Commands
Operation Keystroke Description
Enter
Main Menu Summary
System Management Terminal Interface Summary
? or ChangeMe
Menu Title Description
Menu 23 System Password
Changing the System Password
General Setup
Chapter Menu 1 General Setup
Procedure To Configure Menu
Field Description Example
Select Yes to configure Menu 1.1 Configure Dynamic DNS
Procedure to Configure Dynamic DNS
DynamicDNS
Yes
User
Specified IP Address field
WAN Setup
Chapter Menu 2 WAN Setup
Introduction to WAN
From the main menu, enter 2 to open menu
Page
LAN Setup
Chapter Menu 3 LAN Setup
Protocol Dependent Ethernet Setup
20.3 TCP/IP Ethernet Setup and Dhcp
Menu 3.2 Dhcp Ethernet Setup Fields
Menu 3.2 TCP/IP and Dhcp Ethernet Setup
Both
Menu 3.2 LAN TCP/IP Setup Fields
RIP-1
RIP-1,RIP-2B or RIP-2M
Physical Network & Partitioned Logical Networks
IP Alias Setup
Both, In Only, Out Only or None
Wireless LAN Setup
Field Description Example Essid
CH06 2437MHz
Disable
RTS
Auto
Mixed
Configuring MAC Address Filter
Menu 3.5.1 Wlan MAC Address Filter
Configuring Roaming on the HomeSafe
Menu 3.5.2 Roaming Configuration
10 Menu 3.5.2 Roaming Configuration
Page
Introduction to Internet Access Setup
Chapter Internet Access
Menu 4 Internet Access Setup Ethernet
Ethernet Encapsulation
Configuring the Pptp Client
Default
Configuring the PPPoE Client
New Fields in Menu 4 Pptp Screen
New Fields in Menu 4 PPPoE screen
21-4 Internet Access
Introduction to Remote Node Setup
Chapter Remote Node Configuration
Remote Node Profile Setup
Alias
Ethernet
Press Enter to go to Menu 11.3 Remote Node Network
Layer Options
Nailed-Up Connection
Outgoing Authentication Protocol
CHAP/PAP
Fields in Menu 11.1 PPPoE Encapsulation Specific
Menu 11.1 Remote Node Profile for Pptp Encapsulation
Edit IP
Remote Node Network Layer Options
Dynamic
SUA Only
Remote Node Filter
Many-to-One and Server
RIP-1/RIP-2B/RIP-2M or None
Menu 11.5 Remote Node Filter Ethernet Encapsulation
Traffic Redirect Setup
22-8 Remote Node Configuration
IP Static Route Setup
Chapter Static Route Setup
23-2 Static Route Setup
Dial-in User Setup
Chapter Dial-in User Setup
Page
Applying NAT
Menu 4 Applying NAT for Internet Access
Full Feature
NAT Setup
Applying NAT in Menus 4
NAT
SUA Address Mapping Set
Address Mapping Sets
Following table explains the fields in this menu
Menu 15.1.255 is read-only SUA Address Mapping Rules
Ordering Your Rules
User-Defined Address Mapping Sets
Field Desription Example
Menu 15.1.1 First Set
Edit
Select Rule item
Follow these steps to configure a server behind NAT
Configuring a Server behind NAT
One-to-One,Many-to-One and Server types
Following are some examples of NAT configuration
Example 1 Internet Access Only
General NAT Examples
Example 3 Multiple Public IP Addresses With Inside Servers
Example 2 Internet Access with an Inside Server
Dynamic Inside Global Address is assigned by the ISP
Following figures show how to configure the first rule
Enter 1 to configure the Address Mapping Sets
Address Translation field in menu 4 or menu 11.3
Then enter 15 from the main menu
Enter 2 in Menu 15 NAT Setup
Example 3 Menu
Example 4 NAT Unfriendly Application Programs
20 Example 4 Menu 15.1.1 Address Mapping Rules
Menu 15.3 Trigger Port Setup
Page
Chapter Enabling the Firewall
Access Methods
Remote Management and the Firewall
Enabling the Firewall
SMT Advanced Management
Introduction to Filters
Chapter Filter Configuration
Filter Structure of the HomeSafe
Execute
Abbreviations Used in the Filter Rules Summary Menu
Configuring a Filter Set
Configuring a TCP/IP Filter Rule
Configuring a Filter Rule
Rule Abbreviations Used
Abbreviation Description
Field Description Options
TCP/IP Filter Rule
Less
Equal
Following figure illustrates the logic flow of an IP filter
Executing an IP Filter
Configuring a Generic Filter Rule
Generic Filter Rule Menu Fields
HomeSafe User’s Guide Generic Filter Rule Menu Fields
Example Filter
10 Example Filter Menu
Filter Types and NAT
Applying a Filter
Firewall Versus Filters
Applying LAN Filters
Applying Remote Node Filters
14 Filtering Remote Node Traffic
Page
About Snmp
Chapter Snmp Configuration
Following table describes the Snmp configuration parameters
Snmp Configuration
Supported MIBs
Ports and Permanent Virtual Circuits
Snmp Traps
Port PVC Permanent Virtual Circuit
Page
Configuring External Radius Server
System Password
Chapter System Security
System Security
Enter 4 to display Menu 23.4 System Security IEEE802.1x
29.1.3
Menu 23.4 System Security IEEE802.1x
No Access Allowed
Group Data Privacy field
PSK
Mode
Management Protocol is selected
System Status
System Information and Diagnosis
System Maintenance Status Menu Fields
Menu 24.1 System Maintenance Status
System Information
Menu 1 General Setup
System Information
To get to the System Information
Log and Trace
Menu 24.3.2 System Maintenance Syslog and Accounting
Console Port Speed
Syslog Logging
System Information and Diagnosis 30-5
Call-Triggering Packet
Diagnostic
WAN Dhcp
System Maintenance Menu Diagnostic
30-8 System Information and Diagnosis
Filename Conventions
Chapter Firmware and Configuration File Maintenance
Filename Conventions
File Type Internal Name External Name Description
Using the FTP Command from the Command Line
Backup Configuration
Example of FTP Commands from the Command Line
Follow the instructions as shown in the next screen
General Commands for GUI-based FTP Clients
Backup Configuration Using Tftp
Command Description
GUI-based FTP Clients
Tftp Command Example
Restore Configuration
Restore Using FTP
Following is an example Tftp command
Restore Using FTP Session Example
Uploading Firmware and Configuration Files
You see the following screen when you telnet into menu
Configuration File Upload
Firmware File Upload
FTP Session Example of Firmware File Upload
FTP File Upload Command from the DOS Prompt Example
Tftp File Upload
Tftp Upload Command Example
Command Interpreter Mode
Chapter System Maintenance
Command Syntax
Command Usage
Budget Management
Call Control Support
Call History Fields
Call History
Time and Date Setting Fields
Time and Date Setting
NTP RFC-1305 the default, is similar to Time RFC-868
Daylight Saving field
Resetting the Time
Page
Remote Management
Chapter Remote Management
LAN Only
Introduction to Call Scheduling
Chapter Call Scheduling
Once
Menu 26.1 Schedule Set Setup
Applying Schedule Sets to a Remote Node PPPoE
Appendices and Index
Page
Problem Corrective Action
Troubleshooting
Appendix a
Control Group Edit screen
PPPoE in Action
Appendix B PPPoE
Benefits of PPPoE
Traditional Dial-up Scenario
HomeSafeas a PPPoE Client
Diagram B-2 The HomeSafeas a PPPoE Client
Diagram C-1 Transport PPP frames over Ethernet
What is PPTP?
Appendix C
Pptp and the HomeSafe
Diagram C-3 Example Message Exchange between PC and an ANT
Diagram C-2 Pptp Protocol Overview
Pptp Protocol Overview
Control & PPP connections
Pptp
Page
Chart 2 System Maintenance Logs
Chart 1 System Error Logs
Appendix D Log Descriptions
LOG Message Description
Chart 4 Content Filtering Logs
Chart 3 UPnP Logs
ID content
Type Code Description
Chart 5 Icmp Type and Code Explanations
Configuring What You Want the HomeSafe to Log
Log Commands
Displaying Logs
Page
Windows 95/98/Me
Appendix E Setting up Your Computer’s IP Address
If you need TCP/IP
If you need Client for Microsoft Networks
Checking/Modifying Your Computer’s IP Address
Windows 2000/NT/XP
Click Advanced to go to the Advanced TCP/IP
HomeSafe User’s Guide
Turn on your HomeSafeand restart your computer if prompted
Select Ethernet built-in from the Connect via list
Macintosh OS 8/9
Close the TCP/IP Control Panel
Check your TCP/IP properties in the Network window
Macintosh OS
Select Built-in Ethernet from the Show list
Page
Benefits of a Wireless LAN
Appendix F Wireless LAN and Ieee
Ad-hoc Wireless LAN Configuration
Ieee
Diagram F-1 Peer-to-Peer Communication in an Ad-hoc Network
Infrastructure Wireless LAN Configuration
Diagram F-2 ESS Provides Campus-Wide Coverage
Page
Deployment Issues with Ieee
Appendix G Wireless LAN With Ieee
Security Flaws with Ieee
Advantages of the Ieee
Diagram G-1 Sequences for EAP MD5-Challenge Authentication
EAP-TTLS Tunneled Transport Layer Service
Appendix H Types of EAP Authentication
EAP-MD5 Message-Digest Algorithm
EAP-TLS Transport Layer Security
Certificate Client
Difficulty Wireless Security
Certificate Server
Dynamic Key
Appendix Antenna Selection and Positioning Recommendation
Antenna Characteristics
Types of Antennas For Wlan
Positioning Antennas
Chart 6 Brute-Force Password Guessing Protection Commands
Appendix J Brute-Force Password Guessing Protection
Example
Page
Triangle Route Problem
Ideal Setup
Triangle Route Solutions
Appendix K Triangle Route
Diagram K-3 IP Alias
How To Configure Triangle Route
Diagram K-4 Gateways on the WAN Side
Gateways on the WAN Side
BSS
Appendix L Index
Ibss
See NAT
See Ttls
Wlan