User’s Guide
Page
User’s Guide
Page
Feature Minimum Firmware Levels Required
Minimum Firmware Levels for Common Library Features
Read this First
Contacting Dell
Page
Figures Vii
Appendix B. TapeAlert Flags
Figures
10-14
Tables
Page
If the symbol is It means
Safety and Environmental Notices
Class I Laser Product
Laser Safety and Compliance
Performing the Safety Inspection Procedure
Rack Safety
Page
Related Publications
Preface
Page
Front Panel
Product Description
Number Description
Front panel of a 4U library
Rear panel of a 2U library with a Scsi drive
Rear Panel
A77ug100
Internal view of the library
Internal View of Library
Encryption
Bar Code Reader
Product Description
Snmp Messaging
Supported Internet Protocols
Maximum Library Storage Capacity and Data Transfer Rate
Tape Drive Model Host Interface
Ultrium Tape Drives
Channel Calibration
Speed Matching
Library Specifications
Power Management
Physical Specifications
Power Specifications
Environmental Specifications
Operation Specifications
Supported Device Drivers
Product Environment
Http//support.dell.com
Humidity
Page
Operator Control Panel Philosophy
User Interfaces
Operator Control Panel
Power-ON Screens
Power-ON Display
Selecting Predefined Values
Input Modes
Web User Interface
Power ON/OFF
Toggling Values
Entering Numerical Values
Login
System Status
Web User Interface login
Logging out of the Web User Interface
Web User Interface Help Pages
Page
Determining the Number of Logical Libraries
Installation Planning
Basic Guidelines
Library Sharing
Using Multiple Control Paths for Path Failover
Using Multiple Logical Libraries for Library Sharing
Using Multiple Control Paths
Library Partitioning and Element Addressing
Configuration of a 1 Partition System
Partitioning of 2U Libraries
Partitioning of 4U Libraries
Configuration of a 3 Partition System
Configuration of a 2 Partition System
Scsi Element Addressing
Configuration of a 4 Partition System
Host Interfaces
Logical Unit Number LUN Scanning
Scsi Interface
Drive Scsi LVD Ultra
Type of Interconnection
Physical Characteristics of the Scsi Interface
Using Multiple Scsi Buses
Fibre Channel Interface
SAS Interface
Terminating the Bus
Scsi Differential LVD
Sharing on a Storage Area Network
Using Zoning to Isolate Devices and Enhance Security
Cables and Speeds
Page
Installing Your Library
Installation and Configuration
Using the Library Configuration Form
Choosing a Location
Verifying the Shipment
Unpacking the Library
Installation and Configuration
Removing and Storing the Shipping Lock
Installing foot pads on the bottom of the library enclosure
Shipping lock and label
Rackmounting the Library for Rack Installation only
Rack Kit Mounting hardware
Rear view of a rack showing the narrow part of the rail
Front view of a rack showing the rails installed
12. Sliding the 2U library into the rack
14. Securing the 2U library to the rack
Connecting the Host Interface Cable
17. Removing the protective label from the power receptacle
Connecting a Power Cord
Choosing Your Configuration Method
Configuring Your Library
Configuring Your Library using the Web User Interface
Using Factory Defaults as Your Configuration
Entering Network Settings using the Operator Control Panel
Default Setting
Page
Verifying/Updating Firmware
Logging on to the Web User Interface
Click Upgrade Firmware
Choosing General Library Settings
19. The 2U library Configure Library General screen
Choosing the Number of Logical Libraries for Your Library
20. Example The 4U library Configure Library General screen
Setting Up Encryption
Entering Path Failover Feature Activation Key
24. Feature Activation Key screen
Setting a Drive’s Method of Encryption
26. The Configure Library Drive screen
Choosing Drives Interface Identification/Settings
Enter IPv4 settings if applicable
Entering Library Network Settings
Enter Snmp settings
Enter IPv6 settings if applicable
29. The Configure Library User Access screen
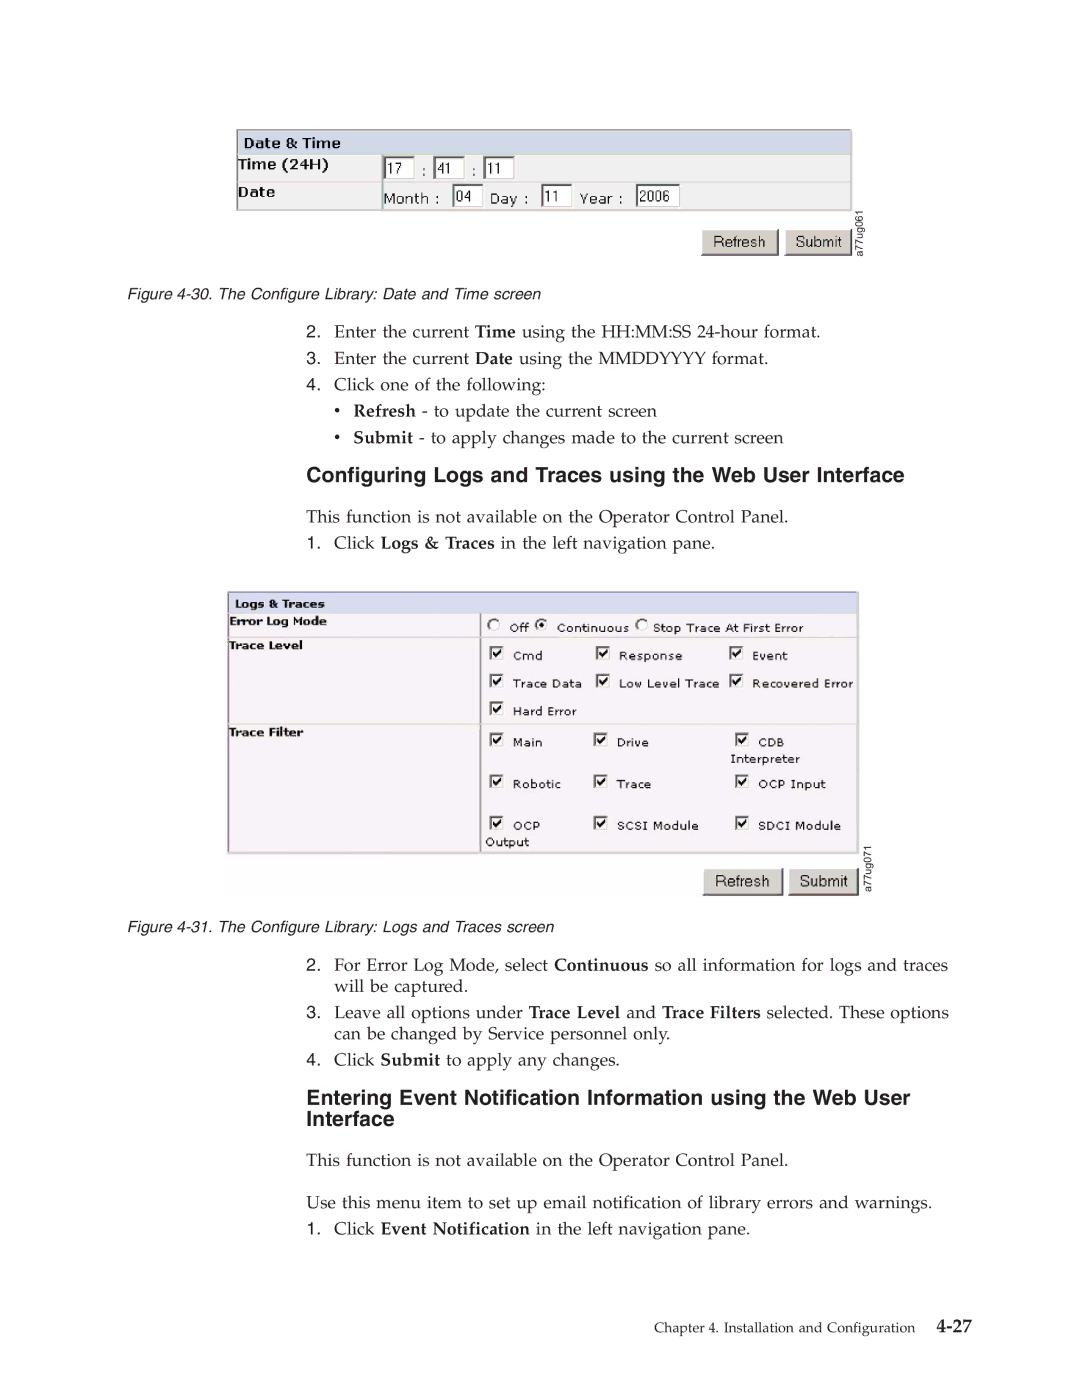
Entering Date and Time using the Web User Interface
30. The Configure Library Date and Time screen
Configuring Logs and Traces using the Web User Interface
Logging out of the Web User Interface
32. The Configure Library Event Notification screen
Navigate to Configure → Set Access PIN
Setting the Operator Control Panel Access PIN using
Preparing the Host
Verifying the Connection
2U Library Cartridge Magazines
Cartridge Magazines
4U Library Cartridge Magazines
2U Library I/O Station
37 U library right magazines
4U Library I/O Station
39. Finger Holes on back side of 4U library I/O Station
Populating the Library with Data Cartridges
Inserting the Cleaning Cartridge
Installation and Configuration
Page
Operations
Configure Library → Restore
Configure → Restore Defaults
Defaults
Configure → Drive → Control
Service → Library Verify
Key Path Diagnostics
Service → Run Tests
Service → Display Contrast
Service Library → Save Drive
Service → Service → Drive Power
Identity → Data Compression
Monitor → Drive → Identity →
Configure Library → Event
Configure → Drive → Ethernet Configure Library → Ethernet
Monitor → Library → Error log
Service Library → View logs
Configure → Network →
Service Library → Upgrade
Configure → Library
Configure → Network → IP
Configure → Path Failover
Configure → Network
Configure Library → Path
Service Library → Reboot
Slots Empty
Service → Telnet Service Port
Active Slots
Control Description Keys
Operator Control Panel Navigation
Operator Control Panel Menu Tree
Monitor Library
Monitor Menu
Monitor
Status Identity Error Log Network
Monitor Drive
This menu item displays drive information and settings
Monitor Drive menu
Example of a 4U Monitor Inventory menu
Monitor Inventory
Control Open I/O Station
Control Menu
Control Magazine
Control Move Cartridges
Control Re-Inventory
Configure Menu
Configure Logical Libraries
12. Configure Logical Libraries menu
Mode
Configure Library
Starting Sequential Mode v Autoload Option
Scsi ID
Configure Drive
IP Stack Choose IPv4 only, IPv6 only, or IPv4 & IPv6
Configure Network
Configure Restore Defaults
Configure Set Access PIN
Restored Item Default Setting Comments
Configure Set Date and Time
User Access
Drives
Service Library Verify
Service Menu
Configure Path Failover
Service Service Drives
Service Run Tests
22. Service Service menu
Web User Interface Menus
Service Display Contrast
Service Telnet Service Port
Menu Item Description
Monitor Library Menu
Monitor Library Library Identity
Fibre
Monitor Library Drive Identity
Menu Item Description 2U Library 4U Library
Scsi
Monitor Library Library Status
27. The 4U library Monitor Library Library Status
Monitor Library Drive Status
Scsi
28. The 4U library Monitor Library Drive Status
Term Definitions
Monitor Library Inventory
Magazine Inventory
Configure Library General
Configure Library Menu
Configure Library General page elements
Configure Library Path Failover
Configure Library Logical Libraries
Click Encryption
Configure Library Encryption
Setting or Changing a Drive’s Method of Encryption
35. Feature Activation Key screen
Configure Library Drives
37. The Configure Library Drive page for a 4U library
Configure Library Network
38. Configure Library Network
Configure Library User Access
Configure Library Date & Time
Configure Library Event Notification
Configure Library Logs & Traces
Notify Errors
Notify Warnings
Manage Library Menu
Configure Library Restore Defaults
Manage Library Move Media
Mail Domain
Service Library Clean Drive
Service Library Menu
Manage Library Perform Inventory
Manage Library Release Magazine
View Drive Logs
Advanced Diagnostics for Service Personnel Only
View Logs
Save Drive Dump
Service Library Perform Diagnostics
Click Start Tests
Service Library Perform Key Path Diagnostics
Click Service, then Key Path Diagnostics
54. The 2U library Service Library Upgrade Firmware
Service Library Upgrade Firmware
Import Media
Service Library Reboot
Import and Export Media during Normal Library Operation
Export Media
Dedicated Cleaning Slot
Configuring I/O Stations and Reserving Slots
Go to Configure Library-General
Reserving Slots
Page
Data Cartridges
Using Ultrium Media
Type Color
Type Native Data Capacity Recording Format
Worm Write Once, Read Many
Cartridge Compatibility
Cleaning Cartridge
Worm Media Errors
Worm Media
Data Security on Worm Media
Cartridges
Bar Code Label
Write-Protect Switch
Guidelines for Using Bar Code Labels
Ensure Proper Packaging
Handling the Cartridges
Provide Training
Perform a Thorough Inspection
Provide Proper Acclimation and Environmental Conditions
Checking for gaps in the seams of a cartridge
Handle the Cartridge Carefully
120F
Page
Installation Problems
Troubleshooting
Maintenance Problems
Library → View Logs
Problem Solution
Front Panel LEDs
Error Codes
Cartridge Movement Problems
Or Web User Interface Configure Library → Restore Defaults
Drive ID SCSI, SAS, or Fibre Channel Loop
Release Magazines
Other Problems
Library Recovery Problem Determination
Customer Replaceable Units CRU and Service Spares
A 250w power supply with LEDs
A 80w power supply without LEDs Power Supply LED Meanings
Isolating Drive Sled Problems
Isolating Web User Interface Problems
Identifying a Suspect Cartridge
Isolating Accessor Scanner Problems
Isolating Host Attachment Interface Problems
Troubleshooting
Page
Preparing to Resolve an Error Code
Error Codes
Example Error Code
Error Code Description User Action
BCR
Error Code Description User Action
Error Code Description User Action
Error Code Description User Action
Error Code Description User Action
Error Code Description Robotics
Error during sled movement to rotation position
Error first sled init, move to sensor failed
Error during rotation to drive position
Error slider init, get range failed
Error during sled positioning without sensor
Error during sled movement in FLMoveSled function
Error during first slider movement
Error during first gripper movement
Sled movement to transport position failed
Sled movement to home sensor position failed
Movement of I/O slot failed
Sled movement to sensor failed
Page
Releasing the Magazines Manually
Service Procedures
Removing Cartridges from Magazine Slots
Access holes for the left magazine
Access holes for the right magazine
Left Magazines pulled out of the 2U library
Http//support.dell.com
Page
Tools Required
Check, Adjust, Remove, and Replace
Electrostatic Discharge
Relocating Your Library
Shipping lock and label storage location
Replacing a Tape Drive Sled
Scsi cable
A77ug027
A77ug028
2U Library
Replacing a Power Supply
Read Me before Continuing
Replacing a Library Controller Card
10. a Library Controller Card being removed from the library
Removal and Replacement
Replacing the Library Enclosure
Preparing the Defective Library for Replacement
Replacing Cartridge Magazines
A77ug101
Unpacking and Preparing the Replacement Library Enclosure
A77ug085
A77ug195
Important Read ME Before Continuing
Swapping Library Controller Cards
16. Removing a Library Controller Card from the library
17. Library Front Panel LEDs
Installing Your Drives in the Replacement Library Enclosure
A77ug027
Swapping Cartridge Magazines
19. Drive sled taping diagrams
20. Access hole for the left magazine facing rear of library
A77ug024
Swapping Power Supplies
23. a power supply being removed from a library
Installing the Replacement Library Enclosure
Desktop Installation
Rack Installation
Returning the Defective Library
Page
Element Type Element Address Range
Appendix A. Scsi Element Types and Addresses
Left Magazine Library Right Magazine
Rear Panel
Lower Left Magazine Lower Right Magazine Slot
Slot Drive
Figure A-1. Configuration of a One Partition System
Figure A-2. Configuration of a Two Partition System
Figure A-4. Configuration of a Four Partition System
Page
TapeAlert Flags Supported by the Library
Appendix B. TapeAlert Flags
Page
Flag Number Description Action Required
TapeAlert Flags Supported by the Drive
Flag Number Description Action Required
Panel Control → Move
→ Service → Drive Power or
Interface Manage Library →
Move Media
Page
Sense Key
Appendix C. Sense Data
Library Sense Data
ASC Ascq
Appendix C. Sense Data C-3
ASC Ascq
Appendix C. Sense Data C-5
Bit Address or Name Byte
Drive Sense Data
Table C-2. LTO Tape Drive Sense Data
Table C-2. LTO Tape Drive Sense Data
Table C-2. LTO Tape Drive Sense Data
Sense Key 5 Illegal Request
Sense Key 4 Hardware Error
Sense Key 7 Data Protect
Sense Key 6 Unit Attention
Table C-2. LTO Tape Drive Sense Data
Appendix C. Sense Data C-13
Page
Appendix D. Enabling LUN Support in Linux
Enabling LUN Support in Netware
Red Hat Enterprise Linux
Appendix D. Enabling LUN Support in Linux D-3
Page
Browser connectivity to a link-local IPv6 address
Windows 2003/XP
Browser connectivity to a global unicast IPv6 address
″http//hostname
Windows 2008/Vista
Appendix F. Library Configuration Form
SAS Drive
Settings
Scsi Drive
User Accounts
Trademarks
Page
Beginning of Partition. See BOP
Glossary
Numbers
Page
Differential. See High Voltage Differential HVD
Page
LCD. See liquid crystal display
Page
Picker. See Accessor
Secure Sockets Layer. See SSL Segment. a part
Telnet. See Telnet Service Port
Page
ASC C-1 Ascq
Index
LUN
Worm
Page