Audix Voice Power
585-310-108 Issue 1, December
FCC Warning Statement
Contents
6386E/33 WGS
Software Installation
Configuration Testing and Troubleshooting
Upgrade Procedures
Recovering from System Failures
Installing a Second Hard Disk
Index
Securing the Board
Removing SIMMs from the Memory Expansion Board
Printer Operation Panel
About This Guide
Purpose and Scope
Intended Audience
Assistance
Conventions Used in This Guide
Shown in this style of type
Information Conventions
Document No -200-1
Related Documents
Document No
Introduction
Preassembled Systems
Physical Requirements
Selecting a Site
Materials Checklist
DescriptionCheck
DescriptionCheck
Remote Terminal Package
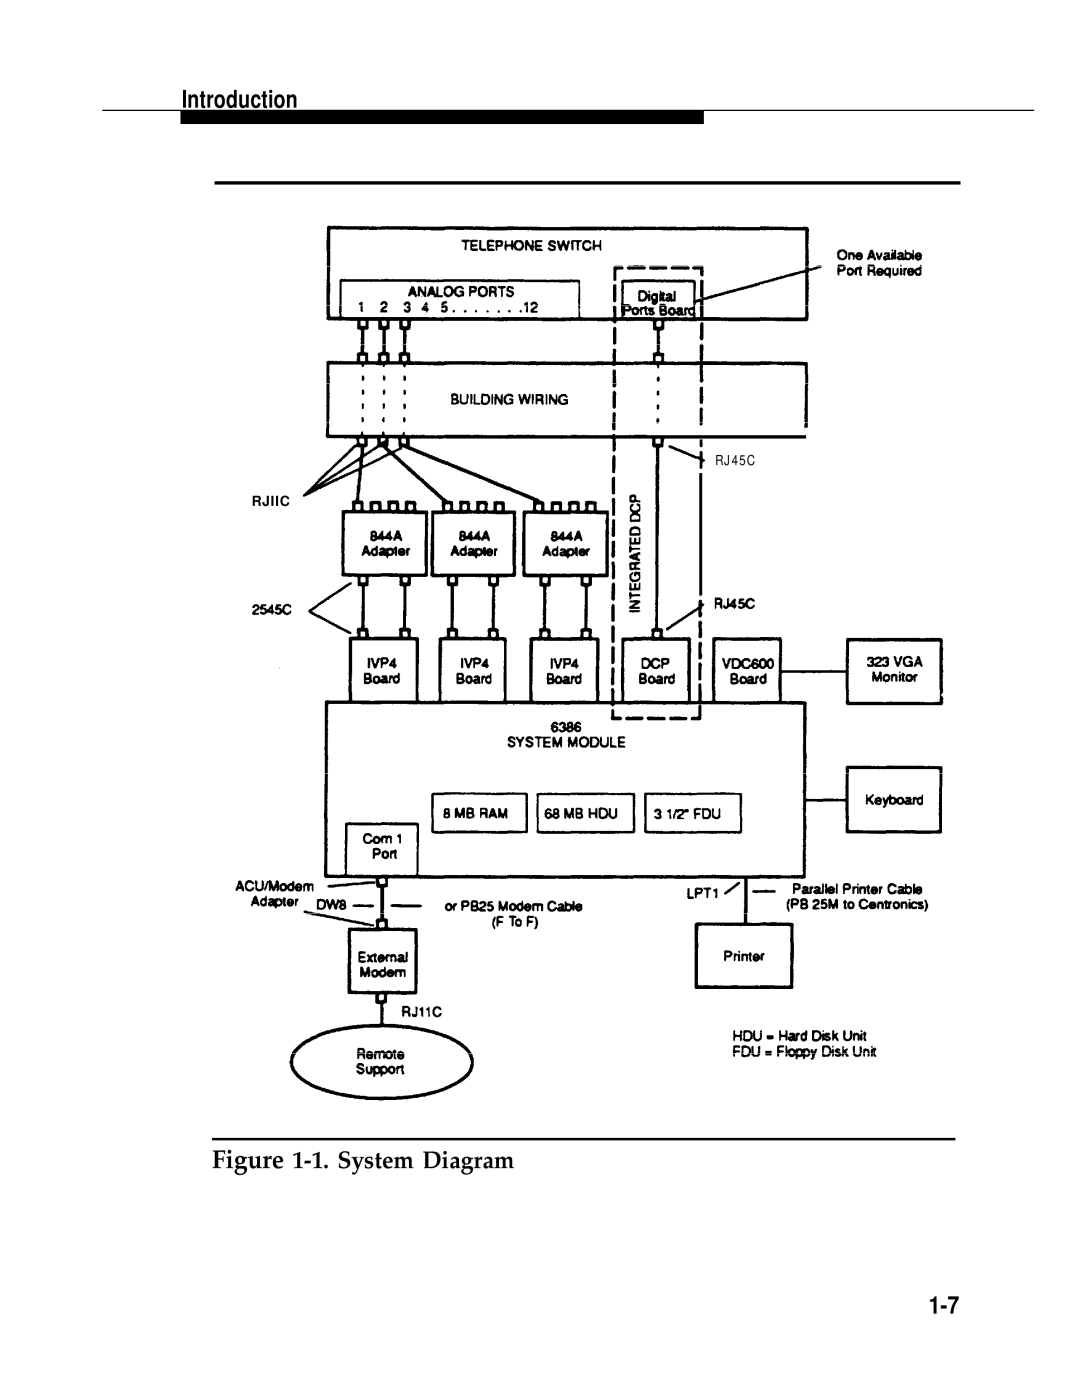
System Diagram
T E
System Diagram
Hardware Installation
Hardware Overview
Hardware Installation
General Installation Instructions
Opening and Closing the Case
Opening the 6386 WGS
6386 WGS Main Cover-Securing Screws
Opening the 6386E WGS
6386E WGS Removing Top Cover
E WGS Access Cover Removal
Opening the 6386/SX WGS
SX WGS Main Cover-Securing Screws
Opening the 6386/25 WGS
25 WGS Main Cover-Securing Screws
Opening the 6386E/33 WGS
E/33 WGS Removing Outside Cover
E/33 WGS Access Cover Removal
General Instructions For Installing Circuit Boards
Removing the Slot Cover
Inserting a Circuit Board into an Expansion Slot
10. Securing the Board
Installing Additional Memory
Installing Additional Memory in the 6386 and 6386E WGS
T E
12. Removing SIMMs from the Memory Expansion Board
Hardware Installation
13. Installing SIMMs on the Memory Expansion Board
14. Switch L07LL-1 through L07LL-8
Hardware Installation
16. Location of Memory Simm Sockets on the 6386/SX WGS
Sockets
Expansion Slots Sockets
19. Location of Memory Simm Sockets on the 6386E/33 WGS
20. Inserting the SIMMs into Sockets
Setting Motherboard Jumpers on the 6386/25 and 6386E/33 WGS
Total onboard RAM 8MB
Hardware Installation
Hardware Installation
23. Location of Motherboard Jumpers on the 6386E/33 WGS
On the 6386E/33 WGS
Onboard RAM Configuration Jumpers
On the 6386/25 WGS Version
Serial Port Configuration Jumpers
Replacing Disk Drive Cables
VDC600Board Configuration and Installation
24. VDC600 Switch and Jumper Locations and Settings
IVP4 Board Configuration and Installation
Configuration of New Boards
26. Factory Switch Configurations
Configuration of Previously Installed Boards
Setting Switch SW1.1
27. Settings for SW1.1
28. Settings for SW12.1
Determining the Board Configuration by Testing
If the numbers do not agree, proceed to Step
Hardware Installation
Hardware Installation
Renumbering Voice Channels
Voice System Administration window appears
Configuration Management window appears
Move the cursor to Renumber Voice Channels
DCP Board Configuration and Installation
29. Location of Jumpers on DCP Board
Connecting Peripherals and Cables
30 WGS System Module Back Panel
31 E WGS System Module Back Panel
32 /SX WGS System Module Back Panel
34 E/33 WGS System Module Back Panel
Configuration the Setup Utility
Hard disk
Running Setup from a Floppy Disk
You may find it necessary to modify the Extended
For the 6386/SX, 6386/25, and 6386E/33 WGS, if you are
Connecting Voice and Data Lines
Connecting the IVP Voice Lines
35. IVP4 Board with 884A Adapter for RJ11C
Hardware Installation
Connecting the DCP Data Line
Setting Up a Report Printer
Will be in Function Mode with function
When pressed in Menu Mode, causes
Selected. Also pressing When
Printer to store the selected value for
Setting the Control Values
Connecting the Printer
Diagnostics
Follow the directions on the screen to run the diagnostics
Installing a Remote-Access Modem
Software Installation
Pre-Installation Considerations
T E
Verifying Hard Disk Size
Wait for the following prompt to display
Installing the Unix Operating System
To install the Unix operating system, follow these steps
Create a partition
=========
======
Type 100 and press Enter Following message displays
Type Y and press Enter Partition menu displays again
System displays the following message
At the end of the analysis, the following displays
Type y and press Enter System displays
Type y and press Enter System displays the following
T E
Disk Size Cylinders File Area
Written down in the procedure Verifying Hard Disk Size
Enter number of cylinders
System calculates the value for /usr2
Floppy Diskette
System will be rebuilt
Only
Verifying Unix System Installation
Software Installation
Installing Audix Voice Power
Creating a Login for Voice Administration
T E
Please indicate the installation medium you intend to use
Installing Integrated Voice Power System Software
PressEnter to return to the # prompt
T E
Press 1 and Enter to enable the parallel port
Interrupts System displays
Monitor Type System displays
Enter the appropriate answer and press Enter
Memory Configuration
Speech System displays
Software Installation
Installing Audix Voice Power Application Software
T E
Please indicate the installation. medium you intend to use
Type audix and press Enter. You are asked to confirm
Installing the Switch Integration Software
Page
Installing Cartridge Tape Utility Software
System displays a list of interrupts. Then it displays
Installing Software for Remote Access
Press F2 CHOICES. Continue pressing
T E
Enter a filename, ‘all’, ‘done’, or ‘files’
Verifying Software Components
Printer Software Setup
System Administration menu is displayed
Software Installation
Press F3 Save
Completing Installation
Acceptance Testing
T E
Testing the IVP4 Switch Settings
Peripheral Setup menu appears
Enable/Disable Second Serial Port menu appears
DCP Conflict
Configuration Testing Troubleshooting
Troubleshooting is limited to two areas
Power-On Self Test
Hardware Verification
Motherboard problem
Bad controller Motherboard problem
Screen Item
Cause of Failure
Hard Disk Failure
Motherboard Failure
Data Corruption
General Diagnostics
IVP4 Board Diagnostics
Voice System Administration menu is displayed
Application Operation Problems
Press F3 Save to begin execution
User Response
Message Waiting Lamp will not turn on or off
Trouble Indication
Unable to login to the Voice Mail Service
Outcalls not being made reliably
User Response
Trouble Indication
Stop and restart the voice system
Upgrade Procedures
Upgrade Procedures
Upgrading from Release 1.1 to Release
T E
Upgrade Procedures
Face Face Help Fmli
Type y or n as appropriate
Type y and press Enter Following message appears
Type y and press Enter Following messages appear
Upgrade Procedures
You will now see a series of .‘ s
Upgrade Procedures
Upgrade Procedures
Upgrading from Release 2.0 to
Talkfile 46 phrase all t a l k f i l e 4 7 p h r a s e a l l
Upgrade Procedures
Upgrade Procedures
Do you wish to continue removal Audix Voice Power?
Upgrade Procedures
T E
Upgrade Procedures
Parallel Ports System displays
Monitor Type System displays
Enter the appropriate answer
Adds the following message
Unix Kernel has been rebuilt
Please indicate the installation medium you intend to use
T E
Upgrade Procedures
Scrpwdb
T E
Upgrade Procedures
Upgrade Procedures
Backing Up Administrative Files
At the Personal Backup menu, move the cursor to Selective
Backing Up Speech Files
Restart the procedure Backing Up Speech Files
Formatting a Floppy Disk
Upgrade Procedures
Recovering from System Failures
Recovering from Data Corruption
Recovering from Hard Disk Crash
Recovering from Motherboard Failure
Confidence Test
Materials Required for Restoring Files
Restoring Files
Restoring Administrative Files
Restore in progress
Restoring Speech Files
Restoring speech
Be sure to return all channels to Inserv
Installing a Second Hard Disk
Introduction
Installing the Second Hard Disk
Usr/vmdb Usr/ocdb
Operating System, in Chapter
Appendix a Installing a Second Hard Disk
Modification software, installation Backup
Cartridge Tape Utility software, installing
Creating, voice administration login
DCP Board Conflict with serial port 2,3-45installation
Grounding procedure
Humidity requirements Installation
Files, restoring
Hardware
Touch-Tone, keys representation
Remote-access, installing modem, 2-66Requirements
Problems, application operation Recovery from
Verifying
Unix operating system installation
Upgrading