INFORMACIÓN DEL DISCO

( (

+RW

-R +R DL

))

DISK-INFORMATIONEN

( (

+RW -R +R DL

))

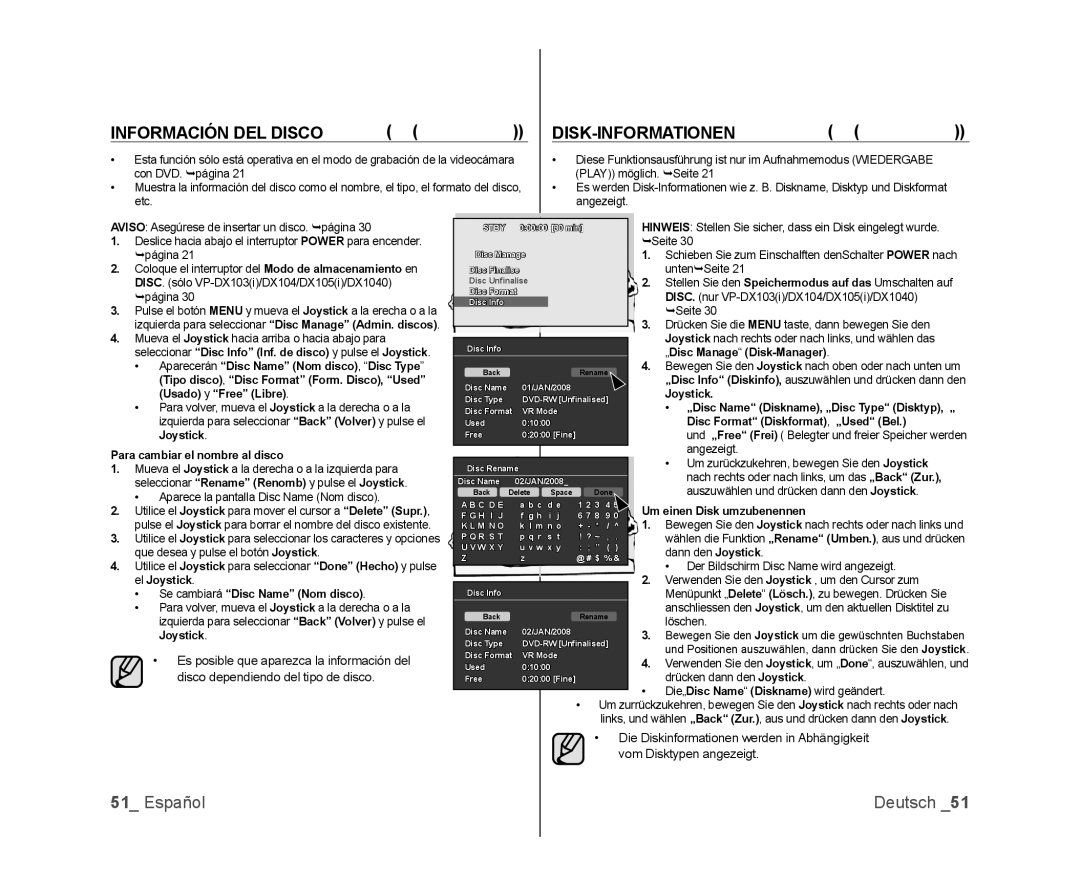
Esta función sólo está operativa en el modo de grabación de la videocámara con DVD. página 21

Muestra la información del disco como el nombre, el tipo, el formato del disco, etc.

Diese Funktionsausführung ist nur im Aufnahmemodus (WIEDERGABE (PLAY)) möglich. Seite 21

Es werden Disk-Informationen wie z. B. Diskname, Disktyp und Diskformat angezeigt.

AVISO: Asegúrese de insertar un disco. página 30

1.Deslice hacia abajo el interruptor POWER para encender. página 21

2.Coloque el interruptor del Modo de almacenamiento en DISC. (sólo VP-DX103(i)/DX104/DX105(i)/DX1040) página 30

3.Pulse el botón MENU y mueva el Joystick a la erecha o a la izquierda para seleccionar “Disc Manage” (Admin. discos).

4.Mueva el Joystick hacia arriba o hacia abajo para seleccionar “Disc Info” (Inf. de disco) y pulse el Joystick.

Aparecerán “Disc Name” (Nom disco), “Disc Type(Tipo disco), “Disc Format” (Form. Disco), “Used” (Usado) y “Free” (Libre).

Para volver, mueva el Joystick a la derecha o a la izquierda para seleccionar “Back” (Volver) y pulse el Joystick.

Para cambiar el nombre al disco

1. Mueva el Joystick a la derecha o a la izquierda para

seleccionar “Rename” (Renomb) y pulse el Joystick.

• Aparece la pantalla Disc Name (Nom disco).

STBY

0:00:00 [30 min]

Disc Manage

Disc Finalise


Disc Unfinalise

Disc Format


Disc Info


Disc Info


Back


Rename

Disc Name

01/JAN/2008


Disc Type

DVD-RW [Unfinalised]

Disc Format VR Mode


Used

0:10:00


Free

0:20:00 [Fine]


Disc Rename


Disc Name

02/JAN/2008_


Back

Delete

Space

Done

HINWEIS: Stellen Sie sicher, dass ein Disk eingelegt wurde. Seite 30

1.Schieben Sie zum Einschalften denSchalter POWER nach untenSeite 21

2.Stellen Sie den Speichermodus auf das Umschalten auf DISC. (nur VP-DX103(i)/DX104/DX105(i)/DX1040) Seite 30

3.Drücken Sie die MENU taste, dann bewegen Sie den Joystick nach rechts oder nach links, und wählen das „Disc Manage(Disk-Manager).

4.Bewegen Sie den Joystick nach oben oder nach unten um „Disc Info“ (Diskinfo), auszuwählen und drücken dann den

Joystick.

„Disc Name“ (Diskname), „Disc Type“ (Disktyp), „ Disc Format“ (Diskformat), „Used“ (Bel.)

und „Free“ (Frei) ( Belegter und freier Speicher werden angezeigt.

Um zurückzukehren, bewegen Sie den Joystick nach rechts oder nach links, um das „Back“ (Zur.), auszuwählen und drücken dann den Joystick.

2.

Utilice el Joystick para mover el cursor a “Delete” (Supr.),


pulse el Joystick para borrar el nombre del disco existente.

3.

Utilice el Joystick para seleccionar los caracteres y opciones


que desea y pulse el botón Joystick.

4.

Utilice el Joystick para seleccionar “Done” (Hecho) y pulse


el Joystick.


Se cambiará “Disc Name” (Nom disco).


Para volver, mueva el Joystick a la derecha o a la


izquierda para seleccionar “Back” (Volver) y pulse el


Joystick.


Es posible que aparezca la información del


disco dependiendo del tipo de disco.

A B C D E F G H I J K L M N O

P Q R S T U V W X Y Z

Disc Info

Back

Disc Name

Disc Type

Disc Format

Used

Free

a b c

d e

1 2 3

4 5

Um einen Disk umzubenennen

f g h

i j

6 7 8

9 0

k l m n o

+ - *

/ ^

1.

Bewegen Sie den Joystick nach rechts oder nach links und

p q r

s t

! ? ~

, .


wählen die Funktion „Rename“ (Umben.), aus und drücken

u v w

x y

: ; ”

( )


dann den Joystick.

z


@ # $ % &


• Der Bildschirm Disc Name wird angezeigt.


2.

Verwenden Sie den Joystick , um den Cursor zum


Menüpunkt „Delete(Lösch.), zu bewegen. Drücken Sie


Rename


anschliessen den Joystick, um den aktuellen Disktitel zu


löschen.

02/JAN/2008


3.

Bewegen Sie den Joystick um die gewüschnten Buchstaben

DVD-RW [Unfinalised]


und Positionen auszuwählen, dann drücken Sie den Joystick.

VR Mode


0:10:00


4. Verwenden Sie den Joystick, um „Done“, auszuwählen, und

0:20:00 [Fine]


drücken dann den Joystick.

Die„Disc Name(Diskname) wird geändert. ückzukehren, bewegen Sie den Joystick nach rechts oder nach

links, und wählen „Back“ (Zur.), aus und drücken dann den Joystick.

Die Diskinformationen werden in Abhängigkeit vom Disktypen angezeigt.

51_ Español

Deutsch _51

Page 57
Image 57
Samsung VP-DX100/EDC, VP-MX25E/EDC Información DEL Disco, Disk-Informationen, Es posible que aparezca la información del

VP-DX100/XEF, VP-DX105/EDC, VP-DX103/XEF, VP-DX100/CAN, VP-MX25E/EDC specifications

The Samsung VP-MX25E/EDC, VP-DX100/XEF, and VP-DX105/XEF are compact camcorders designed to deliver high-quality video recording and user-friendly features. These models embody Samsung's commitment to innovation in portable video technology, offering a range of functionalities to cater to both amateur and experienced videographers.

One of the standout features of the VP-MX25E/EDC is its 34x optical zoom lens, which allows users to capture sharp images from a distance. This feature is particularly beneficial for events such as concerts or outdoor gatherings, where being close to the subject may not be feasible. The camcorder also boasts a 720p HD video recording capability, ensuring that your videos are clear and vibrant.

Both the VP-DX100/XEF and VP-DX105/XEF models are equipped with a 1/6-inch CCD sensor, which provides excellent color reproduction and low light performance. The built-in image stabilization technology minimizes the effects of shaky hands, allowing for smooth and steady footage even during dynamic shooting conditions. This is crucial for anyone looking to share videos online or preserve family moments in high quality.

In terms of usability, the camcorders feature a 2.7-inch LCD screen that tilts out for easy framing and playback. This intuitive display makes it simple for users to navigate through settings and access shooting modes. The VP-DX105/XEF adds a touch of versatility with its touchscreen interface, allowing for more fluid navigation and control.

For storage, these models utilize SD/SDHC memory cards, providing ample space for recording long videos without the worry of running out of storage. Additionally, they come with various shooting modes, including face detection and scene modes, which enhance the shooting experience by automatically adjusting settings for optimal results.

Battery life is another important consideration, and these camcorders come with efficient batteries that allow for extended recording times, suitable for long events or gatherings. Samsung's focus on ergonomics ensures that the camcorders are lightweight and easy to handle, making them perfect for on-the-go recording.

In summary, the Samsung VP-MX25E/EDC, VP-DX100/XEF, and VP-DX105/XEF offer an excellent balance of quality, ease of use, and advanced features. Whether for capturing family moments, educational videos, or personal projects, these camcorders provide reliable performance that meets the demands of today’s content creators.