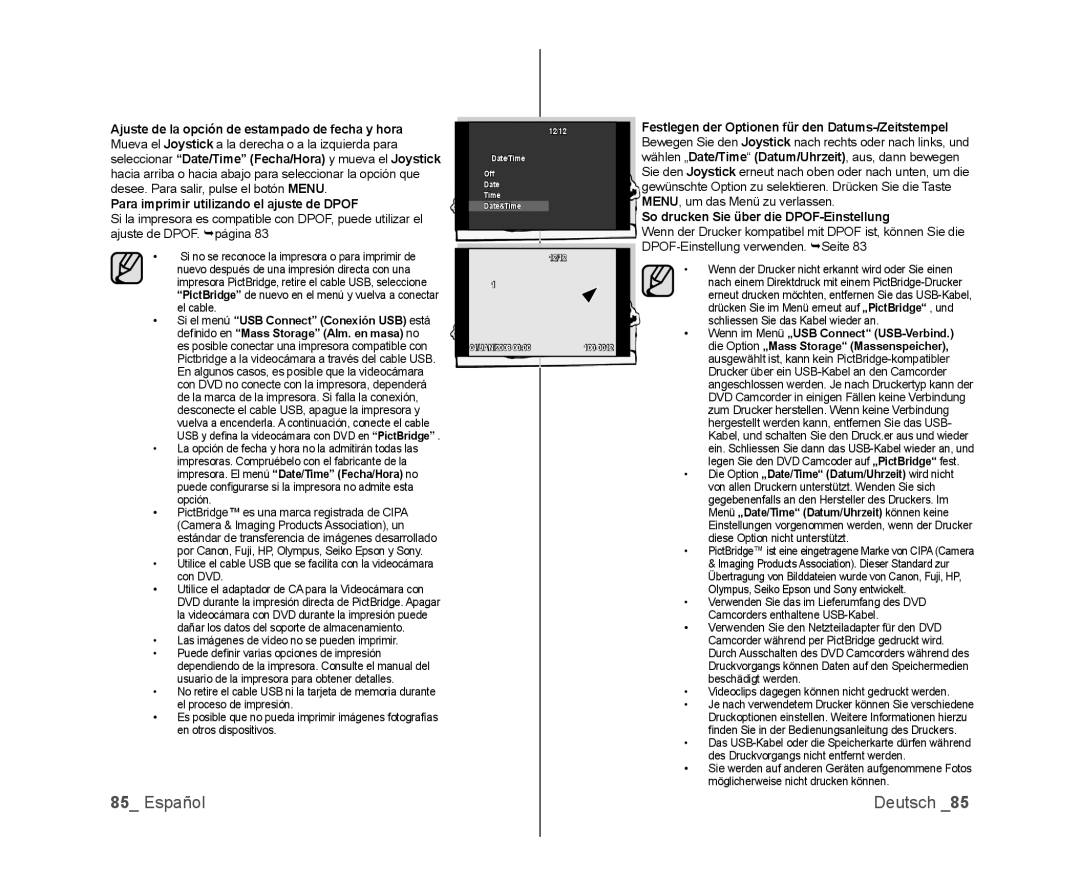
Ajuste de la opción de estampado de fecha y hora Mueva el Joystick a la derecha o a la izquierda para seleccionar “Date/Time” (Fecha/Hora) y mueva el Joystick hacia arriba o hacia abajo para seleccionar la opción que desee. Para salir, pulse el botón MENU.

Para imprimir utilizando el ajuste de DPOF

Si la impresora es compatible con DPOF, puede utilizar el ajuste de DPOF. página 83

Si no se reconoce la impresora o para imprimir de nuevo después de una impresión directa con una impresora PictBridge, retire el cable USB, seleccione “PictBridge” de nuevo en el menú y vuelva a conectar el cable.

Si el menú “USB Connect” (Conexión USB) está defi nido en “Mass Storage” (Alm. en masa) no es posible conectar una impresora compatible con Pictbridge a la videocámara a través del cable USB. En algunos casos, es posible que la videocámara con DVD no conecte con la impresora, dependerá de la marca de la impresora. Si falla la conexión, desconecte el cable USB, apague la impresora y vuelva a encenderla. A continuación, conecte el cable USB y defi na la videocámara con DVD en “PictBridge” .

La opción de fecha y hora no la admitirán todas las impresoras. Compruébelo con el fabricante de la impresora. El menú “Date/Time” (Fecha/Hora) no puede confi gurarse si la impresora no admite esta opción.

PictBridge™ es una marca registrada de CIPA (Camera & Imaging Products Association), un estándar de transferencia de imágenes desarrollado por Canon, Fuji, HP, Olympus, Seiko Epson y Sony.

Utilice el cable USB que se facilita con la videocámara con DVD.

Utilice el adaptador de CA para la Videocámara con DVD durante la impresión directa de PictBridge. Apagar la videocámara con DVD durante la impresión puede dañar los datos del soporte de almacenamiento.

Las imágenes de vídeo no se pueden imprimir.

Puede defi nir varias opciones de impresión dependiendo de la impresora. Consulte el manual del usuario de la impresora para obtener detalles.

No retire el cable USB ni la tarjeta de memoria durante el proceso de impresión.

Es posible que no pueda imprimir imágenes fotografías en otros dispositivos.

12/12

Date/Time

Off

Date

Time

Date&Time

12/12

1

01/JAN/2008 00:00

100-0012

Festlegen der Optionen für den Datums-/Zeitstempel Bewegen Sie den Joystick nach rechts oder nach links, und wählen „Date/Time(Datum/Uhrzeit), aus, dann bewegen Sie den Joystick erneut nach oben oder nach unten, um die gewünschte Option zu selektieren. Drücken Sie die Taste MENU, um das Menü zu verlassen.

So drucken Sie über die DPOF-Einstellung

Wenn der Drucker kompatibel mit DPOF ist, können Sie die DPOF-Einstellung verwenden. Seite 83

Wenn der Drucker nicht erkannt wird oder Sie einen nach einem Direktdruck mit einem PictBridge-Drucker erneut drucken möchten, entfernen Sie das USB-Kabel, drücken Sie im Menü erneut auf „PictBridge“ , und schliessen Sie das Kabel wieder an.

Wenn im Menü „USB Connect“ (USB-Verbind.) die Option „Mass Storage“ (Massenspeicher), ausgewählt ist, kann kein PictBridge-kompatibler Drucker über ein USB-Kabel an den Camcorder angeschlossen werden. Je nach Druckertyp kann der DVD Camcorder in einigen Fällen keine Verbindung zum Drucker herstellen. Wenn keine Verbindung hergestellt werden kann, entfernen Sie das USB- Kabel, und schalten Sie den Druck.er aus und wieder ein. Schliessen Sie dann das USB-Kabel wieder an, und legen Sie den DVD Camcoder auf „PictBridge“ fest.

Die Option „Date/Time“ (Datum/Uhrzeit) wird nicht von allen Druckern unterstützt. Wenden Sie sich gegebenenfalls an den Hersteller des Druckers. Im Menü „Date/Time“ (Datum/Uhrzeit) können keine Einstellungen vorgenommen werden, wenn der Drucker diese Option nicht unterstützt.

PictBridge™ ist eine eingetragene Marke von CIPA (Camera & Imaging Products Association). Dieser Standard zur Übertragung von Bilddateien wurde von Canon, Fuji, HP, Olympus, Seiko Epson und Sony entwickelt.

Verwenden Sie das im Lieferumfang des DVD Camcorders enthaltene USB-Kabel.

Verwenden Sie den Netzteiladapter für den DVD Camcorder während per PictBridge gedruckt wird. Durch Ausschalten des DVD Camcorders während des Druckvorgangs können Daten auf den Speichermedien beschädigt werden.

Videoclips dagegen können nicht gedruckt werden.

Je nach verwendetem Drucker können Sie verschiedene Druckoptionen einstellen. Weitere Informationen hierzu fi nden Sie in der Bedienungsanleitung des Druckers.

Das USB-Kabel oder die Speicherkarte dürfen während des Druckvorgangs nicht entfernt werden.

Sie werden auf anderen Geräten aufgenommene Fotos möglicherweise nicht drucken können.

85_ Español

Deutsch _85

Page 91
Image 91
Samsung VP-DX100/XEF, VP-MX25E/EDC, VP-DX103/XEF, VP-DX100/EDC, VP-DX100/CAN manual Las imágenes de vídeo no se pueden imprimir

VP-DX100/XEF, VP-DX105/EDC, VP-DX103/XEF, VP-DX100/CAN, VP-MX25E/EDC specifications

The Samsung VP-MX25E/EDC, VP-DX100/XEF, and VP-DX105/XEF are compact camcorders designed to deliver high-quality video recording and user-friendly features. These models embody Samsung's commitment to innovation in portable video technology, offering a range of functionalities to cater to both amateur and experienced videographers.

One of the standout features of the VP-MX25E/EDC is its 34x optical zoom lens, which allows users to capture sharp images from a distance. This feature is particularly beneficial for events such as concerts or outdoor gatherings, where being close to the subject may not be feasible. The camcorder also boasts a 720p HD video recording capability, ensuring that your videos are clear and vibrant.

Both the VP-DX100/XEF and VP-DX105/XEF models are equipped with a 1/6-inch CCD sensor, which provides excellent color reproduction and low light performance. The built-in image stabilization technology minimizes the effects of shaky hands, allowing for smooth and steady footage even during dynamic shooting conditions. This is crucial for anyone looking to share videos online or preserve family moments in high quality.

In terms of usability, the camcorders feature a 2.7-inch LCD screen that tilts out for easy framing and playback. This intuitive display makes it simple for users to navigate through settings and access shooting modes. The VP-DX105/XEF adds a touch of versatility with its touchscreen interface, allowing for more fluid navigation and control.

For storage, these models utilize SD/SDHC memory cards, providing ample space for recording long videos without the worry of running out of storage. Additionally, they come with various shooting modes, including face detection and scene modes, which enhance the shooting experience by automatically adjusting settings for optimal results.

Battery life is another important consideration, and these camcorders come with efficient batteries that allow for extended recording times, suitable for long events or gatherings. Samsung's focus on ergonomics ensures that the camcorders are lightweight and easy to handle, making them perfect for on-the-go recording.

In summary, the Samsung VP-MX25E/EDC, VP-DX100/XEF, and VP-DX105/XEF offer an excellent balance of quality, ease of use, and advanced features. Whether for capturing family moments, educational videos, or personal projects, these camcorders provide reliable performance that meets the demands of today’s content creators.