TallyGenicom Intelliprint 8008N Color Laser Printer User Guide
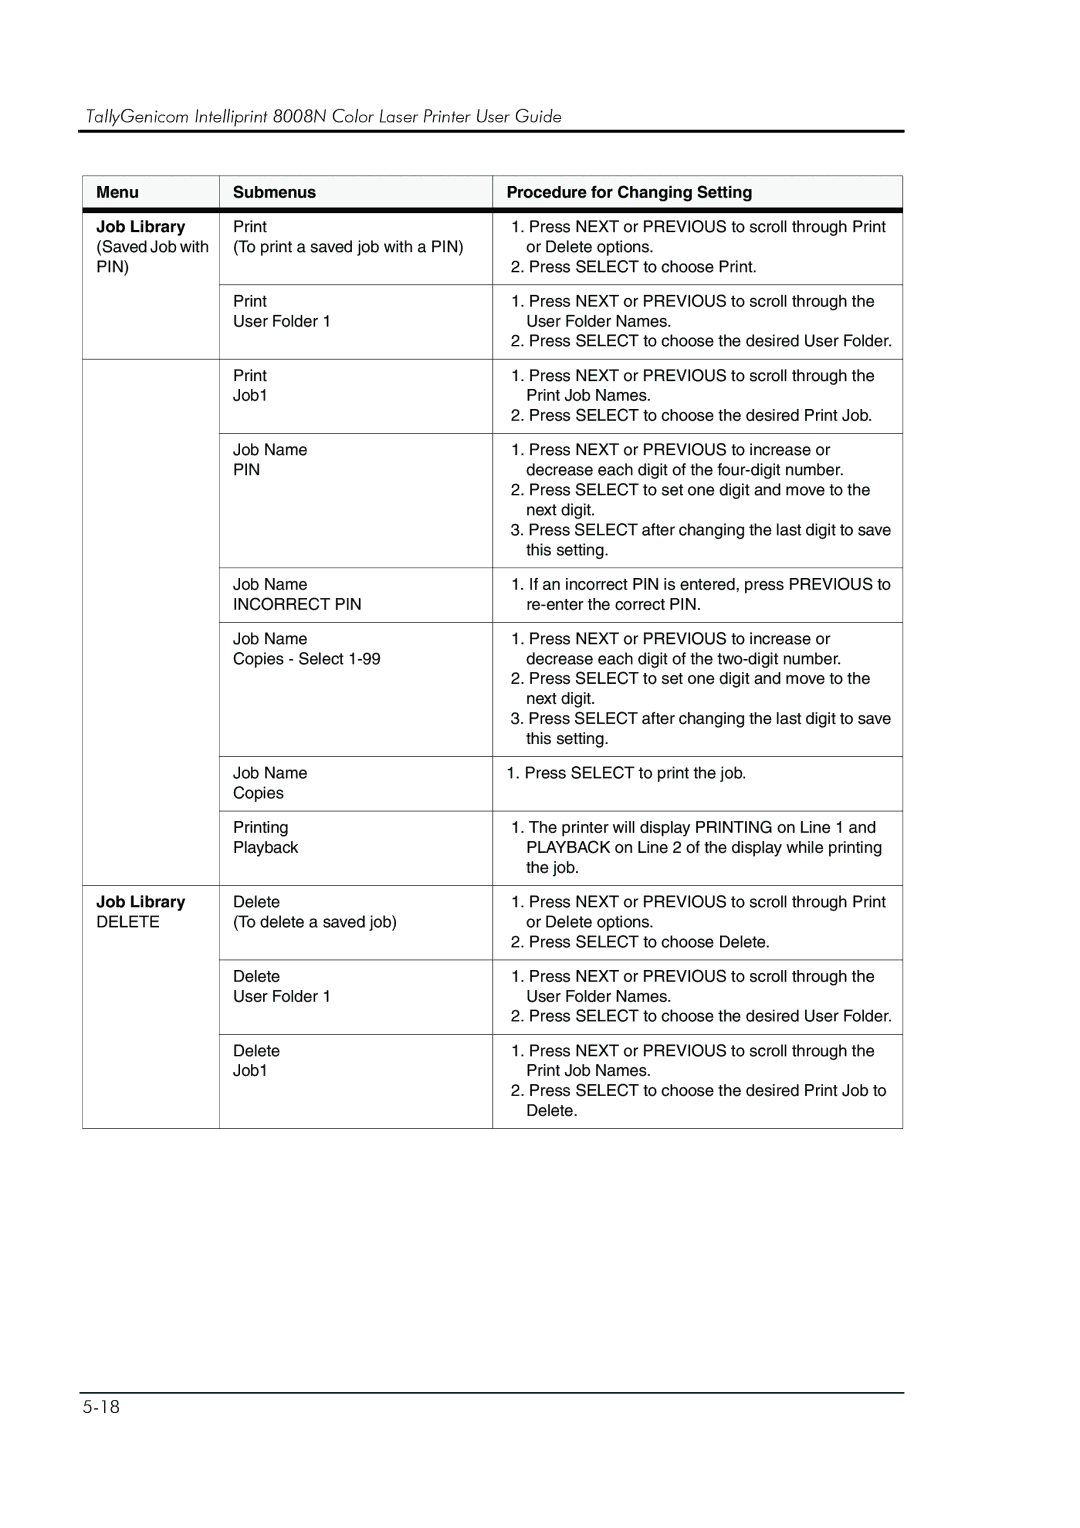
Menu | Submenus | Procedure for Changing Setting | |
|
|
|
|
Job Library | 1. | Press NEXT or PREVIOUS to scroll through Print | |
(Saved Job with | (To print a saved job with a PIN) |
| or Delete options. |
PIN) |
| 2. | Press SELECT to choose Print. |
|
|
|
|
| 1. | Press NEXT or PREVIOUS to scroll through the | |
| User Folder 1 |
| User Folder Names. |
|
| 2. | Press SELECT to choose the desired User Folder. |
|
|
|
|
| 1. | Press NEXT or PREVIOUS to scroll through the | |
| Job1 |
| Print Job Names. |
|
| 2. | Press SELECT to choose the desired Print Job. |
|
|
| |
| Job Name | 1. Press NEXT or PREVIOUS to increase or | |
| PIN |
| decrease each digit of the |
|
| 2. | Press SELECT to set one digit and move to the |
|
|
| next digit. |
|
| 3. Press SELECT after changing the last digit to save | |
|
|
| this setting. |
|
|
|
|
| Job Name | 1. | If an incorrect PIN is entered, press PREVIOUS to |
| INCORRECT PIN |
| |
|
|
| |
| Job Name | 1. Press NEXT or PREVIOUS to increase or | |
| Copies - Select |
| decrease each digit of the |
|
| 2. | Press SELECT to set one digit and move to the |
|
|
| next digit. |
|
| 3. Press SELECT after changing the last digit to save | |
|
|
| this setting. |
|
|
| |
| Job Name | 1. Press SELECT to print the job. | |
| Copies |
|
|
|
|
|
|
| Printing | 1. | The printer will display PRINTING on Line 1 and |
| Playback |
| PLAYBACK on Line 2 of the display while printing |
|
|
| the job. |
|
|
|
|
Job Library | Delete | 1. | Press NEXT or PREVIOUS to scroll through Print |
DELETE | (To delete a saved job) |
| or Delete options. |
|
| 2. | Press SELECT to choose Delete. |
|
|
|
|
| Delete | 1. | Press NEXT or PREVIOUS to scroll through the |
| User Folder 1 |
| User Folder Names. |
|
| 2. | Press SELECT to choose the desired User Folder. |
|
|
|
|
| Delete | 1. | Press NEXT or PREVIOUS to scroll through the |
| Job1 |
| Print Job Names. |
|
| 2. | Press SELECT to choose the desired Print Job to |
|
|
| Delete. |
|
|
|
|