Manuals
/
Kyocera
/
Computer Equipment
/
Printer
Kyocera
KM-C830D
manual
Names of Parts, Main body
Models:
KM-C830
KM-C830D
1
18
161
161
Download
161 pages
13.1 Kb
15
16
17
18
19
20
21
22
Troubleshooting
Specification
Install
Default settings
Symbols
Original size indicator lines
Preset zoom mode
Basic copying procedure
Sharpness adjustment samples
Color Copy Settings
Page 18
Image 18
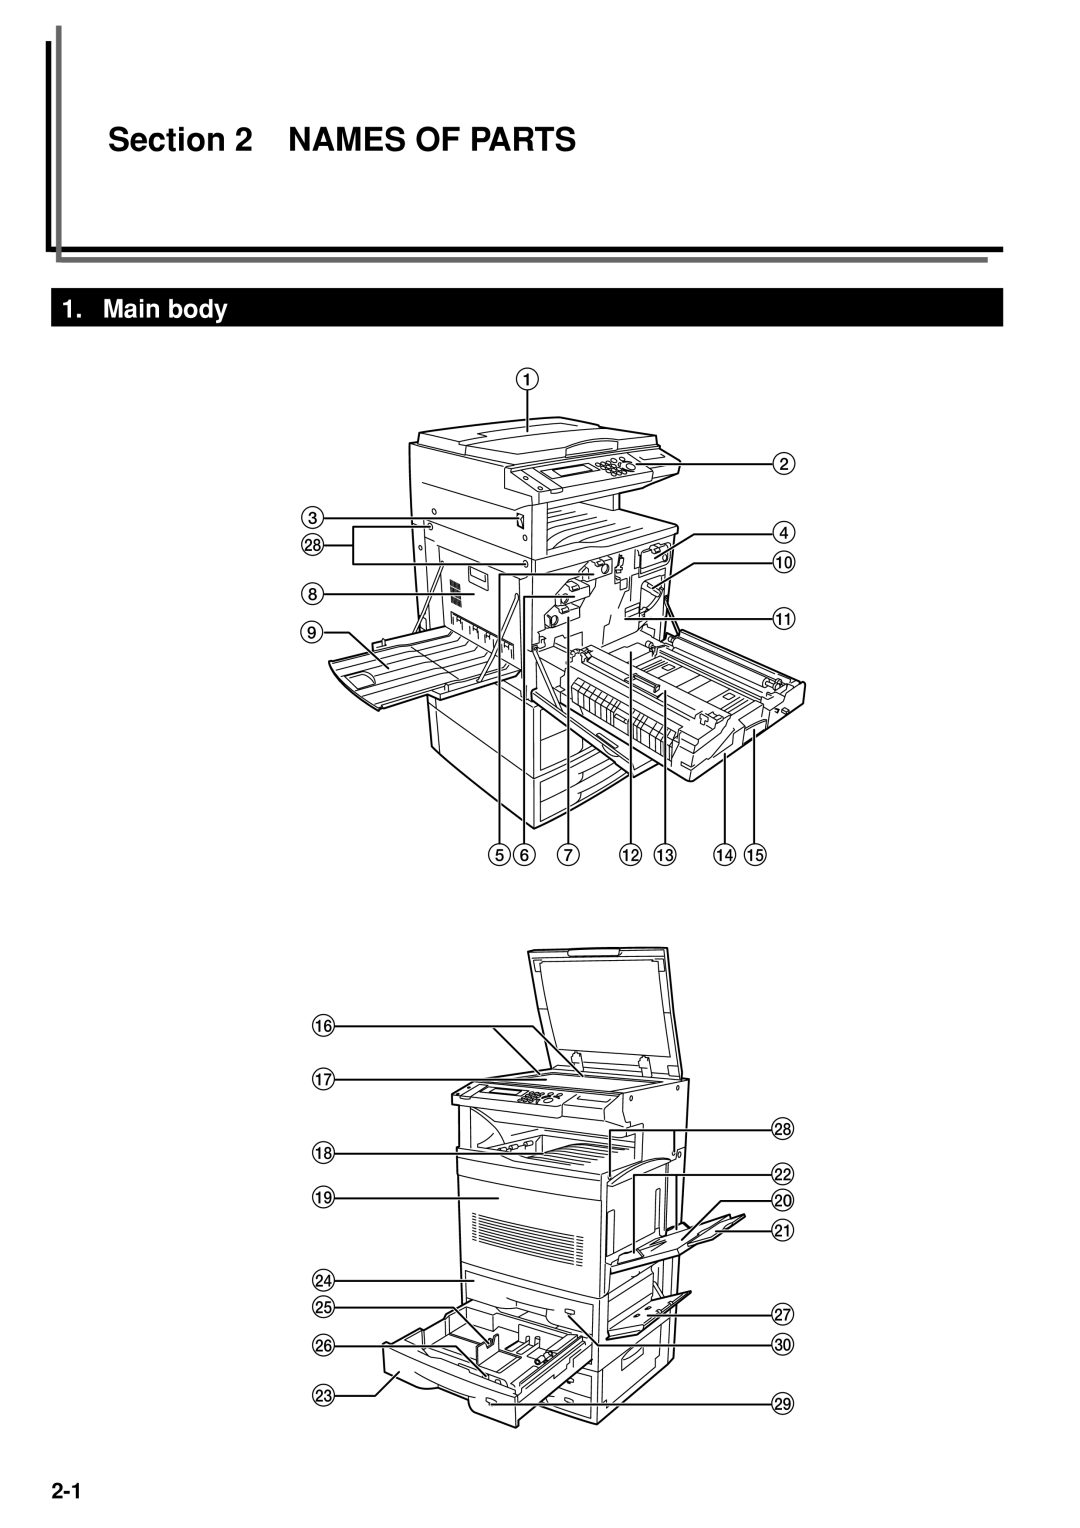
Section 2 NAMES OF PARTS
1. Main body
1
2
3
4
—
0
8
9
!
56 7
@ #
$ %
^
&
°
*
¤
(
)
⁄
›
fi
‡
fl
‚
‹
·
2-1
Page 17
Page 19
Page 18
Image 18
Page 17
Page 19
Contents
Operation Guide
Page
Image quality adjustment samples
Color balance adjustment samples
Iii
Sharpness adjustment samples
Symbols
Contents
Copier Management
Troubleshooting
Preset zoom mode
Auto paper selection mode
Auto magnification selection mode
XY zoom mode Image quality selection
Insert sheet modes Layout modes Booklet mode
Print page numbers mode
Transparency + backing sheet mode Presentation mode
Book to Book mode
Language selection function Copy management mode
English Français Español
IMPORTANT! Please Read First
Installation Precautions
Precautions for USE
Precautions for USE
Names of Parts
Main body
· Paper size indicator
Main switch
Original size indicator lines
Original cover optional
Inch specifications
Metric specifications
Operation panel
Printer Attention indicator
Auto Selection/Filing key & indicator
Book Mode key & indicator
Printer Ready indicator
´ Black&White key
Metric specifications
Automatic drawer switching function
‰ Full Color key
Loading paper
Loading paper into a drawer
Preparations
Setting paper on the multi-bypass tray
Setting the paper size for the multi-bypass tray
Will appear. Use the O cursor or the P cursor key to select
When printing onto envelopes
Acceptable envelope types Size
Designating the envelope size
Setting the envelopes on the multi-bypass tray
Copier
Replacing the toner containers and the waste toner tank
Seal to the opening in the tank
Push down on the waste toner tank release lever shown as
Illustration and remove the waste toner tank
Preparations
Cleaning the charger
Cap
Cover and close it securely
Replacing the oil roller
Push
Selecting the color mode
Basic copying procedure
Setting an original
Warm-up
Selecting functions
Selecting the paper size
Adjusting the copy exposure Inch specifications
Selecting the image quality
Setting the number of copies to be made
Start copying
At the end of copying
Color Copy Settings
Mono-color mode
Gloss mode
One-touch image quality adjustment
Adjusting the color balance
Adjusting the color hue
Example
Adjusting the sharpness
Auto magnification selection mode
Making enlarged and reduced copies
Zoom mode
Preset zoom mode
XY zoom mode
Functions
Interrupt copying
Making duplex 2-sided copies from a 2-sided original
Making duplex 2-sided copies from one-sided originals
Back side of the copy to be rotated 180 degrees or not
Metric specifications
Use the M cursor or the N cursor key to select x
Top margin
Making a margin space for binding Margin mode
Left margin
Front & back margin
Indicator Inch specifications Metric specifications
Want to create the margins at the current settings, press
Functions
Making copies with clean edges Border erase modes
Selecting the erasing area Custom erase mode
Erasing blemishes from edges of copies Sheet erase mode
Erase mode that you want to use
Inverting black and white and colors Invert mode
Making mirror image copies Mirror image mode
Printing page numbers on copies Print page numbers mode
Start to be print, use the numeric keys on the keypad or
Leaving the backing sheet blank
Copying onto the backing sheet
Transparency Mode and then press the Enter key
Transparency mode
If your machine is a standard copier, go directly to step
Replace the first original with the next one and press
Cover mode
Insert sheet modes
Separation insert mode
Types of copy Copy onto Leave both
Front only
Making copies with the insert sheet modes
Cover mode settings
Separation insert mode settings
Copy on Insert sheet? screen will be displayed
Replace the first original with the next one and press
Press the Layout key to light the corresponding indicator
Automatically
Functions
Functions
Functions
Want to copy onto the front cover or not
Press the Book Mode key to light the corresponding
If you selected z Auto Zoom priority z Zoom
Size of original Size of finished Number of copy Copy image
Pages
Functions
Copy and, once you have finished scanning them all, press
Memorizing frequently used settings Program function
Registering a program
Using programmed settings to make copies
Confirming copy settings Recall function
Sorting automatically Sort mode
Rotate copy function
Energy-saving preheat function
Auto shut-off function
More about the auto shut-off function
Copier Management
Copy management
Procedure Description Reference
Copier Management
Accessing the copy management procedures
Performing copy management procedures
Registering new department codes
Deleting department codes
Changing copy limits
Clearing copy counts
Printing out the department code list
Checking the copy counts
Printing out the copy management list
Turning copy management ON/OFF
Making copies when copy management is turned on
Default setting
Default settings
Copy default settings
Description Available settings Factory Reference Setting
Standard copiers
Copiers
Duplex copiers
Inch
Metric
Insert tray
Accessing the copy default settings
Auto exposure adjustment b/w
Exposure mode
Auto exposure adjustment color
Exposure steps
Print original density
Mixed original density
Text original density
Photo original density
Map original density
Copy mode
@ Default drawer b/w
Original quality
Margin width
# Default drawer color
$ Copy limit
Erased border width
Sort mode ON/OFF Output form
Custom erase size
Insert tray
⁄ ACS adjustment
¤ Auto color adjustment
Eject destination
‹ Drum refresh
› Rotate sort ON/OFF
Machine default settings
Reference
Plain
Accessing the machine default settings
Auto shut-off ON/OFF
Auto drawer switching ON/OFF
Status report print out
Special paper location
Auto preheat time
APS for special paper ON/OFF
Color copy paper location
Auto shut-off time
Management PIN code
Display contrast adjustment
Silent mode ON/OFF
@ Day & time
# Checking the total counter
$ Counter report print out
Type of paper
Changing the language used for messages
Srdf Sheet-thru Reverse Document feeder
Acceptable originals
Names of parts
Setting originals in the Srdf
Optional Equipment
Setting originals on the platen
Auto selection mode
Selecting the auto selection mode
Memory Copy Board
Paper Feeder
Document Finisher
Casters
Printer Kit
Setting the Key Counter
Key Counter
Fax Kit
Network Scanner Kit
Message Procedure Reference
If one of the following messages is displayed
Troubleshooting
Message Procedure
Duplex Unit is OUT of Order -SIDED
Misfeed location indicators
If paper jams
Removal procedures
Misfeed in a paper feed area Misfeed in a drawer
Misfeed inside the right side drawer cover
Misfeed in the multi-bypass tray
Misfeed in the paper conveyor section
Misfeed in the transfer section
Reaches a vertical position
Misfeed in the fixing section
While holding the 2 green lock-levers shown as 2
Misfeed inside the left cover or near the copy storage table
6Misfeed in the Duplex Unit Only in duplex copiers
Original position in the copier
Misfeed in the optional Srdf
Misfeed in the optional Document Finisher
Trouble Checkpoint Procedure Reference
If other trouble occurs
10-1
When copying from Optional DF
Cleaning the copier
Cleaning the original cover
Cleaning the platen
Specifications
Writing 600 x 600 dpi
Appendix Functions and settings combination chart
10-4
Safety of Laser Beam
Page
Page
Above warning is valid only in the United States of America
Page
Kyocera Mita AMERICA, INC
Top
Page
Image
Contents