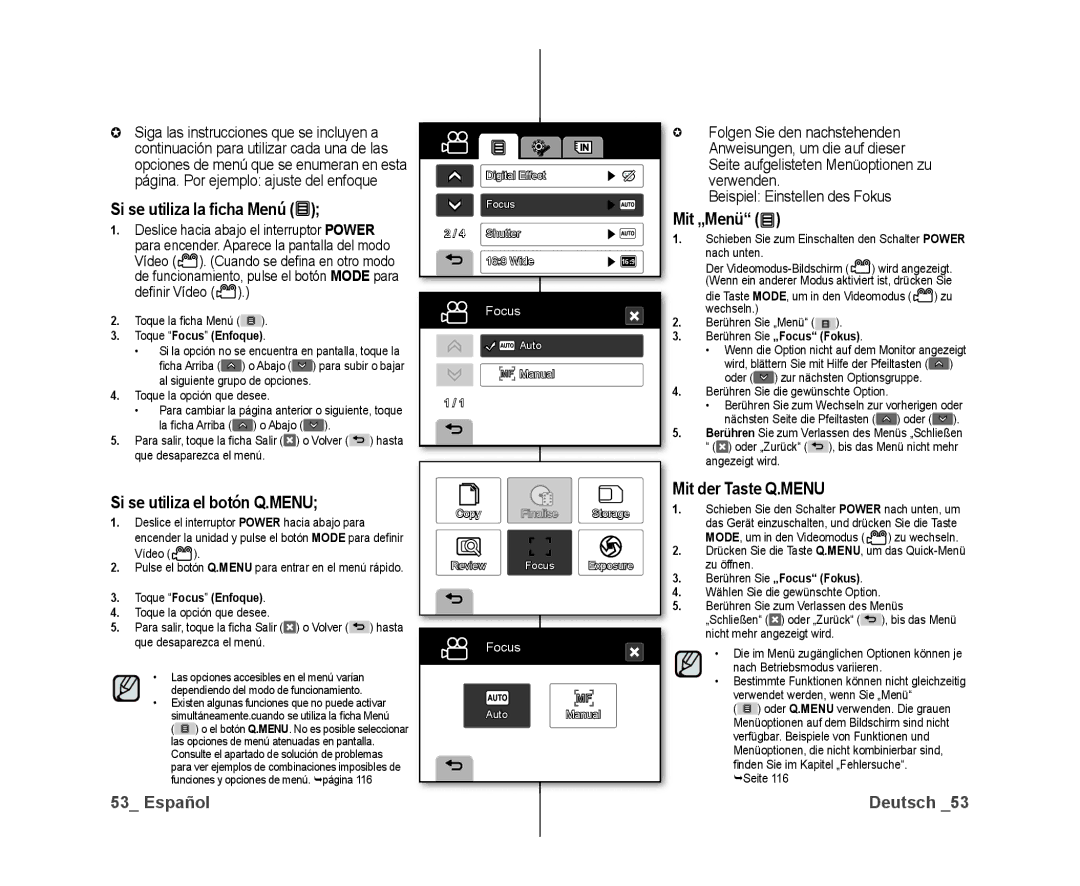
Siga las instrucciones que se incluyen a continuación para utilizar cada una de las opciones de menú que se enumeran en esta página. Por ejemplo: ajuste del enfoque

Si se utiliza la ficha Menú ();

1.Deslice hacia abajo el interruptor POWER para encender. Aparece la pantalla del modo Vídeo ( ). (Cuando se defi na en otro modo de funcionamiento, pulse el botón MODE para defi nir Vídeo ().)

2.Toque la fi cha Menú ().

3.Toque “Focus(Enfoque).

Si la opción no se encuentra en pantalla, toque la fi cha Arriba () o Abajo () para subir o bajar al siguiente grupo de opciones.

4.Toque la opción que desee.

Para cambiar la página anterior o siguiente, toque la fi cha Arriba () o Abajo ().

5.Para salir, toque la fi cha Salir () o Volver () hasta que desaparezca el menú.

Si se utiliza el botón Q.MENU;

1.Deslice el interruptor POWER hacia abajo para encender la unidad y pulse el botón MODE para defi nir Vídeo ( ).

2.Pulse el botón Q.MENU para entrar en el menú rápido.

3.Toque “Focus(Enfoque).

4.Toque la opción que desee.

5.Para salir, toque la fi cha Salir () o Volver () hasta que desaparezca el menú.

Las opciones accesibles en el menú varían dependiendo del modo de funcionamiento.

Existen algunas funciones que no puede activar simultáneamente.cuando se utiliza la fi cha Menú

( ) o el botón Q.MENU. No es posible seleccionar las opciones de menú atenuadas en pantalla. Consulte el apartado de solución de problemas para ver ejemplos de combinaciones imposibles de funciones y opciones de menú. página 116

53_ Español


Digital Effect


Focus


2 / 4

Shutter


16:9 Wide

16:9

Focus

Auto

MF Manual

1 / 1

Copy

Finalise

Storage

Review

Focus

Exposure

Focus

MF

AutoManual

Folgen Sie den nachstehenden Anweisungen, um die auf dieser Seite aufgelisteten Menüoptionen zu verwenden.

Beispiel: Einstellen des Fokus

Mit „Menü“ ()

1.Schieben Sie zum Einschalten den Schalter POWER nach unten.

Der Videomodus-Bildschirm (

) wird angezeigt.

(Wenn ein anderer Modus aktiviert ist, drücken Sie

die Taste MODE, um in den Videomodus (

) zu

wechseln.)


2.Berühren Sie „Menü“ ( ).

3.Berühren Sie „Focus“ (Fokus).

Wenn die Option nicht auf dem Monitor angezeigt wird, blättern Sie mit Hilfe der Pfeiltasten () oder () zur nächsten Optionsgruppe.

4.Berühren Sie die gewünschte Option.

Berühren Sie zum Wechseln zur vorherigen oder nächsten Seite die Pfeiltasten () oder ().

5.Berühren Sie zum Verlassen des Menüs „Schließen “ () oder „Zurück“ ( ), bis das Menü nicht mehr angezeigt wird.

Mit der Taste Q.MENU

1.Schieben Sie den Schalter POWER nach unten, um das Gerät einzuschalten, und drücken Sie die Taste

MODE, um in den Videomodus ( ) zu wechseln.

2.Drücken Sie die Taste Q.MENU, um das Quick-Menü zu öffnen.

3.Berühren Sie „Focus“ (Fokus).

4.Wählen Sie die gewünschte Option.

5.Berühren Sie zum Verlassen des Menüs „Schließen“ () oder „Zurück“ ( ), bis das Menü nicht mehr angezeigt wird.

Die im Menü zugänglichen Optionen können je nach Betriebsmodus variieren.

Bestimmte Funktionen können nicht gleichzeitig verwendet werden, wenn Sie „Menü“

() oder Q.MENU verwenden. Die grauen Menüoptionen auf dem Bildschirm sind nicht

verfügbar. Beispiele von Funktionen und Menüoptionen, die nicht kombinierbar sind,

nden Sie im Kapitel „Fehlersuche“. Seite 116

Deutsch _53

Page 59
Image 59
Samsung VP-DX10/XEE manual Si se utiliza la ficha Menú, Si se utiliza el botón Q.MENU, Mit „Menü, Mit der Taste Q.MENU

VP-DX10/XEO, VP-DX10/XEF, VP-DX10/XEE specifications

The Samsung VP-DX10 is a compact, versatile camcorder that represents an ideal blend of technological innovation and user-friendly design. This model caters to both novice and experienced videographers, offering an impressive assortment of features that enhance the recording experience.

One of the standout characteristics of the VP-DX10 is its ability to record in high-quality MPEG-2 format, ensuring that videos maintain excellent clarity and detail. The device supports DVD-RW/-R and -R DL formats, giving users flexibility in choosing their recording media. With a storage capacity of up to 8 hours and the ability to easily transfer videos to DVD, it streamlines the process of archiving memories.

In terms of imaging performance, the VP-DX10 is equipped with a 1/6-inch CCD sensor, providing a resolution of up to 800,000 pixels for clear and vibrant footage. The 34x optical zoom lens amplifies the camcorder’s capabilities, allowing for dynamic shooting from various distances. Alongside its optical prowess, the VP-DX10 incorporates digital image stabilization technology that minimizes shakiness, making it easier to capture smooth video even during movement.

The device's user-centered design includes a bright, swivel LCD screen, making it convenient to frame shots and play back recordings. Additionally, it features easy-to-navigate menus, enabling quick access to various settings and functions. The built-in USB connectivity allows for direct downloads to computers, facilitating hassle-free editing and sharing of videos.

Moreover, the VP-DX10 incorporates various shooting modes, including sports, portrait, and night modes, each tailored to specific scenarios, enhancing overall recording quality. The presence of a built-in flash and an advanced microphone improves audio-visual recordings, ensuring rich sound quality.

From intelligent battery management to enhanced connectivity options, the Samsung VP-DX10 is designed to meet the demands of modern videographers. Its combination of reliable performance and innovative features makes it a noteworthy choice in the compact camcorder market, appealing to users seeking both portability and quality.