SIP IP Phone
Page
Software License Agreement
Page
Contents
Contents
Chapter Configuring Operational Features
113
Chapter Configuring Advanced Operational Features
Chapter Troubleshooting
100
Appendix B Configuration Server Setup
Appendix E Sample BLF Softkey Settings
Limited Warranty
Audience
Introduction
Other Documentation
For Go to
Chapters and appendixes in this guide
Page
Topic
Topics
References
Description
Reference
Optional Accessories
For 53i, 55i, 57i, and 57i CT For 55i, 57i, and 57i CT
536M Expansion Module
Model 53i IP Phone
53i Phone Features
Keys Key Description
53i Key Descriptions
Directory
Model 55i IP Phone
55i Phone Features
55i Key Descriptions
Icom
Dial
Model 57i and 57i CT IP Phone
57i and 57i CT Phone Features
57i and 57i CT Key Descriptions
Options List
Alphabetical order
Accesses the last 200 calls received
Accesses another extension on the network
Applications and voicemail, provided by third parties
57i CT Cordless Handset Key Descriptions
57i CT Cordless Handset Features
Function # Function Description
Softkeys
Installation Considerations
Firmware Installation Information
Installation Requirements
Configuration Server Requirement
IP Phone Associated Model Firmware
Firmware and Configuration Files
Configuration File Precedence
Step Action
Installing the Firmware/Configuration Files
Page
Configuration Interface Methods
IP Phone UI
Configuration Methods
57i/57i CT
Options Key
On the 55i, 57i, 57i CT
Using the Options Key
From the 53i, 55i, or 57i/57i CT
From the 57i CT handset
HTTP/HTTPS Support
Aastra Web UI
Https Client
HTTP/HTTPS Client and Server Support
Https Server
Using Https via the Aastra Web UI
IP address or host name
Accessing the Aastra Web UI
55i Network Status Window Logout button
Operation
Status
Directory
Reset
Expansion Module N
Handset Keys
Preferences
Basic Settings
Call Forward
Advanced Settings
TLS Support
To disable the Aastra Web UI
Troubleshooting
Enabling/Disabling the Aastra Web UI
Using the Configuration Files
Configuration Files Administrator Only
References
Directory 1 companydirectory Directory 2 mypersonaldirectory
Administrator Options
Administrator
IP Phone UI Options
Options-Administrator Menu using the default password
References
Administrator Menu
Phone Status
Handset Pairing
Simplified IP Phone UI Options Menu
Full Options Menu Simplified Options Menu
Configuring the Simplified IP Phone UI Options Menu
Aastra Web UI Options
Administrator Web UI Menu
Basic Settings-Preferences-General
Operation-Reset
Advanced Settings
Configuration File Options
Phone Status Screen for 55i, 57i, and 57i CT Phones
Phone Status
Phone Status via IP Phone UI
Phone Status Screen for 53i Phone
Firmware Info
IP&MAC Addresses
LAN Port
PC Port
Hardware Information
Network Attributes
Firmware Information
For
Restarting the Phone Using the IP Phone UI
Restarting Your Phone
Select Restart Phone
Click on Operation-Reset-Phone
Restarting the Phone Using the Aastra Web UI
Select Factory Default
Set Phone to Factory Defaults/Erase Local Configuration
Setting Factory Defaults on the Phone
Setting Factory Defaults Using the IP Phone UI
Settings Factory Defaults Using the Aastra Web UI
Select Erase Local Config
Erasing the Phone’s Local Configuration
Aastra Web UI
General Settings
Basic Settings
Parameter Aastra Web UI Configuration Files Description
Available on the 55i, 57i, and 57i CT only
This feature on the Basic Preferences screen is
Parameter
Aastra Web UI Configuration Files Description
Incoming Intercom Settings all models
Parameter Description Aastra Web UI Configuration Files
Incoming/Outgoing Intercom Calls
Outgoing Intercom Settings 55i, 57i, and 57i CT only
Intercom line parameter
Mapping on
Key Mapping
Ring Tones
Priority Alerting Settings
Options
Call Pickup BLF or XML Call Interception on
Directed Call Pickup DCP
Time and Date
Auto Call Distribution ACD Settings
Langde.txt
Language
Langfr-ca.txt
Langes.txt
Network Settings
Dhcp
Basic Network Settings
Parameter Parameters
IP Phone UI Aastra Web UI Configuration Files Description
Configuring LAN and PC Port
Options
Advanced Network Settings
Configuring NAT Address
Network Time Servers on
Server1, time server2, and time
Https
SIP
Type of Service ToS, Dscp
LAN Port Settings Port
Global Settings
Where the Dscp value range is
Example
PC Port Settings Port
Basic SIP Authentication Settings
SIP Settings
Options
Line Appearance BLA 55i
Basic SIP Network Settings
OFF
URI
Advanced SIP Settings optional on
Advanced SIP Settings
Line Number in Register Messages on
Parameter Parameters
Registration Renewal
Broadsoft Servers on
You can configure the following RTP settings
RTP Settings
Real-time Transport Protocol RTP Settings on
IP Phone Available Model
Line Settings
IP Phone Model Softkeys Expansion Module Programmable Keys
Softkeys, Programmable Keys, Expansion Module Keys
Action URI
Download Protocol Settings
Configuration Server Settings
To the FTP server. See the following
Http path
Https path
Mode Auto resync mode
Auto-Resync Settings
Section, Automatic Update
XML Push Server List Approved IP Addresses
Firmware Update Features
Configuring the IP Phones
Configuring the IP
Overview
Basic Network Settings
Network Settings
Http
Protocol Format Examples
DNS Caching
Configuring Dhcp
Select Network Settings
Select Administrator Menu
Configuring Network Settings Manually
Configuring
Aastra Web UI
Auto-negotiation
Configuring LAN and PC Port Negotiation
Half-Duplex 10Mbps or 100Mbps
Full-Duplex 10Mbps or 100Mbps
Configuring the LAN Port and PC Port
Select LAN Port Link
Select PC Port Link
Default is AutoNegotiation
Default is Auto Negotiation
To save your settings
Network Address Translation NAT
Advanced Network Settings
Other proxy/registrars
NAT router configuration
Nortel Proxy/Registrar
SBC or ALG proxy/registrar
Nortel Networks NAT
Configuring Nortel NAT optional
Select Restart 41-001160-00, Release 2.1, Rev
Aastra Web UI
Select Network Settings Select Static NAT
Configuring NAT Address and Port optional
Select NAT RTP Port
Aastra Web UI
Https Client/Server Configuration
Configuring Https Client and Server Settings
Configure Https Server
Configure Https Client
TSL
Universal Plug and Play UPnP for remote phones
Upnp manager Upnp gateway Sip nat rtp port
Configuring UPnP optional
Select Restart
Select Network Settings Select NAT Settings
Aastra Web UI
Virtual LAN optional
LAN Port
Global
PC Port
Range
Dscp Range/VLAN Priority Mapping
Dscp Range/VLAN Priority
Vlan Priority
ToS Field
Configuring Type of Service ToS/DSCP optional
Protocol Default Dscp Name
Select Network Settings Select Type of Service Dscp
Select Restart
Configuring
Select Phone Vlan Select Vlan Priority
Configuring Vlan optional
Select Network Settings Select Vlan Settings
Select Vlan Enable
To set Vlan ID and priority for PC Port Port
To set Vlan ID and priority for LAN Port Port
Select Phone Vlan
SIP Priority RTP Priority Rtcp Priority
Select PC Port Priority
To set Vlan ID and priority for the LAN Port Port
Step Action Click on Advanced Settings-Network-VLAN
To set Vlan ID and priority for the PC Port Port
Select Preferences Select Time and Date Select Time Server
Configuring NTP Servers optional
Select Timer Server 1, Timer Server 2, or Time Server
Network Time Servers
Configuring the IP Phones
To save your changes
Global SIP Settings
SIP Global Network Parameters
Basic SIP Settings
SIP Global Authentication Parameters
SIP Global Parameters
SIP Per-Line Network Parameters
SIP Per-Line Authentication Parameters
SIP Per-Line Parameters
IP Phone UI Parameters Aastra Web UI Parameters
SIP Precedence Example
How it Works
Backup Proxy/Registrar Support
SIP Server SRV Lookup
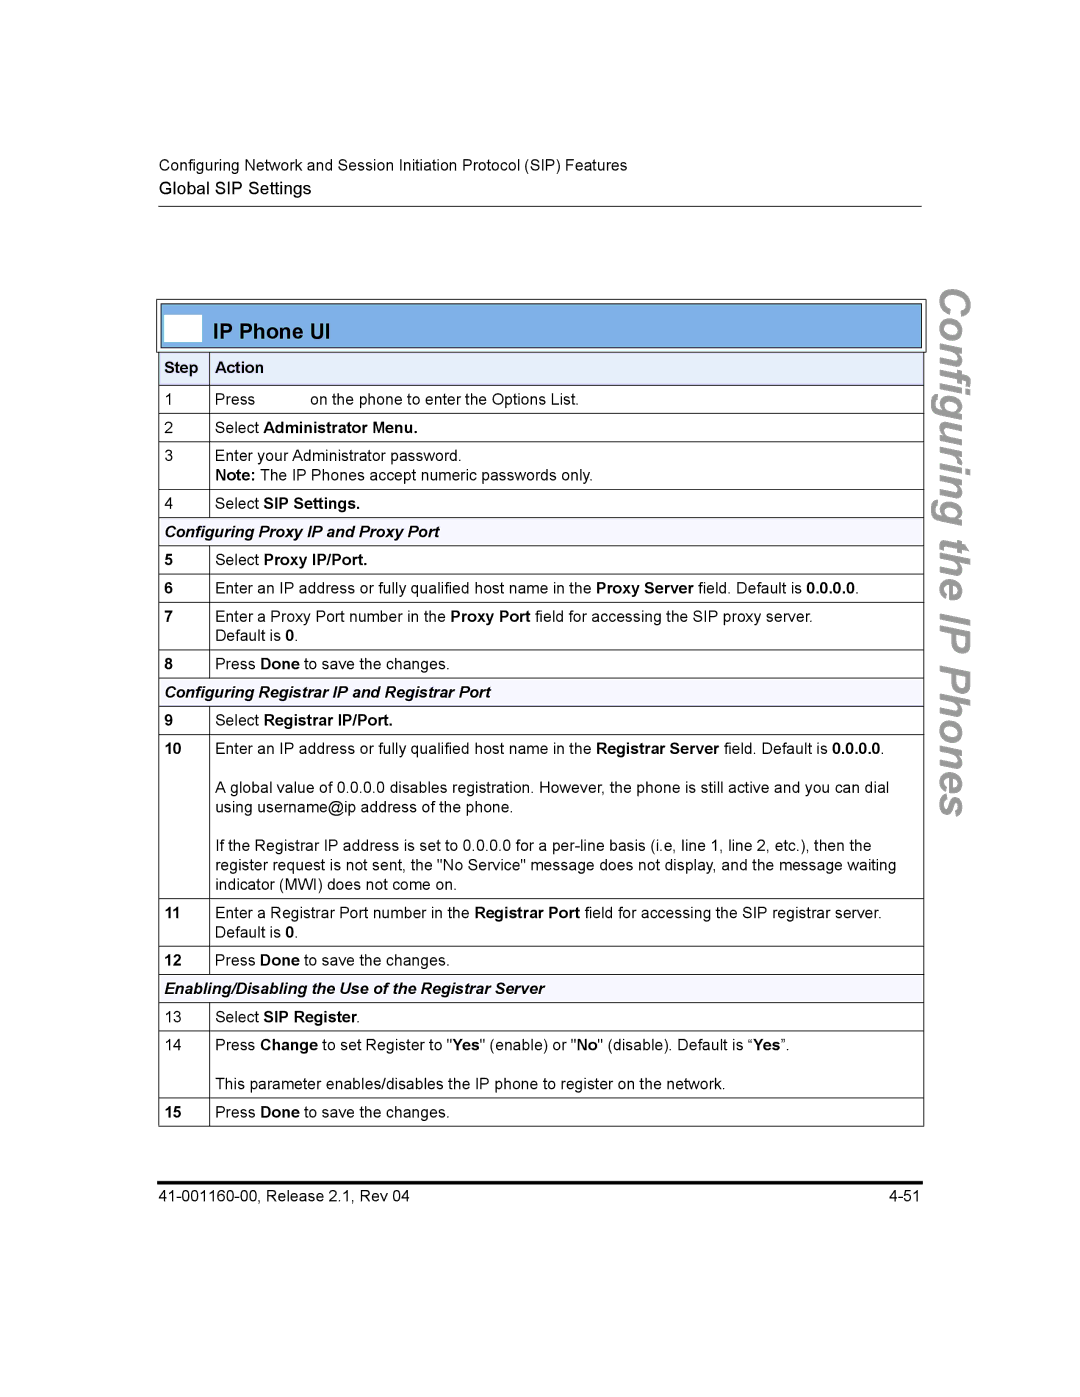
Configuring Basic SIP Network Settings optional
Configuring Registrar IP and Registrar Port
Configuring Proxy IP and Proxy Port
Enabling/Disabling the Use of the Registrar Server
Phones
Configuring the IP Phones
To configure SIP authentication settings
Lab Phone
57i
John Burns
53i
To configure SIP network settings
To save your changes
Aastra Web UI Parameters Configuration File Parameters
Advanced SIP Settings optional
Configuring Advanced SIP Settings
Configuring the IP Phones
Step Action
Configuring the IP Phones
Configuring the IP Phones
Real-time Transport Protocol RTP Settings
Basic Codecs G.711 u-Law, G.711 a-Law, G.729
RTP Port
Customized Codec Preference List
Default Codec Settings
Bit Rate Algorithm Packetizatio Silence Time Suppression
Out-of-Band Dtmf
Customized Codec Settings
Attribute Value
RTP Encryption
Dtmf Method
Silence Suppression
Configuring RTP Features
Configuring the IP Phones
Per-Line Settings
Step Action Click on Advanced Settings-Line N-RTP Settings
Phones
Autodial Settings
Global Configuration
Configuring AutoDial Using the Configuration Files
Per-Line Configuration
Global Configuration
Configuring Autodial Using the Aastra Web UI
Click on Advanced Settings-Global SIP-Autodial Settings
Click on Advanced Settings-Line 1 9-Autodial Settings
Per-Line Configuration
Configuring the IP Phones
Select Configuration Server
Configuring the Configuration Server Protocol
Select Download Protocol
Use Tftp Use FTP Use Http Use Https
Tftp Settings FTP Settings Http Settings Https Settings
Select FTP Password
Use the following table to configure the applicable server
Tftp Settings Select Primary Tftp
FTP Settings Select FTP Server
Select Download Path
Https Settings Select Http Client Select Download Server
Step Action Click on Advanced Settings-Configuration Server
Tftp
Select Operation-Reset and click
Configuring the IP Phones
Operational IP Phone Features
Features
Configuring Operational Features
Configuring a User Password
User Passwords
Select User Password
Click on Operation-User Password
Click on Operation-Phone Lock
Resetting a User Password
Operational IP Phone Features
Procedure
Administrator Passwords
Locking/Unlocking the Phone
Unlock the phone
Locking/Unlocking the Phone Using the IP Phone UI
Lock the phone
Select Phone Lock
Locking/Unlocking the Phone Using the Aastra Web UI
Features
Configuring a Lock/Unlock Key Using the Configuration Files
Click on Operation-Softkeys and XML
Configuring a Lock/Unlock Key using the Aastra Web UI
Click on Operation-Programmable Keys
Using the Configured Lock/Unlock Key on the IP Phone
Emergency Number Description
Defining an Emergency Dial Plan
Configuring an Emergency Dial Plan
Time and Date
Feature Method of configuration
Daylight Savings Time DST Information
Set Date and Date Format
Set Time and Time Format
Set Daylight Savings Time
Set Time Zone
Select Time Zone
16 For
Click on Basic Settings-Preferences-Time and Date Setting
Language
Loading Language Packs via the Configuration File mac.cfg
Loading Language Packs
Example
Loading Language Packs via the Aastra Web UI
Specifying the Language to Use
Step Action Press
Operational IP Phone Features
Loading the Language Pack
Click on Basic Settings-Preferences-Language Settings
Specifying the Language to Use in the Aastra Web UI
Aastra Web UI displays all screens in the language you chose
PrgkeyN locked
FeaturekeyN locked
Locking IP Phone Keys
TopsoftkeyN locked
Locking the IP Phone Keys
Local Dial Plan
Symbol Description
Prefix Dialing
Dial Plan Example
SIP Dial Plan Terminator
Digit Timeout
Click on Basic Settings-Preferences
To save your changes
Park Calls/Pick Up Parked Calls
Park/Pickup Static Configuration 55i, 57i, 57i CT only
Sprecode Pickupsprecode
Park Call Pickup Call
Park/Pickup Call Server Configuration Values
How It displays on the Phone
55i, 57i, 57i CT only
Configuring Park /Pickup using Static Configuration
Operational
Click on Basic Settings-Preferences-General
Suppressing Dtmf Playback
Configuring Suppression of Dtmf Playback
Click on Operation-Reset
Display Dtmf Digits
Configuring Display Dtmf Digits
Operational
Call Waiting/Call Waiting Tone
Call Waiting Tone
Configuring Call Waiting/Call Waiting Tone
Click on Basic Settings- Preferences-General
Stuttered Dial Tone
Configuring Stuttered Dial Tone
Operational IP Phone Features
XML Beep Support
Configuring XML Beep Support
Operational IP Phone Features
Configuring Status Scroll Delay
Status Scroll Delay
OperationalIPPhone
Incoming Call Interrupts Dialing
Configuring Incoming Call Interrupts Dialing
How it Works
Features
For
Goodbye Key Cancels Incoming Call
Configuring the Goodbye Key to Cancel Incoming Calls
For the 55i, 57i, and 57i CT
Features
UPnP Mapping Lines for remote phones
Configuring UPnP Mapping Lines
Mapping Lines
Features
Configuring Message Waiting Indicator MWI
Message Waiting Indicator Line
Click on Basic Settings- Preferences-General
Incoming/Outgoing Intercom with Auto-Answer and Barge
Configuration File Parameters Web UI Parameters
Outgoing Intercom Calls
Auto-Answer/Play Warning Tone
Delay before Auto-Answer
Incoming Intercom Calls
Microphone Mute
Allow Barge
Configuring Intercom Calls Settings
Configuration Files
Incoming intercom settings
Features
Operational IP Phone Features
Key Mapping
Redial disabled Conference disabled Call transfer disabled
Enabling/Disabling Redial, Xfer, and Conf Keys
Mapping Redial and Conf Keys as Speeddials
Operational
Using Redial Key for Last Number Redial
Configuration Method Valid Values Default Value
Ring Tone Settings Table
Ring Tones and Tone Sets
Phone Features
Ring Tone Sets
Select Set Ring Tone
Configuring Ring Tones and Tone Sets
For global configuration only
Select Preferences
For per-line configuration
For global configuration
How Priority Alerting Works
Priority Alerting
Asterisk/Broadworks Server Ring Tone Keywords
Sylantro Server Ring Tone Keywords
Ring Tone Patterns
Call Criteria Bellcore Tones
Bellcore-dr4
Call criteria Bellcore tones for each call criteria
Bellcore-dr2
Bellcore-dr3
Call Waiting Tones
Configuring Priority Alerting
For Sylantro Servers
Done
Directed Call Pickup BLF or XML Call Interception
Directed Call Pickup Prefix optional
Operational IP Phone Features
Enabling/Disabling Directed Call Pickup
Configuring BLF/BLF List for Directed Call Pickup
Operational IP Phone Features
For the 55i, 57i, and 57i CT softkeys
Operational IP Phone Features
Configuring XML for Directed Call Pickup
Operational IP Phone Features
For the 55i, 57i, and 57i CT softkeys
Operational IP Phone Features
Softkeys 55i, 57i, 57i CT
State-Based Softkeys 55i, 57i, 57i CT only
Softkey Type Default States
SoftkeyN states
Softkey Idle Connected
Configuration Example
Model 560M
Programmable Keys 53i
Softkey/Programmable Key/Expansion Module Key Functions
Model 536M
Key Functions Table
Group Call Pickup
Distribution ACD
Directed Call
Pickup DCP
Last Call Return
Sprecode
Park
Pickup
Conference
Icom
Transfer
Services
Configuration Aastra Web UI Key Function
Empty
Configuring Softkeys and Programmable Keys
For Softkeys and Expansion Module Keys
For programmable keys
57i Cordless CT Feature Keys
Feature Key Programming Guidelines
List empty Use web page to configure
Handset Key Functions Table
Handset Feature Key Functions
Function File Parameter Description Transfer
Feature Key Configuration Aastra Web UI
Feature Key Configuration Aastra Web UI Function
Configuring Handset Feature Keys
Click on Operation-Handset Keys
Speeddial Prefixes
Busy Lamp Field BLF
BLF Setting For use with Asterisk
BLF\List Setting
BroadSoft BLF Configuration
Asterisk BLF Configuration
Configuring BLFs
Aastra Web UI
41-001160-00, Release 2.1, Rev 119
BLF Subscription Period
Configuring BLF Subscription Period
Click on Advanced Settings-Global SIP-Advanced SIP Settings
Automatic Call Distribution ACD for Sylantro Servers
Configuring an Automatic Call Distribution ACD Key
ACD Auto-Available Timer
Configuring the ACD Auto-Available Timer
Type field, select Auto Call Distribution
Configuring an ACD Key Using the Aastra Web UI
Auto Available check-box, click Enabled 126
41-001160-00, Release 2.1, Rev 127
Using the ACD Feature on your IP Phone
41-001160-00, Release 2.1, Rev 129
Logging In to a Phone Queue 55i, 57i, 57i CT
Aastra IP Phone UI
41-001160-00, Release 2.1, Rev 131
Logging In To a Phone Queue
ACD Subscription Period
Configuring ACD Subscription Period
Aastra Web UI
Directed Call Pickup/Group Call Pickup for Sylantro Servers
Configuration Files
41-001160-00, Release 2.1, Rev 137
Operational IP Phone Features
Operational IP Phone Features
Value field, enter groupcallpickup
Using Directed Call Pickup/Group Call Pickup
Using Directed Call Pickup DCP
Using Group Call Pickup GCP
DCPonline
Do Not Disturb DND
Configuring DND
OperationalIPPhoneFeatures
Bridged Line Appearance BLA 55i, 57i, 57i CT only
IP Phone Model Possible # of BLA Lines
Configuring BLA
Line Mode Phone Number BLA Number
Global BLA
For Sylantro Server
Per-Line BLA
Configuring Global BLA
For global configuration of BLA
Click on Advanced Settings-Line N
For per-line configuration of BLA
Using a BLA Line on the IP Phone
#line 1 Bob
BLA Support for Third Party Registration
Alice’s configuration is as follows
Park/Pick Up Key
Park/Pickup Programmable Configuration using a key
On 57i/57i CT
Server Park Configuration Pickup Configuration
Configuring Park/Pickup Key Using Configuration Files
Model 57i/57i CT Examples
Model 53i Examples
Configuring a Park/Pickup Key Using Aastra Web UI
For the 57i/57i CT
For the 57i CT Handset
53i Screen
41-001160-00, Release 2.1, Rev 161
Parking a Call
Using the Park Call/Pickup Parked Call Feature
Picking up a Parked Call
41-001160-00, Release 2.1, Rev 163
Last Call Return lcr For Sylantro Servers
Configuring Last Call Return
Operational IP Phone Features
For the 57i CT Handset
Click on Operation-Programmable Keys i Screen
Call Forwarding
Call forward disabled
Enabling/Disabling the Ability to Configure Call Forwarding
IP Phone Model Available Lines for Call Forwarding
Select Call Forward
Configuration Method for Call Forwarding
Configuring Call Forwarding
For global configuration of call forwarding
For 55i/57i/57i CT
Click on Basic Settings-Call Forward
For per-line configuration of call forwarding
Callers List Key
Callers List
41-001160-00, Release 2.1, Rev 175
Using the Callers List
Callers list disabled
Enabling/Disabling Callers List
41-001160-00, Release 2.1, Rev 177
Click on Operation-Directory
Downloading the Callers List
Creating Customizable Callers List and Services Keys
Customizable Callers List and Services Keys
Enabling/Disabling Missed Calls Indicator
Missed Calls Indicator
Missed calls indicator disabled
Accessing and Clearing Missed Calls
Directory key
Directory List
Directory List Capabilities
Administrator/User Functions for Directory List
184
Enabling/Disabling Directory List
Directory disabled
Character Description
Server to IP Phone Download
Directory List Limitations
Server to IP Phone Download Behavior
Directory List Limitations
To dial from an entry in the Directory List
Using the Directory List
To add a new entry to the Directory List
To delete an entry from the Directory List
To edit an entry in the Directory List
To delete all entries from the Directory List
From the 57i CT handset
Downloading from the IP Phone to the Server
Downloading from the Server to the IP Phone
FeaturesPhoneIP
Sip lineN vmail
Voicemail 55i, 57i, and 57i CT only
Sip line1 vmail *97 Sip line2 vmail *95
Using Voicemail 57i57i CT only
Creating Customized XML Services on the IP Phones
XML Customized Services
AastraIPPhoneExecute
AastraIPPhoneConfiguration
XML Object Description AastraIPPhoneDirectory
AastraIPPhoneStatus
XML Get Timeout
Xml status scroll delay config files
Status Scroll Delay seconds Web UI
Timeout
Attribute/Option Description/Usage Valid Values LockIn
CancelAction
For example
Enabling/Disabling a Beep for Status Message Displays
Status Scroll Delay seconds via the Aastra Web UI
Scroll Delay Option for Status Messages
XML Configuration Push from the Server
XML Get Timeout
Configuring the Phone to use XML
Xml application URI Xml application title
Configuring for XML on the IP Phone
Example Configuration of XML application
XML Push Requests
Aastra Web UI
Applicable field
For
41-001160-00, Release 2.1, Rev 207
Select Custom Features
Using the XML Customized Service
For the 55i/57i/57i CT
XML Action URIs
You dial out the number 5551212, the phone executes a GET on
Configuring XML Action URIs
Http//10.50.10.140/startup
Click on Advanced Settings-Action URI
Http//10.50.10.140/outgoing.php?number=$$REMOTENUMBER$$
XML Softkey URI
Configuring XML Softkey URIs
Http//10.50.10.140/script.pl?name=$$SIPUSERNAME$$
Aastra
Click on Operation-Programmable Keys 53i Screen
Handset tx gain
Audio Transmit and Receive Gain Adjustments
Parameter Description Headset tx gain
Headset sidetone gain
Audio mode
Configuring Audio Transmit and Receive Gain Adjustments
Parameter Description Handsfree tx gain
Centralized Conferencing for Sylantro and Broadsoft Servers
Per-Line Parameter
Global Parameter
Conf@mediaserver address mediaport
Configuring Centralized Conferencing Using the Aastra Web UI
Click on Advanced Settings-Line #-Basic SIP Network Settings
1 Screen
Customizing the Display Columns on the 560M Expansion Module
Expansion Module 2 3 pages
Expansion Module 1 3 pages
2 Screen
Example
Expansion Module 3 3 pages
3 Screen
Cuztomizing the 560M Expansion Module Column Display
Page
Advanced Operational Features
IP Phone Administrator Guide About this chapter
Feature Description
Advanced Operational Features
Advanced
MAC Address/Line Number in Register Messages
Configuring the MAC address/Line Number in Register Message
Sip send mac Sip send line
FeaturesOperational
SIP Message Sequence for Blind Transfer
Configuring SIP Message Sequence for Blind Transfer
Sip update callerid
Update Caller ID During a Call
Configuring Update Caller ID During a Call
Configuring Boot Sequence Recovery Mode
Boot Sequence Recovery Mode
Force web recovery mode disabled
Max boot count
Auto-discovery Using mDNS
Single Call Restriction 57i CT only
Configuring Single Call Restriction
FeaturesOperational
3KRQH�%
Missed Call Summary Subscription
Global Parameters
Aastra Web UI
Click on Advanced Settings-Line N-Advanced SIP Settings
Blacklist Duration Broadsoft Servers
Configuring Blacklist Duration Using the Configuration Files
Configuring a Server Blacklist Using the Aastra Web UI
Whitelist Proxy
Configuring Whitelist Proxy Using the Configuration Files
Configuring Whitelist Proxy Using the Aastra Web UI
Transport Layer Security TLS
SIP Asserted Identity for Sylantro Servers
Configuring TLS Using the Configuration Files
Advanced Operational
Configuring TLS Using the Aastra Web UI
Click on Advanced Settings-TLS Support
To save your changes
Symmetric UDP Signaling
Removing UserAgent and Server SIP Headers
Configuring UserAgent/Server SIP Headers
Sip user-agent
Mandatory versus Optional Billing Codes
Billing Codes Implementation Notes
50500#6172385000
6172385000#300
Phonenumber%23billingcode
Phonenumber%23billing code
Numbers Not Requiring Billing Codes
Page
Encryption and the IP Phone
Encrypted Files on the IP Phone
Configuration File Encryption Method
To encrypt the IP phone configuration files
Procedure to Encrypt/Decrypt Configuration Files
\ anacrypt aastra.cfg -p 1234abcd
\ anacrypt
Page
Firmware Upgrade
Upgrading the Firmware
Manual Firmware Update Tftp only
Step Action Click on Advanced Settings-Firmware Update
Manual Firmware and Configuration File Update
To restart the phone
Mode Time
Automatic Update auto-resync
Auto-resync mode Auto-resync time
Configuring Automatic Update
Select the auto-resync mode from the Mode field
Reference
Page
Troubleshooting
Log Settings
Troubleshooting
Module/Debug Level Settings
Support Information
Performing Troubleshooting Tasks
Get local.cfg Get server.cfg Show task and Stack Status
To set log settings
Step Action Click on Advanced Settings-Troubleshooting
Get server.cfg field
To set blog modules
To perform support tasks
Local.cfg field
Why does my phone display Application missing?
Troubleshooting Solutions
Fix
Why does my phone display the No Service message?
Why does my phone display Bad Encrypted Config?
Reason
Troubleshooting
How do I restart the IP phone?
How do I set the IP phone to factory default?
How do I erase the phone’s local configuration?
Step Action Click on Operation-User Password
How to reset a user’s password?
How do I lock and unlock the phone?
Click on Operation-Phone Lock
Page
Appendix a
IP Phone Administrator Guide About this appendix
Appendix
Setting Parameters in Configuration Files
Simplified IP Phone UI Options Menu
Parameter Configuration Files
Parameter IP phone UI
Subnet mask
Default Value Range
Range Example
Password Settings
Configuration Files Aastra.cfg, mac.cfg
Parameter user password
Emergency Dial Plan Settings
Aastra Web UI Settings
Download protocol
Default Value Range Example
Description Format Default Value Range Example IP phone UI
Parameter alternate tftp server
Ftp server
Ftp password
Https server
Description Format Default Value Range Example Aastra Web UI
Parameter auto resync mode
Parameter Aastra Web UI
Network Address Translation NAT Settings
Sip nat rtp port
Sip nortel nat timer
Https Client and Server Settings
Https block http post xml
UPnP Settings
Global Parameters
Virtual Local Area Network Vlan Settings
Upnp manager and upnp gateway must be set
LAN Port Ethernet Port 0 Parameters
Dscp Priority
Parameter tos priority map
PC Port Ethernet Port 1 Parameters
Type of Service ToS/DSCP Settings
Time Server Settings
Parameter time server2
Time and Date Settings
Parameter dst config
Time Zone Name Time Zone Code
Time Zone Name/Time Zone Code Table
NST
HKS
PES
SIP Local Dial Plan Settings
Sip dial plan terminator
SIP Global Authentication Settings
SIP Basic, Global Settings
Parameter sip user name
Sip auth name
Sip bla number
SIP Global Network Settings
Sip backup proxy ip
Sip outbound proxy port
Sip registrar port
Sip backup registrar port
SIP Per-Line Authentication Settings
SIP Basic, Per-Line Settings
Sip lineN user name
Sip lineN auth name
Sip lineN bla number
Asip lineN mode
SIP Per-Line Network Settings
Sip linex backup proxy ip
Sip lineN outbound proxy port
Sip lineN registrar port
Sip linex backup registrar port
Global Settings
Centralized Conferencing Settings
Per-Line Settings
Period
Advanced SIP Settings
Sip send mac
Description Format Default Value Range Example
Parameter sip session timer
Sip T2 timer
Sip transport protocol Transport Protocol
Sip registration retry timer
Sip registration renewal timer
Sip acd subscription period
Missed Call Summary Subscription Settings
Missed call summary subscription parameter, phone B receives
Per-Line Parameter
Transport Layer Security TLS Settings
Sips persistent tls
Sips root and intermediate
Sips local certificate
Sips trusted certificates
RTP, Codec, Dtmf Global Settings
Silsupp
Payload
Sip dtmf method
Sip silence suppression
Sip lineN srtp mode
Format Default Value Range Examples
Default Value Range Examples
Voicemail Settings
Directory Settings
Customize Callers List and Services Key
Callers List Settings
Call Forward Settings
Missed Calls Indicator Settings
XML Settings
Xml application title
Xml beep notification
Action URI Settings
Action uri incoming
Ring Tone and Tone Set Global Settings
Range Aastra Web UI & IP Phone UI
Parameter tone set
Ring Tone Per-Line Settings
Incoming Call Interrupts Dialing Setting
For
For the 55i, 57i, and 57i CT
Stuttered Dial Tone Setting
Call Waiting Settings
Message Waiting Indicator Settings
For Sylantro Server only
Priority Alert Settings
Parameter alert community
Alert community
Parameter alert external
Alert group
Parameter alert priority
Configuration File
Language Settings
Langfrca.txt Langesmx.txt Langde.txt Langit.txt
Language Pack Settings
Country Country Code
Language Codes from Standard ISO
Country Codes from Standard ISO
Language Language Code
Bahamas
Appendix
Iceland
41-001160-00, Release 2.1, Rev 115
Pakistan
Appendix a
Uganda
Suppress Dtmf Playback Setting
Display Dtmf Digits Setting
For Configuration Files
Intercom, Auto-Answer, and Barge In Settings
Outgoing Intercom Settings
Default Value For Aastra Web UI
Sip intercom prefix code
Incoming Intercom Settings
Sip play warning tone
Audio Transmit and Receive Gain Adjustment Settings
Handset sidetone gain
Handsfree tx gain
Directed Call Pickup BLF or XML Call Interception Settings
Directed call pickup prefix
Parameter play a ring splash
ACD Auto-Available Timer Settings
Server Park Values Asterisk Sylantro BroadWorks
Park and Pickup Global Settings 57i/57i CT only
Server Pickup Values Asterisk Sylantro BroadWorks
Mapping Key Parameters
Call transfer disabled
Map conf key to
Model 560M Functions on Bottom keys
Expansion Module Programmable Lines Handset
Softkey Settings for 55i, 57i, 57i CT
Format Default Value
Group Call Pickup on groupA
Directed Call Pickup on Extension
Parameter softkeyN label
SoftkeyN value
Parameter softkeyN line
For softkey type Sprecode, Park
Default Value For softkey type None
Lcr, Directory, Callers List, Icom, Services, empty
For softkey type Flash
Outgoing
Incoming
Programmable Key Settings for 53i
Text Not Applicable 146
List BLF/List in the Aastra Web UI
Parameter prgkeyN value
PrgkeyN line
Top Softkey Settings for 57i and 57i CT
Automatically activates a service provided by the server
Example
TopsoftkeyN label
Parameter topsoftkeyN value
TopsoftkeyN line
Handset Feature Key Settings for the 57i CT
FeaturekeyN label
ExpmodX keyN type
Used as the Services key
Parameter expmodX keyN label
ExpmodX keyN value
Format Default Value Range Example Aastra Web UI
Locking Softkeys and Programmable Keys
Appendix a
ExpmodX key N locked
Expansion Module
Customizing 560M Expansion Module Column Display
Expanmod1page2right
Expanmod2page1left
Expanmod2page2right
Expanmod3page1left
Expanmod3page2right
Advanced Operational Parameters
Blind Transfer Setting
Appendix
Update Caller ID Setting
Single Call Restriction
Blacklist Duration
User-Agent Setting
Symmetric UDP Signaling Setting
Log Settings
Troubleshooting Parameters
Parameters Aastra Web UI
Module Name configuration files
Appendix B
Tftp Server Set-up
Configuration Server Protocol Setup
Configuration Server Protocol Setup
Page
Appendix C
IP Phone at the Asterisk IP PBX
Name/username Host Mask Port
Exten 1234,1,DialSIP/phone1,20
Phone1/phone1192.168.1.1D 255.255.255.255 5060 Unmonitored
Page
Appendix D
57i Sample Configuration File
Sample Configuration Files
Sample Configuration Files
# Time Server Settings ## =====================
# Configuration Server Settings
## = = = = = = = = = = = = = = =
Previous expression
# General SIP Settings # = = = = = = = = = = =
# Per-line SIP Settings # ======================
Sip line3 vmail *78
# Speed Dials
# Phone Model 57iCT
57i CT Sample Configuration File
# Dhcp Setting # ============
# Network Settings # ================
# Time Server Settings # ====================
# =============================
Appendix
Previous expression
# General SIP Settings # ====================
# Per-line SIP Settings # =====================
# Softkey Settings # ================
# Speed Dials
# DND Key softkey4 type dnd softkey4 label DND
#Takes an
Appendix D
Appendix D
Appendix D
Appendix D
53i Sample Configuration File
# Dhcp Setting # =============
# Time Server Settings # =====================
Appendix D
# Additional Network Settings # ============================
Appendix D
Appendix
Appendix D
Previous expression
# General SIP Settings # ======================
# Per-line SIP Settings # =======================
# Programmable Key Settings # ===========================
Prgkey Value
Page
Appendix E
53i Configuration Parameters for Asterisk BLF
57i and 57i CT Configuration Parameters for Asterisk BLF
Asterisk BLF
BroadSoft BroadWorks BLF
53i Configuration Parameters for Broadsoft BroadWorks BLF
Page
Appendix F
Multiple Proxy Server Configuration
Multiple Proxy Server Configuration
Page
Appendix G
G-40 G-62 G-65
Character Description Escape Sequence
Overview
XML format
Support of Virtual Web Servers
Creating XML Objects
Existing Action Text Menu Input Keys
Creating Custom Softkeys
Implementation
Text Menu Object Menu Screens
XML Screen Example
You use this attribute as follows
Turning Off Automatic Numbering of Menu Items
Appendix G
AastraIPPhoneTextMenu style=bullet
Using Bullets in Menu Items
Appendix G
Text Screen Object Text Screens
XML Example
Test
For 55i, 57i, and 57i CT
XML Support for Answer and Ignore Softkeys
Implementation 55i, 57i, 57i CT
OHN 3MITH
Text Screen Format Object for Text Screens
AastraIPPhoneFormattedTextScreen Structure
Line of static text
Line of static text
Implementation IP Addresss
UserInput Object User Input Screens
XML Description
Proxy Server Server IP Backspace Dot Cancel Done
Implementation Number
Proxy Port Backspace Cancel Done
Implementation String
Symbol XML Encoding
XML Softkey Example
TimeUS TimeInt US Date Int Date
Time and Date Formats User Input Screens
US Time Enter Current Time 120000am Cancel Done
US Date Enter Birthday 12/22/1980 Cancel Done
Selection......./Selection
Multiple Input Fields User Input Screens
DisplayMode
New AastraIPPhoneInputScreen Attributes DefaultIndex
Or condensed
Screen
Scolling down changes to the next input field
Condensed Mode Screen
Directory Object Directory List Screen 57i only
XML Example
AastraIPPhoneStatus Structure
Status Message Object Idle Screen
XML Examples
AastraIPPhoneExecute Object Structure
Execute Commands Object for executing XML commands
Using the NoOp Command
Using the Reset Command
XML Softkey or Programmable Key LED Behavior Command
Using the FastReboot Command
LED Behavior XML Attribute
Appendix G
AastraIPPhoneConfiguration Object Structure
XML Example
Dynamic Configuration Parameters
Dynamic Configuration Parameters
Appendix G
XML Image Objects 55i, 57i/57i CT only
Press#1Stock-WeatherMarket
VerticalAlign HorizontalAlign Height Width
AastraIPPhoneImageScreen Object
Image
AastraIPPhoneImageMenu
AastraIPPhoneImageMenu
#Weather
AastraIPPhoneTextMenu Icon Menu
Done
Using the IconList
SoftKey index = 4 icon=2
URI Name Displays this
IP Phone Internal Icon Images
Appendix
Attributes/Options to Use with XML Objects
Timeout Attribute Configurable via XML objects only
LockIn Attribute Configurable via XML objects only
CancelAction Attribute configurable via XML objects only
Post / HTTP/1.1
Http Post
Appendix G
Http Refresh Header
Refresh Setting Format
XML Schema
XML Schema File
Http Language Header
Appendix G
Appendix G
Appendix G
Exclusions
Limited Warranty
After Warranty Service
Warranty Repair Services
Index
Index-2
41-001160-00, Release 2.1, Rev Index-3
Index-4
41-001160-00, Release 2.1, Rev Index-5
Index-6
41-001160-00, Release 2.1, Rev Index-7
Index-8
Page
SIP IP Phone Administrator Guide


 IP Phone UI