Operating Instructions
Page
Table of Contents
Loading Paper
104
100
103
105
139
137
138
141
188
184
185
189
250
248
249
251
286
284
285
288
343
329
334
345
Legal Prohibition
How to Read This Manual
Introduction
Disclaimer
Password
Differences in Functions between Different Models
About IP Address
List of Option
User Restriction
Model-Specific Information
Code Xxxx
User Information on Electrical & Electronic Equipment
Important Safety Instructions
Environmental Advice for Users
All Other Users
Page
Declaration of Conformity
Important Safety Instructions
Energy Saver mode
Energy Star Program
Saving Energy
Page
Guide to Components
Exterior Front View
Getting Started
Exterior Rear View
DAC009
Interior
Fax Received indicator
Control Panel
Guide to Components
Color of the control panel varies depending on the model
Installing the Machine
Where to Put the Machine
24 cm Inches 20 cm
Installing the Machine
Installing Option
This section explains how to install options
Attaching Paper Feed Unit
Check that the package contains the paper feed unit
DAC049
About Operation Tools
This section explains the operation tools of this machine
Initial Setup
Initial Setup
Multi-access
Changing Operation Modes
Sending it
Printing
Internet Fax transmission
Received fax into
Machines memory
Fax immediate transmission
Fax immediate transmission*3
Receiving a LAN-Fax job from
Assigning a setting using the control panel
Assigning a Setting Using Web Image Monitor
Close the Web browser
Configuring Network Settings
Configuring the IP Address Settings
Turn on the machine Press the User Tools key
Assigning the machines IPv4 address manually
Specifying settings to receive an IPv6 address automatically
Assigning the machines IPv6 address manually
Sharing the Printer on a Network
On the Start menu, click Devices and Printers
Click Apply
Wireless LAN Setup
Infrastructure mode
Ad Hoc mode
Press Yes
Press Yes
Enabling the User Restriction Settings
Restricting Machine Functions According to User
Click Available Functions per User
List of currently registered user entries appears
Modifying user entries
This section explains how to modify user entries
This section explains how to delete user entries
Deleting user entries
Close the Web browser
Connected to the machine
When Machine Functions are Restricted
Black-and-white Start or Color Start key Color copying
Printing both color
Authentication using the printer or LAN-Fax driver
Getting Started
Supported Paper
16 to 43 lb 80 g/m2, 20 lb Middle thick paper Thick paper 1
Loading Paper
16 to 43 lb Middle thick paper Thick paper 1
None
Specifications of Paper Types
195 mm × 267 mm
That of middle thick paper
Plain Paper, Thick Paper 1, or Thick Paper
71/4 × 101/2 inches, 8 × 13, 81/2 × 13 inches, Folio 81/4 ×
Inches, 16K 195 mm × 267 mm
Onto
Approximately half that of middle thick paper
Paper thicker than 160 g/m2 cannot be printed onto
Half that of middle thick paper
Print cartridges photo conductor unit
Supported paper tray Tray 1 and bypass tray
Fan envelopes, and then align their edges before loading
Loading Paper
Non-Recommended Paper Types
Print Area
Print area may vary depending on the paper size
Fax function
Pull out the paper tray carefully with both hands
Loading Paper
Loading Paper into Tray1
Place the tray on a flat surface
DAC051
Extending Tray 1 to load paper
Remove the rear cover using a coin
Loading Paper into Bypass Tray
Follow Steps 3 to 7 in Loading Paper into Tray1
Insert the top edge of the paper into the machine
Adjust the paper guides to the paper size
Loading Envelopes
Lowering the fusing unit levers
Lower the fusing unit levers
Specifying Paper Type and Paper Size Using Control Panel
This section explains how to specify the paper type
Specifying the paper type
Specifying the standard paper size
This section explains how to specify a custom paper size
Specifying a custom paper size
Loading Paper
Placing Originals
About Originals
Recommended size of originals
Unscannable image area
Placing Originals
Placing Originals on the exposure glass
Lift the ADF
By using the ADF, you can scan multiple pages at once
Placing Originals in the Auto Document Feeder
Lower the ADF
DAC019
Canceling a Print Job
This section explains the basic printing procedure
Basic Operation
Windows
Canceling a print job before printing has started
Canceling a print job while printing
Mac OS
Press FormFeed while the error message is being displayed
Continuing Printing Using Mismatched Paper
Resetting the Print Job
When the error message is displayed, press JobReset
Printing Confidential Documents
Storing a Locked Print file
A4Mixed 100
Printing a Locked Print file
Deleting a Locked Print file
Press Delete
Locked Print file is deleted
Checking which Locked Print File Jobs Have Been Canceled
Page
PictBridge Printing
What Is PictBridge?
Direct Printing from a Digital Camera PictBridge
This function is compatible with USB
Exiting PictBridge
Use the following procedure to quit the PictBridge mode
What Can Be Done on this Machine
Check that Ready appears on the screen
When PictBridge Printing Does Not Work
Disconnect the USB cable from the machine
89 If a Paper Mismatch
Not of the specified size
Print job. For details, see
Occurs
Using Various Print Functions
Print Quality Functions
Print Output Functions
Changing orientation or rotating the image
Using Various Print Functions
102
Copier Mode Screen
Screen in standby mode
If necessary, configure advanced photocopy settings
Press the Copy key
Canceling a Copy
106
Making Enlarged or Reduced Copies
25% to 400% in 1% increments 107
Press the Reduce/Enlarge key
Temporary job settings are cleared in the following cases
Specifying Reduce/Enlarge
Press Reduce, Enlarge, or Zoom
1Sd 4Orig-Comb 4on1 1Sd 109
1Sd 8Orig-Comb 4on1 2Sd 110
Portrait Top to Bottom, Top to Top
Specifying Combined and 2-sided Copies
DAC602 DAC603
Manually Performing 2-Sided Copying Using the ADF
Manually Performing 2-Sided Copying Using the Exposure Glass
Page
Copying Both Sides of an ID Card onto One Side of Paper
Copying an ID Card
Press the ID Card Copy key
DAC601
Selecting the Document Type According to Original
Specifying the Scan Settings
Adjusting Image Density
Press the Density key
Specifying the Original Type
Press the Image Quality key
120
Scanner Mode Screen
Sing/Mul Scn Size
Registering Scan Destinations
Required Scale Pages in a document, but Jpeg does not
Entry
Characters
Required Support multiple pages in a document 123
Scan to FTP Settings Description Quick Dial Number Optional
Setting Description
Resolution Optional
Scan Size Optional
Are stored. Can contain up to 64 characters
Up to 32 characters
Directory Optional
Connection Test
Can contain up to 32 characters
Service Name Required
Login Password Optional
Files. Can contain up to 64 characters
Setting Description File Format Color/Gray
Required Support multiple pages in a document
Specified shared folder exists
This section explains how to delete registered destinations
Modifying Scan Destinations
Deleting Scan Destinations
Scan to E-mail/FTP/Folder
Press the Scanner key
Press the Address Book key
Press the B&W Start key or the Color Start key
If you see this screen, proceed to the next step
DAC516
Basic Operation for Scan to USB
You can press the Clear/Stop key to clear the destination
Insert your USB flash disk into the USB flash disk port
Place the original on the exposure glass or in the ADF
To scan in black and white, press the B&W Start key 133
Remove the USB flash disk from the machine
135
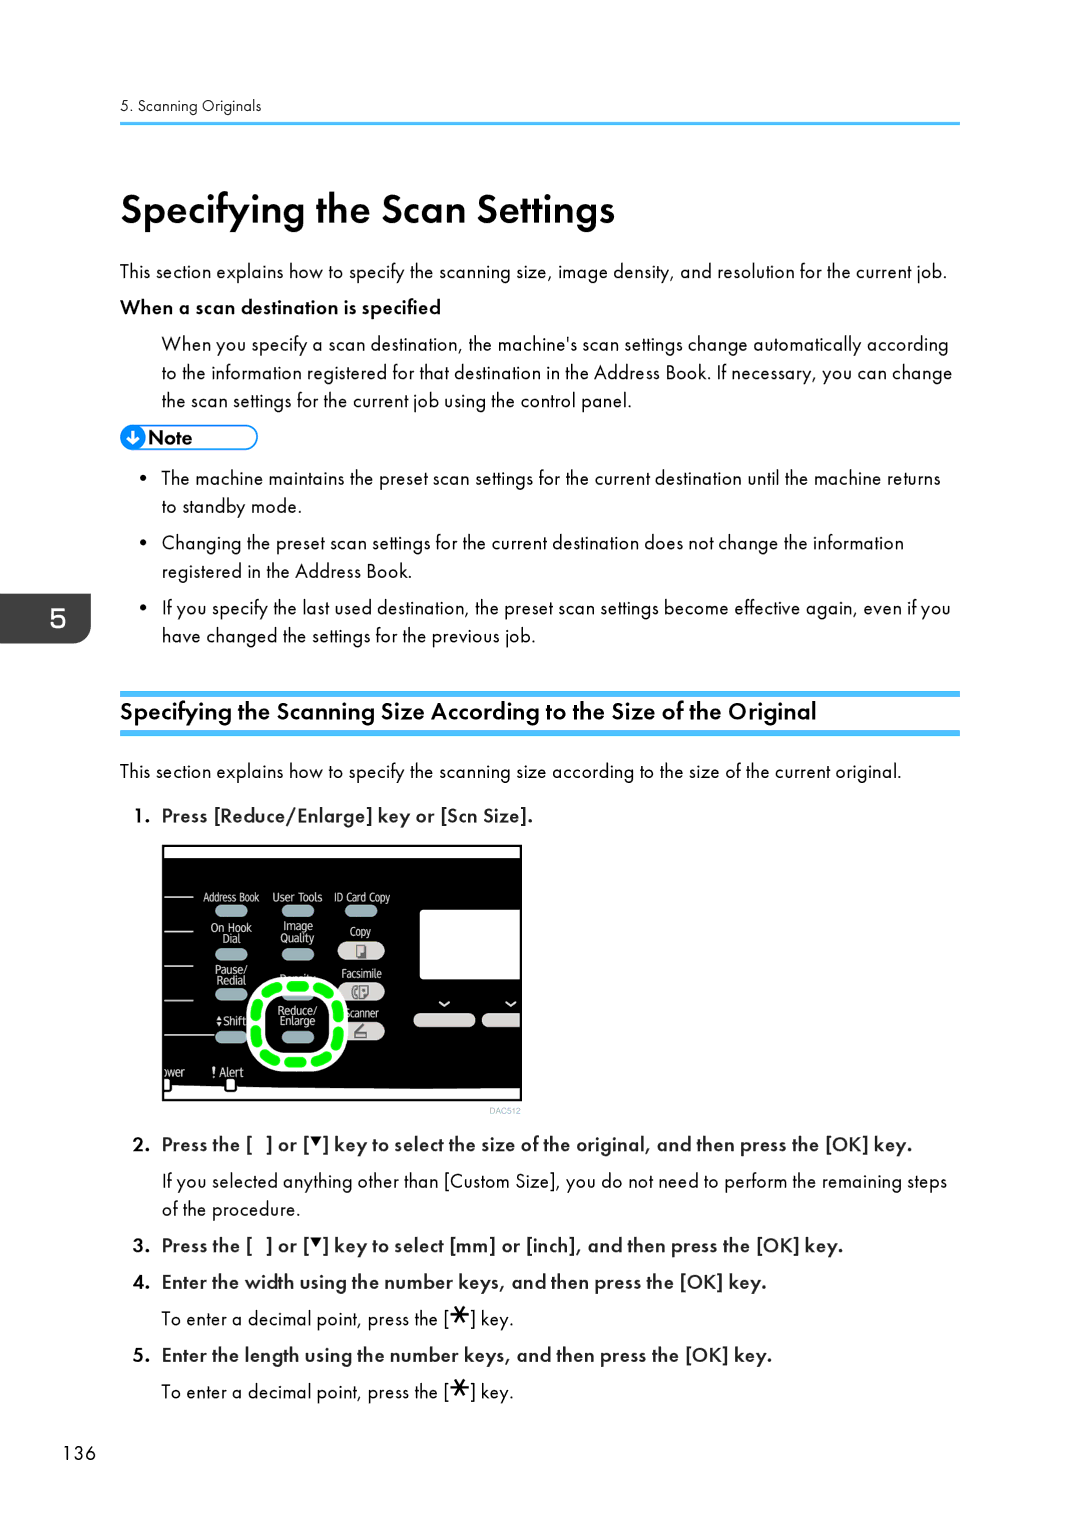
Press Reduce/Enlarge key or Scn Size
Adjusting Image Density
Specifying Resolution
Basic Operation for Twain Scanning
Using Twain Scanner
Scanning from a Computer
Twain Scanning
Settings you can configure in the Twain dialog box
140
Basic Operation for WIA Scanning
142
Fax Mode Screen
Screen in standby mode RX File Del File
Sending and Receiving a Fax
Setting the Date and Time
Entering Characters
Entering Characters
Registering Fax Destinations Using the Control Panel
Registering Fax Destinations
For entering characters, see page 146 Entering Characters
Fax number can contain 0 to 9, pause, , , and space
Registering Fax Destinations Using Web Image Monitor
Modifying or deleting fax destinations
Fax number and fax name registered for that number appear
228 Administrator Settings
Speed Dial Number Dial or Speed Dial destination
Fax Number Required
Re-entering a fax number to confirm destination
Preventing Transmission to the Wrong Destination
Modifying fax destinations
Click Fax Quick Dial Destination
Press the User Tools key
Selecting Transmission Mode
Sending a Fax
Press the Facsimile key, and then press the or key
Internet Fax Transmission
Basic Operation for Sending a Fax
Press the Facsimile key
Press the B&W Start key
Canceling a Transmission
This section explains how to cancel a fax transmission 157
Machine can store up to 5 unsent fax jobs
Canceling a Transmission Before the Original Is Scanned
Canceling a Transmission While the Original Is Being Scanned
Press Del File
Press the or
OK key
Specifying the destination using the One Touch buttons
Specifying the Fax Destination
Specifying the destination using Speed Dial
161
Specifying the destination using the broadcast function
162
Specifying the destination using the redial function
Add a destination by using one of the following methods
Useful Sending Functions
Sending a fax using On Hook Dial
To cancel sending a fax, press the Clear/Stop key
Press the Pause/Redial key
Press the On Hook Dial key
On Hook appears on the screen
165
Sending a fax after a conversation
Press TX, and then press the B&W Start key
166
Specifying the Scan Settings
Adjusting image density
Specifying the resolution
Press the Image Quality key
Using the Fax Function from a Computer LAN- Fax
Basic Operation for Sending Faxes from a Computer
Edit the cover sheet as necessary, and then click OK 169
Canceling a fax
Click Send
Configuring Transmission Settings
Registering destinations
Configuring the LAN-Fax Address Book
Opening the LAN-Fax address book
Modifying destinations
Confirmation message appears
Modifying groups
Deleting individual destinations or groups
Click Yes
Editing a Fax Cover Sheet
Exporting/Importing LAN-Fax Address Book data
175
Selecting Reception Mode
Receiving a Fax
Receiving a fax in FAX/TEL Manual mode
Receiving a fax in Fax Only mode
177
Receiving a fax in FAX/TEL Automatic mode
Receiving a fax in FAX/TAD mode
178
Receiving an Internet Fax
Inactive Manual reception
Receiving a fax using the control panel
Receiving a fax using Web Image Monitor
Click OK Close the Web browser
Forwarding or Storing Faxes in Memory
Forwarding settings
182
Configuring the forwarding conditions
Enter the start time and the end time, and press the OK key
183
Configuring the storing conditions
Printing Out Faxes Stored in Memory
Enter the start time and the end time
Receiving or Rejecting Faxes from Special Senders
Press RX File
Fax number can contain 0 to 9, , and space
Registering the Special Senders
Limiting the incoming faxes
186
187
Lists/Reports Related to Fax
Configuring the Machine Using the Control Panel
Press the or key to select the settings you want to use
Configuring the Machine Using the Control Panel
Menu Chart
Configuring the Machine Using the Control Panel
Copier Features Settings
Configuring the Machine Using the Control Panel
Copier Features Settings
Configuring the Machine Using the Control Panel
Standard Fine 197
Scanner Features Settings
High Limitless Scan
Fax Transmission Features Settings
Default On Off 201
Fax Features Settings
FAX/TAD
Fax Features Settings
Configuring the Machine Using the Control Panel
Fax Features Settings
Jbig
Fax Features Settings
Address Book Settings
System Settings
Default 60 sec 15 sec 300 sec Network
USB
System Settings
Configuring the Machine Using the Control Panel
System Settings
Configuring the Machine Using the Control Panel
Tray Paper Settings
Default Plain Paper
Any Size/Type
Tray 217
Printing the Configuration
Printing Lists/Reports
Types of Lists/Reports
Printing Lists/Reports
Printer Features Settings
Portrait Landscape 221
Configuring the Machine Using the Control Panel
Solid Color Presentation Photographic Off 223
Network Settings
WPS
Dhcp
Network Settings
Administrator Settings
Pstn / PBX
230
Administrator Settings
Configuring the Machine Using the Control Panel
Configuring the Machine Using Web Image Monitor
Using Web Image Monitor
Displaying Top
Changing the Interface Language
Checking the System Information
Status Tab
Counter Tab
Number of color pages
Accumulated value of cyan toner A4 page coverage in percent
Functions, and lists/reports
Covered A4 pages
Fully-covered A4 pages
Magenta Using the printer function
Yellow Using the printer function
239
Machine Information Tab
Configuring the System Settings
Sound Volume Adjustment Tab
Tray Paper Settings Tab
Paper, Cardstock, Envelope, Thick Paper 2 106-160g/m2
Select the paper type for Tray 1 from the following
75-90g/m2, Thick Paper 1 91-105g/m2, Recycled Paper, Color
Tray Description
Machines settings
Select how print jobs using the Tray 1 are handled
System Settings
Applied regardless of the machines settings
Machines settings
Copier Tab
Fax Tab
Be sent even if this setting is enabled
Administrator
Address in the Administrator
Fax Number Confirmation Description
Priority Tray Tab
Timeout Tab
Toner Saving Tab
Shortcut to Function Tab
Warm-up time for maintenance will also be lowered
Black-and-White Print Priority Tab
Print Priority Description
Registering Destinations
Registering Fax Special Senders
Restricting Machine Functions According to User
Network Status Tab
Configuring the Network Settings
Items below cannot be configured
Firmware
IPv6 Configuration Tab
Network Application Tab
DNS Tab
Auto E-mail Notification Tab
Snmp Tab
Smtp Tab
POP3 Tab
Internet Fax Tab
Wireless Tab
Wireless LAN directly, select Ad-Hoc
Enter the Ssid of the access point
Communication Mode Select the mode to connect
Connections are configured
WEP Key
Configuring the IPsec Settings
IPsec Global Settings Tab
IPsec Policy List Tab
IKE Settings
IP Policy Settings Description
If this setting is left blank, 32 IPv4 or 128 IPv6 will be
Any subsequent policies will be renumbered accordingly
Gateways such as VPN devices
Authentication and data encryption
We recommend this type for communication between security
Only
IKE Diffie-Hellman
Prints a list of scan destinations
List Sent, or forwarded
Prints a list of Quick Dial entries
Scanner Journal
Configuring the Administrator Settings
Administrator Tab
Reset Settings Tab
Backs up settings that are not related to the network
Backup Setting Tab
Menu Settings instead
Backs up the IPsec settings to a file
Set Date/Time Tab
Restore Setting Tab
Restore Setting Description File to Restore
File
Energy Saver Mode Tab
PCL6 Mode
PCL6 Mode Description
C252 when using the normal driver
Maintaining the Machine
Replacing the Print Cartridge
274
275
Remove the protective cover from the print cartridge
276
DAC064
Replacing the Waste Toner Bottle
Slide both levers on the front cover forward
279
280
Close the bottle cap
Leave the bottle cap open
281
Push in the waste toner bottle until it clicks
282
When it stops, push on the Push mark until it clicks
Replacing the Fusing Unit and Transfer Roller
Replacing a Component
Replacing the Intermediate Transfer Unit
285
Cleaning the Toner Density Sensor
Remove the rearmost print cartridge
Slide the toner density sensor lever once to the left
Carefully insert the print cartridge removed in vertically
287
Cleaning the Friction Pad and Paper Feed Roller
Wipe the friction pad with a damp cloth
289
Maintaining the Machine
Cleaning the Registration Roller and Paper Tray
Wipe the inside of the paper tray with a cloth
292
DAC085
Cleaning the ADF
Cleaning the Exposure Glass and ADF
Cleaning the Exposure Glass
Following procedure describes how to clean the ADF
Removing Paper Jams
Removing Printing Jams
If paper jams inside the fusing unit
Do not touch the fusing unit 296
Pull the paper downward to remove it. Do not pull it upward
297
Pull up the fusing unit levers
If paper jams inside a tray
298
Do not touch the fusing unit
Pull out the jammed paper carefully
299
If paper jams inside the transfer unit
300
Removing Scanning Jams
If you cannot find the jammed paper, look inside the machine
Be careful not to pull the original too hard, as it may rip
Open the ADF cover
Gently pull the jammed paper to remove it
Close the ADF cover and the cover of the input tray for ADF
Close the ADF
303
Common Problems
Adjust the volume of the beep
Paper Feed Problems
Only add paper when there is none left in the tray
Problem Solution
Cleaning the Registration Roller and Paper Tray
Guides, adjust the paper guides to remove the gaps
Pages Adjust the paper guides to remove the gaps
308
Print Quality Problems
Checking the Condition of the Machine
Checking the printer driver settings
Lines
311
Printer Problems
When You Cannot Print Properly
There is a considerable delay
Problem Solution Locked Print file is canceled
Lower setting for Gradation in Print Quality. For
Between the print start command
Configured in the application
Changing the settings with printer driver may help to
Check that the page layout settings are properly
Job
From the color on the computers
See page 209 System Settings
Sales or service representative
Tab in the printer drivers dialog box
When You Cannot Print Clearly
All the print cartridges again
Service representative
For details, see page 209 System Settings
Horizontal lines appear on
Black gradation is not natural Only when using PostScript
Problem Solution White spots appear
Come out clean
Dirty with paper dust if you use paper other than standard
When Paper Is Not Fed Properly
Other Printing Problems
Copier Problems
When You Cannot Make Clear Copies
When You Cannot Make Copies as Wanted
Scanner Problems
When You Cannot Browse the Network to Send a Scan File
When Scanning Is Not Done As Expected
Fax Problems
When You Cannot Send or Receive Fax Messages As Wanted
Transmission
Reception
Printing
When an Error Is Notified via a Report or E-mail
When a report is printed from the machine
When an error notification E-mail is received
Error notification e-mail
Error Code
Fax at a lower resolution
Load valid size paper in the tray, and configure
Paper size settings under Tray Paper Settings
2XXX32 to An error occurred while receiving a fax
253 Configuring the Network Settings
Error Code Solution 3XXX11
Check if the network settings such as the IP address
No double-byte character is used. See
Sender to check the e-mail settings
Error Code Solution 4XXX21
To check the e-mail settings
E-mail had an invalid Content-Type, or an
Compression method of the received Tiff file was
Error Code Solution 4XXX43
Lower resolution
Tiff file
Error and Status Messages on the Screen
Copy Performed because the tray
215 Tray Paper Settings
Open Frt. Cvr. then Fusing unit levers are not
Other than the bypass tray
Press JobReset to cancel the job
Using the A4, Letter, or Legal size
Mode in Duplex/Combine under
Calls using the telephone. If you
Access the USB flash disk Properly Failed to Create File
Check that Pstn / PBX in Admin
Use. See page 228 Administrator
Button you pressed
If using the PCL printer driver, set
Canceled depending on
When performing printing Print file
Faxes, or send at a lower resolution
Paper exit area Paper Feed Problems Misfeed Tray
Message Causes Solutions Misfeed Dup. Unit
Paper tray Paper Feed Problems Misfeed Stnd. Tray
Tray 1 paper input area Paper Feed Problems Misfeed Tray
Reconnect the Ethernet cable properly
Message Causes Solutions RX Comm. Error
See page 215 Tray Paper Settings
Then try the operation again
Perform sort copying Setting Error
Specifying the Scan Settings
Cancelled
Reinstall the waste toner bottle. See
Removed before the operation
Message Causes Solutions Unsupported USB
File system was used USB Disconnected
Could be completed Display USB Memory
Appendix
Available Functions
Appendix
Transmission Using IPsec
Encryption and Authentication by IPsec
Security Association
Encryption Key Exchange Settings Configuration Flow
Specifying Encryption Key Exchange Settings
Specifying IPsec Settings on the Computer
If the settings are not displayed, click Add
Click OK twice
Transmission Using IPsec
Enabling and Disabling IPsec Using the Control Panel
New IP security policy IPsec settings is specified
Click OK, and then click Next Click Finish
351
Moving and Transporting the Machine
Disposal
Be sure to check the following points
Where to Inquire
Consumables
Print Cartridge
Consumables
Waste Toner Bottle
Specifications of the Machine
General Function Specifications
This section lists the machines specifications
Energy Saver mode 358
Printer Function Specifications
Copier Function Specifications
Maximum resolution scanning and printing
Network protocol TCP/IP, IPP, Bonjour
Scanner Function Specifications
Fax Function Specifications
Fax transmission and reception
Reception
Internet Fax transmission and reception
Quick dial 20 items Number of redials for Fax
Mail format 363
Format MIME, Base64
Specifications of Options
Paper Feed Unit TK1010
Paper capacity Sheets Paper size
Copyright Information about Installed Applications
Expat
Iperf
WPA Supplicant
368
Trademarks
Product names of Windows 8 are as follows 369
Appendix
Index
372
154
373
374
375
376
Page
EN GB EN US M204-8611