Manuals
/
Epson
/
Computer Equipment
/
Printer
Epson
L90
manual
4 PC863 Canadian-French
Models:
L90
1
163
192
192
Download
192 pages
12.28 Kb
160
161
162
163
164
165
166
167
Troubleshooting
Specs
Electrical Characteristics
Install
FAQ
Error codes
Interface Signals
Panel LED and Error Status
Key to Symbols
Connecting the Cable
Page 163
Image 163
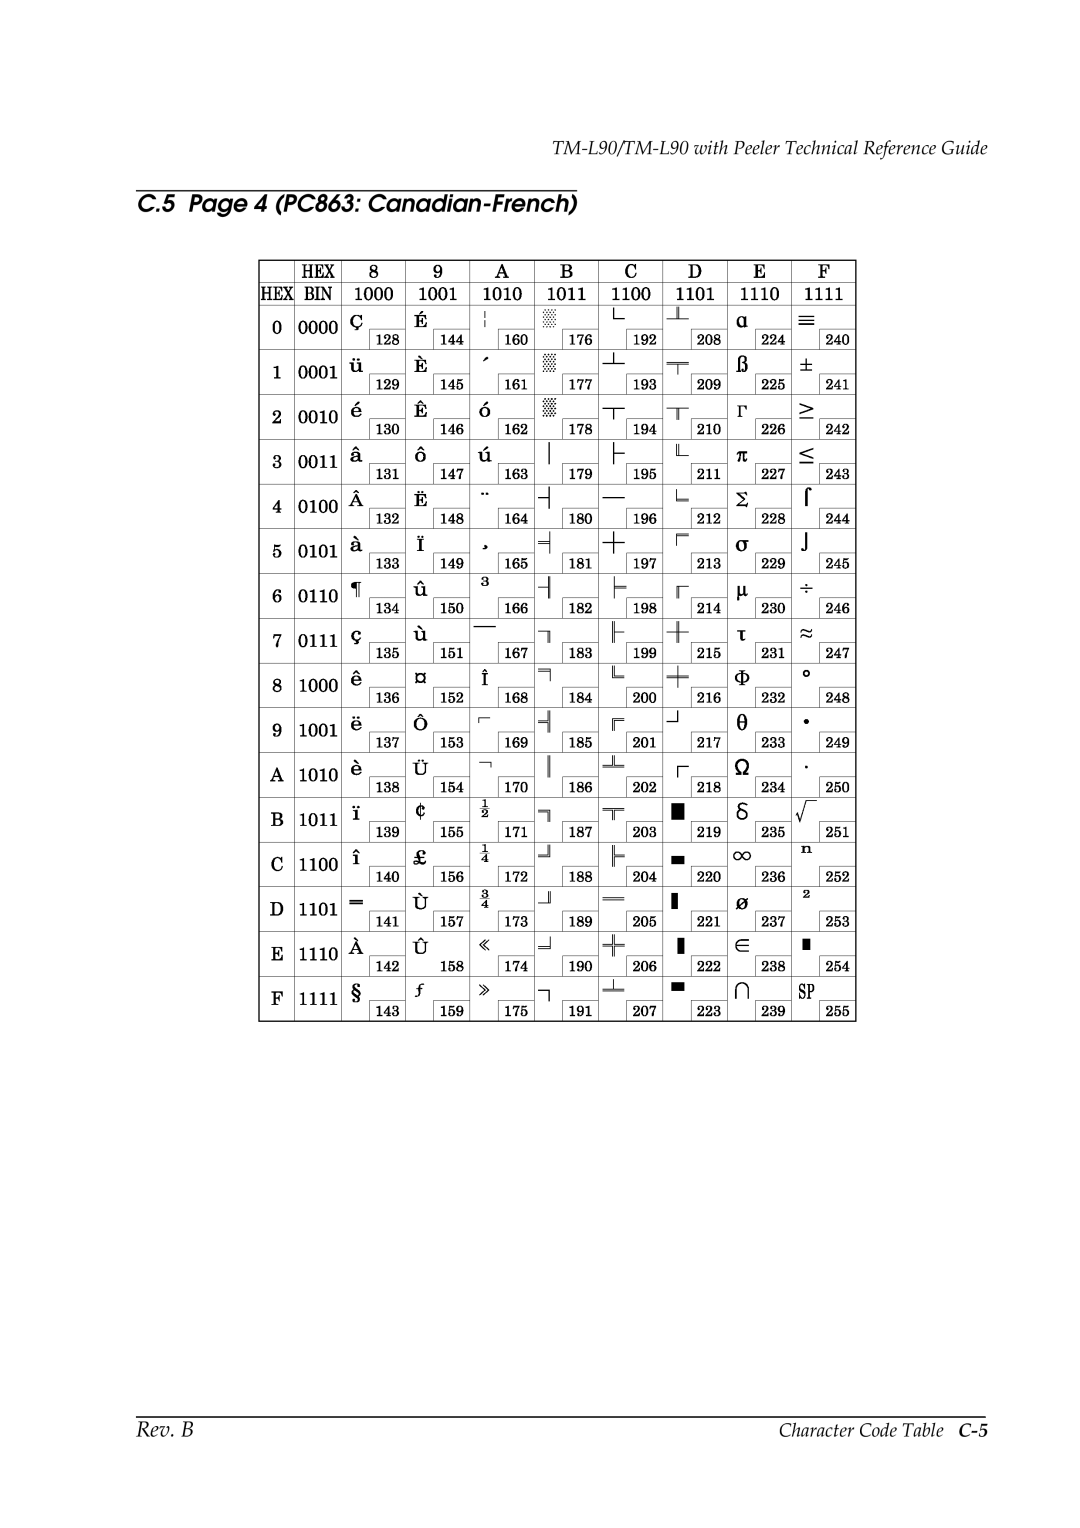
TM-L90/TM-L90
with Peeler Technical Reference Guide
C.5 Page 4 (PC863:
Canadian-French)
Rev. B
Character Code Table
C-5
Page 162
Page 164
Page 163
Image 163
Page 162
Page 164
Contents
TM-L90/TM-L90 Peeler Technical Reference Guide
Page
TM-L90/TM-L90 with Peeler Technical Reference Guide
Revision Table
Key to Symbols
For Safety
Iii
Modular Connector
Related Documentation
Manual Content
About This Manual
Aim of the Manual
Rev. B
Contents
Application Development Information
Connecting to the Host Computer and Options
Appendix B Consumable Specifications
ESC/POS Command-Related Information
Product Specifications
Appendix a Interface And Connectors
Appendix C Character Code Table
Appendix G Shipping Procedures
Appendix D Option Specifications
Appendix E Maintenance
Appendix F Troubleshooting
Page
Models
Accessories
Product Overview
Product Structure
2Product Overview Rev. B
Option
Part Names TM-L90
Name and Description of Each Part
Printer Part Names
Part Names of TM-L90 Peeler Specification
Part names TM-L90 peeler specification
4Product Overview Rev. B
Control Panel
Feed button with the TM-L90 peeler specification
Feed button with TM-L90
6Product Overview Rev. B
Paper OUT LED with the TM-L90 peeler specification
Power Switch
Paper OUT LED with TM-L90
Mode switch TM-L90 peeler specification only
Power switch cover
8Product Overview Rev. B
Mode switch
Connector Panel
Connectors
10Product Overview Rev. B
Setup Flow
Setup
Precaution For Installation
Installation Procedures
2Setup Rev. B
Instructions for Installation
4Setup Rev. B
Paper exit guide
Part names and the locations of N.E. detector components
Adjusting Roll Paper Near-End Detection Position
6Setup Rev. B
With TM-L90
Rev. B Setup
Adjustment Positions of N.E. Detector
8Setup Rev. B
Detector Holder
Load the roll paper Close the roll paper cover
Setup Rev. B
With the TM-L90 peeler specification
Adjust the sensor so that it projects from the window
Near end sensor holder
Near end sensor adjustment position
Set the roll paper Close the roll paper cover
Attaching Power Supply Unit
Connecting Power Supply Unit PS-180
Power Supply Connector
Autocutter settings TM-L90 only
Lift the top of the cutter unit upward and remove it
Setup Rev. B
Setting Roll Paper Width
Notch Front edge Shaft Protrusion
DIP Switch Settings
OFF
DIP switch settings Serial interface model
DIP switch settings Parallel, USB, Ethernet model
Setting Memory Switches
Items that can be set in the memory switch setting mode
Location of the Feed button inside the roll paper cover
Starting the Memory Switch Setting mode
Ending Memory Switch Setting mode
Entering Memory Switch Settings Mode
Operating procedure of Memory Switch Settings
Selection of Print density
Selecting individual settings
Rev. B Setup
Setup Rev. B
Rev. B Setup
Or more times No change
With the TM-L90 peeler specification
How to Set Various Items with ESC/POS Commands
Setting Various Items via Utilities
TM-L90 memory switch settings
Memory Switch Functions
Customized values
MSW8
Serial Communication condition
MSW7
TM-L90 peeler specification memory switch settings
TM-L90/TM-L90 with Peeler Technical Reference Guide
Serial Communication condition
Paper Loading Method
Paper setting with peeling issuing
Rev. B Setup
Setup Rev. B
Setting Paper Layout
Automatic paper layout setting
Rev. B Setup
+1.5 mm
Parameters Calculated for Automatic Layout Setting
Clearing Paper Layout Setting
TM Setup Items Summary
Feed
Self Test Mode
Operating Mode Panel Switch Operation
With TM-L90
With the TM-L90 peeler specification
Connecting the Cable
Connecting to the Host Computer and Options
Connecting to the Host Computer and Options
With the RS-232C interface
Connecting to the Host Computer
Pass-through Connections
Direct Connection Stand alone
Tightening Screws
Connection procedure
Hexagon Bolts Threaded in Inches and Millimeters
With the USB interface
With the parallel IEEE1284 interface
Attaching Locking Wire Saddle
6Connecting to the Host Computer and Options
With the Ethernet interface IEEE802.3 TM-L90 only
Name of Parts
Names of parts
Connecting to the Drawer
10Connecting to the Host Computer and Options
Epson Advanced Printer Driver Overview
Application Development Information
Introduction of Control Methods
Windows Driver Epson Advanced Printer Driver
2Application Development Information Rev. B
Epson Advanced Printer Driver Contents
Supported development languages
Epson Advanced Printer Driver Support Environment
Supported interfaces
Supported OSs with confirmation of system operation
Driver Information and Download Destination
4Application Development Information Rev. B
Epson Opos ADK Opos Control Overview
Epson Opos ADK Contents
Epson Opos ADK Support Environment
6Application Development Information Rev. B
Electronic Logo Registration Utility for Nvram
3 ESC/POS Commands
TM Printer Memory Switch Setup Utility
Various Utilities
Printer Cover Sensor
Sensors
8Application Development Information Rev. B
Busy state
Offline
Selecting conditions that invoke a Busy State
Printer Busy conditions and the Msw1-3 status
Label peeling sensor peeler specification only
10Application Development Information Rev. B
Receive buffer
Paper to use for high speed
Setting of Paper Width
Print Density
Print Speed
Code 128 Barcode
Barcode Printing
12Application Development Information Rev. B
Printable characters for code set a
Printable characters for code set B
14Application Development Information Rev. B
Printable characters for code set C
16Application Development Information Rev. B
Precautions for Two-Dimensional Code Printing
Two-Color Printing
NV Memory
Print data dropout occurs Check the handshake process
FAQ List
Confirmation procedure
Corrective procedure
18Application Development Information Rev. B
Rev. B Application Development Information
20Application Development Information Rev. B
Power Supply Switch-Related User Operation List
ESC/POS Command-Related Information
Power Off Control by the Host
Control After Paper Cut
When the Power Supply Switch is Enabled
When the Power Supply Switch is Disabled
Head Divided Control
Customizing Printer
Printer initial setting up
Changing command default values
Using the NV Memory
Printer Status
Hexadecimal Dump Mode
Product Specifications
Product Specifications
TM-L90
2Product Specifications Rev. B
TM-L90 peeler specification
4Product Specifications Rev. B
Print Specifications
Mtbf
Reliability
6Product Specifications Rev. B
TM-L90 peeler specification
Character Configurations and Dimensions
Character Specifications
8Product Specifications Rev. B
Character Specifications
Paper feed
Paper Feed Specifications
Paper Specifications
Precautions for Printing and Paper Feed
Printable Area For Thermal Paper
10Product Specifications Rev. B
Printing Area
Thermal Paper
Printable Area for Label
Label
Printing Position in Relation to Cutter Position TM-L90
12Product Specifications Rev. B
Printing Position in Relation to Cutter Position
23.5mm
14Product Specifications Rev. B
Overview of External Dimensions
External Appearance TM-L90
External Appearance TM-L90 Peeler Specification
16Product Specifications Rev. B
Operating specifications
Interface board specifications RS-232 standard
Interface And Connectors
RS-232 Serial Interface
RTS
Functions of each connector pin
Code
3 XON/XOFF
Mode
IEEE1284 Parallel Interface
Connector Pin Assignment
Interface Signals
6Interface And Connectors
TM-L90 Roll Paper
Consumable Specifications
Receipt Roll Paper
Specified Original Roll Paper
Specified Receipt Roll Paper
Paper to Use for High Speed
Print Density Adjustment
Black Mark Interval Requirement
Requirements for Black Mark Position for Receipt Paper
Die-Cut Label Roll Paper
Specified Die-Cut Label Roll Paper Specifications
Die-Cut Label Paper
Specified Original Paper
Consumable Specifications B-7
Label Size Requirement
Requirements for Die-Cut Label Size
Requirements for Black Mark Position
Requirements for Transparency Rate of Die-Cut Label Paper
10Consumable Specifications
Continuous Label Paper
Continuous Label Roll Paper
Specified Continuous Label Roll Paper
Requirements for Size of Continuous Label Paper
TM-L90 with Peeler Roll Paper
14Consumable Specifications
Consumable Specifications B-15
16Consumable Specifications
If paper other than the specified original paper is used
18Consumable Specifications
Consumable Specifications B-19
20Consumable Specifications
Consumable Specifications B-21
22Consumable Specifications
Consumable Specifications B-23
24Consumable Specifications
0 PC437 USA, Standard Europe
Character Code Table
1 Katakana
2 PC850 Multilingual
3 PC860 Portuguese
4 PC863 Canadian-French
5 PC865 Nordic
16 WPC1252
17 PC866 Cyrillic #2
18 PC852 Latin2
19 PC858 Euro
255 Blank
Country
International Character Set
Case specifications
Option Specifications
Electrical Characteristics
Case Specifications
Material
AC Cable Selection
Cleaning the autocutter TM-L90 only
Maintenance
Adhesive adheres on cutter blade
Adhesive being removed with flat-blade screwdriver
Print Head Cleaning
4Maintenance
Cleaning the peeler TM-L90 peeler specification only
6Maintenance
Power Power LED
Troubleshooting
Panel LED and Error Status
Power Power LED
Error Error LED
Error Error LED
No Roll Paper Paper OUT LED
Automatically recoverable errors
Error code
Automatically recoverable errors
Recoverable Errors
Recoverable errors
Troubleshooting F-5
Unrecoverable Errors
Unrecoverable errors
Troubleshooting F-7
8Troubleshooting
When a paper jam occurs TM-L90 peeler specification
10Troubleshooting
Shipping Procedures
2Shipping Procedures
Page
Seiko Epson Corporation
Top
Page
Image
Contents