Beyond the Basics
Using CODE to enter characters
Some settings give you a chance to enter an identifying name (see EasyStart, page 1.10). You can do this with the
To use the CODE key to enter characters:
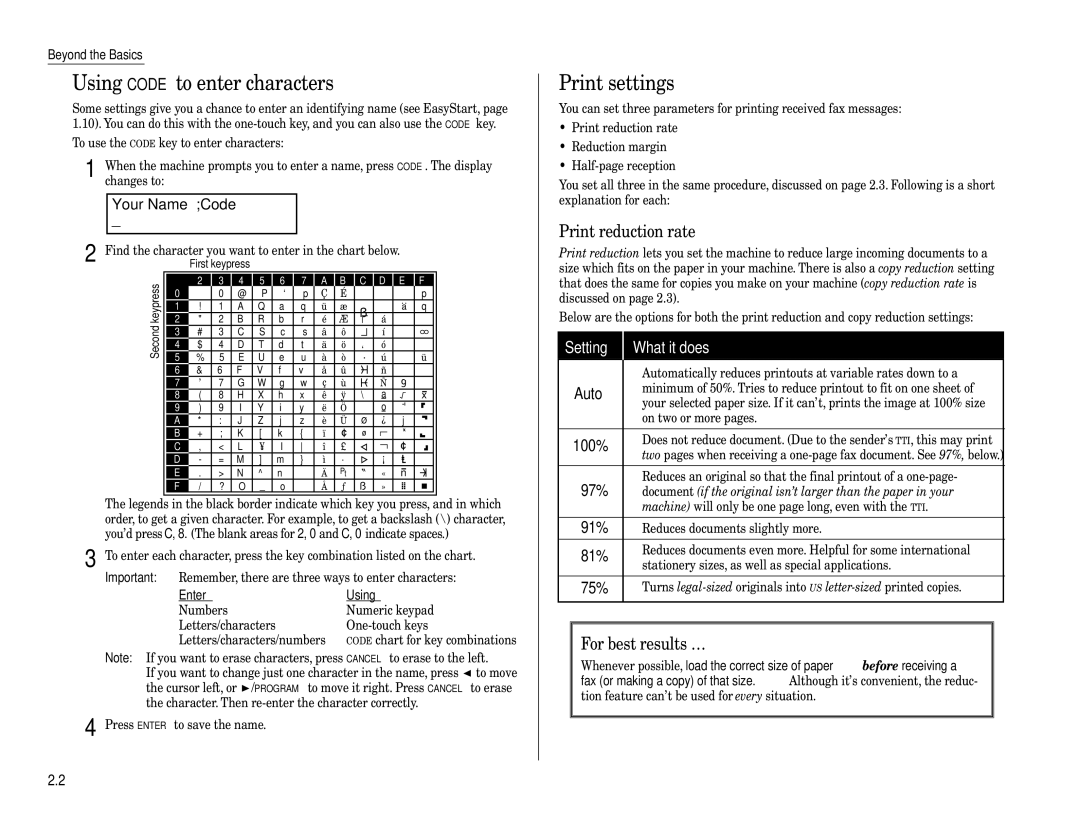
1 When the machine prompts you to enter a name, press CODE. The display changes to:
Your Name ;Code
_
2 Find the character you want to enter in the chart below. First keypress
keypress |
| 2 3 | 4 5 6 | 7 | A B C D E F | ||||||||
0 |
| 0 | @ P | ` | p Ç É |
| ↑ | α | p | ||||
1 | ! | 1 | A Q a | q ü æ | ˚ | ↓ |
| q | |||||
2 | " | 2 | B | R | b | r | é | Æ | á | β | θ | ||
Second | 3 | # | 3 | C S | c | s | â | ô |
| í | ε |
| |
4 | $ | 4 | D T d | t | ä | ö | `. | ó | ∝ | Ω | |||
5 | % | 5 | E | U | e | u | à | ò | ú | σ | ü | ||
| 6 | & | 6 | F V f | v å û |
| ñ ρ | Σ | |||||
| 7 | ’ | 7 | G W g w ç | ù |
| Ñ |
| π | ||||
| 8 | ( | 8 | H | X h | x ê | ÿ | \ a |
| x | |||
| 9 | ) | 9 | I | Y | i | y | ë | Ö ″ | o |
|
| |
| A | * | : | J | Z | j | z | è | Ü |
| ¿ | j |
|
| B | + | ; | K | [ | k | { | ï |
|
|
|
|
|
| C | , | < | L | ¥ | l | î | £ |
| ¡ |
| ⎟ | |
| D | - | = M ] m | } | ì | ¥ |
|
| |||||
| E | . | > N ^ n → | Ä | Pt |
| « | n |
| ||||
| F | / | ? O | _ | o | ← | Å | ƒ | ˚ | » |
|
| |
The legends in the black border indicate which key you press, and in which order, to get a given character. For example, to get a backslash (\) character, you’d press C, 8. (The blank areas for 2, 0 and C, 0 indicate spaces.)
3 To enter each character, press the key combination listed on the chart.
Important: Remember, there are three ways to enter characters:
Enter | Using |
Numbers | Numeric keypad |
Letters/characters | |
Letters/characters/numbers | CODE chart for key combinations |
Note: If you want to erase characters, press CANCEL to erase to the left.
If you want to change just one character in the name, press ![]() to move the cursor left, or
to move the cursor left, or ![]() /PROGRAM to move it right. Press CANCEL to erase the character. Then
/PROGRAM to move it right. Press CANCEL to erase the character. Then
4 Press ENTER to save the name.
Print settings
You can set three parameters for printing received fax messages:
•Print reduction rate
•Reduction margin
•
You set all three in the same procedure, discussed on page 2.3. Following is a short explanation for each:
Print reduction rate
Print reduction lets you set the machine to reduce large incoming documents to a size which fits on the paper in your machine. There is also a copy reduction setting that does the same for copies you make on your machine (copy reduction rate is discussed on page 2.3).
Below are the options for both the print reduction and copy reduction settings:
Setting | What it does |
| Automatically reduces printouts at variable rates down to a |
Auto | minimum of 50%. Tries to reduce printout to fit on one sheet of |
| your selected paper size. If it can’t, prints the image at 100% size |
| on two or more pages. |
|
|
100% | Does not reduce document. (Due to the sender’s TTI, this may print |
| two pages when receiving a |
97% | Reduces an original so that the final printout of a |
document (if the original isn’t larger than the paper in your | |
| machine) will only be one page long, even with the TTI. |
|
|
91% | Reduces documents slightly more. |
81% | Reduces documents even more. Helpful for some international |
| stationery sizes, as well as special applications. |
75% | Turns |
|
|
For best results …
Whenever possible, load the correct size of paper before receiving a fax (or making a copy) of that size. Although it’s convenient, the reduc- tion feature can’t be used for every situation.
2.2