Digital Video Camcorder
Caméscope vidéo numérique
’aide de la carte mémoire
Features of Your NEW Minidv Camcorder
Standard de la carte mémoire vers
Consignes
Safety warnings
Precautions
Avertissements de sécurité
Remarques Concernant LE Nettoyage DES Têtes Vidéo
Adjusting the LCD Screen
Remarques et instructions de sécurité
Réglage DE Lécran LCD
Réparation ET Pièces DE Rechange
Servicing & Replacement Parts
Opened and the battery pack removed
Remarques SUR LE Caméscope
Contents
Sommaire
Easy.Q mode
Tants mode Easy Q
Mode Audio
Scene setting the zero memory
Digital Still Camera Mode VP-D385 i only
VP-D385i
100
107
103
What is Included with Your Minidv Camcorder
Familiarisez-vous avec votre caméscope Mini-DV
VUE Avant Gauche Front & Left View
Votre caméscope Mini-DV
Familiarisez-vous avec Getting to know your
MiniDV camcorder
VUE Latérale Gauche Left Side View
VUE Supérieure Droite
Right & TOP View
Usable Memory Cards 2GB Max Jacks
VUE Inférieure Arrière Rear & Bottom View
Prises
Prise AV
Bouton A.DUB
Bouton Avance rapide
Bouton Retour rapide
Préparation
Preparation
Insertion DE LA Pile DE Type Bouton
Installing the BUTTON-TYPE Battery
Precaution regarding the button-type battery
Consigne relative à la pile de type bouton
Insertion/Éjection du bloc de batteries
Charging the Battery Pack
Insertion DU Bloc DE Batteries
Charge de la batterie
Témoin de charge
Charging indicator
Battery Time Charging time
Si la batterie est en cours de charge, ce témoin est orange
Affichage du niveau de charge de la batterie
Changez la batterie aussitôt que possible
Remarques concernant la batterie
Connecting a Power Source
Using a Household Power Source
Utilisation dune source
Caméscope Mini-DV
Préparationpreparation
Mise sous tension/hors tension du
Turning the miniDV camcorder on and off
OSD in Camera Mode
OSD in Player Mode
Screen Indicators in M.CAM / M.PLAYER Modes VP-D385i only
Using the Display Button
Utilisation DU Bouton Affichage
Gestion DES Menus Rapides À Laide DU Pavé
Using the Joystick
Utilisation DU Pavé
Handling Quick Menus with the Joystick
État Entrée
Focus
Exposure Focus
Films
Réglage du menu Système
Setting the Clock Clock SET
Réglage DE Lhorloge PARAM. Horloge
Caméscope Télécommande VP-D382i/D382H/D385i uniquement
Remote VP-D382 i /D382H/D385 i only
Modes CameraCam/Player/M.Cam/M.Player
Player Le mode CameraCam Ou Player
Réglage initial réglage du
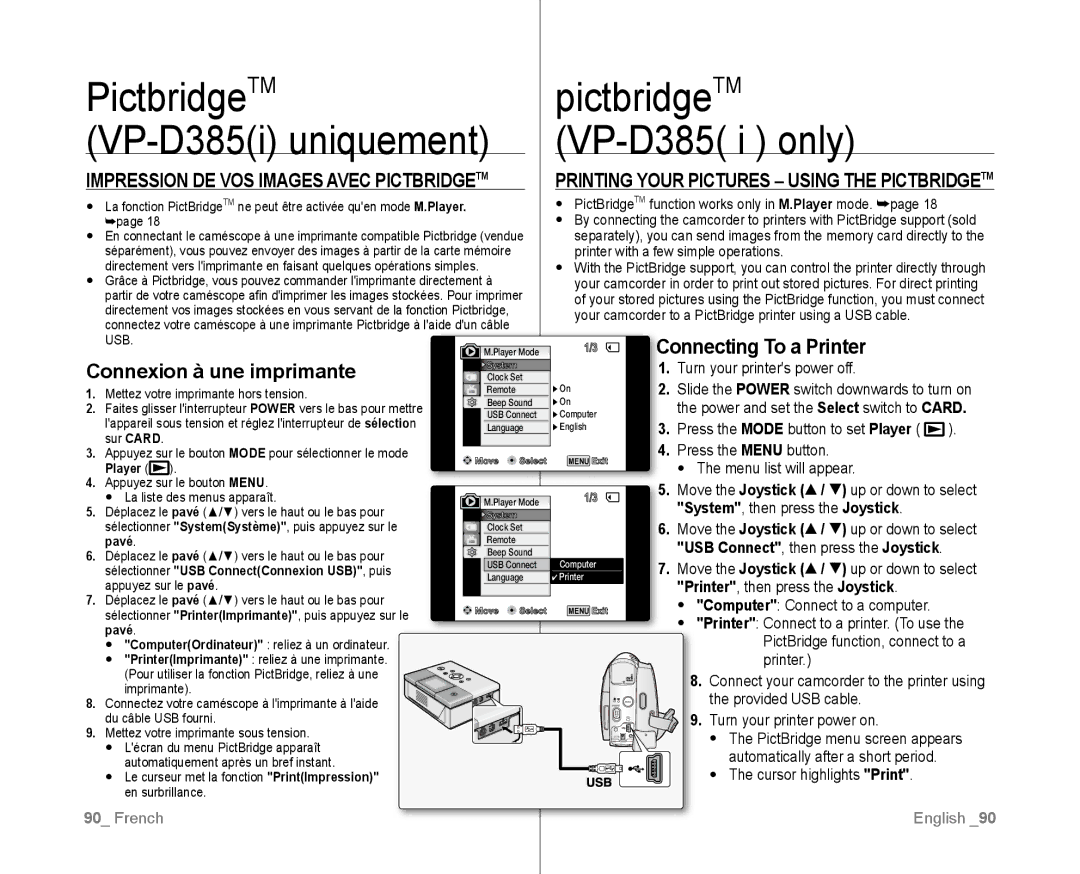
Move the Joystick
Si vous appuyez sur le bouton Mode pour passer
Shutter Sound, then press the Joystick
Selecting the OSD Language Language
System menu setting
Réglage initial
Move the Joystick Language , then press the Joystick
Appuyez sur le bouton Mode pour sélectionner le
Mode CameraCam
Le mode Démonstration affiche le format 43 sur lécran LCD
Appuyez sur le bouton Menu La liste des menus apparaît
Réglage du menu Affichage
Setting the Guideline Guideline
Réglage DES Repére Repére
CameraCam/Player/M.Cam/M.Player
Up or down to adjust
Adjusting the LCD screen does not affect
LCD BrightLum. LCD
Or Player
Display menu setting
Modes CameraCam/Player/M.Cam/M.Player.
Date, TimeHeure, Date&TimeDate & Heure
You can select the output path of the OSD
LCD et sur votre écran TV.
TV Display function works in Camera
On Screen Display
Enregistrement de base
Basic recording
Sur le bouton Début/fin denregistrement
Bouton Début/fin denregistrement
Camera
Enregistrement de base Basic recording
Pour annuler le mode Easy Q
To cancel the Easy Q mode
Appuyez sur le bouton Début/fin denregistrement
Zoom Avant ET Arrière
Zooming in and OUT
Basic recording
Réglez linterrupteur de sélection sur Tape
Reviewing and Searching a Recording
Recherche dun enregistrement pavé
Record Search Joystick
Pour arrêter lenregistrement
Pour démarrer lenregistrement
To Start Recording
To Stop Recording
Mise AU Point AUTOMATIQUE/MANUELLE
Auto Focus / Manual Focus
Setting the Exposure
Setting the Shutter Speed & Exposure
Réglage de lexposition
Advanced recording
Enregistrement avancé
16Bit
Lindicateur Coupe Vent OnMarche ou Auto saffiche
WindCut Plus On or Auto indicator is displayed
Cutting OFF Wind Noise Windcut Plus
Menu list will appear
Elle permet de mettre en valeur les signaux
Advanced recording
CameraCam.
Micros internes
Camera
Sommaire
Settings Contents
Réglage DE LA Fonction PROG. AE
Auto
Daylight
Réglage de la balance des blancs
Setting the white balance manually
Enregistrement avancé Advanced recording
Manuellement
Puis appuyez sur le pavé
La fonction Effets visuels napparaît quen mode CameraCam.
Pour sélectionner Visual EffectEffets visuels
Mirror
Sepia
Negative
Emboss2
To exit, press the Menu button Wide indicator is displayed
Réglage DU Mode
Setting the 169 Wide mode 169 Wide
169 wide function works only in Camera mode.
Using the Tele Macro Macro
Utilisation DE LA Télé Macro Macro
Setting the Digital Image Stabilizer DIS
DIS menu to Off
Using Back Light Compensation Mode BLC
CameraCam et M.Cam.
Sélection du zoom numérique
Zoom Avant ET Arrière À Laide DU Zoom Numérique Zoom NUM
Zooming In and Out with Digital Zoom Digital Zoom
Selecting the Digital Zoom
BLC, Digital Zoom, Shutter
Program AE, Mosaic, Mirror
Emboss2, Pastel1, Pastel2
Exposure
Vp-d382 i /D382H/d384/d385 i only
Utilisation DE Léclairage Éclair Using the Light Light
VP-D382i/D382H/D384/D385i Uniquement
LightÉclair. sur OffArrêt
Tape photo recording works only in Camera mode.
La plupart des fonctions reviennent au mode précédent
VP-D382i/D382H/D385i only
Photo Search, then press the Joystick
Lecture Dune Cassette SUR Lécran LCD
Lectureplayback
Playing Back a Tape on the LCD Screen
Fonctions Disponibles EN Mode Player
Various Functions while in Player Mode
Lecture X2 avant/arrière VP-D382 i /D382H/D385 i uniquement
Lecture
Playback
Reverse Playback VP-D382 i /D382H/D385 i only
Audio Dubbing VP-D382 i /D382H/D385 i only
MIX1+2Mixage 1+2 pour lire les
Mode Player
Dubbed Audio Playback Audio Select
Sound2Son1 ou MIX1+2Mixage
Effets Sonores
Audio Effect
Connection
Setting the AV In/Out AV In/Out VP-D381i/D382i/D385i only
Branchements
Sélectionner OutSortie ou InEntrée, puis
Tape Playing Back on a TV Screen
Connecting to a TV that has Audio/Video Input Jacks
Connexion à un téléviseur avec entrée audio/vidéo
Lecture de la cassette
Branchements
Playback the tape
Connexion à un téléviseur sans entrée audio/vidéo
Copying a Camcorder Tape onto a Video Tape
When Copying is Complete
Une fois la copie terminée
Branchements Connection
Using the VOICE+ Function
Joystick /// when you
Press the Recording start/stop
Pour enregistrer à partir dun téléviseur
When Recording Copying is Complete
Une cassette de caméscope
Une fois lenregistrement la copie terminé
Utilisation Dune Carte Mémoire
Using a Memory Card Usable Memory Card
Not supplied
Photo image file
Image configuration file
Movie image file
Structure of Folders and Files on the Memory Card
Nombre dimages sur la carte mémoire
Format dimage
Image format
Number of Images on the Memory Card
File No., then press the Joystick
Setting the File Number File No
Memory, then press the Joystick
To exit, press the Menu button
Digital still camera mode
Taking a Photo Image Jpeg on the Memory Card
To view a Single Image
Visualisation DE Photos Jpeg
Viewing Photo Images Jpeg
Pour visualiser une seule image
Protection from accidental Erasure Protect
VP-D385 i only
Le message No image !Pas dimage
Suppression DE Photos ET DE Films
Supprimer
Suppression de toutes les images en
Deleting All Images at Once Une seule fois
Formatting a Memory Card format
Complete !Terminé ! saffiche une fois le formatage terminé
Recording Moving Images Mpeg on a Memory Card
Digital still camera mode VP-D385 i only
Enregistrement DE Films Mpeg SUR UNE Carte Mémoire
Enregistrement de films sur une carte mémoire
Enregistrement DE Films Mpeg SUR UNE Carte Mémoire
Play SelectSél. Memoire, puis appuyez sur le pavé
MemoryMémoire, puis appuyez sur le pavé
Le message Please wait..Veuillez attendre et les six
Before operation
This function works only in Player mode
Avant de commencer
Your camcorder can read moving image data
Before operation
Avant de commencer
Photo CopyCopie Photo
Suppression du voyant dimpression
Marking Images for Printing Print Mark
Removing the Print Mark
Printing Your Pictures Using the PictBridgeTM
Connecting To a Printer Connexion à une imprimante
PictbridgeTM
Setting the Date/Time Imprint Option
Setting the Number of Prints
Canceling the Printing
Selecting Images
Ieee 1394 data transfer
Enregistrement à laide dun câble de connexion DV
Models with an ‘i’ suffix do feature DVIEEE1394/AVAnalogue
Recording with a DV Connection Cable
IEEE1394 cable DV Jack Recording start/stop button
Débit de la connexion USB en fonction du système
USB interface VP-D385i only
Utilisation DE Linterface USB
USB Connection Speed depending on the System
French English
Selecting the USB Device USB Connect
Installing the Software DV Media Pro Programme
Débranchement du câble USB
Using the Removable Disk Function
Raccordement À UN Ordinateur
Utilisation de la fonction de disque amovible
Using the Web Camera Function
Utilisation de la fonction Webcam
After Finishing a Recording
Entretienmaintenance
LA FIN DUN Enregistrement
Cassettes Utilisables
Press the Mode button to set Player Insert a cleaning tape
Cleaning and Maintaining the Camcorder
Cleaning the Video Heads
Nettoyage ET Entretien DU Caméscope
Power sources
Maintenance
Using Your MiniDV Camcorder Abroad
Entretien
Dépannage
Troubleshooting
Troubleshooting
Dépannage
Condensation due à lhumidité
Symptom
Moisture Condensation
Sous Fonctions
Setting menu items
Réglage DES Éléments DE Menu
Menu
Setting the USB Language
Sous-menu Fonctions Mode disponible
Guideline Setting the Guideline LCD Bright
Mode
VP-D384/VP-D385i VP-D382H/ VP-D384/ VP-D385i
Model Name VP-D381i/ VP-D382i
NOM DU Modèle VP-D381i/VP-D382i/VP-D382H
Soit à vous adresser au revendeur à qui vous lavez acheté
08 25 08 65 65 € 0,15/Min Fax 01 48 63 06
United Kingdom
Tel 0818 717 Fax +44 0131 202
Τηλ
FOURLlS Trade Α.Ε.Β.Ε
Κρυονερίου 112 145 68 Κρυονέρι, Αττικής
Fourlis Trade Α.Ε.Β.Ε
Country Contact Centre Web Site
Conforme à la directive RoHS
RoHS compliant