Dell Multifunction Color Laser Printer 3115cn Users Guide
ADF
United States Government Restricted Rights
Finding Information
Troubleshooting Guide Troubleshooting Guide
Finding Information
Dell Printer Configuration Web Tool
Using the Dell Printer Configuration Web Tool
For Internet Explorer 6.0/7.0
Display Format
Changing the Settings of Menu Items
TCP/IP
Printer Status
Printer Settings
ECP
Dell Printer Configuration Web Tool
Tiff
TTN2
Pstn
Dell Printer Configuration Web Tool
Printer Settings
ECP
Dell Printer Configuration Web Tool
Dell Printer Configuration Web Tool
Tiff
TTN2
Sets Pstn as the line type
Printer Maintenance
Dell Printer Configuration Web Tool
Print Server Settings
Ssid
Http
Print Server Settings
10BASE-T
TCP/IP
IPX/SPX
NCP
Snmp
·IPX
Other Features
Copy Printer Settings
Mail Address
Server Address Top
Phone Book
Print Volume
Tray Settings
About Your Multifunction Printer
Automatic Document Feeder ADF
Operator Panel
Power Saver Mode2
Installing the Print Cartridges
Installing the Print Cartridges
Installing the Print Cartridges
Installing the Print Cartridges
Installing the Print Cartridges
Choosing the Right Cable
Connecting Your Multifunction Printer
Connecting the Multifunction Printer Locally
Turn On the Multifunction Printer
Connecting the Multifunction Printer to the Network
Ethernet port
Assign an IP Address
Print and Check the System Settings
Verify the IP Settings
Connecting the Telephone Line
Connecting Your Multifunction Printer
Page
Enterprise Console Management Modules
Installing Optional Modules
Installing Optional Modules
Installing Optional Modules
Microsoft Windows Vista
When Using PCL Driver
Windows 2000/Windows NT
Mac OS
When Using PS Driver
Installing a Duplexer
Installing Optional Modules
When Using PCL Driver
When Using PS Driver
Enterprise x64 Edition
Installing a Memory Card
Installing Optional Modules
When Using PCL Driver
Click Apply, and then click OK Close the Printers dialog box
Installing the Dell Multi-Protocol Card
IPv6 Windows Vista
Confirming the Installation of the Multi-Protocol Card
Installing the Dell Wireless Printer Adapter 3310 USB
Installing Optional Modules
Wireless Installation using USB connection
Installing Optional Modules
Installing Optional Modules
Installing Optional Modules
Installing Optional Modules
Installing Optional Modules
Installing Optional Modules
Installing Optional Modules
Installing Optional Modules
Installing Optional Modules
Installing Optional Modules
Installing Optional Modules
Wireless Installation using wireless connection
For Windows Server
Installing Optional Modules
Installing Optional Modules
Installing Optional Modules
For Dynamic Host Configuration Protocol network
For example
For Fixed IP network
For example, http//1.2.3.5
For Dynamic Host Configuration Protocol network
For example, http//168.254.1.1
For Fixed IP network
For example, http//1.2.3.5
Access point Infrastructure, Dhcp network
Installing Optional Modules
Access point Infrastructure, Fixed IP network
For example, IP Subnet mask
For example, http//192.168.1.2
Confirming the Installation of the Wireless Printer Adapter
Print Media Guidelines
Paper Characteristics
Paper
Unacceptable Paper
Recommended Paper
Selecting Preprinted Forms and Letterhead
Selecting Paper
Selecting Pre-punched Paper
Printing on Letterhead
Envelopes
Transparencies
Selecting Transparencies
Labels
Storing Print Media
Identifying Print Media Sources and Specifications
Print Media Sizes and Support
Print Media Supported
Setup Paper Type
Loading Print Media in Standard and Optional Trays
Loading Print Media
Loading Print Media
Loading Letterhead
Multipurpose Feeder
Print Media Dimensions
Loading the Multipurpose Feeder
Capacity
Loading Print Media
Loading Envelopes
Using the Multipurpose Feeder
Using Booklet Print
Using the Duplex Function
Linking Trays
Using the Output Tray
Using the Output Tray Extension
Operator Panel
Using the Operator Panel Buttons
Printing a Panel Settings
Printing a System Settings
System Settings
Using the Operator Panel to Change System Settings
System Settings
Initializing Nvram for Network Settings
Resetting Defaults
Understanding Menus
Reduce/Enlarge
Sharpness
Auto Fit
Collated
Copy Defaults
Using the Scan Menus
Scan to Email
Scan to Network
File Format
Scan to Application
Color
Original Type
Resolution
Document Size
Sharpness
Lighter/Darker
Contrast
Using the Fax Menus
Group Dial
OnHook
Delayed Start
Polling Receive
Fax Defaults
Using the Job Status Menus
Stored Print
Using the Setup Menus
Understanding Menus
Tray
Reports
System Settings
Job History
Admin Menu
Paper Tray
Print Language
Paper Size
Sided Print
Orientation
Font
Binding Edge
Symbol Set
Font Size
Form Line
Font Pitch
Quantity
Image Enhance
Draft Mode
Hex Dump
PS Error Report
Default Color
LineTermination
Paper Select Mode
Wired Network
PS Job Time-Out
Ethernet
TCP/IP
LPD
Protocol
IPX/SPX
Initialize NVM
IP Filter IPv4
Adobe Protocol
Wireless/Status
Wireless Network
Wireless/Reset Wireless
Protocol
IPP
IPX/SPX
Parallel Settings
Interval Timer
Fax Settings
Int. of Redial
Number of Redial
Ans Select
Auto Answer Fax
Auto Ans. Ans/FAX
Ring Tone Volume
Line Monitor
Line Type
Remote Receive
DM Prevention
Remote Rcv Tone
Duplex Print
Send Header Name
Send Header
Local Name
Drpd Pattern
Fwd. Settings Num
Forward Settings
Fwd. Set Print
Prefix Dial
Discard Size
Prefix Dial Num
Color Fax
Extel Hook Thresh
Power Saver Mode2
Fwd. Error Print
Power Saver Timer
Country
Alert Tone
Auto Reset
Understanding Menus
Time-Out
Clock Settings
Auto Log Print
Mm/inch
Print Text
Print ID
Banner Sheet
Fax Transmit
Fax Activity
Fax Broadcast
RAM Disk
Protocol Monitor
Substitute Tray
Paper Density
Adjust BTR
Adjust Fuser
Auto Reg Adjust
Init Print Meter
Color Reg Adjust
Clear Storage
Non-DELL Toner
Adjust Altitude
Copy/Scan/Fax Lock/Change Password
Panel Lock/Change Password
Panel Lock/Panel Lock Set
Copy/Scan/Fax Lock/Copy/Scan/Fax Set
Secure Receive/Secure Receive Set
Secure Receive/Change Password
Speed Dial
Address Book
Panel Language
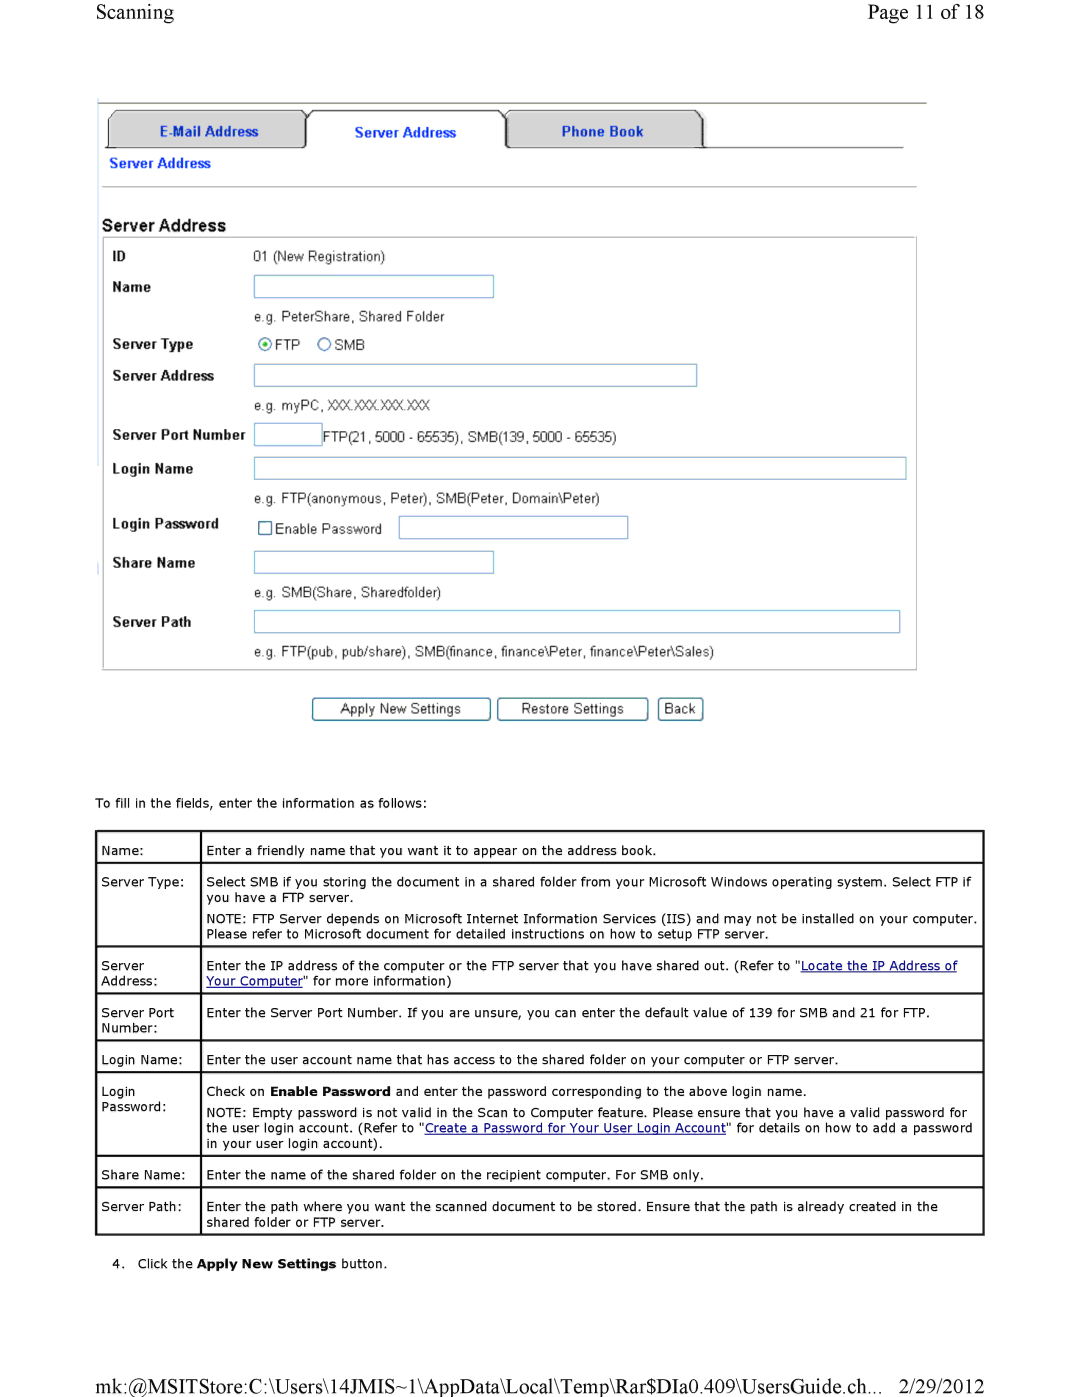
Server Address
Fax Pending
Disabling Panel Lock
Setting of Panel Lock
Understanding Menus
Printing Status Window
Understanding Your Multifunction Printer Software
Status Window
Status Monitor Console
User Setup Disk Creating Tool
Printer Settings Utility
Software Update
ScanButton Manager
Address Book Editor
Dell ScanCenter
Tips for Successful Printing
Printing
Sending a Job to Print
Tips on Storing Print Media
Canceling From the Printer Operator Panel
Canceling a Print Job
Canceling a Job From the Computer Running Windows
Printing a Font Sample List
Printing a Report
Printing and Deleting Held Jobs
Using the Print and Hold Function
Printing Held and Proof Print Jobs
Store Print
Secure Print
Proof Print
Copying
Making Copies From the Document Feeder Glass
Copying
Making Copies From the ADF
Color
Original Type
Color Saturation
Auto Fit
2Sided
Multiple-Up
Poster Copying
Margin
Image Repeat
Collated
Changing the Default Settings
Setting the Power Saver Timer Option
Scanning Overview
Scanning
Scanning From Operator Panel
Scanning Using the Windows Image Acquisition WIA Driver
Scanning
Sharing a Folder From Your Computer
Using a Scanner on the Network
Scanning
Scanning
Scanning
Setting Up the Address Book
Page
Scanning
Scanning
Scan to Computer/Server Through Wireless Setup
Sharing a Folder With Sub-folder From Your Computer
Start to send the scanned file on the Network
Setting Problems
Locate the IP Address of Your Computer
Create a Password for Your User Login Account
Registering a New User
Setting E-Mail Alert
Start to send e-mail with the scanned file
Setting Problems
Setting the Machine ID
FAX Languages Setting Procedure
Keypad Letters and Numbers
Using the Number Keypad to Enter Characters
Changing Numbers or Names
Inserting a Pause
Changing the Clock Mode
Setting the Time and Date
Setting Sounds
Speaker, Ringer, Key Sounds and Alarm Sounds
Specifying the Fax Settings
Sending a Delayed Fax
Speaker Volume
Changing the Fax Settings Options
· PBX
Available Fax Settings Options
Drpd
Advanced Fax Settings
Modem Speed
Loading an Original Document
Sending a Fax
Original Type
Adjusting the Document Resolution
Lighter/Darker
Sending a Fax Manually
Sending a Fax Automatically
Confirming Transmissions
Sending a Fax from the driver Direct Fax
Example Procedure
Automatic Redialing
Transmission image quality
Receiving a Fax
Receiving Automatically in the Fax Mode
About Receiving Modes
Loading Paper for Receiving Faxes
Receiving Automatically in the TEL/FAX or Ans/FAX Mode
Receiving Manually in the Tel Mode
Receiving Manually Using an External Telephone
Receiving Faxes Using the Drpd Mode
Changes in the menu for color fax settings
Setting the Color Fax Function
Color Fax
Conditions faxing in color
Automatic Dialing
Sending a Fax Using a Speed Dial
Speed Dialing
Storing a Number for Speed Dialing
Group Dialing
Setting Group Dial
Editing Group Dial Numbers
Other Ways to Fax
Using the Secure Receiving Mode
Printing a Speed Dial List
Using an Answering Machine
Changing Setting Options
Printing a Report
Using a Computer Modem
Networking
Wired Network-connected Printer
About Sharing the Multifunction Printer on a Network
Locally-shared Printer
Setting Up the Locally Shared Printer
Point and Print
Peer-to-Peer
Configuring Network Parameters on the Operator Panel
Setting Up a Network-connected Printer
Setting Network Protocols
Printing a Network Configuration
Configuring TCP/IP
Static Addressing
Dynamic Addressing BOOTP/DHCP
Resetting the Network Interface Card
Restoring the Network Configuration
Understanding Fonts
Weight and style
Typefaces and fonts
Pitch and Point Size
Bitmapped and Scalable Fonts
Resident Fonts
PCL 5/PCL
Carta
Goudy Bold
ITC Lubalin Graph Demi
Symbol Sets for PCL 5/PCL
Symbol Sets
ISO 6 Ascii
NNN-NNN
Understanding Multifunction Printer Messages
See Clearing Jams
YYY
Understanding Multifunction Printer Messages
ADF
Yymmddhhmmss
Understanding Multifunction Printer Messages
Avoiding Jams
Clearing Jams
Identifying the Location of Paper Jams
Removing Print Jams from the ADF
Removing Print Jams From the Multipurpose Feeder
Clearing Jams
Removing Print Jams From the Standard Tray
Clearing Jams
Removing Print Jams From the Fuser Unit
Clearing Jams
Clearing Jams
Removing Print Jams From the Optional Duplexer
Clearing Jams
Removing Print Jams From the Optional Feeder
Clearing Jams
Clearing Jams
Page
Printer Setup
Printing With Web Services for Devices WSD
Installing a Printer Driver Using the Add Printer Wizard
Determining the Status of Supplies
Maintaining Your Multifunction Printer
Conserving Supplies
Ordering Supplies
Replacing Print Cartridges
Storing Consumables
Removing the Used Print Cartridge
Installing a New Print Cartridge
Maintaining Your Multifunction Printer
Replacing the Fuser Unit
Removing the Used Fuser Unit
Maintaining Your Multifunction Printer
Installing a New Fuser Unit
Maintaining Your Multifunction Printer
Removing the Used Separator Roller in Tray
Replacing Separator Rollers
Maintaining Your Multifunction Printer
Installing the New Separator Roller in the Tray
Removing the Used Separator Roller Inside the Multifunction
Printer
Align the hole of the new separator roller with the axle
Replacing the Transfer Belt Unit
Removing the Used Transfer Belt Unit
Installing a New Transfer Belt Unit
Maintaining Your Multifunction Printer
Printing the Color Registration Chart
Adjusting Color Registration
Determining Values
Entering Values
Cleaning the scanner
Cleaning the Roller in the ADF
Maintaining Your Multifunction Printer
Removing the Optional 550-Sheet Paper Feeder
Removing Options
Removing Options
Removing the Optional Duplexer
Removing Options
Removing the Optional Memory Card
Removing Options
Removing the Optional Multi-Protocol Card
Removing Options
Removing the Wireless Printer Adapter
Removing Options
Close the control board cover and turn the screw clockwise
OS Compatibility
Printer Specifications
Dimensions
Power Supply
Memory
Environmental
Cables
Copier Specification
Facsimile Specifications
Scanner Specification
Printer Specifications
Safety Information Regulatory Information
Safety and Regulatory Information
Industry Canada Compliance Statement
FCC Information
European Community EC Directives Conformity
Avis de Conformité aux Normes de lindustrie du Canada
CE Notice European Union
CE Mark Notice
Información NOM únicamente para México
Noise Emissions Levels
Energy Star
Laser Notice
Energy Star Compliance
Safety and Regulatory Information
Safety and Regulatory Information
Dell Technical Support Policy
Appendix
Contacting Dell
Warranty and Return Policy