LST1260-001B
Please read the following before getting started
For Customer Use
Important Safeguards
Safety Precautions for USA
Please use this unit in an appropriate power source
Safety Precautions
Precautions When Mounting Rack
Information for Canada Renseignement Pour Canada
Precautions
Precautions for Proper Use of this Product
Precautions for Handling Hard Disk Drive
Software Installation
Anti-virus
Others
Contents
Viewer Part Applications
Viewer Part Reference
About the Software
Microsoft Software License Terms
Terms
Windows Time Service
Search Suggestions Service
Consent to Update Infrared Emitter/Receiver
Media Playback Updates
Windows Update Agent
Product Support
Not Fault Tolerant
Third Party Programs
Microsoft Software License Terms
Copyright and Permission Notice
Page
About the Software
Page
About the Software
Legend of symbols in this manual
Structure of Manuals
Structure of This Manual
Name of manual Intended reader Format Description
Workflow from Installation to Operations
When you change settings of Management Application
About the Software Used with This Unit
Overview of the Software
Software Overview
Part Names and Functions
Front
Rear Panel
Signal GND signal ground terminal
Rear I/O Terminals
Reserve Terminal
OPE ON/OFF Operate ON/OFF terminal
Recorder Part
Mount the rack mount bracket using screw a
Mount to the rack using screws C
Mounting to a Rack
Remove the foot screws B 4 pcs on the bottom of the unit
Connecting
Basic System Configuration
Connecting a monitor
Connecting a microphone and speaker
Microphone Speaker Connecting additional HDDs
Devices Connected to Terminals of This Unit
Terminal Remarks
Connecting external security devices
Rear input terminals
Connecting to network cameras LAN1
Connecting to surveillance computers LAN2
Network cameras Switching hub
Computer Switching hub Time server NTP server
Switching the Power Off
Switching the Power On/ Off
Switching the Power On
Activating the System
Shutting Down the System
Press the Operate button with the system shut down
Double-click the Keyboard button on the desktop
Control panel opens up
Connect This Unit to a Network
Click Network and Internet
Configuring Basic Monitoring System Settings
Enter the IP address, subnet mask, and default gateway
Starting Up Management Application
Click OK
Click Next
Connecting Cameras
Click Add Hardware Devices
Configuring Settings of Cameras Connected
Enter the user name and password of the cameras
Click Configure Video and Recording Click Next
Click Next Confirm the cameras to register and click Finish
Make the settings to receive images for each camera
Specify the frame rate and recording conditions
Data location setting screen for each camera appears
Description Purpose
Recording Path
Purpose
Building a RAID10 configuration
Making settings to erase old recordings
Making Full Use of Recording Performance
Click Finish
Applications
Defining a Preset PTZ Position
Defining a Preset Position
Click + in Advanced Configuration
Double-click a camera name
Setting screen appears
Click PTZ Preset Positions Select PTZ Type
When Type 2 or Type 3 is selected Click Import/Refresh
To modify a preset position
To delete a preset position
Auto PTZ Patrolling
To change the order of the list
Select PTZ Patrolling
Double-click a camera name Click Add New
Enter the PTZ patrol profile name
PTZ patrol profile name must be unique
PTZ Scanning
Specify patrol timing
Resume patrolling paused manually or by any event
Select a camera from Select Camera
Adjusting Motion Detection
Sensitivity setting screen appears
Click Finish
Events Configuration-Generic Event
Events and Actions
Types of Event and Action
Event types
Specify the event name and contents
Click Add
Event Configuration-Input Event
Events Configuration-Generic Event
Click + of the hardware to configure settings
Click an input event to enable
Select the Enable event check box
Repeat Steps 5 and 6 for each input event to enable
Event Configuration-Manual Event
Select the event setting target
Event name setting screen appears
Enter the event name and click OK
Events Configuration-Timer Event
Enter a name and generation timing of the timer event
Select the event to set the timer event and click
Open the properties screen of each event
Action Setup-Moving the PTZ Camera Preset Position
Click + in Hardware Devices Select PTZ on event
Action Setup-Distributing Camera Images Matrix
Specify a combination of an event and a preset position
Click + in Advanced Configuration Double-click Matrix
Preset position movement by event has been set
Select a camera to distribute live images to computers
Click Matrix Event Control
Select an event for each recipient
Action Setup-Starting Recording
Recording and Storage Properties window appears
Recording start by event has been set
Action Setup-Output
Select the event to start/stop recording
Select hardware to configure and click Add
Specify essential properties
Output name
Output connected to
Recording Images Before/ After Occurrence of Event or Motion
Configuring Mail Settings
Mail Settings of Unit Setting
Double-click 4. Unit Setup on the desktop
Notifications related to hardware
Mail Setup for Management Application
Configuring the outgoing and incoming mail servers
Specify the authentication method for mail delivery
Enter the mail sender’s address
Double-click E-mail
Select the Send e-mail if this event occurs check box
When an input event occurs/a motion is detected
Receive an e-mail upon the occurrence of an Event
Manual Event Properties window property appears
Using More Than One NVR
When a manual event occurs
Click + in Advanced Configuration Double-click Master/Slave
Select the Enable as master server check box and click OK
Configure settings from the NVR to be used as the master
Master/slave setting screen appears
Slave server setting screen appears
NVR you just configured is registered as a slave
Registering a Slave NVR
Specify the address and port number of the slave server
Configuring Smart Client User Settings
Adding a User
User property screen appears User has been configured
Limiting the Rights of Each User
Screen for setting the camera access authorizations appears
Settings have been changed
Adding a User Group
Deselect functions you want to limit the use of prohibit
Set the group access rights, then click OK
Group properties window appears
Administration Protection Properties screen appears
Configuring the Startup Password of Management Application
Double-click Administrator
Connecting an External HDD
Serial terminal When an External HDD has been added
Adding an HDD
Follow the wizard to set drive partitions, etc
Building a RAID Configuration
Select the volume, then click Next
Select the HDDs to build the RAID configuration
Click Create
Page
Confirmation screen appears
NAS connection user setting screen appears
Using NAS
Click NAS Setting
Adding an HDD
Specify the path to the NAS drive in Archiving path
You are returned to the Camera Properties screen
Saving/Restoring Settings
Saving/Restoring the Settings of Unit Setting
Click Save Setting
Click Save
Saving/Reading the Settings of Management Application
Click Load Setting
Reading Settings
Select a file to load and click Load
Reference
Setup This Unit
Unit Setup
Preset Values Description
Do not select Check box
Do not select
Unlimited
20Units
10 sec
none
English
Network Settings
IP address setting
Host name setting
Preset Values
Setting the Date and Time of This Unit
Using the time server
Internet Time Settings window opens up
Click Clock, Language, and Region
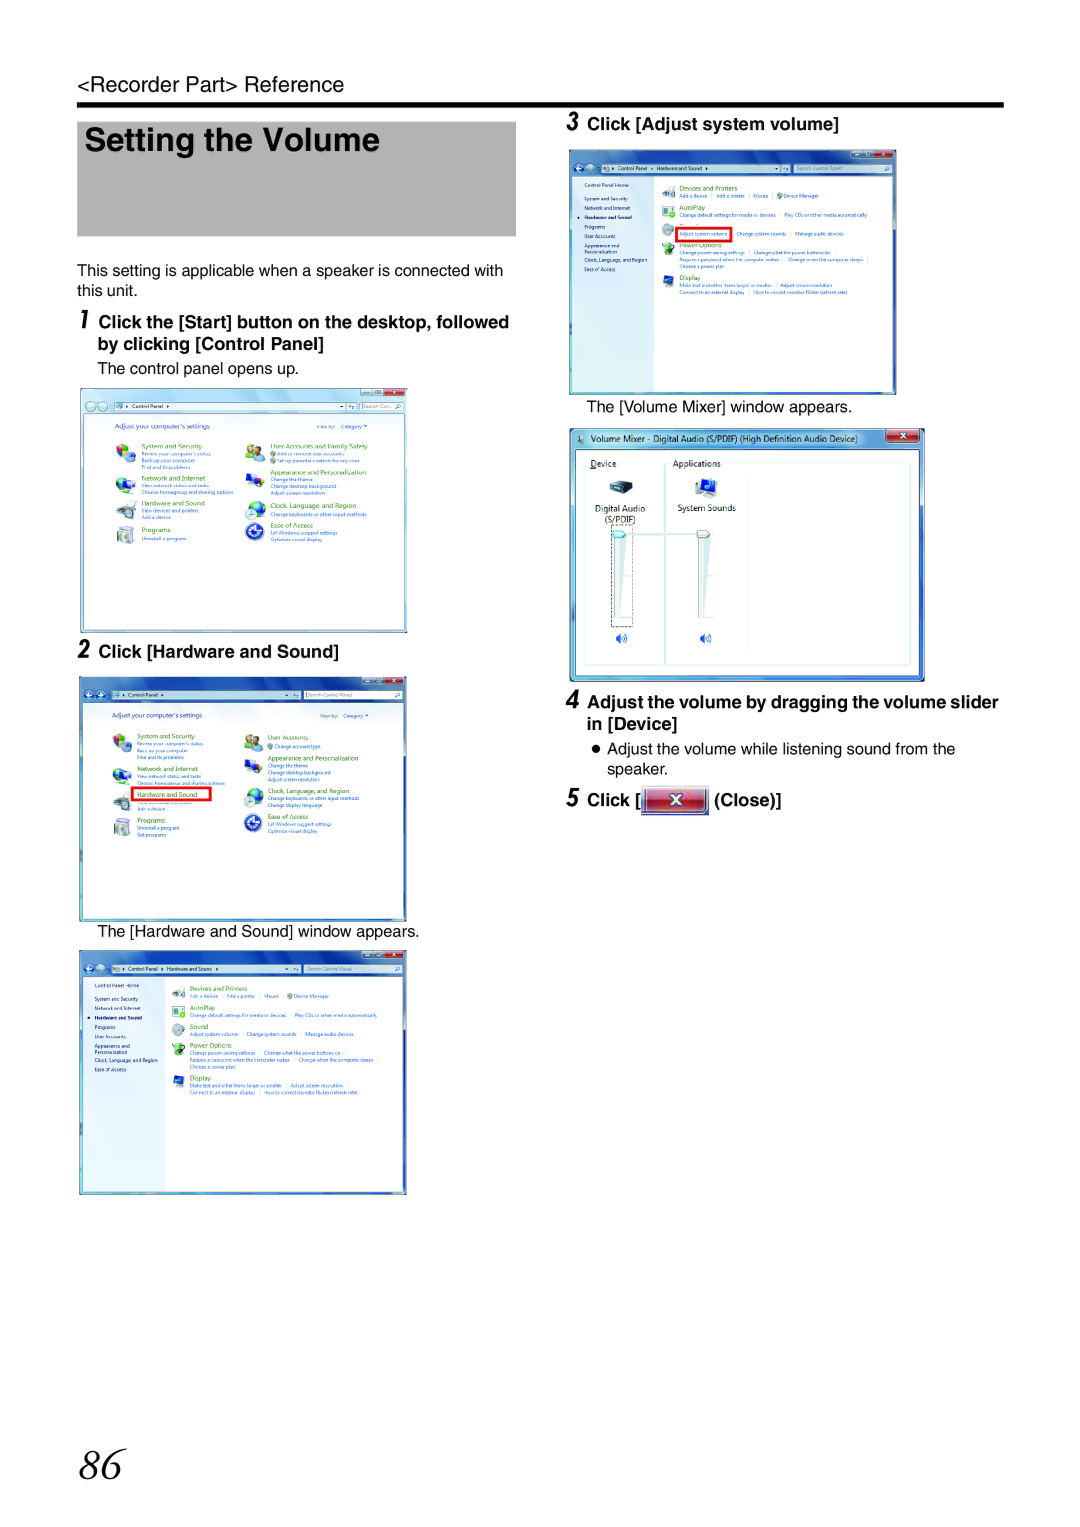
Setting the Volume
Click Adjust system volume
Control panel opens up Volume Mixer window appears
Adjust the volume while listening sound from the speaker
Setting the Password to Login to This Unit
Setting the Password
Click Administrator
Click Create a password
Click Create password
Validating the Password
Enter the password
Page
Configure Video
Recording Adjust Motion Detection
Configure User Access
Management Application Wizards
Management Application Advanced Configuration
Hardware Devices
Fixed
20 Second
10.00 Second
Seconds
Occurrence of an event
Event can be recorded. You can specify units
Using dynamic
Path
7 Days
Repair, scan
240 milliseconds
For editing the patrolling details Preset Positions
On the camera
Medium
30 seconds
100
Cameras and Storage Information
101
Motion Detection
300 sec
1800 sec
Configure settings for each camera
102
Time Unit
Second
103
Event
Event and motion Detection Schedule only Start Event
Schedule only
Audio Selection Audio selection Default Microphone
Speaker are used Default Speaker
104
Always
105
Events and Output
10 1 sec
Select check
106
Search
Always off
107
Scheduling and Archiving
Always on
108
Camera name Online Period a Online schedule Schedule
Logs
109
Matrix
0 minutes
110
Mail
Server Access
111
Server
Western European ISO iso-8859-1
Users
112
Master/Slave
Services
User Camera Access a
113
Live Camera
Changing the Monitor Settings
Changing the Monitor Resolution
Click Resolution and drag the slider to select a resolution
114
Establishing a Dual-monitor Configuration
Right-click on the desktop and select Screen resolution
115
Connect multiple monitors to this unit in advance
116
Locking Operations
Manually Registering a Camera
Changing the System Configuration
117
118
Replacing a Hardware Device
Adding a Camera License
Confirm the serial number MAC address
How to Use a Network
119
Deleting a Hardware Device
Proper Use of LAN1/LAN2
Select the Enable internet access check box
120
Performing Remote Monitoring through WAN
Internet address
Changing the Recording Settings
121
Defining a Recording Schedule
Scheduling and Archiving Properties screen appears
122
Prepare a schedule
Online Period
Speedup
123
E-mail Notification
Setting Speech Communication with Cameras
124
PTZ Patrolling
Patrol profile
Adding a Drive Using UPS
Switch on the power of the UPS and then this unit
125
Type Connection method
Setting Snmp
Click Snmp Setting
126
Click Copy extended MIB file to flash memory
a list of TRAPs supported by this unit
127
a list of statuses that can be obtained from this unit
128
Changing the Log Storage Period
Change the retention days
Log Properties window appears
Saving Maintenance Information
Click JVC Log Setting
129
Specify the retention days
HDD Maintenance
130
Checking HDD Usage
Checking the Load Factor of This Unit
Performing Defragmentation
Initializing the Settings
131
Viewer Part
Specify your login information in the following fields
133
Starting Smart Client
Double-click the Smart Client shortcut on the desktop
134
Click the Connect button
To log out Click Log Out
To finish Click Close
135
Viewer Description
136
Computer
Computer Network Settings
Initial LAN2 Settings of This Unit
Computer Settings
137
138
Installing the Viewer on a Computer
Installing the Smart Client
139
Creating a View
Groups and Views
Group and view structure
140
Creating a View
141
Editing Views
Click to the left of Server in the System Overview section
List of available cameras appears
142
Viewing Live Images
Showing the Live Window
Click the Live tab
Switching Views
143
Manually Recording Images of a Specific Camera
Operation section on the live screen
Viewing Images by Using PTZ Features
Using the Preset Features
144
Operating Cameras on the Live Image Screen
Other Useful Features
145
146
Manual events
Output control
Camera shortcut menu
147
Viewing Recorded Images
Displaying the Playback Screen
Click the Playback tab
148
Operation section on the playback screen
Section Icon Description
On the desktop, etc
Searching for Recorded Images
Search for recorded images by date and time
Searching from the Image List
Click Go To
150
Searching for Images by With/ Without Recording
Timeline Description
Search by timeline Select a timeline display
Searching for Recorded Images from the Alert List
151
Searching for Recorded Images
Blue grids are displayed
152
Smart Search
To skip parts with no recording
153
Playing back Recorded Images
Description Time
154
Listening to recorded audio sounds
Viewer Part
Automatically Switching Images of Multiple Cameras
156
Click the Playback tab Click Print... in the Print section
Release the mouse button at a preferred position
157
Enlarging Images of a Selected Camera Hotspot
Specify a display period in seconds
Changing the Camera While the Carousel Function is Active
Enter a URL and click OK
158
Displaying a Web Page Html Page in View
159
Displaying a Still Image instead of Camera Images
Select an image file and click Open
To enter a new URL, click New… button
Operation Button Window
160
Creating a Frequently-used
Customizing Joystick Settings
161
Select the action to assign in the Action field
162
Disabling Joystick Operation
Viewer Part
164
Saving Images and Audio Sounds on a USB Flash Memory Export
Saving as a Video or Still Image
Select the export format
165
Saving Images in Database Format
Specify contents to save
166
167
Viewing Exported Data by Computer
Starting the Export Viewer
Viewing Exported Data
Exiting the Export Viewer
168
Data Playback/Stopping Data Playback
Operations and Settings Available on Each Screen
169
Live Screen
Section Description
170
Playback Screen
171
Setting Screen
Section Preset Values Description
Section Preset Values Description Properties
172
Full
No split
When the Matrix window is selected Image quality
173
Set the image quality of the distributed
Set the frame rate of the distributed image
When a hot spot is selected Image quality
Ratio Do not select check box Camera image Show Use default
174
Selected Image location
When automatic screen conversion is selected Image quality
175
Option Setting
176
177
Last
Available
Unavailable
178
Global
Normal
No filter
Checking Version Information
Setting the Matrix Display Area
179
Others
181
Compatible Network Cameras
Compatible
Not compatible
182
Recording Time Schedule
Jpeg VGA 32KB Recording Unit Hour
H.264 Recording Unit Hour
183
Default Value List
Settings of This Unit
Settings of This Unit Network
184
Management Application Advanced Configuration
185
Hardware Devices
Initial value
186
187
Cameras and Storage Information
188
Mpeg
189
Events and Output
190
None Event protocol
191
Scheduling and Archiving
Scheduling All Cameras Schedule all cameras
Online Always off Speedup Mail
Logs
192
Matrix
Server Access
193
E-mail
Central
Users
194
Master/Slave
195
Troubleshooting
Actions when Warning Indicator Lights Up
196
Attachments/Accessories
Dimensional Outline Drawing Unit mm
197
350
198
Index
199
JVC Kenwood Corporation