Note
If the optional tray is not installed, the tray options on the screen is grayed out.
Changing the default settings
You can set the default values for copy, fax, email, scan and paper all at once.
1Press Machine Setup on the control panel.
2Press Admin Setting.
3When the login message appears, enter password with number keypad and press OK. (Page 3.5)
4Press the General tab > Default Settings > Default Option.
5Press the function you want to change, and change its settings.
For example, if you want to change the default setting of the brightness & darkness for a copy job, press Copy > Darkness and adjust the brightness & darkness.
6Press OK.
Changing the font setting
Your machine has preset the font for your region or country.
If you want to change the font or set the font for special condition such as the DOS environment, you can change the font setting as follows:
1Ensure that you have installed the printer driver from the provided software CD.
2
3Click Printer Setting.
If your machine is connected to a network, SyncThru™ Web Service screen appears automatically.
4Log in to the SyncThru™ Web Service as an administrator. (See "Managing your machine from the website" on page 9.)
5Click Settings > Machine Settings > Printer.
6Click PCL.
7Select your preferred font in the Symbol set list.
8Click Apply.
Note
Following information shows the proper font list for corresponding languages.
•Russian: CP866, ISO 8859/5 Latin Cyrillic
•Hebrew: Hebrew 15Q,
•Greek: ISO 8859/7 Latin Greek,
•Arabic & Farsi: HP
•OCR :
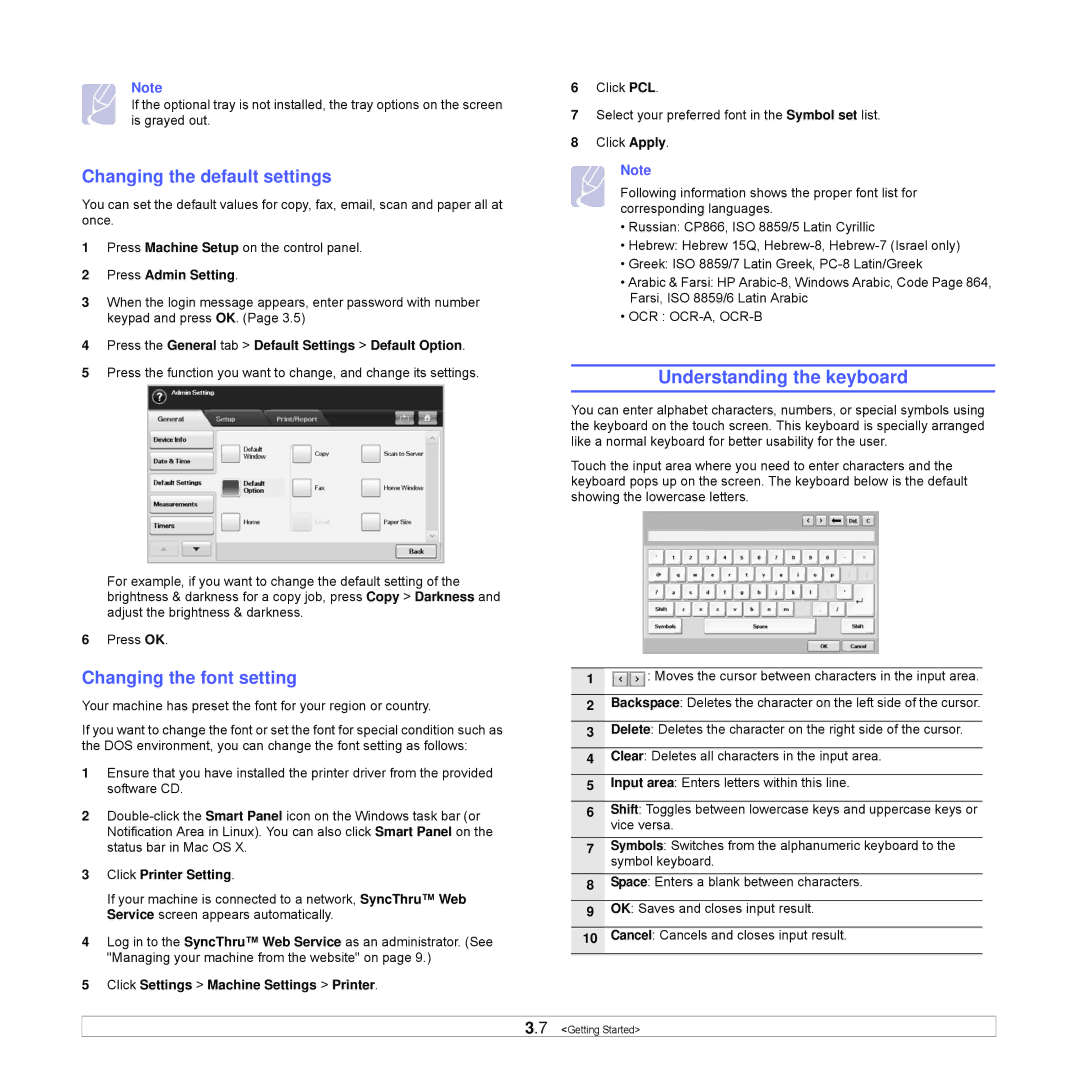
Understanding the keyboard
You can enter alphabet characters, numbers, or special symbols using the keyboard on the touch screen. This keyboard is specially arranged like a normal keyboard for better usability for the user.
Touch the input area where you need to enter characters and the keyboard pops up on the screen. The keyboard below is the default showing the lowercase letters.
1![]() : Moves the cursor between characters in the input area.
: Moves the cursor between characters in the input area.
2Backspace: Deletes the character on the left side of the cursor.
3Delete: Deletes the character on the right side of the cursor.
4Clear: Deletes all characters in the input area.
5Input area: Enters letters within this line.
6Shift: Toggles between lowercase keys and uppercase keys or vice versa.
7Symbols: Switches from the alphanumeric keyboard to the symbol keyboard.
8Space: Enters a blank between characters.
9OK: Saves and closes input result.
10Cancel: Cancels and closes input result.
3.7 <Getting Started>