HP 53131A/132A/181A 225 MHz Counter
Page
Assembly-Level Service Guide
Safety Considerations contd
Contents
Test 2 Trigger Level HP 53131A/132A Only
Test 5 Option 030/050/124 Channel 3 Frequency
Test 2 Channel 1 Frequency Sensitivity HP 53181A
Service
About the HP 53181A Calibration Menu
Replacing Assemblies
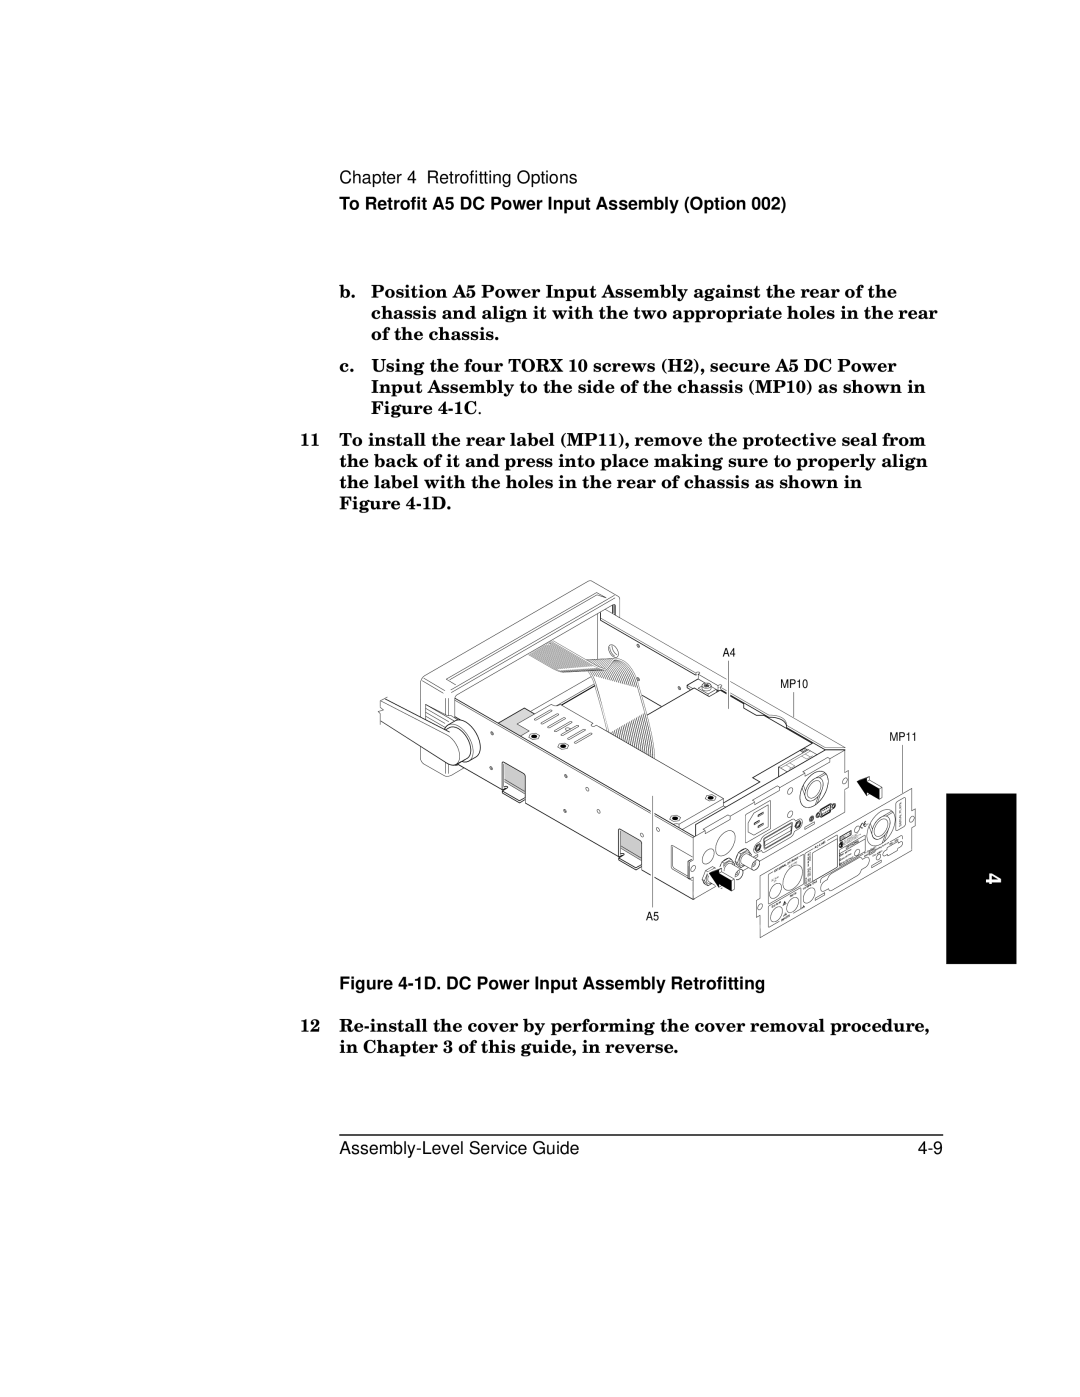
Retrofitting Options
Index
Contents Xii Assembly-Level Service Guide
Repair Strategy
How to Use This Guide
Instrument Identification
Instruments Covered by this Guide
Assembly-Level Service Guide Organization
How to Order Guides
Description of the 225 MHz Counters
Assembly-Level Service Guide Xvii
Hardware
Options
Accessories Supplied
Accessories Supplied and Available
Accessories Available
Support
Preface
Performance Tests
Operational Verification
Introduction
Introduction
Optional HP-IB Verification
Complete Performance Tests
Recommended Calibration Cycle
Test Record
Equipment Required
Equipment Required
Recommended Test Equipment
HP 53131A/132A/181A Operational Verification
Power-On Self Tests
HP 53131A/132A/181A Operational Verification
Counter
HP 53131A/132A
HP 53131A/132A/181A Operational Verification HP 53181A
1B. Operational Verification Setup for HP 53181A
Termination Check
Run Self Test
Counter HP 3458A
Digital Multimeter
Press Channel 1 50Ω/1MΩ key
External Arm Test HP 53131A/132A Only
Counter Setup
Equipment
Synthesized Signal Generator
Procedure
HP 8130A Pulse Generator
HP 8663A
External Timebase Tests
HP 3325B Synthesizer #1
MHz External Timebase Input HP 53131A and HP 53181A Only
HP 3325B Synthesizer #2 Counter
MHz External Timebase Input HP 53131A and HP 53181A Only
MHz External Timebase Input for the HP 53132A
HP 53131A/132A Complete Performance Tests
HP 53131A/132A Complete Performance Tests
HP 53131A/132A Performance Tests
Test 1 Time Interval HP 53131A/132A Only
Counter Setup
Equipment
Test 1 Time Interval HP 53131A/132A Only
HP 8130A HP53131A/132Pulse Generator Counter
Procedure
Test 2 Trigger Level HP 53131A/132A Only
Test 2 Trigger Level HP 53131A/132A Only
HP 3325B HP 53131A/132A Synthesizer Counter
Trigger Level Test Setup
This is the trigger level it should be 0.0 V ±15 mV
Equipment
KHz to 100 MHz Sensitivity for HP 53131A/132A
Counter HP 8663A Synthesized Signal Generator
HP 53131A/132A Ref.
HP 8663A Synthesized
Performance Tests
MHz to 200 MHz Sensitivity for HP 53131A/132A
MHz to 225 MHz Sensitivity for HP 53131A/132A
Equipment
HP 53131A/132A Counter
Channels 1 and 2 Frequency Accuracy Test Setup
Performance Tests
Equipment
HP 53131A/132A Counter
HP 8663A Synthesized Signal Generator
Sweep Oscillator
To 3.0 GHz Sensitivity for Option 030 only
Sweep the frequencies from 200 MHz to 5.0 GHz
Sweep the frequencies from 200 MHz to 12.4 GHz
Gate & ExtArm, Time Time 1.000 s
On the Counter, press Run key
Test 7 Peak Volts, Channels 1 and 2 HP 53131A/132A Only
Test 7 Peak Volts, Channels 1 and 2 HP 53131A/132A Only
HP 3325B HP 53131A/132ASynthesizer Counter
Volt Peak
Volt Peak
HP 53131A/132A HP-IB Verification Program Optional
HP 53131A/132A HP-IB Verification Program Optional
HP 53131A/132A Performance Test Record Page 1
HP 53131A/132A Performance Test Record Page 1
HP 53131A/132A Performance Test Record Page 2
HP 53131A/132A Performance Test Record Page 2
HP 53131A/132A Performance Test Record Page 3
HP 53131A/132A Performance Test Record Page 3
HP 53131A/132A Performance Test Record Page 4
HP 53131A/132A Performance Test Record Page 4
HP 53131A/132A Performance Test Record Page 5
HP 53131A/132A Performance Test Record Page 5
HP 53131A/132A Performance Test Record Page 6
HP 53131A/132A Performance Test Record Page 6
HP 53181A Complete Performance Tests
HP 53181A Complete Performance Tests
HP 53181A Performance Tests
Test 1 Trigger Level HP 53181A Only
Test 1 Trigger Level HP 53181A Only
HP 3325B HP 53181ASynthesizer Counter
11. Trigger Level Test Setup
This is the trigger level it should be 0.0 V ±15 mV
Test 2 Channel 1 Frequency Sensitivity HP 53181A Only
Test 2 Channel 1 Frequency Sensitivity HP 53181A Only
KHz to 100 MHz Sensitivity for HP 53181A
12. Channels 1 Frequency Sensitivity Test Setup
Test 2 Channel 1 Frequency Sensitivity HP 53181A Only
MHz to 225 MHz Sensitivity for HP 53181A
MHz to 200 MHz Sensitivity for HP 53181A
Test 3 Channel 1 Frequency Accuracy HP 53181A Only
Test 3 Channel 1 Frequency Accuracy HP 53181A Only
HP 53181A Counter
HP 8663A Synthesized Signal Generator
Sweep Oscillator
Test 3 Channel 1 Frequency Accuracy HP 53181A Only
Equipment
14. Option 015/030/050 Channel 2 Frequency Test
MHz to 1.5 GHz Sensitivity for Option 015 Only
MHz to 2.7 GHz Sensitivity for Option 030 Only
MHz to 5.0 GHz Sensitivity for Option 050 only
MHz to 12.4 GHz Sensitivity for Option 124 only
MHz to 1.5 GHz Accuracy Test for Option
Connect equipment as shown in Figure
Minimum to Maximum Accuracy Test for Options 030/050/124
Verify the HP 53181A Counter reads 100 MHz ±70 mHz
Performance Tests
Test 6 Peak Volts, Channel 1 HP 53181A Only
Test 6 Peak Volts, Channel 1 HP 53181A Only
16. Peak Volts Test Setup
HP 53181A HP-IB Verification Program Optional
HP 53181A HP-IB Verification Program Optional
HP 53181A Performance Test Record Page 1
HP 53181A Performance Test Record Page 1
HP 53181A Performance Test Record Page 2
HP 53181A Performance Test Record Page 2
HP 53181A Performance Test Record Page 3
HP 53181A Performance Test Record Page 3
HP 53181A Performance Test Record Page 4
HP 53181A Performance Test Record Page 4
Service
Service
Returning the Instrument to Hewlett-Packard for Service
Returning the Instrument to Hewlett-Packard for Service
To Provide Repair Information
To Pack in the Original Packaging Materials
To Pack in the Commercially Available Materials
Overview of the HP 53131A/132A Calibration Menu
About the HP 53131A/132A Calibration Menu
About the HP 53131A/132A Calibration Menu
CAL Unsecure
HP 53131A/132A Calibration Menu Tree
Calibration procedures
To Unsecure for Calibration
To View the Calibration Menu and Security Status
To Initiate the Calibration Routines
Information about Calti QUIK? and Calti FINE?
About the HP 53131A/132A Calibration Menu
HP 59992A J06 Time Interval Calibrator
HP 8130A HP 53131A/132A Pulse Generator Counter
To Change to a New Security Code
To Secure Against Calibration
To Get Help with the Calibration Menu
To View the Calibration Count
HP 53131A/132A Calibration Procedures
HP 53131A/132A Calibration Procedures
First Determine the Counter Firmware Revision
To Calibrate the Offset for Channels 1
BAD Code
HP 53131A/132A Calibration Procedures
To Calibrate the Gain for Channels 1
DC Power Supply HP 53131A/132A Counter
Digital Multimeter
Press Enter key again
To Calibrate Time Interval
HP 8130A HP53131A/132A Pulse Generator Counter
CAL TI QUIK? Calibration
HP 8130A Pulse Generator
CAL TI FINE? Calibration
TI CAL Pass
House Standard MHz Reference HP 53131A/132A Counter
To Calibrate the Standard Timebase
Medium, High, or Ultra-High
To Calibrate the High Stability Timebase Option
Overview of the HP 53181A Calibration Menu
About the HP 53181A Calibration Menu
About the HP 53181A Calibration Menu
About the HP 53181A Calibration Menu
HP 53181A Calibration Menu Tree
Key to access this menu
To View the Calibration Menu and Security Status
To Initiate the Calibration Routines
To Change to New the Security Code
HP 53181A Calibration Procedures
HP 53181A Calibration Procedures
To Calibrate the Offset for Channel
BAD Code
To Calibrate the Gain for Channel
HP 53181A DC Power Supply Counter Digital Multimeter
House Standard MHz Reference HP 53181A Counter
To Calibrate the High Stability Timebase Option
Safety Considerations
Pre-Troubleshooting Information
Pre-Troubleshooting Information
Interruption is Prohibited
Recommended Test Equipment
Repair Considerations
Disassembly and Reassembly Specifics
Electrostatic Discharge
Surface Mount Repair
Product Safety Checks
After Service Considerations
Product Performance Checks
HP 53131A Assembly Identification
Assembly Identification and Location
53132-60014 53131-69014
Assembly Name HP Part No Exchange Part A1 Motherboard Series
8A. Instrument Top Internal View
8B. Instrument Top Internal View Option
Troubleshooting the Counter
Power Supply Check
Motherboard Assembly
Wire Color Voltage Tolerance
A4 AC Power Supply Voltages
Overview of the Self-Test Routines
Test
Self Tests
Diagnosing the Faulty Assembly by Using
To Run the Test-All Self Test
Test Loop to OFF
To Run the Individual Self Tests
11B. HP 53181A Self Test Troubleshooting Setup
Failure Indicator Assembly at Fault
Troubleshooting
Replacing Assemblies
Replacing Assemblies
Do This First
Tools Required
Tools Required
Rear Bezel Removal
To Remove the Cover
Bottom View for Cover Removal
To Remove the Front Bezel
To Remove the Front Bezel
Front Bezel Removal
To Remove the Front Bezel
To Remove A1 Motherboard Assembly
To Remove A1 Motherboard Assembly
A1 Motherboard Assembly Removal
To Remove the A2 Display Board, Keypads, and Window
To Remove the A2 Display Board, Keypads, and Window
To Remove the A2 Display Board, Keypads, and Window
Replacing Assemblies
To Remove A3 1.5/3.0/5.0/12.4 GHz Channel Assembly Option
015/030/050/124
Optional Channel Input Assembly Removal
To Remove A4 AC Power Supply Assembly
To Remove A4 AC Power Supply Assembly
10. Location of the Rubber Foot
To Remove A5 DC Power Input Assembly Option
To Remove A5 DC Power Input Assembly Option
11. DC Power Input Assembly Option 002 Removal
Remove the cover
Remove A6 High Stability Timebase Assembly
To Remove the Rear Terminals Option
To Remove the Rear Terminals Option
13. Rear Terminals Option 060 Removal
To Remove the Rear Terminals Option
To Remove the Rear Terminals Option
Retrofitting Options
Retrofitting Options
Retrofitting Options
Option 002 DC Power Input Assembly Parts
To Retrofit A5 DC Power Input Assembly Option
Preliminary Procedure
To Retrofit A5 DC Power Input Assembly Option
1A. DC Power Input Assembly Retrofitting
Retrofitting Procedure
1B. DC Power Input Assembly Retrofitting
To Retrofit A5 DC Power Input Assembly Option
1C. DC Power Input Assembly Retrofitting
1D. DC Power Input Assembly Retrofitting
Dc-supply
Option 010 High Stability Timebase Assembly Parts
Option 001 Medium Stability Timebase Assembly Parts
Option 012 Ultra-High Stability Timebase Assembly Parts
Turn off the Counter and remove power cord Remove the cover
High Stability Timebase Retrofitting Option 001, 010
Option 060 Rear Terminals Parts
To Retrofit the Rear Terminals Option
To Retrofit the Rear Terminals Option
3A. Plug Removal for Rear Terminals Retrofitting
3B. Rear Terminals Retrofitting
To the rear of the chassis
To Retrofit the Rear Terminals Option
Replaceable Parts
Exchange Assemblies
Exchange Assemblies
Replaceable Parts
Reference Designations
Reference Designations
How To Order a Part
How To Order a Part
Parts Identification
By telephone
Contacting Hewlett-Packard
For mail correspondence, use the address below
Cabinet Parts and Hardware
Cabinet Parts and Hardware
Reference Designation
Code
Mfr Mfr Part Number
Option
MP2 MP3
Mfr Code Manufacturer Name Address Zip Code
Manufacturer’s Code List
Backdating
Older Instruments
Manual Changes
Instrument this Guide Directly Applies To
Backdating Hardware
Change 2 New A3 5/12.4 GHz Prescaler Assembly
Change 1 Below Series Prefix 3711A
Backdating Hardware
Change 3 New Tcxo boards
10. A4 AC Power Supply -9V Output Check Option 010/012 Only
Change 4 Series 3710A to 3705A
Change 6 Below Series Prefix 3416A
Change 5 Series 3705A to 3546A, 3548A
Change 8 Below Serial Prefix 3404A
Change 7 Below Serial Number 3349A01906
About the HP 53131A Calibration Menu
Backdating Firmware
Change 1 Firmware Revisions 3317, 3335, 3402
Backdating Firmware
About the HP 53131A Calibration Menu
HP 53131A Utility/Calibration Menu Tree
HP 53131A Calibration Procedures
HP 53131A Calibration Procedures
DC Power Supply HP 53131A Counter
To Calibrate Time Interval
HP 8130A HP53131APulse Generator Counter
Equipment
House Standard MHz Reference HP 53131A Counter
Medium or High
Backdating Specifications
Backdating Specifications
Change 1 53131A, Serial Prefix 3710A and Below
Change 2 53132A, Serial Prefix 3546A and Below
Change 3 53181A, Serial Prefix 3711A02841 and Below
Backdating Specifications
HP 53131A/132A Specifications
Channel 1 & 2 Input Characteristics1
Channel 1 & 2 Input Specifications1
Instrument Inputs
Channel 3 Input Characteristics
Channel 3 Input Specifications4
External Arm Input Specifications
External Arm Input Characteristics
Time Base
Time Base Output Specifications
Time Base
Internal Time Base Stability
Measurement Specifications
Measurement Specifications
Frequency, Period
Automatic or External Arming
HP 53131A-Worst Case RMS Resolution
HP 53132A-Worst Case RMS Resolution
× Frequency
Frequency Measurement Example
LSD
Time Interval
Pulse Width
Phase
Rise/Fall Time
Totalize
Duty Cycle
Peak Volts
Trigger Level Timing Error
Definitions of Systematic Uncertainty Terms Trigger Error
Measurement Definitions
Measurement Definitions
Time Interval Measurement LSD Definition
Typical Versus Worst Case Specifications
Additional Considerations for Digits and Time Arming Modes
Measurement Arming and Processing
Measurement Arming and Processing
Gate Time Measurement Throughput
Measurement Arming
Measurement Limits
Measurement Statistics
General Information
General Information
HP 53181A Specifications
Channel 1 Input Characteristics
Channel 1 Input Specifications
Channel 2 Input Characteristics
Channel 2 Input Specifications3
Time Base
Where N = 1 for Ch1 Frequency 1 MHz
Worst Case RMS Resolution
Frequency Measurement Example
Ratio 1 ⁄ Ch2 Freq × Gate Time Ratio 2 ⁄
Typical Versus Worst Case Specifications
Available Statistics
Power is removed from the counter
General Information
Index
Index-2 Assembly-Level Service Guide
Assembly-Level Service Guide Index-3
Index-4 Assembly-Level Service Guide
Contacting Hewlett-Packard
Page
From front matter
Manual Part Number