DX4500/DX4600 Digital Video Recorder
Contents
Operation
Appendix a
List of Illustrations
111
124
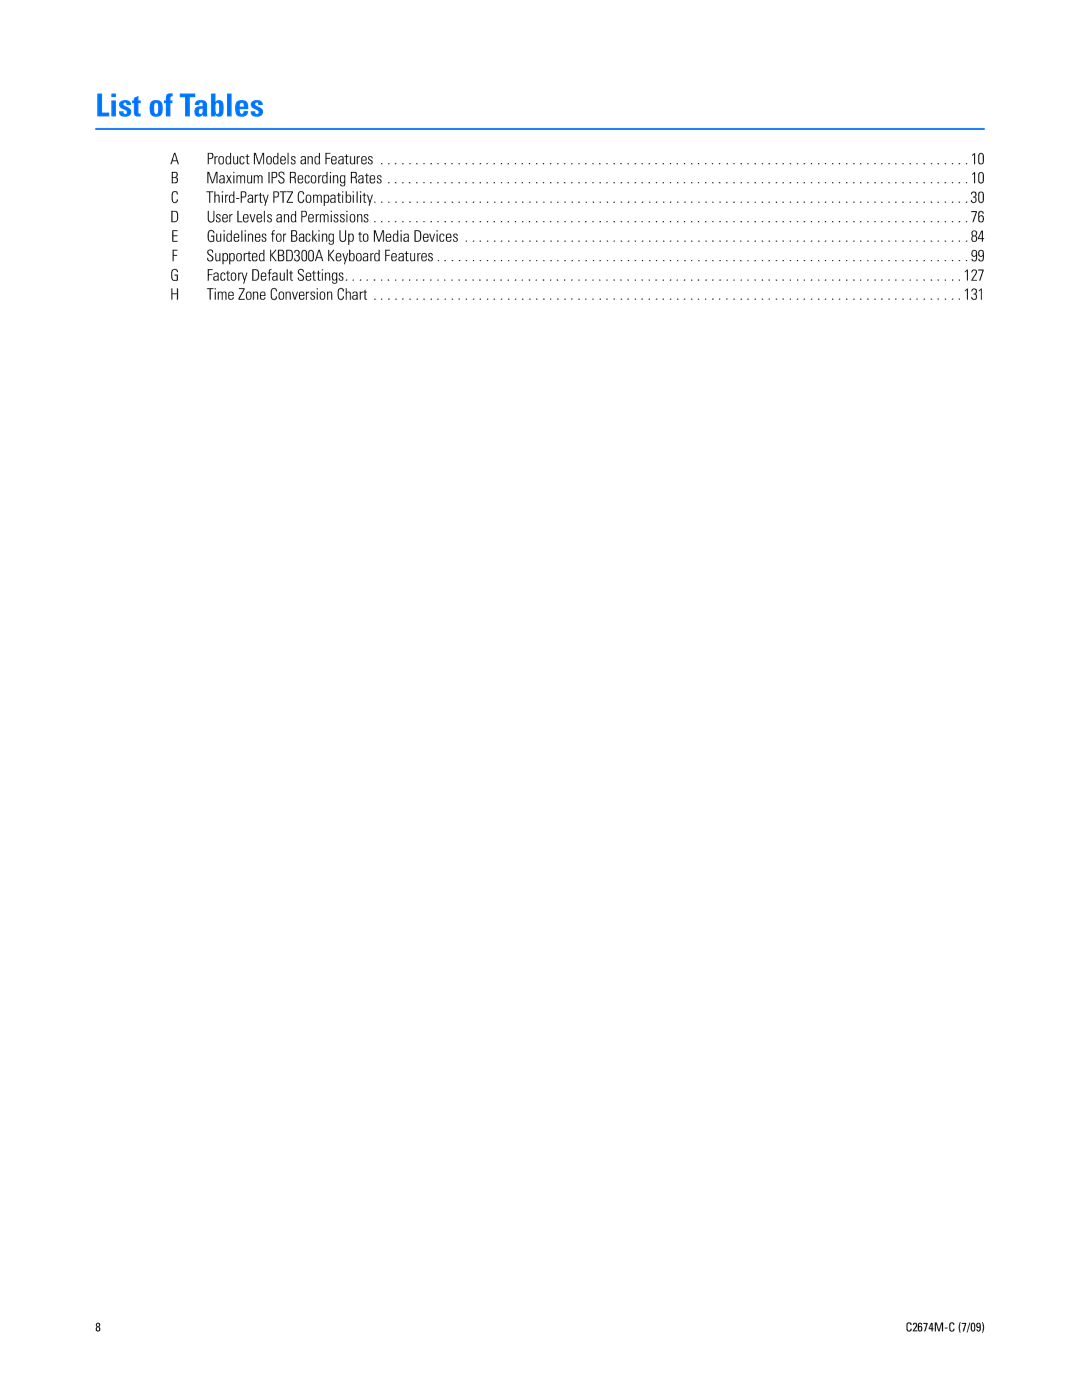
List of Tables
Models and Features
Welcome to the DX4500/DX4600 Series DVRs
Feature DX4508 DX4516
Remote Client Software Applications
DX4616
Model
Hardware Upgrades
Upgrade Policy
Software Upgrades
Getting Acquainted
Application Window
GUI Toolbar
Stop Stops playback
Setup Menu
Stop Stops playback Forward Provides two modes
PTZ Control
System Status Indicators
Front Panel
Channel and Camera Control Buttons
Button 1 Only selects camera
Playback Controls
Shuttle Dial outer ring
Monitor Selection
On the GUI toolbar Zoom Zooms a camera in and out
Remote Control
Power
Function as Login icon on the GUI toolbar
Channel Selection
PTZ Controls
Selection Controls
Arrow Buttons Selects menu options
Virtual Keyboard
Turning On and Logging On to the DVR
Click OK. The system logs you on and the Login icon
Logging Off and Turning Off the DVR
Setup Window
Navigating the Setup Window
Pane Front Panel/Remote Control Mouse
Properties Displays
Camera Menu Setup
Camera Menu
To create a camera name, do the following
Properties
Video Adjustment
PTZ Setup
Table C. Third-Party PTZ Compatibility
Third-Party PTZ Device Protocol
LGSD168
Baxall BPD1-RAS916 Pelco P
To select a PTZ channel, do the following
C2674M-C 7/09
Video Setup
Recording Setup
Resolution DX4608/DX4616 Settings
Video Format
C2674M-C 7/09
Motion Record Setup
MULTI-EVENT Recording Setup
Alarm Record Setup
Instant Record Setup
Schedule Menu Setup
Schedule Menu
Daily Recording Schedule
Daily Recording Schedule
Copying Schedules
Copying by DAY, WEEKDAY, or Weekend
Copying Between Channels
Selecting Destination Channels
Holiday Schedules
Creating a Holiday Schedule
Save the settings Do one of the following
C2674M-C 7/09
Editing a Holiday Schedule
Holiday List Dialog Box
Holiday Schedule
Deleting a Holiday Schedule
Select the Holiday option
Save the revised Holiday list Do one of the following
Display Menu Setup
Main and Spot Monitors
OSD Settings To select a language, do the following
Save the changes Do one of the following
Linking Menu Setup
Alarm Inputs
Changing the Input Type Do one of the following
To configure the relay output, perform the procedure in step
Motion Detection
To configure the motion area, do the following
Define and Select a Motion View Area
Relay Outputs
To clear a selected view area, do one of the following
C2674M-C 7/09
Network Menu Setup
TCP/IP
C2674M-C 7/09
Configuring Ddns
Ddns
Ddns Virtual Keyboard
Notification
Setting Notification
Mail
To configure the Smtp server settings
Test E-mail Message Save the changes Do one of the following
Emergency Notification
Enabling Emergency Notification
Enter the destination remote computer IP address
To configure a destination computer IP address
Repeat this procedure to configure additional IP addresses
System Menu Setup
Date and Time
C2674M-C 7/09
Set the date format
Configuring Daylight Saving
DST Time Shift
To save the changes Do one of the following
NTP
Verify that the DVR is synchronized with the NTP
Sound Settings Enable sound for any of the properties
Sound
User Accounts
DVR Operation User Level
Changing the Administrator Default Password
Repeat a to enter the remaining password characters
Adding a NEW User
Network server
Software Update
USB drive
DVR S/W Dialog Box
Configuration
IMPORTING, EXPORT, and Factory Default Settings
Overwrite
To reset the DVR to factory defaults
Hard Disk
Formatting the System Drives
Working with Hard Drives
Backup
Device can be used for daily or weekly backups
Guideline Media
Media can be formatted
Instant Backup
Selecting the Backup Schedule
C2674M-C 7/09
Weekly Backup Schedule
Daily Backup Schedule
Page
Erasing and Formatting Media
CD/DVD Writer Not Available Dialog Box
Would You Like to Erase a Media Dialog Box
Viewing Backed UP Video
System IR Remote ID and User Logout
IR Remote ID
Auto User Logout
Recovering the Administrator Password
Log on to the system
About Basic System Defaults
Live Video
Instant Playback
Instant Record and Playback
Starting and Stopping Instant Record
PTZ in Live View
Viewing Playback and Live Video Simultaneously
Working with PTZ Devices Using the KBD300A Keyboard
Buttons
Activating Presets
Activating Patterns
Sending Auxiliary Commands to a Device
PTZ Presets
Stop programming the pattern
Verify that you can activate the preset
PTZ Patterns
Accessing Programming Features of a Remote Camera
Clearing a Pattern
104 C2674M-C 7/09
Acknowledging AN Alarm or Motion Event
Copying and Exporting Video
Cancel Cancels the change
Main and Spot Monitors
Main Monitor
Sequentially numbered starting from the main channel
Spot Monitor
Selecting the Main Video Output Monitors
Displaying Video on the Analog Monitor
Accept the change
Displaying Video on the VGA Monitor
Information
System Log and Information
LOG List
Example System Information
Playback View and Controls
Playback mode has the following conditions
Playback Video
Playback Video
Searching for Video Events
Search Media
DATE/TIME Search
To conduct a date and time search
C2674M-C 7/09 115
DST DATE/TIME Search
Select Data Dialog Box To conduct a DST date and time search
Timeline Position in DST Time Period
Conduct an event search
Change the month setting
Event Search
Event Search Results
Bookmark Search
Event Playback Video in PIP Pane
Export Search
Playback of Bookmarked Video
Playback of Exported Video
Pixel Search
Pixel Search Calendar Select the channel
Set the area
Pixel Search Results
Bookmark Playback
Bookmarking Video
Viewing Bookmarked Video
Clearing Bookmarks
Exporting Video
Enter
DX4500/DX4600 Factory Defaults
Schedule
Display
Linking
Network
System
Table G. Factory Default Settings Sheet 4
Password Hidden Yes Update Selection
Yes Backup Partition Selection
Yes Method
+10 hours +11 hours
Time Zone Conversion Chart
Time Zone Standard Time Daylight Saving Summer Time
Page
Product Warranty and Return Information