3.Configure the full warning limit.
a.On the front panel or remote, press the up/down arrow buttons ![]()
![]() to highlight Full Warning, and then press ENTER. Using the mouse, click the Full Warning settings box. The settings box changes color.
to highlight Full Warning, and then press ENTER. Using the mouse, click the Full Warning settings box. The settings box changes color.
b.On the front panel or remote, press the left/right arrow buttons ![]()
![]() to display the desired setting. Using the mouse, click the settings box.
to display the desired setting. Using the mouse, click the settings box.
c.On the front panel or remote control, press ENTER. Using the mouse, click Full Warning. The settings box changes color.
4.To configure the event partition size, repeat the procedure in step 3.
5.To configure the auto delete feature, repeat procedure in step 3.
BACKUP
The DX4500/DX4600 backup feature allows you to perform an instant backup of recorded data or configure the system to perform an automatic backup of data on a scheduled basis. The administrator or power user has permissions for setting up and conducting backup procedures.
The DX4500/DX4600 backup feature allows you to schedule how the DVR backs up recorded video data.
•Partition Selection: Allows you to specify the type of data to be backed up: all (instant, normal, and event [alarm/motion]), normal (instant and normal), or event (alarm and motion).
•Device: Indicates the destination backup media. The DVR determines what media is available and displays those media as options. If a USB device is installed, the system displays the manufacturer’s name of the device. (for example, a ClipDrive or Flash Drive).Table E describes the guidelines for backing up data to various media.
•Schedule: Specifies the backup period.
–OFF: Disables the backup feature.
–Daily: Schedules daily backups between the start and end time
–Weekly: Schedules weekly backups, allowing you to specify different start and end times for each day of the week.
–Instant: Allows you to manually backup data by specifying the date and the start and end time.
•Schedule Start: Specifies the day and time (in hours and minutes) the scheduled backup begins.
•Time Range Date: Defines the date the backup process begins.
•Time Range Start: Indicates the time the backup process begins.
•Time Range End: Indicates the time the backup process ends.
You cannot use the Estimate Size, Start Backup, or Erase Media options while the backup process is running.
The USB device should not be removed while the backup process is running. Doing so can disrupt the formatting of the USB drive. If the USB is removed, it will have to be reformatted to work properly.
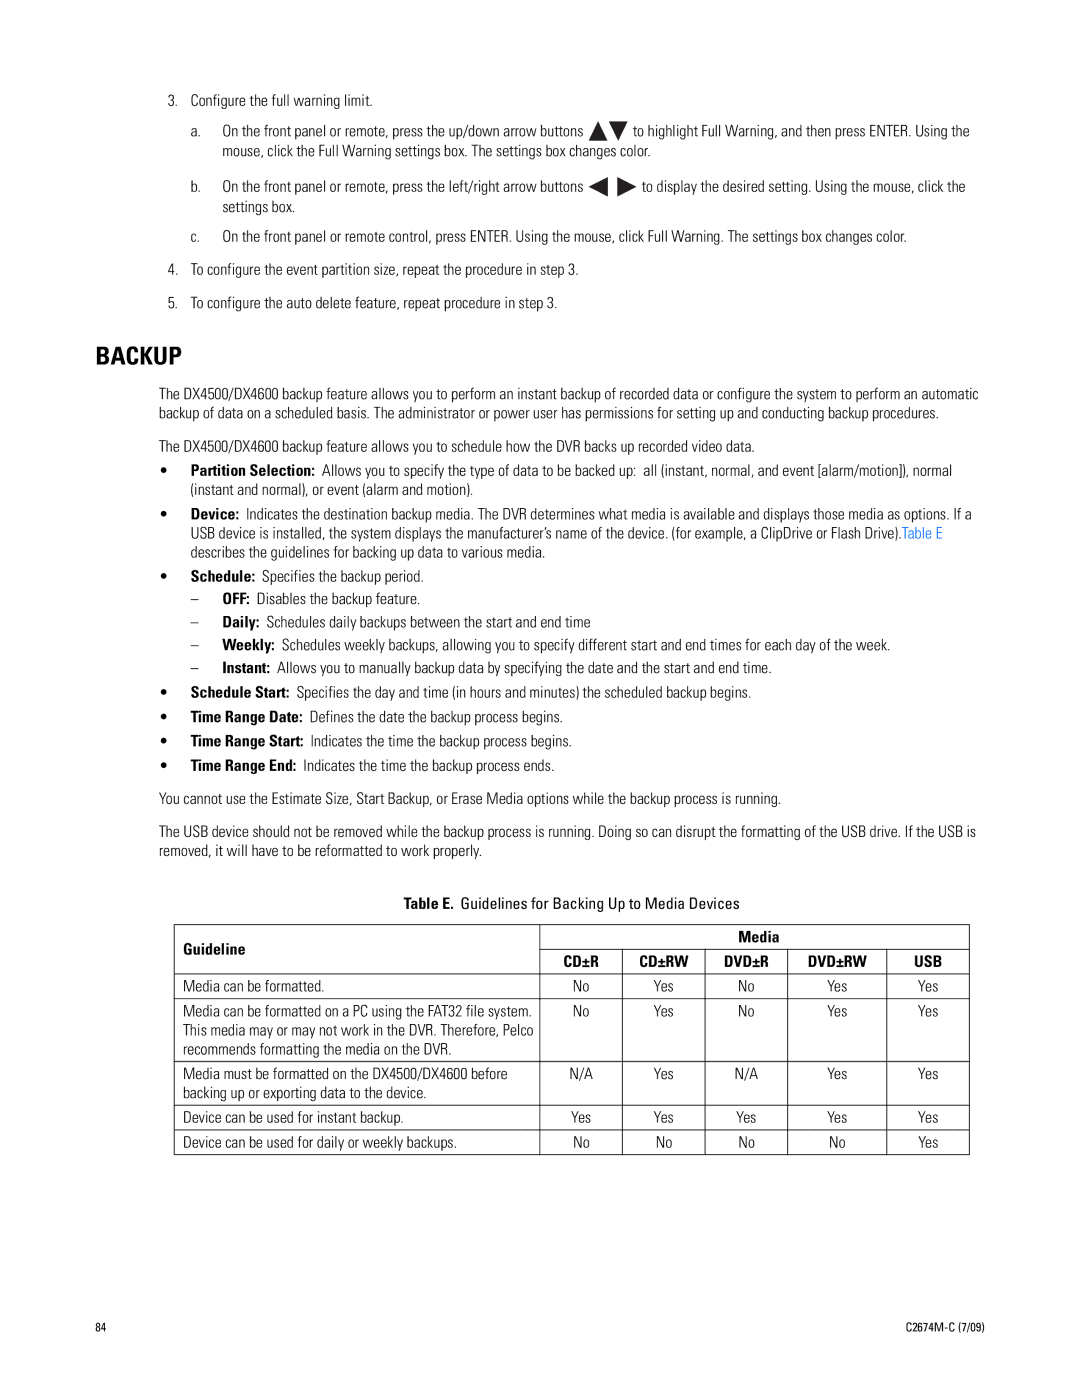
Table E. Guidelines for Backing Up to Media Devices
Guideline |
|
| Media |
|
| |
|
|
|
|
| ||
CD±R | CD±RW | DVD±R | DVD±RW | USB | ||
| ||||||
|
|
|
|
|
| |
Media can be formatted. | No | Yes | No | Yes | Yes | |
|
|
|
|
|
| |
Media can be formatted on a PC using the FAT32 file system. | No | Yes | No | Yes | Yes | |
This media may or may not work in the DVR. Therefore, Pelco |
|
|
|
|
| |
recommends formatting the media on the DVR. |
|
|
|
|
| |
|
|
|
|
|
| |
Media must be formatted on the DX4500/DX4600 before | N/A | Yes | N/A | Yes | Yes | |
backing up or exporting data to the device. |
|
|
|
|
| |
|
|
|
|
|
| |
Device can be used for instant backup. | Yes | Yes | Yes | Yes | Yes | |
|
|
|
|
|
| |
Device can be used for daily or weekly backups. | No | No | No | No | Yes | |
|
|
|
|
|
|
84 |
|