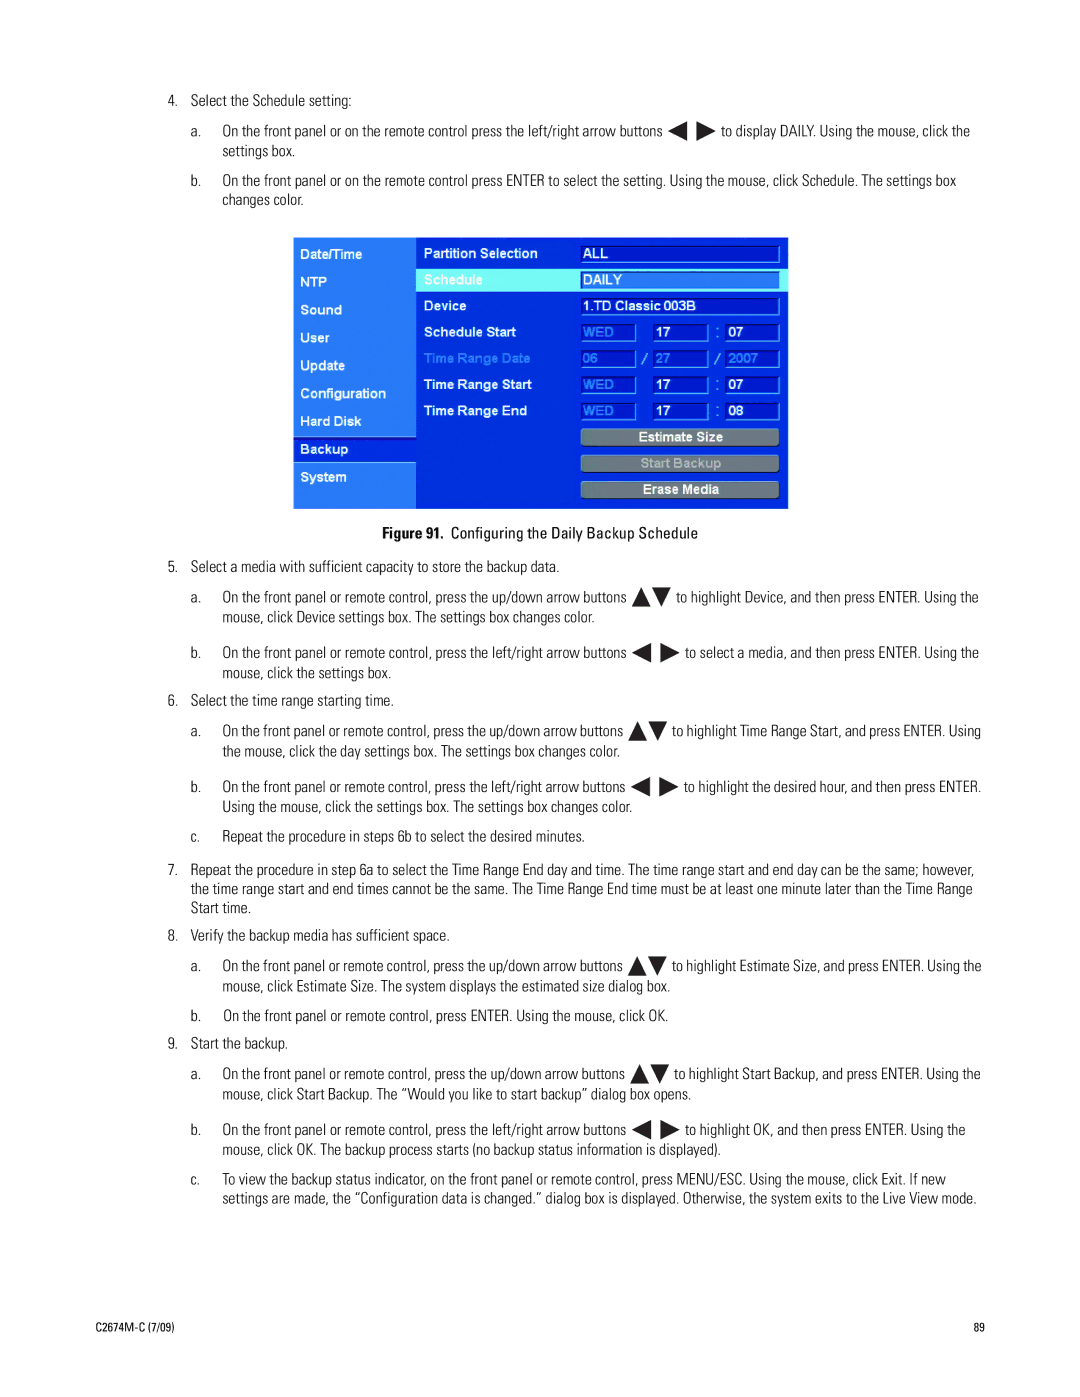
4.Select the Schedule setting:
a.On the front panel or on the remote control press the left/right arrow buttons ![]()
![]() to display DAILY. Using the mouse, click the settings box.
to display DAILY. Using the mouse, click the settings box.
b.On the front panel or on the remote control press ENTER to select the setting. Using the mouse, click Schedule. The settings box changes color.
Figure 91. Configuring the Daily Backup Schedule
5.Select a media with sufficient capacity to store the backup data.
a.On the front panel or remote control, press the up/down arrow buttons 
 to highlight Device, and then press ENTER. Using the mouse, click Device settings box. The settings box changes color.
b.On the front panel or remote control, press the left/right arrow buttons 
 to select a media, and then press ENTER. Using the mouse, click the settings box.
6.Select the time range starting time.
a.On the front panel or remote control, press the up/down arrow buttons 
 to highlight Time Range Start, and press ENTER. Using the mouse, click the day settings box. The settings box changes color.
b.On the front panel or remote control, press the left/right arrow buttons 
 to highlight the desired hour, and then press ENTER. Using the mouse, click the settings box. The settings box changes color.
c.Repeat the procedure in steps 6b to select the desired minutes.
7.Repeat the procedure in step 6a to select the Time Range End day and time. The time range start and end day can be the same; however, the time range start and end times cannot be the same. The Time Range End time must be at least one minute later than the Time Range Start time.
8.Verify the backup media has sufficient space.
a.On the front panel or remote control, press the up/down arrow buttons 
 to highlight Estimate Size, and press ENTER. Using the mouse, click Estimate Size. The system displays the estimated size dialog box.
b. .On the front panel or remote control, press ENTER. Using the mouse, click OK.
9.Start the backup.
a.On the front panel or remote control, press the up/down arrow buttons ![]()
![]() to highlight Start Backup, and press ENTER. Using the mouse, click Start Backup. The “Would you like to start backup” dialog box opens.
to highlight Start Backup, and press ENTER. Using the mouse, click Start Backup. The “Would you like to start backup” dialog box opens.
b.On the front panel or remote control, press the left/right arrow buttons ![]()
![]() to highlight OK, and then press ENTER. Using the mouse, click OK. The backup process starts (no backup status information is displayed).
to highlight OK, and then press ENTER. Using the mouse, click OK. The backup process starts (no backup status information is displayed).
c.To view the backup status indicator, on the front panel or remote control, press MENU/ESC. Using the mouse, click Exit. If new settings are made, the “Configuration data is changed.” dialog box is displayed. Otherwise, the system exits to the Live View mode.
| 89 |
