HM-DSR100U
POWER
D-VHS DIGITAL SATELLITE RECORDER
INSTRUCTIONS
ABOUT HEAD CLEANING
Note to CATV system installer
3. DO NOT place heavy objects on the VCR or remote control
CAUTIONS
ANTENNA INSTALLATION INSTRUCTIONS
INSTALLATION
IMPORTANT PRODUCT SAFETY INSTRUCTIONS
Page
BEFORE YOU INSTALL YOUR NEW VCR
HOW TO USE THIS INSTRUCTION MANUAL
SERVICING
Page
Important Product Safety Instructions
Table of Contents
Chapter 4 Using the System
If You Are Installing Your System Yourself
User and Installation Guide
1 Introduction
WELCOME
HIGHLIGHTS
Service Center
User and Installation Guide
ABOUT SATELLITE TELEVISION
Satellites Your Location Uplink Center Telephone Connection
Introduction
About D-VHS
ABOUT D-VHS
FEATURES OVERVIEW
User and Installation Guide
Available Services
AVAILABLE SERVICES
Introduction
Open the Main Menu
Change Channels
Open the Program
Guide
THE RECORDER
The Parts of 2 Your System
User and Installation Guide
EP LIGHT
The Recorder
The Parts of Your System
TV/VCR BUTTON
Page
User and Installation Guide
VHF/UHF ANT. IN RF OR VHF CONNECTION
S-VIDEO OUTPUT
The Parts of Your System
The Recorder
AC-3 DOLBY DIGITAL OUTPUT
User and Installation Guide
HIGH SPEED DATA PORT
TELEPHONE JACK
See Programming the Remote Control on page 4-39 for this procedure
The Remote Control
THE REMOTE CONTROL
The Parts of Your System
ABOUT THE UHF REMOTE CONTROL
User and Installation Guide
UHF REMOTE ADDRESS
IR CONTROL OF OTHER COMPONENTS
TV/VCR BUTTON
The Remote Control
The Parts of Your System
User and Installation Guide
GUIDE
The Remote Control
When you have the Browse Banner open, press the Up or Down
The Parts of Your System
You can use the number pad buttons for several purposes
User and Installation Guide
The Remote Control
Press the Rec button to start recording a program. The D-VHS mode is
The Parts of Your System
User and Installation Guide
PROVIDED ACCESSORIES
THE SATELLITE ANTENNA
USING THE REMOTE CONTROL
3 Getting Started
1. Make sure that fresh batteries are installed in the remote
User and Installation Guide
Getting Started
Using the Remote Control
User and Installation Guide
TURNING ON THE SYSTEM
CHANGING CHANNELS
CANCELING A PROCEDURE
Canceling a Procedure
Cancel
Getting Started
0 Cancel
User and Installation Guide
System Setup Menu
0 Cancel
1 Program Guide
About Menus and Other Multiple-Choice Screens
1 Program Guide
Getting Started
There are two types of lists single selection and multiple selection
User and Installation Guide
About Menus and Other Multiple-Choice Screens
When you highlight a choice in a single-selection list, it typically appears as shown below
Getting Started
THE SYSTEM SETUP MENU
User and Installation Guide
System Setup Menu
THE MAIN MENU
The System Setup Menu
Set up the recorder to work with the type of telephone system you have
Getting Started
Note Caller ID must be provided by your local telephone company
User and Installation Guide
Getting Started
Local TV Link
To add local broadcast or cable channels, do the following
User and Installation Guide
Local TV Link
Getting Started
9. Notice that the first time you display the
13.Press the Left arrow button to move the
User and Installation Guide
Local TV Link
Getting Started
20.Repeat steps 10 through 19 until all desired channels are added
Press Select. Repeat until all desired channels are deleted
User and Installation Guide
Local TV Link
System Setup
Getting Started
2 Add Local Chan
Save
User and Installation Guide
ABOUT THE PROGRAM BANNER
4 Using the System
1. Current Date/Time
User and Installation Guide
Using the System
About the Browse Banner
ABOUT THE BROWSE BANNER
User and Installation Guide
INFO
Using the System
About the Browse Banner
2. Press the Select button to change to the new
ABOUT THE PROGRAM GUIDE
User and Installation Guide
SAT mode
1. Press the Mode button until the remote is in
About the Program Guide
Press the Menu button to open the
User and Installation Guide
1. Press the Mode button until the remote is in
Using the System
SAT mode
About the Program Guide
User and Installation Guide
GUIDE
INFO
About Themes
Using the System
ABOUT THEMES
User and Installation Guide
T H E
Down
Ordering Pay Per View Programs
Using the System
ORDERING PAY PER VIEW PROGRAMS
To order through the Service Center
User and Installation Guide
FAVORITES LISTS
Using the System
Favorites Lists
Favorites
Modify List
FOX CBS HBO DISC SHO - E MAX2 MTV FOX AMC ABC NBC
User and Installation Guide
Favorites Lists
Using the System
Clear
Edit List Name
User and Installation Guide
4 4 Favorites
MENU
Security Features
Using the System
SECURITY FEATURES
Locks
User and Installation Guide
Using the System
Security Features
Press the Select button 5. Select the Channel Locks option
Rating
User and Installation Guide
PG-13
NC-17
Security Features
Using the System
Violence Language Nudity Sexual Content
Expanded Rating
User and Installation Guide
Locking the System on page
3. Select the OK option
Using the System
Security Features
3 Lock System
User and Installation Guide
Security Features
Using the System
8. Either Select the OK option
User and Installation Guide
Security Features
Using the System
User and Installation Guide
ELECTRONIC MAIL
Mail
Using the System
Software Upgrades
SOFTWARE UPGRADES
Delete Save
8. Select the Save option
User and Installation Guide
Page
Save
Using the System
Viewing Programs in Other Languages
VIEWING PROGRAMS IN OTHER LANGUAGES
Press the Menu button to open the Main Menu
8. Either Select the Save option to save your language choice. The recorder returns to the
User and Installation Guide
Setting Up Channel Order
Using the System
SETTING UP CHANNEL ORDER
1. Select the Front Panel option
User and Installation Guide
DIAGNOSTIC TESTS
Diagnostic Tests
Using the System
2 Remote Control
This test verifies that your system has good signal reception
User and Installation Guide
Programming the Remote Control
Using the System
PROGRAMMING THE REMOTE CONTROL
0 - indicates a second TV 1 - indicates a second VCR
User and Installation Guide
Using the System
Programming the Remote Control
To install an attenuator
5. Press the Address button to store the code in the remote
User and Installation Guide
Programming the Remote Control
Using the System
EQUIPMENT CODES FOR PROGRAMMING THE REMOTE
User and Installation Guide
Page
TELEVISIONS
Equipment Codes for Programming the Remote
Installation and Setup
Page
VCRS
Page
User and Installation Guide
5 VCR Features
SIMPLE PLAYBACK AND RECORDING
COMPATIBILITY OF CASSETTES AND RECORDING MODES
To play back a D-VHS or VHS tape, do the following
User and Installation Guide
the SAT mode
VCR Features
Simple Playback and Recording
1. Press the Mode button until the remote is in
Accidental erasure prevention
User and Installation Guide
SP EP
VCR Setup
VCR Features
Simple Playback and Recording
Mode
User and Installation Guide
PLAYBACK FEATURES
FF/BROWSE
VCR Features
Playback Features
User and Installation Guide
ªINDEX
INDEX£
Playback Features
VCR Features
User and Installation Guide
VCR Features
Playback Features
Video stabilizer
Superimpose
User and Installation Guide
VCR Features
Playback Features
HI-FI Normal Mixed
Counter Memory
User and Installation Guide
Playback Features
VCR Features
a For Automatic Start of Playback after Tape Rewind
User and Installation Guide
Recording Features
VCR Features
RECORDING FEATURES
User and Installation Guide
8 VCR Setup
Second audio
VCR Features
Recording Features
The recording duration appears on the TV screen for approx. 5 seconds
User and Installation Guide
USING CALLER ID
Enable Caller ID Disable Caller ID
Using Caller ID
Jane Doe
VCR Features
EVENT TIMERS
User and Installation Guide
Event Timers
VCR Features
While the icon is displayed, you may do the following
To choose through the Theme Categories screen
User and Installation Guide
Event Timers
VCR Features
1. Press the Mode button until the remote is in
User and Installation Guide
the SAT mode
Next press the Select button and then
Event Timers
VCR Features
Set Date/Time
AUXIN-0 CBS-4 ABC-7 NBC-9
15.Press the number buttons to input the date under Mo./Day
User and Installation Guide
Event Timers
VCR Features
User and Installation Guide
3. Select the Timers option. The Event Timer
Management screen will be displayed
VCR Features
Event Timers
To make changes after you have set event timers, do the following
Timers
User and Installation Guide
Editing to or from Another VCR
VCR Features
EDITING TO OR FROM ANOTHER VCR
EDITING FROM A CAMCORDER
User and Installation Guide
Installation
Starting Your
INTRODUCTION
Supplied with HM-DSR100DU. Sold separately for HM-DSR100RU
User and Installation Guide
Starting Your Installation
Before You Start Installation
User and Installation Guide
LNBF - DUAL OUTPUT
User and Installation Guide
COMPONENTS OF THE SATELLITE ANTENNA
Components of the Satellite Antenna
Starting Your Installation
Flathead bolts with nuts attach the dish to the support arm bracket
WHAT YOU NEED
User and Installation Guide
Optional Installation Kit
Starting Your Installation
Installation Kit Guide
Compass Silicone sealant
User and Installation Guide
Finding the Satellites
Starting Your Installation
FINDING THE SATELLITES
1. Press the Mode button to set the recorder
to the SAT mode
User and Installation Guide
Starting Your Installation
Finding the Satellites
FINDING A CLEAR LINE OF SIGHT
3. Use the elevation number to find out how high the satellites are in the sky from your location. You know that vertical is 90, and horizontal 0, and halfway in between is
User and Installation Guide
Discussion of Potential Mounting Sites
Starting Your Installation
DISCUSSION OF POTENTIAL MOUNTING SITES
DO NOT’S
User and Installation Guide
Starting Your Installation
Discussion of Potential Mounting Sites
You can mount the satellite antenna on a solid brick wall
2 lag screws, 1/4” x 3” 4 lag screws, 5/16” x 2”
User and Installation Guide
drill 1/8” twist drill bit 3/16” twist drill bit
7/16” socket or box-end wrench bubble level or plumb line pencil
Starting Your Installation
Discussion of Potential Mounting Sites
MOUNTING THE ANTENNA ON CINDER BLOCK
Do not mount the satellite antenna on a tile roof
User and Installation Guide
Starting Your Installation
Discussion of Potential Mounting Sites
MOUNTING THE ANTENNA ON WOOD
Page
User and Installation Guide
Installing and
Wiring Your System
INSTALLING THE SATELLITE ANTENNA
INSTALLING THE ANTENNA MOUNT
User and Installation Guide
Installing and Wiring Your System
Installing the Satellite Antenna
Pivot Bolt Elevation Bolts one on each side Mast Clamp Bolts
User and Installation Guide
Installing the Satellite Antenna
Installing and Wiring Your System
Do not kink or pinch the cable
INSTALLING THE ANTENNA ON A METAL POLE
User and Installation Guide
cable ties
post hole digger cement 7/16” socket or box-end wrench
Installing the Satellite Antenna
Installing and Wiring Your System
The most common method to install the pole in the ground is to use cement to secure it in the hole. Make sure that the pole remains at 90˚ from horizontal as the cement dries. You may want to use guy wires or braces to keep the pole steady
WHAT YOU WILL NEED
User and Installation Guide
GROUNDING AND WIRING THE SATELLITE ANTENNA
Grounding and Wiring the Satellite Antenna
Installing and Wiring Your System
Locate the grounding block as close to the grounding rod as possible
User and Installation Guide
Grounding and Wiring the Satellite Antenna
Installing and Wiring Your System
WIRING FROM THE ANTENNA TO THE RECORDER
GROUNDING THE MAST
AIMING THE ANTENNA FOR THE STRONGEST SIGNAL
User and Installation Guide
Aiming the Antenna for the Strongest Signal
Installing and Wiring Your System
6. Look at the Signal Strength bar
11.Tighten all the bolts to prevent movement of the satellite antenna
User and Installation Guide
Installing and Wiring Your System
Connecting the Recorder to a Telephone Line
CONNECTING THE RECORDER TO A TELEPHONE LINE
TouchTone Rotary / Pulse
8. Press the Select button
User and Installation Guide
Ordering Your Programming
Installing and Wiring Your System
ORDERING YOUR PROGRAMMING
User and Installation Guide
WIRING YOUR SYSTEM TOGETHER
MULTIPLE RECEIVERS
Wiring Your System Together
Installing and Wiring Your System
VHF/UHF ANT. IN RF OUT
The yellow connector carries the video signal
User and Installation Guide
Wiring Your System Together
Installing and Wiring Your System
Most of the wiring setups assume the following
QUICK INSTALL WITH RF OR UHF CONNECTION
User and Installation Guide
Broadcast TV Antenna Telephone or Connection Cable
Antenna
Wiring Your System Together
Installing and Wiring Your System
Features
Equipment
Features
User and Installation Guide
Equipment
Quality
Manual Clock Setting
Installing and Wiring Your System
MANUAL CLOCK SETTING
PM AM
Save
User and Installation Guide
FCC COMPLIANCE
A Appendix
This equipment is hearing-aid compatible
User and Installation Guide
Appendix
How to Identify and Resolve Radio-TV Interference Problems Stock No
National Electrical Code NEC
250-1. SCOPE
User and Installation Guide
Page A-4
250-83. MADE AND OTHER ELECTRODES
810-15. GROUNDING
Appendix
National Electrical Code NEC
f Electrode. The grounding conductor shall be connected as follows
User and Installation Guide
See Direction
Glossary
See Changing Channels
See Video Connection
Page A-8
User and Installation Guide
Appendix
Glossary
Page A-9
PROBLEMS AND SOLUTIONS TABLES
User and Installation Guide
What Is
Problems and Solutions Tables
What Is
Appendix
What Is
User and Installation Guide
USE THE REMOTE CONTROL
Possible Why
What Is
Problems and Solutions Tables
Appendix
Possible Why
What Is
User and Installation Guide
What Is
SYSTEM FEATURES
What Is
Problems and Solutions Tables
What Is
Appendix
What Is
User and Installation Guide
What Is
What Is
What Is
Problems and Solutions Tables
What Is
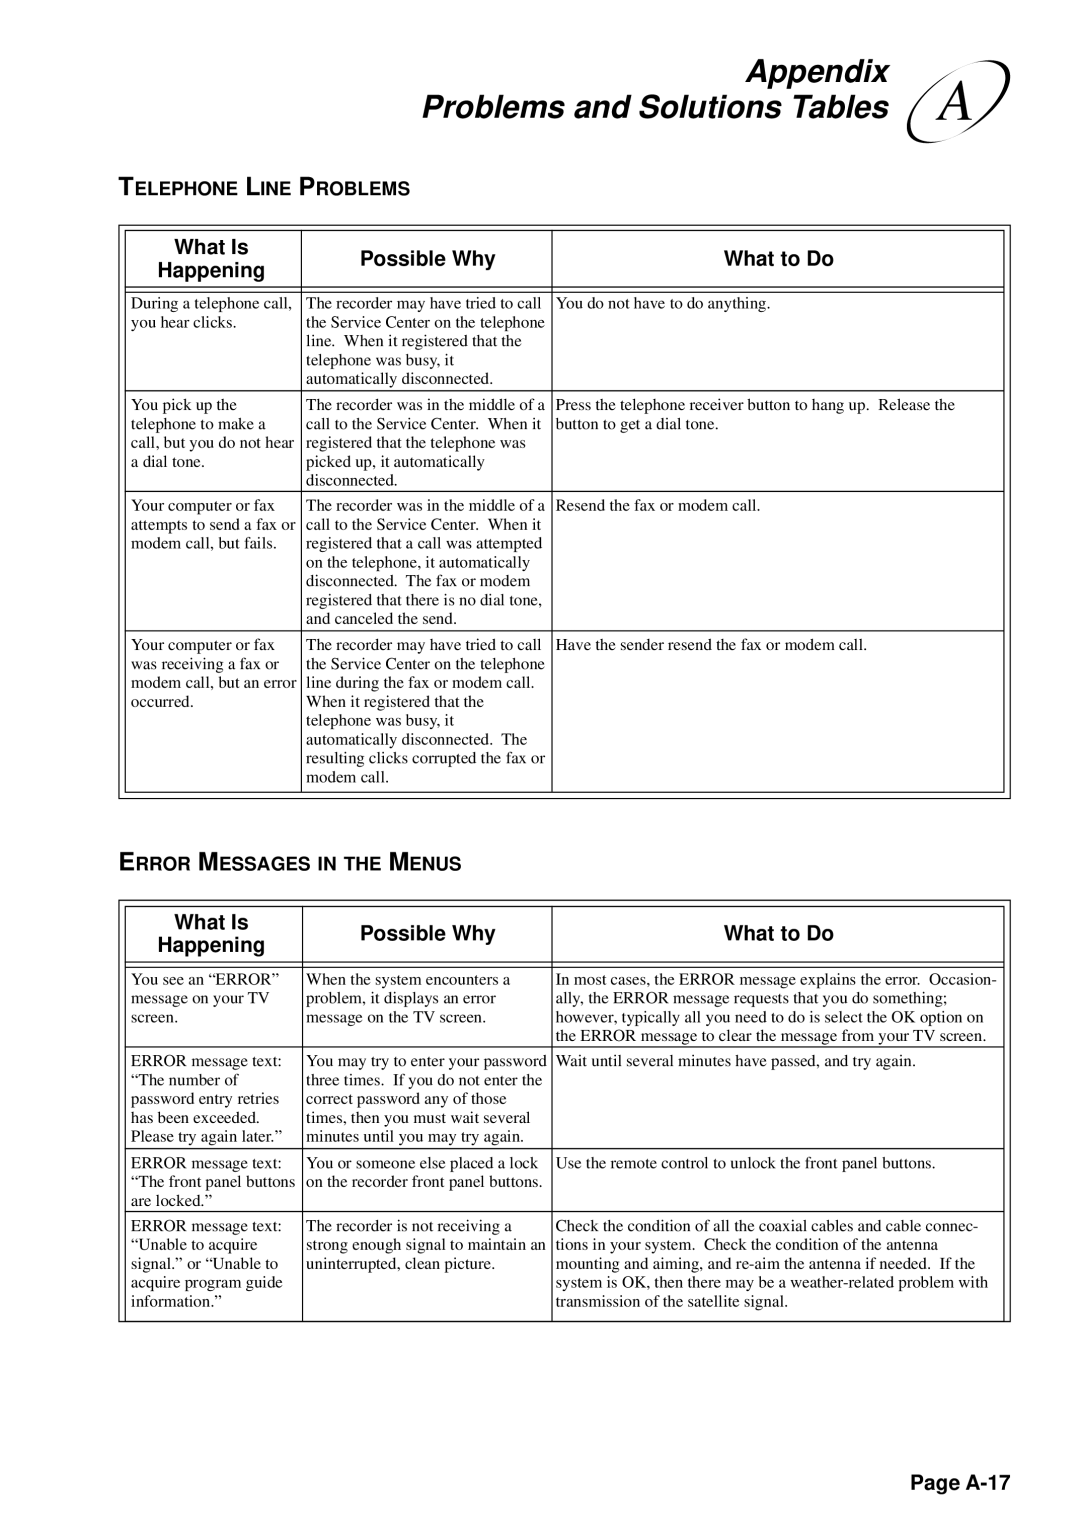
TELEPHONE LINE PROBLEMS
What Is
User and Installation Guide
DIAGNOSTIC TEST
Possible Why
What Is
Problems and Solutions Tables
Appendix
Possible Why
What Is
User and Installation Guide
EVENT TIMERS
Possible Why
What Is
Problems and Solutions Tables
What Is
Appendix
What Is
User and Installation Guide
TIMER RECORDING
Possible Why
QUESTIONS AND ANSWERS
Questions and Answers
Appendix
Page A-23
CONNECTOR
User and Installation Guide
TIMER
ACCESSORIES
JVC SERVICE & ENGINEERING COMPANY OF AMERICA
HOW TO LOCATE YOUR JVC SERVICE CENTER
For Servicing
DIVISION OF US JVC CORP
User and Installation Guide
1 YR
LIMITED WARRANTY
Page A-26
Page
I Index
User and Installation Guide
Page
Fast Forward Button 2-3, 2-13 Favorites Lists 1-4
Page
INDEX
User and Installation Guide
Page
Favorites Lists 4-14 Highlighting a Menu Option
View Button 2-11 Volume Button
Access Door 2-1 Accessory Jack
INDEX
Page
Mast Assembly 6-5 Mount Installation 7-2 Mounting Bracket
User and Installation Guide
Security Locks 1-4, 4-19 Service Center
Page
Page
INDEX
Page
User and Installation Guide
HM-DSR100U