14. PRINTING FORMAT
14.2Programming Compressed/Expanded Printing
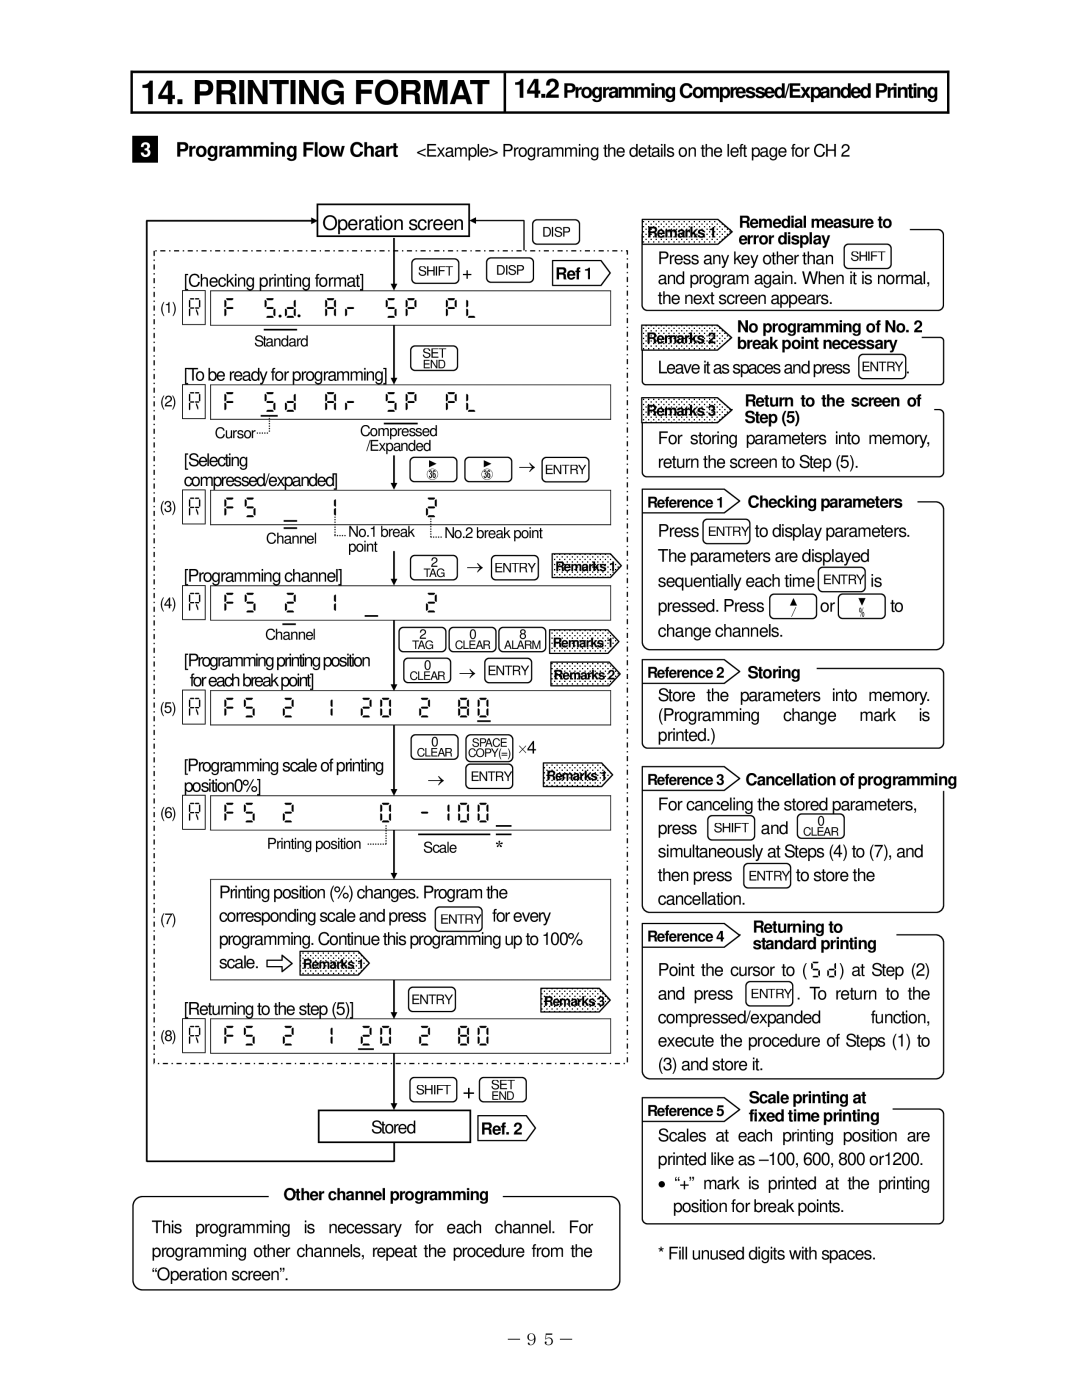
3Programming Flow Chart <Example> Programming the details on the left page for CH 2
Operation screen | DISP |
|
[Checking printing format] | SHIFT | + DISP | Ref1 |
|
|
|
(1)

Standard
SET
Remedial measure to
Remarks 1 error display
Press any key other than SHIFT
and program again. When it is normal, the next screen appears.
No programming of No. 2
Remarks 2 break point necessary
[To be ready for programming]
END
Leave it as spaces and press ENTRY .
(2)

Cursor | Compressed |
|
|
[Selecting | /Expanded |
| → ENTRY |
| | ||
compressed/expanded] |
|
|
|
(3)
Channel No.1 break No.2 break point point
| [Programming channel] | 2 | → ENTRY | Remarks 1 | |||||||
| TAG |
|
|
|
| ||||||
(4) | |
| | |
|
|
|
| |||
|
|
|
|
|
|
|
|
|
|
|
|
|
|
|
|
|
|
|
|
|
|
| |
|
|
| Channel | 2 | 0 | 8 | Remarks 1 | ||||
| [Programmingprintingposition | TAG | CLEAR | ALARM | |||||||
| 0 | → ENTRY | Remarks 2 | ||||||||
| foreachbreakpoint] | CLEAR | |||||||||
(5)

|
|
|
|
|
| 0 | SPACE | ⋅4 | ||||
| [Programming scale of printing | CLEAR | COPY(=) | |||||||||
|
| → | ENTRY | Remarks 1 | ||||||||
| position0%] |
|
| |||||||||
|
|
|
|
|
|
|
|
| ||||
(6) | |
| | |
| |||||||
|
|
|
|
|
|
|
|
|
|
|
|
|
|
|
|
|
|
|
|
|
|
|
|
|
|
|
|
|
| Printing position |
|
|
|
|
|
|
|
|
|
|
|
|
|
| Scale |
| * |
|
| ||
Printing position (%) changes. Program the
(7)corresponding scale and press ENTRY for every programming. Continue this programming up to 100%
scale. ![]() Remarks 1
Remarks 1
[Returning to the step (5)] | ENTRY | Remarks 3 |
|
|
(8)![]()
![]()
SHIFT + SETEND
| Stored | Ref. 2 | |
|
|
|
|
Other channel programming
This programming is necessary for each channel. For programming other channels, repeat the procedure from the “Operation screen”.
Remarks 3 | Return to the screen of | |
Step (5) | ||
|
For storing parameters into memory, return the screen to Step (5).
Reference 1 Checking parameters
Press ENTRY to display parameters. The parameters are displayed sequentially each time ENTRY is pressed. Press / or % to change channels.
Reference 2 Storing
Store the parameters into memory. (Programming change mark is printed.)
Reference 3 Cancellation of programming
For canceling the stored parameters,
press SHIFT and 0
CLEAR
simultaneously at Steps (4) to (7), and then press ENTRY to store the cancellation.
|
| |
Reference 4 | Returning to | |
standard printing | ||
|
Point the cursor to () at Step (2) and press ENTRY . To return to the
compressed/expanded function, execute the procedure of Steps (1) to
(3) and store it.
Scale printing at
Reference 5 fixed time printing
Scales at each printing position are printed like as
•“+” mark is printed at the printing position for break points.
* Fill unused digits with spaces.
-95-