Review the functions of the remote control included with the Pioneer
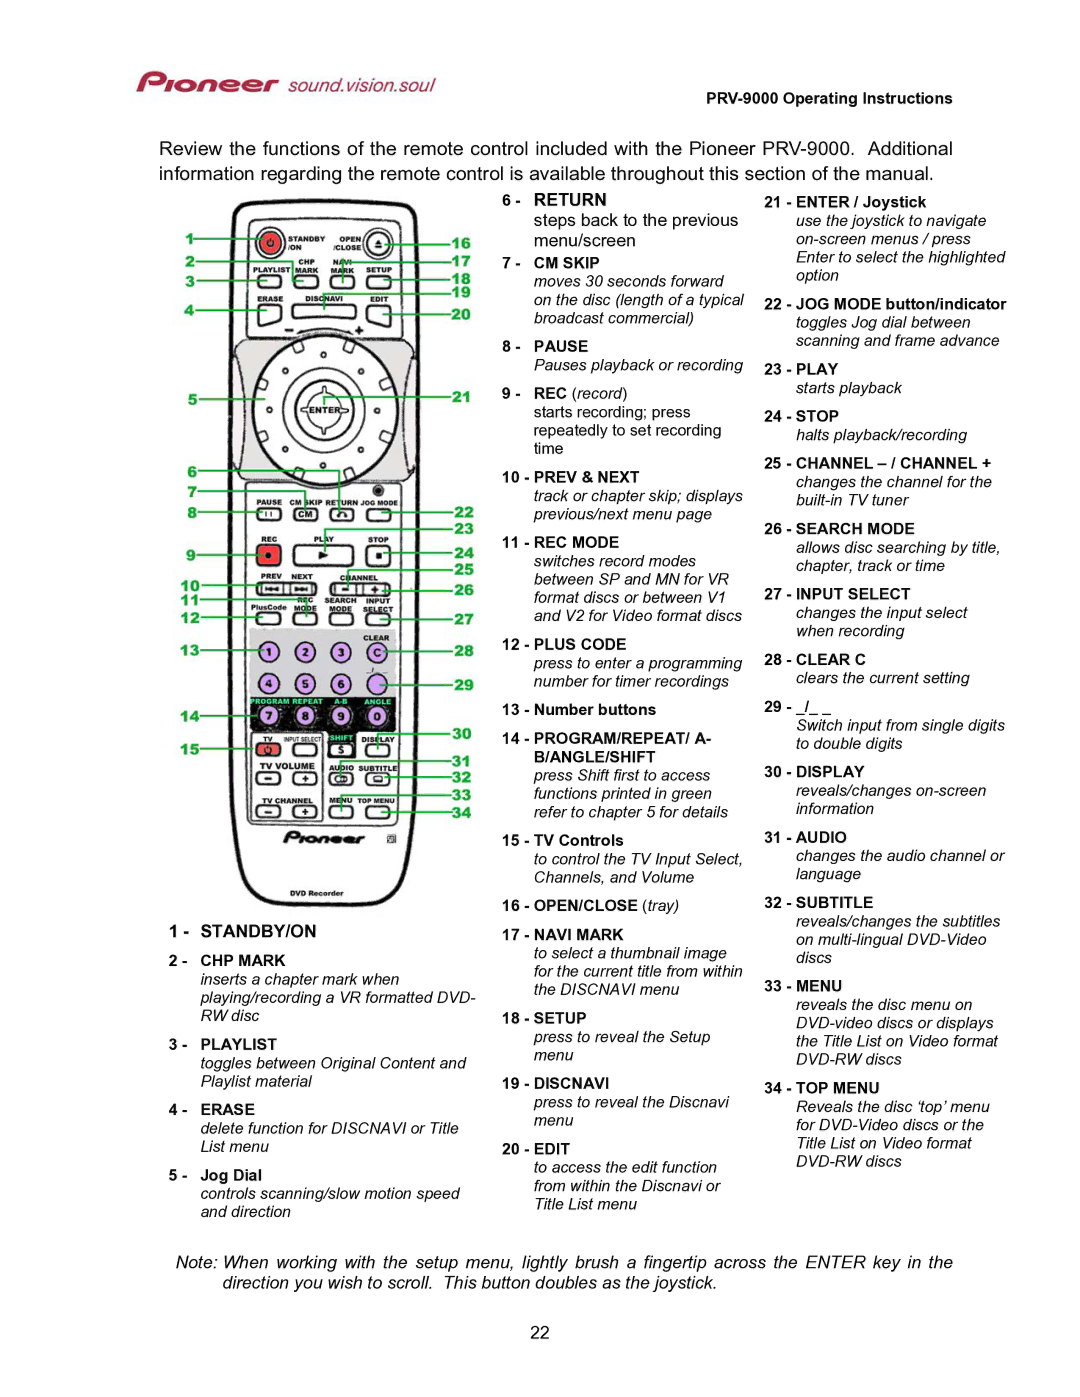
1 - STANDBY/ON
2 - CHP MARK
inserts a chapter mark when playing/recording a VR formatted DVD- RW disc
3 - PLAYLIST
toggles between Original Content and Playlist material
4 - ERASE
delete function for DISCNAVI or Title List menu
5 - Jog Dial
controls scanning/slow motion speed and direction
6 - RETURN
steps back to the previous menu/screen
7 - CM SKIP
moves 30 seconds forward on the disc (length of a typical broadcast commercial)
8 - PAUSE
Pauses playback or recording 9 - REC (record)
starts recording; press repeatedly to set recording time
10 - PREV & NEXT
track or chapter skip; displays previous/next menu page
11 - REC MODE
switches record modes between SP and MN for VR format discs or between V1 and V2 for Video format discs
12 - PLUS CODE
press to enter a programming number for timer recordings
13 - Number buttons
14 - PROGRAM/REPEAT/ A-
B/ANGLE/SHIFT
press Shift first to access functions printed in green refer to chapter 5 for details
15 - TV Controls
to control the TV Input Select, Channels, and Volume
16 - OPEN/CLOSE (tray)
17 - NAVI MARK
to select a thumbnail image for the current title from within the DISCNAVI menu
18 - SETUP
press to reveal the Setup menu
19 - DISCNAVI
press to reveal the Discnavi menu
20 - EDIT
to access the edit function from within the Discnavi or Title List menu
21 - ENTER / Joystick
use the joystick to navigate
22 - JOG MODE button/indicator
toggles Jog dial between scanning and frame advance
23 - PLAY
starts playback
24 - STOP
halts playback/recording
25 - CHANNEL
changes the channel for the
26 - SEARCH MODE
allows disc searching by title, chapter, track or time
27 - INPUT SELECT
changes the input select when recording
28 - CLEAR C
clears the current setting
29 - _/_ _
Switch input from single digits to double digits
30 - DISPLAY
reveals/changes
31 - AUDIO
changes the audio channel or language
32 - SUBTITLE
reveals/changes the subtitles on
33 - MENU
reveals the disc menu on
34 - TOP MENU
Reveals the disc ‘top’ menu for
Note: When working with the setup menu, lightly brush a fingertip across the ENTER key in the direction you wish to scroll. This button doubles as the joystick.
22