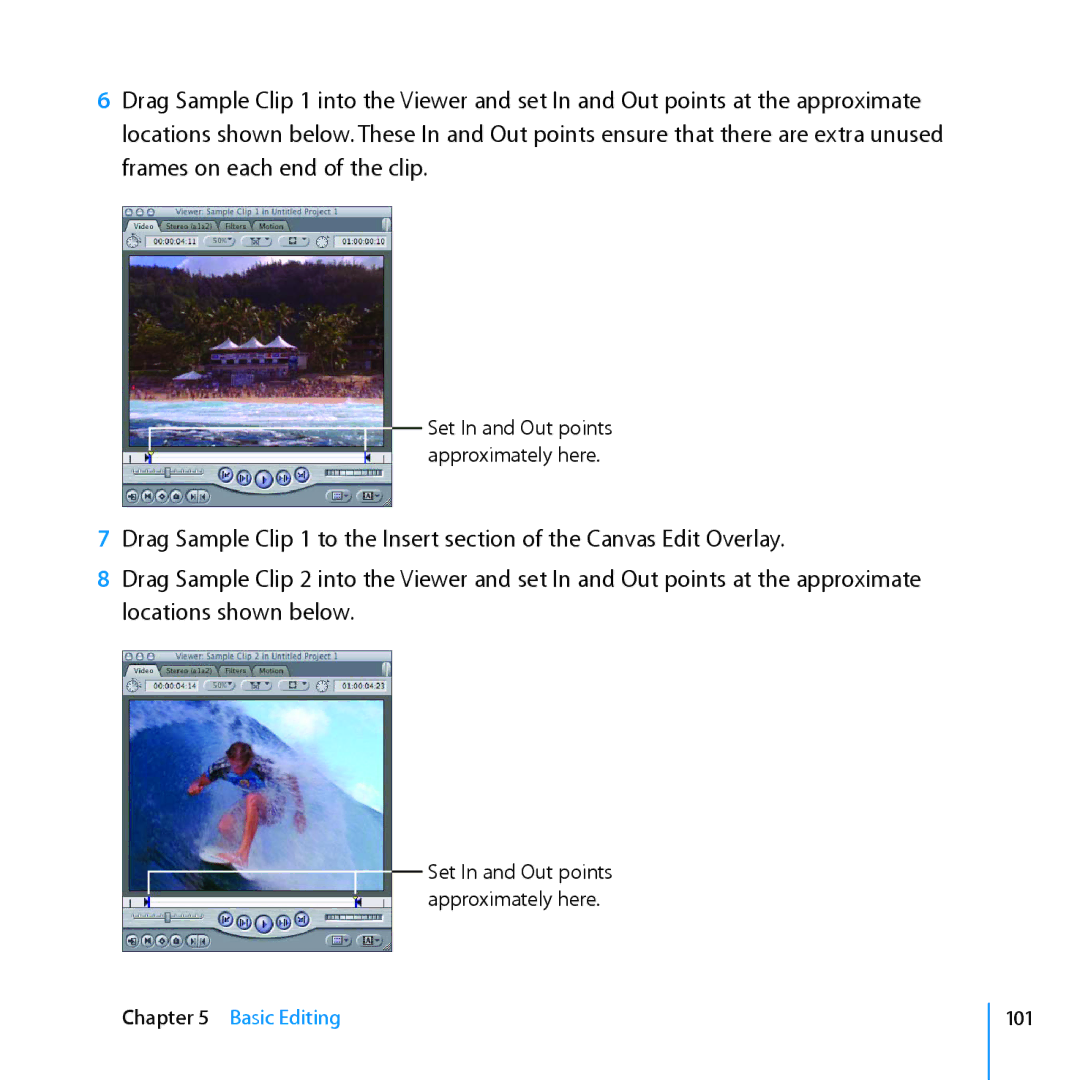
Exploring Final Cut Pro
Final Cut Pro7
KKApple Inc Copyright 2009 Apple Inc. All rights reserved
33 Chapter 2 Bringing Media into Your System
Contents
7 Chapter 1 A First Look at Final Cut Pro
81 Chapter 4 Working with the Canvas and Timeline
55 Chapter 3 Preparing Clips in the Viewer
99 Chapter 5 Basic Editing
117 Chapter 6 Working with Audio
151 Chapter 8 Adding Video Filters and Transitions
141 Chapter 7 Creating Voiceovers
171 Chapter 9 Outputting Your Finished Movie
177 Chapter 10 Getting Answers
Page
A First Look at Final Cut Pro
To open Final Cut Pro
Opening Final Cut Pro
3 Click Continue
When Final Cut Pro opens, your screen will look similar to this
Viewer
Canvas
To import sample video files
Jump In Explore the Browser
Getting Ready
To import your own video files that are already on your computer
Change the Browser display
Try This
Create and work with bins
Select items in the Browser
Save changes to your project
Create a new sequence
View additional Browser information
Place a clip in the Viewer
Jump In Explore the Viewer
Change the display of a clip in the Viewer
Try This
Scrubber bar Play button
Play a clip in the Viewer
Jog control
Navigate to specific locations in a clip
Shuttle control
In point marker Out point marker Play In to Out button
Set and work with In and Out points
Chapter 1 A First Look at Final Cut Pro
Navigate between edit points
mm Press the Up Arrow and Down Arrow keys to move between edit points
Chapter 1 A First Look at Final Cut Pro
Jump In Explore the Canvas
Sequence tab Scrubber bar Transport controls
Try This
Use the Canvas to place a clip in the Timeline
Drag from here
to here
Play and navigate within the clip in your sequence
Change the display of the Canvas
Zoom pop-up menu
Go to Next Edit button Scrubber bar Go to Previous Edit button
Move the playhead forward or backward
Change the display of the Canvas
Reposition the playhead in the Canvas if your mouse has a trackball
View pop-up menu
Chapter 1 A First Look at Final Cut Pro
Play and navigate within the sequence in the Timeline
Jump In Explore the Timeline
Try This
Chapter 1 A First Look at Final Cut Pro
Drag the clip to move it
Scroll through the sequence in the Timeline
Change a clip in the Timeline
Chapter 1 A First Look at Final Cut Pro
Cancel your actions
Change the Timeline track size
Add more clips to the Timeline using the Canvas window
Open a sequence clip in the Viewer to make changes
Eliminate gaps between clips in your sequence
Try This
Jump In Work with the Main Windows
Change the active window
Learning About Sequences
Learning About Projects, Sequences, Clips, and Media Files
Chapter 1 A First Look at Final Cut Pro
Understanding the Relationship Between Clips and Media Files
Key Concepts
ÂÂ Timeline The Timeline holds a sequence of clips in the order in which they should appear in your movie. Video and audio clips are stored in tracks in the Timeline, and you can move, rearrange, change, and delete clips to create the chronological order of your video
Bringing Media into Your System
Getting Ready
Jump In Explore Tape-Based Video Capture
Connect your camcorder or deck to the computer
Create a new project to hold your video
Preview footage on tape
Select a logging bin
Try This
Open the Log and Capture window mm Choose File Log and Capture
Enter logging information about a clip
Set rough In and Out points for a clip that you want to capture
Log additional clips without capturing them
Capture a single clip
Chapter 2 Bringing Media into Your System
Capture your footage as a single clip using Capture Now
Batch capture multiple clips at once
Chapter 2 Bringing Media into Your System
Jump In Explore File-Based Video Transfer
Create a new project to hold your video
Getting Ready
Chapter 2 Bringing Media into Your System
Connect your camcorder or deck to the computer and copy your footage
Try This
Mount a volume
Select a logging bin
Open the Log and Transfer window mm Choose File Log and Transfer
Clip name Transport controls Mark Out button Mark In button
Locate files on mounted volumes
Preview footage
Log a clip
Set rough In and Out points for a clip
mm Enter a short, descriptive clip name in the Clip Name field
Chapter 2 Bringing Media into Your System
Click to reveal the current logging bin in the Browser
Add a clip to the Transfer Queue
Progress bar
Pause button Thumbnail Resize slider
Log additional clips without immediately transferring them
Prepare to import a still image
Jump In Import Still Images and Other Media
Prepare to import an audio file
Getting Ready
Chapter 2 Bringing Media into Your System
Import still images into a project
Try This
Drag the audio clip
Import audio files into a project
Chapter 2 Bringing Media into Your System
Learning About Ingesting Media and Setting Up Projects
Chapter 2 Bringing Media into Your System
Key Concepts
ÂÂ Logging Logging footage allows you to record information about a clip that will help you identify it later. Using the Log and Capture window or the Log and Transfer window, you can record information about the clip, including a reel name, clip name or description, and other information such as the shot or take number, notes, and more. You can also set rough In and Out points for the clip that you can refine later during your edit
Next, you’ll explore using the Viewer to discover more of its features
Jump In Get to Know the Viewer
Preparing Clips in the Viewer
Chapter 3 Preparing Clips in the Viewer
Getting Ready
Change the size of the Viewer
Reposition the Viewer
Open multiple clips in separate Viewer windows
Close a Viewer window
Turn off the display of overlays
Show the timecode overlays
Open the Timecode Viewer
Place the playhead at an In point, at an Out point, or at Media End
Change the duration of a clip by specifying a duration in timecode
Navigate between markers
Add markers to indicate specific times in a clip
Delete markers
your markers after you’ve finished experimenting
Jump In Change Clips in the Viewer
Display a clip in a wireframe mode
Getting Ready
Try This
Reposition the clip on the screen
Jump In Create a Title Clip
Scale the display of the clip up or down on the screen
Rotate a clip to a different viewing angle
Try This
Create a title clip in the Viewer
Get to know the titling controls
Font Color color picker
Insert a title clip in your sequence
Chapter 3 Preparing Clips in the Viewer
Reposition a title on the screen
Reposition the superimposed title to fit the background clip
Superimpose a title over another clip
Arrange a title and clip to appear side by side
Try This
Jump In Change Clips over Time
Set keyframes and scale a clip up or down
Add Motion Keyframe button
5 Resize and reposition the clip to fill the normal display area
4 Click the Add Motion Keyframe button to set another keyframe
6 Play the clip in the Viewer to see it change size over time
Chapter 3 Preparing Clips in the Viewer
Move a clip over time
Navigate between keyframes in the Viewer
Drag the title clip off the screen
Drag to rotate the wireframe
Rotate a clip over time
Chapter 3 Preparing Clips in the Viewer
Change a clip’s opacity over time
The opacity increases here
Keyframe graph area Opacity keyframe button
9 Choose Window Arrange Standard to resize the Viewer
Learning About Motion Parameters
Keyframe navigation buttons Keyframe button
Key Concepts
ÂÂ Image mode A Viewer display mode that shows the video content of a clip as it plays back. You can change the display to show the clip at reduced or expanded sizes as you work with the clip
Page
Getting Ready
Working with the Canvas and Timeline
Jump In Work with the Canvas
Chapter 4 Working with the Canvas and Timeline
Canvas Timeline
Display a sequence in Image+Wireframe mode in the Canvas
Try This
Keep the Viewer and Canvas in sync for easy editing
Update the Viewer to show the current frame in the Canvas
1 Choose Open from the Playhead Sync pop-up menu in the Canvas
2 Play the sequence
Navigate to markers in the Timeline
Set markers in the Timeline to mark specific points in a sequence
Delete markers in the Timeline
Change markers in the Timeline
Try This
Jump In Work with Tracks in the Timeline
Select clips in the Timeline
Turn an audio track on or off
Lock a track to keep it from changing
Turn a video track on or off
Place only the video portion of a clip in a sequence
Place only the audio portion of a clip in a sequence
Chapter 4 Working with the Canvas and Timeline
Add new tracks to a sequence
1 Choose Sequence Insert Tracks
Set a video destination track before placing clips in a sequence
A4 Destination controls
Set audio destination tracks before placing clips in a sequence
Getting Ready
Jump In Edit Clips into a Sequence in the Timeline
Chapter 4 Working with the Canvas and Timeline
Mark a clip in the sequence and replace it
Place a clip so that it starts at a specific point in a sequence
Fill a specific segment of a sequence with a clip
Place a clip so that it ends at a specific point in a sequence
Next, you’ll explore basic editing techniques in Final Cut Pro
Key Concepts
Page
Jump In Trim Clips
Basic Editing
1 Press Control-U to choose the Standard window layout
Getting Ready
7 Drag Sample Clip 1 to the Insert section of the Canvas Edit Overlay
9 Drag Sample Clip 2 to the Insert section of the Canvas Edit Overlay so that it is placed in the Timeline after Sample Clip
Try This
Drag with snapping on or off
Slide a clip left or right in the sequence
Move an edit point between clips to change where a cut occurs
Change a clip’s In or Out point without leaving gaps
Slip a clip’s content within the current sequence In and Out points
Chapter 5 Basic Editing
Jump In Make Simple Split Edits and Cutaways
Video In point before the clip’s audio In point
Audio In point before the clip’s video In point
Cutaway clip
Getting Ready
Try This
Create a J-cut, in which the audio precedes the video
Create an L-cut, in which the video precedes the audio
Add a short cutaway shot to a sequence
6 Play the sequence to see the result of the cutaway that you added
Chapter 5 Basic Editing
Learning About the Trim Edit Window
The left side of the window shows the Out point of the outgoing clip. The In point of the incoming clip appears on the right side of the window. You can drag the In point or Out point markers to change them. You can also move the playheads on either side of the Trim Edit window and click the Mark In and Mark Out buttons to move the In and Out points to the location you want
Next, you’ll explore working with audio in Final Cut Pro
Key Concepts
Page
Audio tab
Working with Audio
Level Keyframe button Drag hand for moving the clip
Stereo waveforms
Chapter 6 Working with Audio
Jump In Work with a Clip’s Audio in the Viewer
Getting Ready
2 Name the sequence “Adjusting Audio” and press Return
Chapter 6 Working with Audio
Set up for working with audio
Try This
Scrub audio forward or backward
Play an audio clip in the Viewer
Chapter 6 Working with Audio
Change a clip’s audio level using the Audio Mixer
Add markers to specific audio points
Change a clip’s audio level using the Level slider in the Viewer
Change a clip’s pan using the Viewer’s Pan slider
Remove all audio changes from a clip
Add markers during playback
Remove all markers from a clip
Reset button
Chapter 6 Working with Audio
Jump In Change Audio Levels over Time
Increase in audio level
Try This
Increase a clip’s audio level over time using keyframes
Drag the slider until the Level field displays 0 zero
Decrease the audio level over time using keyframes
Drag the Level slider to decrease the audio level
6 Play the clip to hear how the audio fades over time
Chapter 6 Working with Audio
Edit a sound using keyframes
of the sound
Chapter 6 Working with Audio
Level Keyframe button to add a keyframe
Chapter 6 Working with Audio
Quickly add keyframes
6 Play the clip from the beginning to hear how the audio drops out
Quickly delete keyframes
Quickly navigate between keyframes
Chapter 6 Working with Audio
Jump In Work with Audio Tracks in the Timeline
Audio level overlay in pink
Try This
Select a clip’s audio items
Getting Ready
Display audio waveforms
Delete a clip’s audio
2 Choose Show Audio Waveforms from the Track Layout pop-up menu
Chapter 6 Working with Audio
Trim an audio clip
Display audio level overlays
Move an audio clip in the Timeline
Clip Overlays control
Balance the audio level of clips in the Timeline
Change audio over time by adjusting keyframes in the Timeline
Chapter 6 Working with Audio
Drag the audio level overlay to change the audio level
Chapter 6 Working with Audio
Balance the overall audio level of a sequence in the Timeline
1 Position the Timeline playhead over the audio clip items
Next, you’ll explore creating voiceovers with the Voice Over tool
Key Concepts
Jump In Add Voiceover Clips
Creating Voiceovers
Chapter 7 Creating Voiceovers
Getting Ready
Try This
Specify microphone settings in the Voice Over tool
Open the Voice Over tool
Set an audio destination track for your voiceover clip
Specify a clip name for the first voiceover clip
Turn off audio playback for the sample clip in the Timeline
Discard a new voiceover audio clip that isn’t acceptable
Listen to the new voiceover clip
Review button
Discard Last Recording button
Record multiple voiceover clips, one after another
Record multiple takes of a voiceover clip
Record a voiceover clip within a specific interval of your sequence
Delete takes that you don’t want
7 To remove the In and Out points, choose Mark Clear In and Out
Key Concepts
Adding Video Filters and Transitions
Chapter 8 Adding Video Filters and Transitions
Jump In Apply Filters to Clips
Try This
Apply a Sepia filter to a clip in a sequence
Getting Ready
Chapter 8 Adding Video Filters and Transitions
Adjust the Sepia filter for a clip
Remove a filter from a clip
Apply a Color Tint filter to a clip
Experiment with applying different filters and adding keyframes
Change a filter over time using keyframes
Jump In Make Simple Color Corrections
Change a clip’s saturation
Apply the Color Corrector 3-way filter to a clip in a sequence
Change a clip’s dark tones
Change a clip’s midtones
Transition between clips
Jump In Add Transitions Between Clips
Getting Ready
6 Drag Sample Clip 1 to the Insert section of the Canvas Edit Overlay
Leave about 2 seconds of unused footage at the beginning of the clip
Try This
Add a clip with a transition to a sequence
Add a transition to an edit point
Delete a transition
Change the duration of a transition
Apply a different transition to a cut
Apply transitions from the Effects tab
Get to know the available video transitions
Chapter 8 Adding Video Filters and Transitions
Learning About Transitions
The duration of the clips remains the same when a transition is added
First complete frame of the incoming clip
Last complete frame of the outgoing clip
The last full frame to be seen is now earlier in the clip
Handle before the In point
Chapter 8 Adding Video Filters and Transitions
Key Concepts
Page
Outputting Your Finished Movie
Export your sequence as a QuickTime movie
Jump In Create a QuickTime Movie
Getting Ready
Try This
Chapter 9 Outputting Your Finished Movie
Jump In Export a Movie in a Specific File Format
Getting Ready
Try This
Export your sequence for display on iPod
Export your sequence for display on YouTube
Key Concepts
Export a streaming sequence suitable for viewing on a website
Jump In Explore Final Cut Pro Help
Getting Answers
Open the Final Cut Pro User Manual
Search for a specific topic that interests you
Review discussions on Final Cut Pro discussion forums
Search for Apple service and support information
What’s Next?