Videocamera DVD
Para PC
Ver imagens no PC e utilizar a câmara
Visualizzazione delle immagini sul PC e
Mediante la videocamera per PC
Precauzioni
Avvertenze per la sicurezza
Avisos de segurança
Precauções
Informazioni d’uso importanti
Prima DI Utilizzare LA Videocamera
Antes DE Utilizar Esta Câmara DE Vídeo
Simboli , Accanto AI Titoli
Informazioni SU Questo Manuale Utente
Avvertenze Relative AI Marchi
Sobre O Manual do Utilizador
Precauzioni d’uso
Precauções durante a utilização
Nota Importante
Non toccare la lente del pick-up laser
Non esporre la videocamera DVD a fuliggine o vapore
Não exponha a câmara de vídeo DVD a fuligem ou vapor
Não utilize a câmara de vídeo DVD perto de gás corrosivo
Indice
Accessori forniti con la videocamera
Índice
Antes DE Gravar
Modo Videocamera DVD REGISTRAZIONE/ Riproduzione
Modo Videocamera DVD Modifica DEI Filmati Gestione Disco
Connessione AD
Stampa Delle Foto Solo VP
UN PC Solo VP
Apenas Para
Especificações
Resolução DE Problemas
Introdução às funções básicas
Introduzione alle funzioni di base
Durante la registrazione di fi lmati su un disco DVD
Ao gravar fi lmes num DVD
Finalise
Di base Básicas
Introdução às funções
finaliszato
DVD finalisado -R
Apresentação da câmara de vídeo DVD
Accessori Forniti CON LA Videocamera DVD
QUE É Fornecido COM a SUA Câmara DE Vídeo DVD
Aparência exacta de cada item varia em função do modelo
Vista Anterior E Direita
Vista Frontale E DA Destra
Vista DAL Basso E DA Sinistra Vista Esquerda E Inferior
Informazioni generali
Sulla videocamera DVD
Vista Posteriore E Superiore Vista Posterior E Superior
Preparação
Preparazione
Battery
Holder
Imediatamente assistência médica
Segurar a Câmara DE Vídeo DVD
Carregar a Bateria
Carica DEL Pacco Batterie
Per caricare il gruppo batterie
Para carregar a bateria
Manutenzione della batteria
Informazioni sui gruppi batterie
Informazioni sulla durata della batteria
Acerca das baterias
Caricamento della batteria
Indicatore di carica
Carregar a bateria
Indicador de carga
Tempo di carica 50 min
Gruppo batterie
Tempi di registrazione continua senza zoom
Bateria
Utilizar a câmara de vídeo DVD com o transformador CA
Utilizzo della videocamera DVD con l’adattatore CA
Selezione dei modi operativi
Accensione e spegnimento della videocamera DVD
Ligar e desligar a câmara de vídeo DVD
Seleccionar os modos de funcionamento
Preparazionepreparação
Indicatori DEL Display Indicadores do Ecrã
Modo registrazione videocamera
Modo de gravação da câmara de
Modo de reprodução de
Lmes
Estado de funcionamento
Modo de gravação
Modo di registrazione
Modo de funcionamento
Stby em espera ou
3 45
Modo di riproduzione videocamera digitale Video
Utilizzo DEL Joystick
Utilizzo DEL Tasto DI Visualizzazione
Utilizar O Botão Visualizar
Utilizar O Joystick
Utilizzo DEL Display LCD
Utilizar O LCD
Utilizzo DEL Mirino Utilizar O Visor Electrónico
Definição Inicial Idioma OSD E DATA/HORA
Preparazione Preparação
Seleccionar o idioma para o OSD
Selezione della lingua del display OSD
Impostazione di data e ora Acertar a data e a hora
Setting Impostazione Seleccionar Setting Definição
Activar/desactivar a apresentação da data e da hora
0000 01/GEN/2008
DVD antes de gravar
Modo câmara de vídeo
Inserimento E Rimozione DI UN Disco
Introduzir E Remover UM Disco
Attenzione
Quando utilizar um disco novo formatar um disco novo
Tempo DE Gravação
Tempo DI Registrazione
Il tasto di avvio/arresto registrazione che meglio si
Registrazione DI Filmati Gravar Filmes
Premere il tasto di avvio/arresto registrazione
Carregue no botão Início/Paragem de gravação
Modo videocamera DVD registrazione/riproduzione
Modo EASY.Q
Gravação Fácil Para Principiantes
Cattura immagine
Cattura DI Immagini Fisse Durante LA
Zoom
USO Dello Zoom
Mode
Riproduzione DI Filmati Reproduzir Filmes
Regolazione del volume
Operazioni di riproduzione
Várias operações de reprodução
Eliminar Imagens
Eliminazione DI Immagini
Select file Seleziona file Elimina la singola immagine
Select file Sel. ficheiro Elimina uma imagem individual
Appare il messaggio Partial Delete? Selected
Elim. parz
Part of a file will be deleted Eliminare? La parte
Selezionata del file sarà eliminata
12.JAN.2008 30.JAN.2008
Playlist Lista DE Reprodução
Movie image 4 Movie image 5 Movie image 6 Movie image
1000
Creazione di una playlist Criar uma lista de reprodução
Oppure la si disattiva l’indicatore Rimosso Dall’immagine
Arrange Disponi, quindi premere il joystick
Execute Esegui, quindi premere il joystick
file to this order? Disponi file selezionato Questo ordine?
Add Arrange Delete Partial Delete Exit
Modifi ca dei fi lmati
Apagar uma secção de um filme de uma lista de reprodução
Il fi le selezionato riempie lo schermo e rimane in pausa
Finalização DOS Discos
Sinistra per selezionare Disc Manage Gestione disco
Finalise Finalisza disco, quindi premere il joystick
Riproduzione su un PC con un’unità DVD
Gestione del disco DVD gerir o disco
Eproduzir num computador com uma unidade de DVD
Eproduzir um disco fi nalisado num leitor/gravador de DVD
Disco NÃO Finalizado
Definalizzazione DI UN Disco
Formato Disco
Formatar O Disco
Gestione disco Disc Manage Gerir disco
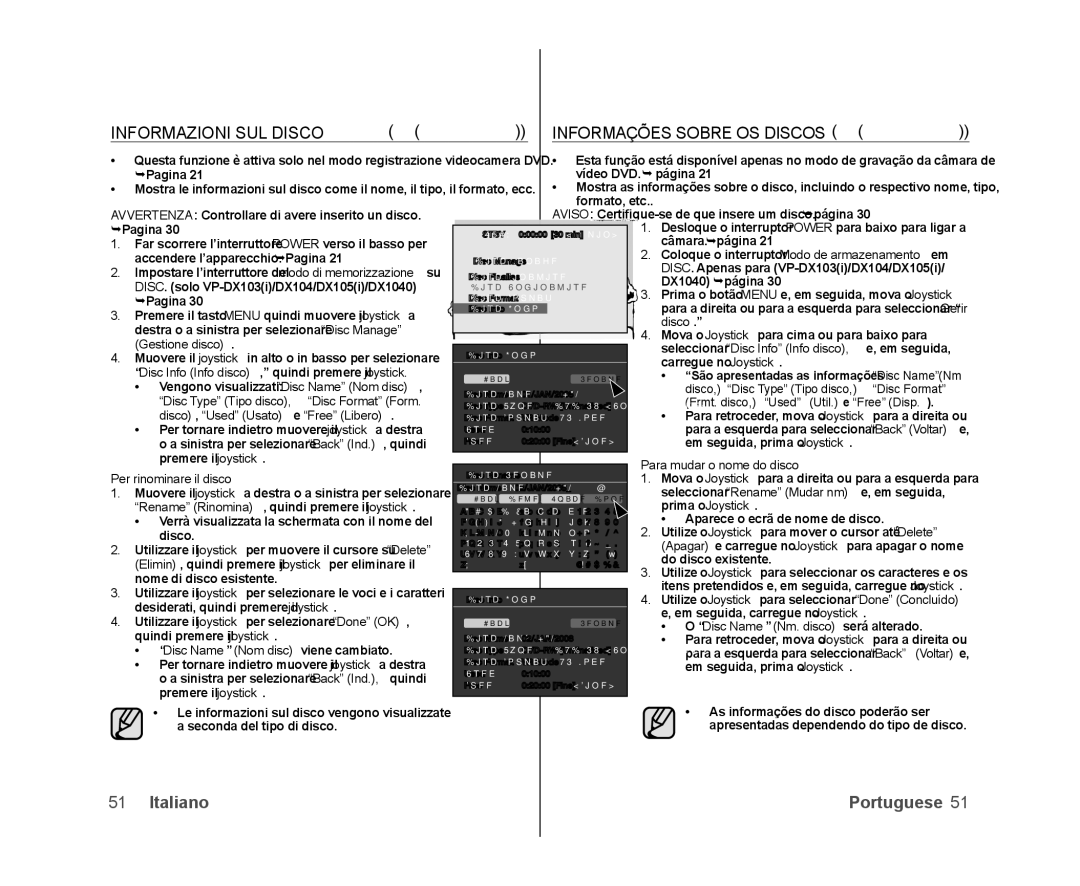
Informações Sobre OS Discos
Informazioni SUL Disco
Di memoria
Inserimento di una scheda
Estrazione della scheda di memoria
Introduzir um cartão de memória
MMCMulti Media Card
Scheda di memoria SD
Avvertenze comuni per le schede di memoria
Impiego della scheda di memoria
Notas sobre a utilização
Nota sull’uso
Tempo di registrazione dei filmati
Tempo Gravável E Número DE Imagens
Numero delle foto registrabili
Tempo de gravação de filmes
Registrazione DI Filmati
Scatto DI Foto Tirar Fotografias
Automaticamente
Premere il joystick
Basso
Utilizzare il joystick per eseguire varie operazioni di
Visualizzazione DI Foto VER Fotografias
Protect Protezione Seleccionar Protect Proteger
Delete Elimina Seleccionar Delete Apag
Eliminazione DI Immagini Eliminar Imagens
Desiderata This File Il file o All Files Tutti i file
This File Este fich Apaga o fi cheiro
Gestione DEI Menu Utilizar OS Menus
Utilizzo delle voci di menu utilizar os itens de menu
Utilizzo del tasto Menu
Utilizar o botão Menu
Itens DE Menu
Voci DI Menu
Voci del menu Registrazione
Itens do menu de gravação
Voci del menu Impostazioni
Voci del menu Riproduzione
Itens do menu de reprodução
Itens do menu de definições
Scene ModeAE Modo scenaAE
Voci DEL Menu Registrazione Itens do Menu DE Gravação
Scene ModeAE Modo cenaAE
Impostazioni Descrizione
Utilizar os itens de menu
Utilizzo delle voci di menu
White Balance Bilan. bianco
White Balance Eq. branco
Exposure Exposição
Exposure Esposizione
Prima o Joystick
Auto
Recomenda-se a exposição manual nas seguintes situações
Anti-ShakeDIS Anti urtoDIS
Digital Effect Effetti digitali
Focus Messa a fuoco Focus Focagem
Shutter Obturador
Shutter Otturatore
Wide
Quality Qualità
Quality Qualidade
Back Light Retroilluminazione
Wind Cut Tagl. vento
Back Light off Wind Cut Anti-Ruído
Back Light Contraluz
Nite
Light Luce solo VP-DX102/DX105i
Light Iluminação Apenas para VP-DX102/DX105i
Dissolvenza a comparsa
Fader Dissolvenza
Dissolvenza a scomparsa
Aparecimento gradual da imagem
Digital Zoom Zoom digital
Digital Zoom Zoom Digitale
Descrizione
File No. N. file solo VP-DX103i/DX104/DX105i/DX1040
Conteúdo
Definições
Itens do Menu DE Reprodução
Voci DEL Menu Riproduzione
Voci DEL Menu Impostazioni
Itens do Menu DE Definições
Date/Time Data/Hora
Date/Time Data/Ora
LCD Brightness Luminosità LCD
LCD Colour Colore LCD
Auto Power Off Deslig. Auto
Auto Power Off Spegnim. automatico
Beep Sound Suono Bip
Beep Sound Sinal sonoro
TV Display Display TV
Remote Telecomando solo VP-DX102/DX104/DX105i/DX1040
AV In/Out solo VP-DX100i/DX103i/DX105i
TV Display Visualizaçã TV
Default Set Predefinição
Default Set Impostaz. pred
Menu Colour Menu Colore
Transparency Trasparenza
Impostazioni Stampa Dpof Definição DE Impressão Dpof
Questa funzione non è disponibile per i fi lmati
Esta função não está disponível para fi lmes
Impostare USB Connect USB connessa su PictBridge. Pagina
Definir o número de cópias a imprimir
Para a esquerda para seleccionar Print Impressão e
Per stampare con l’impostazione Dpof
Definir a opção de impressão de data/hora
Imprimir utilizando a definição Dpof
Dispositivi AV
Collegamento con
Collegamento a UN Televisore Ligar a UM Televisor
Visualizzazione sullo schermo TV
Registrazione 169 Immagini Registrate nel Formato Wide
Supporto di Formato Televisore panoramico
Immagini Registrate nel Formato Wide Off
Filmati
Collegamento con
Registrazione
Prima o botão de início/paragem da gravação no
Registrazione copia su un disco Gravar Copiar para um disco
Per registrare da un televisore
Para gravar a partir de um televisor
Requisitos do Sistema
Requisiti DI Sistema
DV Media Pro
Display
Instalar O DV Media PRO
Installazione DI DV Media PRO
Driver, DirectX 9.0, Video Codec
DV Driver, DirectX 9.0, Video Codec
Indicata DV Driver, DirectX 9.0, Video
Codec DV Driver, DirectX 9.0, Video Codec
Ligar O Cabo USB
Collegamento DEL Cavo USB
Scollegamento del cavo USB
Desligar o cabo USB
Quando si utilizza la funzione Windows
Quando si utilizza Windows XP/Vista
Se utiliza o Windows XP/Vista
Se utiliza o Windows
Formato immagine
Struttura di fi le e cartelle sui supporti di memorizzazione
Strutura de pastas e fi cheiros no suporte de rmazenamento
Formato de imagens
Transferir Ficheiros DA Câmara DE Vídeo DVD Para O PC
Trasferimento DI File Dalla Videocamera DVD AL PC
Connessione ad un PCsolo VP- DX103 i/DX104/DX105 i/DX1040
Manutenção
Manutenzione
Informações Adicionais
Informazioni Aggiuntive
Pulizia e utilizzo del disco
Supporti di memorizzazione
Display LCD
Batterie
Baterias
Descrição dos tipos de disco
Descrizione del disco
Utilizar a Câmara DE Vídeo DVD no Estrangeiro
Utilizzo Della Videocamera DVD ALL’ESTERO
Resolução de problemas
Risoluzione dei problemi
Indicatori e messaggi di avviso
Indicadores e mensagens de aviso
Se durante la
Schede di memoria solo VP-DX103 i /DX104/DX105 i /DX1040
PictBridge Apenas para VP-DX103 i /DX104/DX105 i /DX1040
PictBridge solo VP-DX103 i /DX104/DX105 i /DX1040
Alimentação
Sintomas e soluções
Visores
Sintoma Explicação/solução
Schede di memoria solo VP-DX103i/DX104/DX105i/DX1040
Registrazione
Gravar
Date/Time Data/Ora è impostato su Off
Sintomo Spiegazione/Soluzione
Impostare Date/Time Data/Ora su on
Registrazione e l’istante
Regular a imagem durante a gravação
Regolazione dell’immagine durante la registrazione
Riproduzione sulla videocamera DVD
Reproduzir na câmara de vídeo DVD
Ligar a um computador
Connessione ad un computer
Funzionamento generale
Menu
Operações gerais
Especificações
Specifiche
Italia Italy
Portugal
Contatti Samsung nel Contactar a Samsung em todo Mondo Mundo
Conforme a directiva RoHS
Conformità RoHS