Basic troubleshooting
Verify that the conditions in the following lists are met before troubleshooting a specific MFP problem.
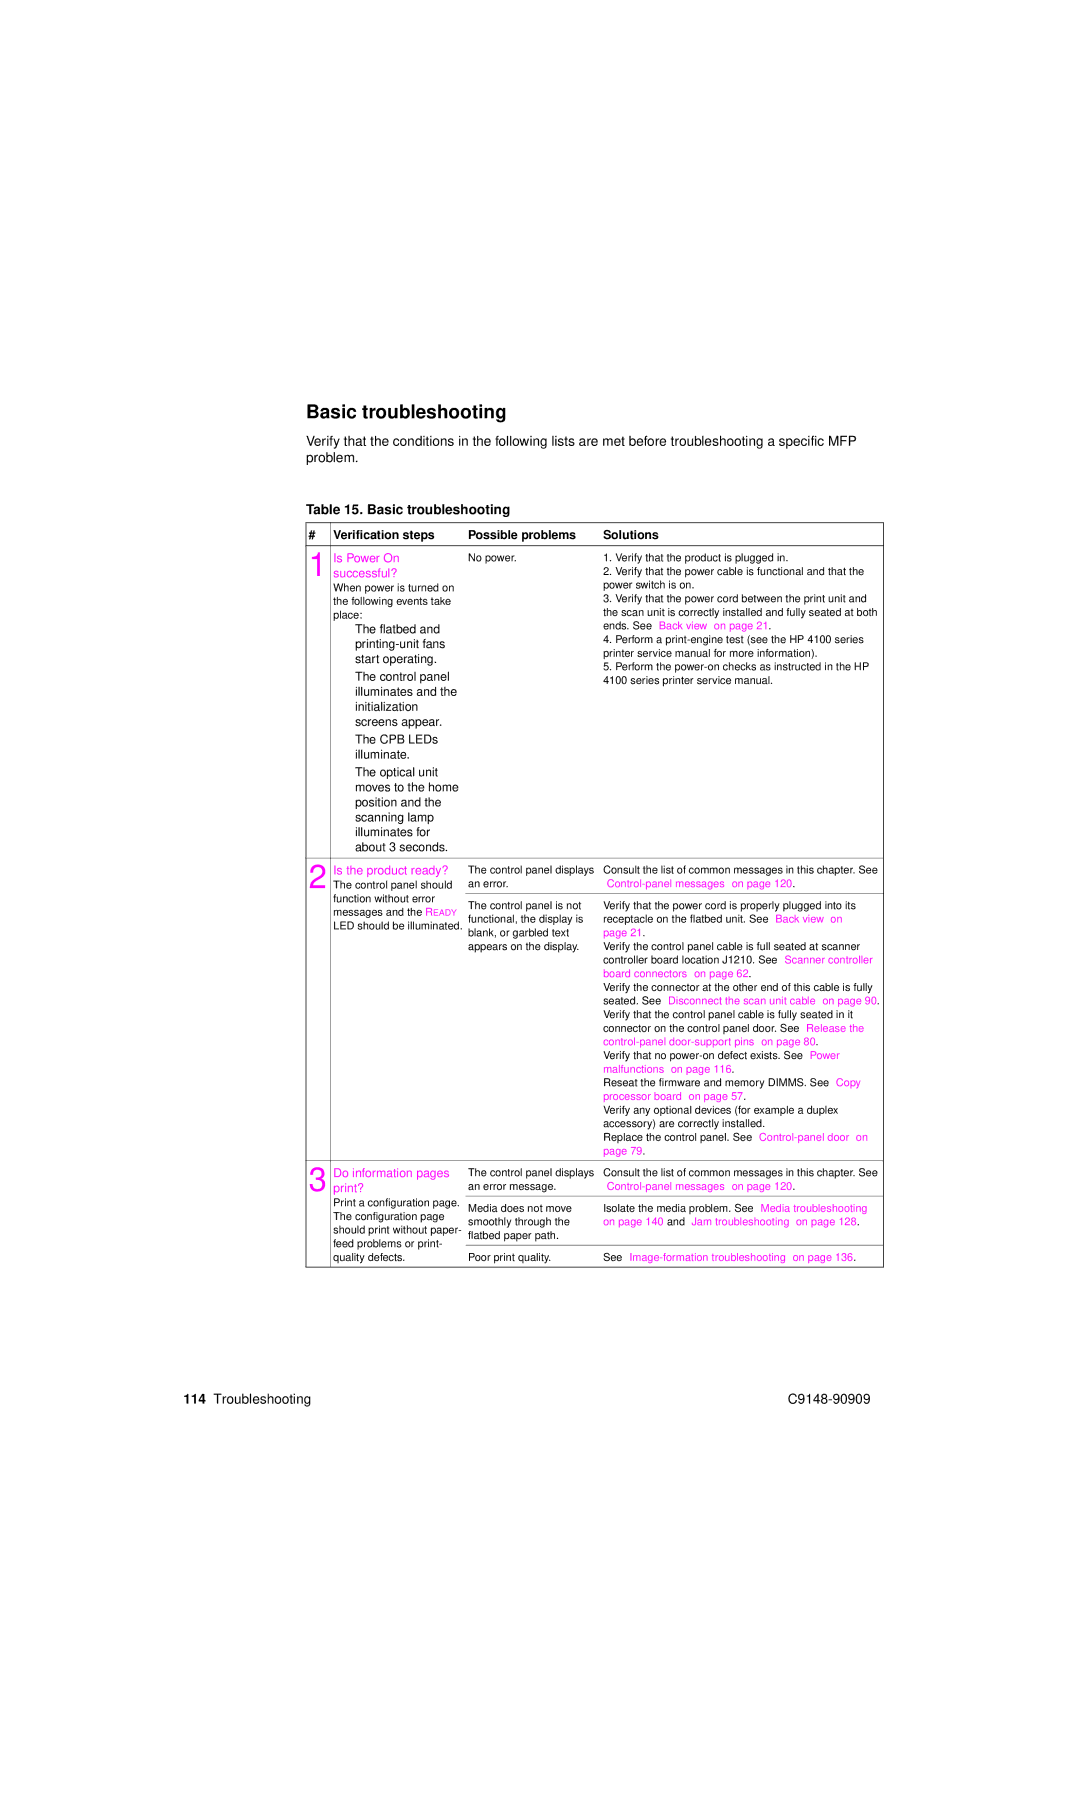
Table 15. Basic troubleshooting
# | Verification steps | Possible problems | Solutions | |
|
|
|
| |
1 | Is Power On | No power. | 1. Verify that the product is plugged in. | |
successful? |
| 2. Verify that the power cable is functional and that the | ||
| When power is turned on |
| power switch is on. | |
| the following events take |
| 3. Verify that the power cord between the print unit and | |
| place: |
| the scan unit is correctly installed and fully seated at both | |
| ● | The flatbed and |
| ends. See “Back view” on page 21. |
|
|
| 4. Perform a | |
|
|
| printer service manual for more information). | |
|
| start operating. |
| |
|
|
| 5. Perform the | |
|
| The control panel |
| |
| ● |
| 4100 series printer service manual. | |
|
| illuminates and the |
|
|
|
| initialization |
|
|
|
| screens appear. |
|
|
| ● | The CPB LEDs |
|
|
|
| illuminate. |
|
|
| ● | The optical unit |
|
|
|
| moves to the home |
|
|
|
| position and the |
|
|
|
| scanning lamp |
|
|
|
| illuminates for |
|
|
|
| about 3 seconds. |
|
|
|
|
|
| |
2 | Is the product ready? | The control panel displays | Consult the list of common messages in this chapter. See | |
The control panel should | an error. |
| ||
| function without error |
|
| |
| The control panel is not | Verify that the power cord is properly plugged into its | ||
| messages and the READY | |||
| functional, the display is | receptacle on the flatbed unit. See “Back view” on | ||
| LED should be illuminated. | |||
| blank, or garbled text | page 21. | ||
|
|
| appears on the display. | Verify the control panel cable is full seated at scanner |
|
|
|
| controller board location J1210. See “Scanner controller |
|
|
|
| board connectors” on page 62. |
|
|
|
| Verify the connector at the other end of this cable is fully |
|
|
|
| seated. See “Disconnect the scan unit cable” on page 90. |
|
|
|
| Verify that the control panel cable is fully seated in it |
|
|
|
| connector on the control panel door. See “Release the |
|
|
|
| |
|
|
|
| Verify that no |
|
|
|
| malfunctions” on page 116. |
|
|
|
| Reseat the firmware and memory DIMMS. See “Copy |
|
|
|
| processor board” on page 57. |
|
|
|
| Verify any optional devices (for example a duplex |
|
|
|
| accessory) are correctly installed. |
|
|
|
| Replace the control panel. See |
|
|
|
| page 79. |
|
|
|
| |
3 | print?Do information pages | an error message. | ||
|
|
| The control panel displays | Consult the list of common messages in this chapter. See |
| Print a configuration page. |
|
| |
| Media does not move | Isolate the media problem. See “Media troubleshooting” | ||
| The configuration page | smoothly through the | on page 140 and “Jam troubleshooting” on page 128. | |
| should print without paper- | |||
| flatbed paper path. |
| ||
| feed problems or print- |
|
| |
|
|
| ||
| quality defects. | Poor print quality. | See | |
|
|
|
|
|
114 Troubleshooting |