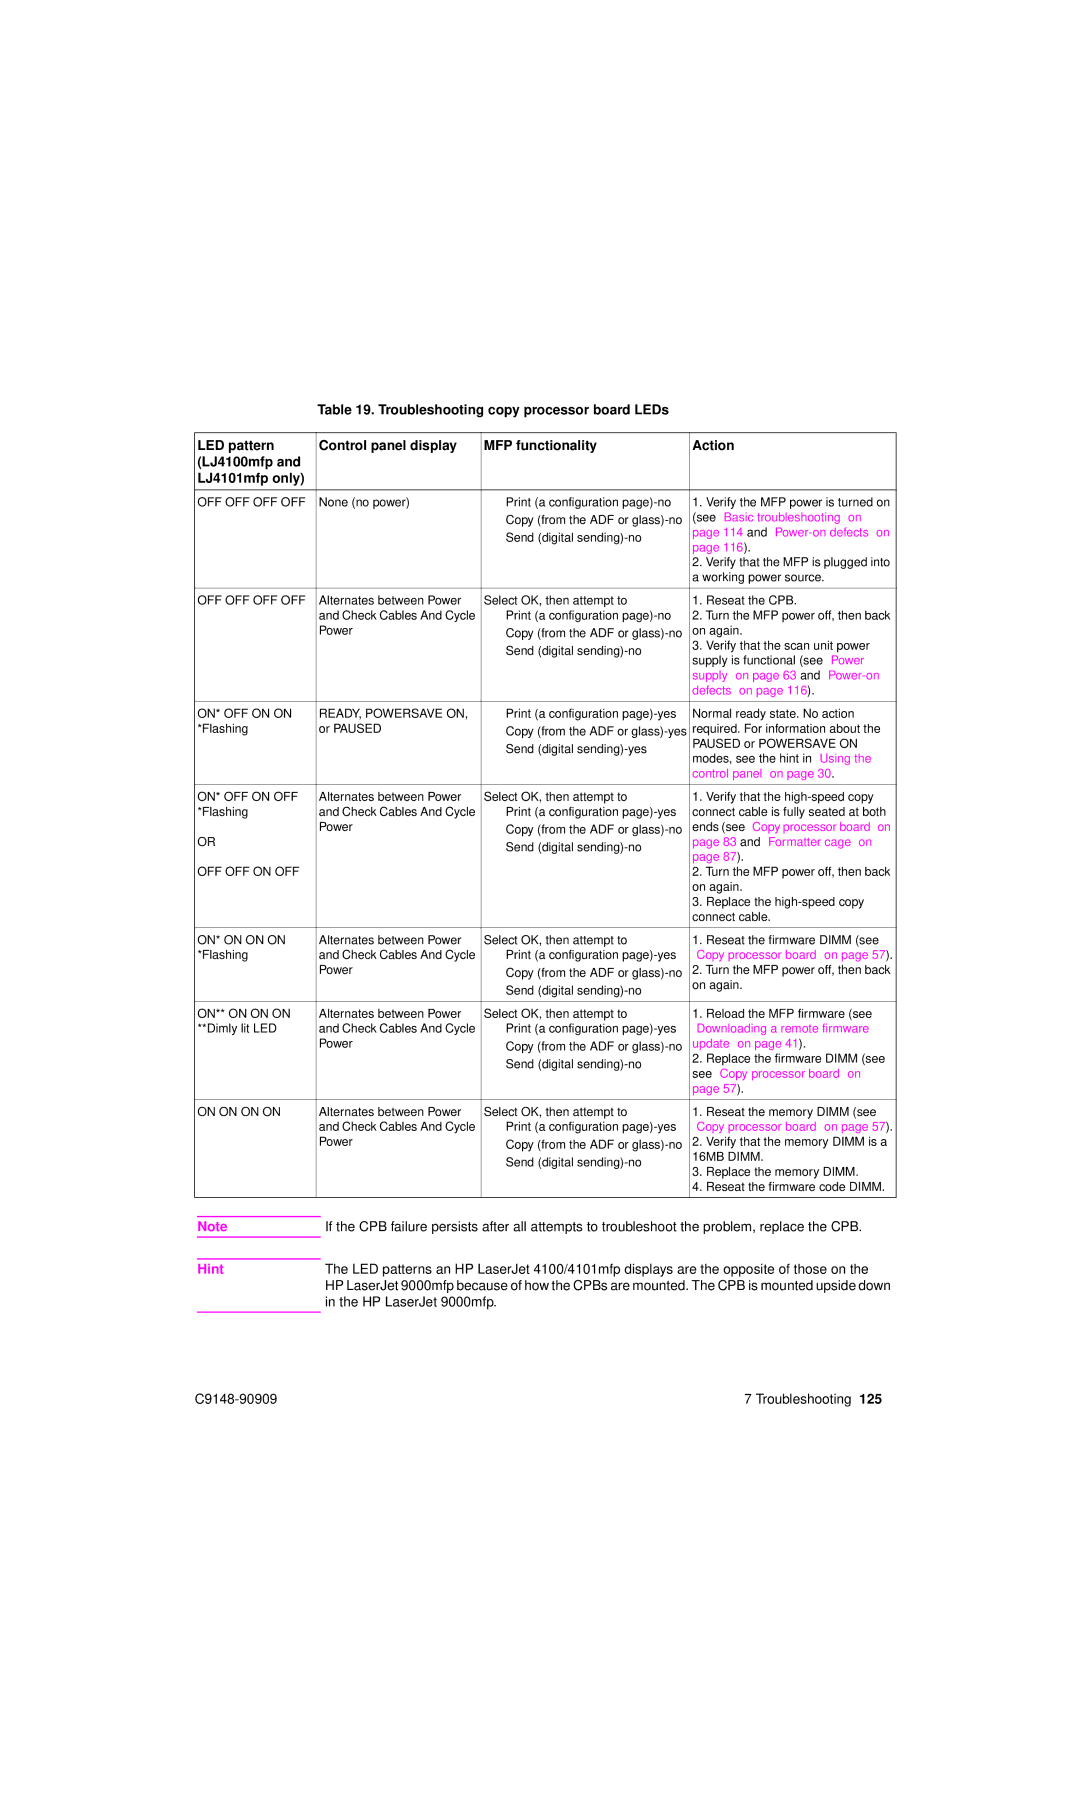
Table 19. Troubleshooting copy processor board LEDs
LED pattern | Control panel display | MFP functionality | Action | |
(LJ4100mfp and |
|
|
|
|
LJ4101mfp only) |
|
|
|
|
|
|
|
|
|
OFF OFF OFF OFF | None (no power) | ● Print (a configuration | 1. | Verify the MFP power is turned on |
|
| ● Copy (from the ADF or | (see “Basic troubleshooting” on | |
|
| ● Send (digital | page 114 and | |
|
| page 116). | ||
|
|
| ||
|
|
| 2. Verify that the MFP is plugged into | |
|
|
| a working power source. | |
|
|
|
|
|
OFF OFF OFF OFF | Alternates between Power | Select OK, then attempt to | 1. | Reseat the CPB. |
| and Check Cables And Cycle | ● Print (a configuration | 2. Turn the MFP power off, then back | |
| Power | ● Copy (from the ADF or | on again. | |
|
| ● Send (digital | 3. | Verify that the scan unit power |
|
| supply is functional (see “Power | ||
|
|
| ||
|
|
| supply” on page 63 and | |
|
|
| defects” on page 116). | |
|
|
|
| |
ON* OFF ON ON | READY, POWERSAVE ON, | ● Print (a configuration | Normal ready state. No action | |
*Flashing | or PAUSED | ● Copy (from the ADF or | required. For information about the | |
|
| ● Send (digital | PAUSED or POWERSAVE ON | |
|
| modes, see the hint in “Using the | ||
|
|
| ||
|
|
| control panel” on page 30. | |
|
|
|
|
|
ON* OFF ON OFF | Alternates between Power | Select OK, then attempt to | 1. | Verify that the |
*Flashing | and Check Cables And Cycle | ● Print (a configuration | connect cable is fully seated at both | |
OR | Power | ● Copy (from the ADF or | ends (see “Copy processor board” on | |
| ● Send (digital | page 83 and “Formatter cage” on | ||
|
| page 87). | ||
|
|
| ||
OFF OFF ON OFF |
|
| 2. Turn the MFP power off, then back | |
|
|
| on again. | |
|
|
| 3. | Replace the |
|
|
| connect cable. | |
|
|
|
|
|
ON* ON ON ON | Alternates between Power | Select OK, then attempt to | 1. | Reseat the firmware DIMM (see |
*Flashing | and Check Cables And Cycle | ● Print (a configuration | “Copy processor board” on page 57). | |
| Power | ● Copy (from the ADF or | 2. Turn the MFP power off, then back | |
|
| ● Send (digital | on again. | |
|
|
|
| |
|
|
|
|
|
ON** ON ON ON | Alternates between Power | Select OK, then attempt to | 1. | Reload the MFP firmware (see |
**Dimly lit LED | and Check Cables And Cycle | ● Print (a configuration | “Downloading a remote firmware | |
| Power | ● Copy (from the ADF or | update” on page 41). | |
|
| ● Send (digital | 2. | Replace the firmware DIMM (see |
|
| see “Copy processor board” on | ||
|
|
| ||
|
|
| page 57). | |
|
|
|
|
|
ON ON ON ON | Alternates between Power | Select OK, then attempt to | 1. | Reseat the memory DIMM (see |
| and Check Cables And Cycle | ● Print (a configuration | “Copy processor board” on page 57). | |
| Power | ● Copy (from the ADF or | 2. | Verify that the memory DIMM is a |
|
| ● Send (digital | 16MB DIMM. | |
|
| 3. | Replace the memory DIMM. | |
|
|
| ||
|
|
| 4. | Reseat the firmware code DIMM. |
|
|
|
|
|
Note
Hint
If the CPB failure persists after all attempts to troubleshoot the problem, replace the CPB.
The LED patterns an HP LaserJet 4100/4101mfp displays are the opposite of those on the HP LaserJet 9000mfp because of how the CPBs are mounted. The CPB is mounted upside down in the HP LaserJet 9000mfp.
7 Troubleshooting 125 |