Issue 3 July
Issue
Table of Contents
Hardware Installation
LAN Connections
General LCS60 Software Configuration
PPP Configuration Administration
LCS60 Configuration and Connection for PPP Service
LCS60 Configuration and Connection for Arap Service
Slip Configuration Administration
Arap Configuration Administration
LCS60 Configuration and Connection for Slip Service
Lcsadm Interface
Gateway Services Configuration Administration
User Information
Basics Logging On
Maintenance
StarKeeper II NMS
Originating Group Security
Manual Pages
User Error Messages
Software Installation Fujitsu or Seagate ST5660N Drive
Reload System Software Unix System Software Installation
Glossary
User Information
Index
Index
Figures
Figure F-8 PPP Connection Screen
Tables
Table of Contents Xiv Issue
Screens
Page
LAN Protocols
Document Organization Reference Documentation
Overview
Network Security Copy Protection
Remote Access Protocols
IP Address Assignment by the LCS60 Hardware Features
Multiple IP Subnetworks
Manual Pages Customer Assistance
Table of Contents Issue
Document Organization
User Information
Software Installation
Reference Documentation
Man Pages
Gateway References
Apple References
Other References
Overview
PPP References
Slip Reference
Benefits
Simple Network Management Protocol Snmp
LAN Protocols
Domain Name Server DNS Resolver
Supported Traps and MIBs
AppleTalk Protocol
Routing Information Protocol RIP
LCS60 as an AppleTalk Router
AppleTalk Network Number and Zone Assignment
IPX Virtual Network Assignment
IPX Protocol
TCP/Async Gateway Service
Remote Access Protocols
Serial Line IP Slip
TCP Service Ports
Van Jacobson TCP/IP Header Compression
Point-to-Point Protocol PPP
Compressed IPX Header Cipx
AppleTalk Remote Access Protocol Arap
Multiple IP Subnetworks
IP Routing
IP Routing with the LCS60
Security Groups
IP Address Assignment
Enhanced Processor
Hardware Features
IP Address Assignment by the LCS60
Fiber Interface
Network Security
Copy Protection
Administration
Backup/Restore
Centralized Network Management
R3.0 Upgrade
Remote Upgrade
Online Manual Pages
Manual Pages
Customer Assistance
Where command is the name of the command
Site Preparation
Assembly
Installing the LCS60
Introduction
Ethernet
Configuration of the Lucent Technologies Data Switch LCS60
Power and Grounding
LAN Connections
Introduction
Controls and Indicators
Lists the LCS60 controls and indicators
Board Indicator Function
Controls and Indicators
Controls Location Switch Function
Indicators
Specifications
Cabling
Space Requirements
Required Additional Equipment
EMI Considerations
Required Equipment
Rack Mounting
Assembly
Installing the LCS60
Unpacking
Hardware
Table-Top Mounting
Wall Mounting
9600 bps Baud Rate ⎜ Flow Control
Connecting the System Console
System Console and Port Configuration
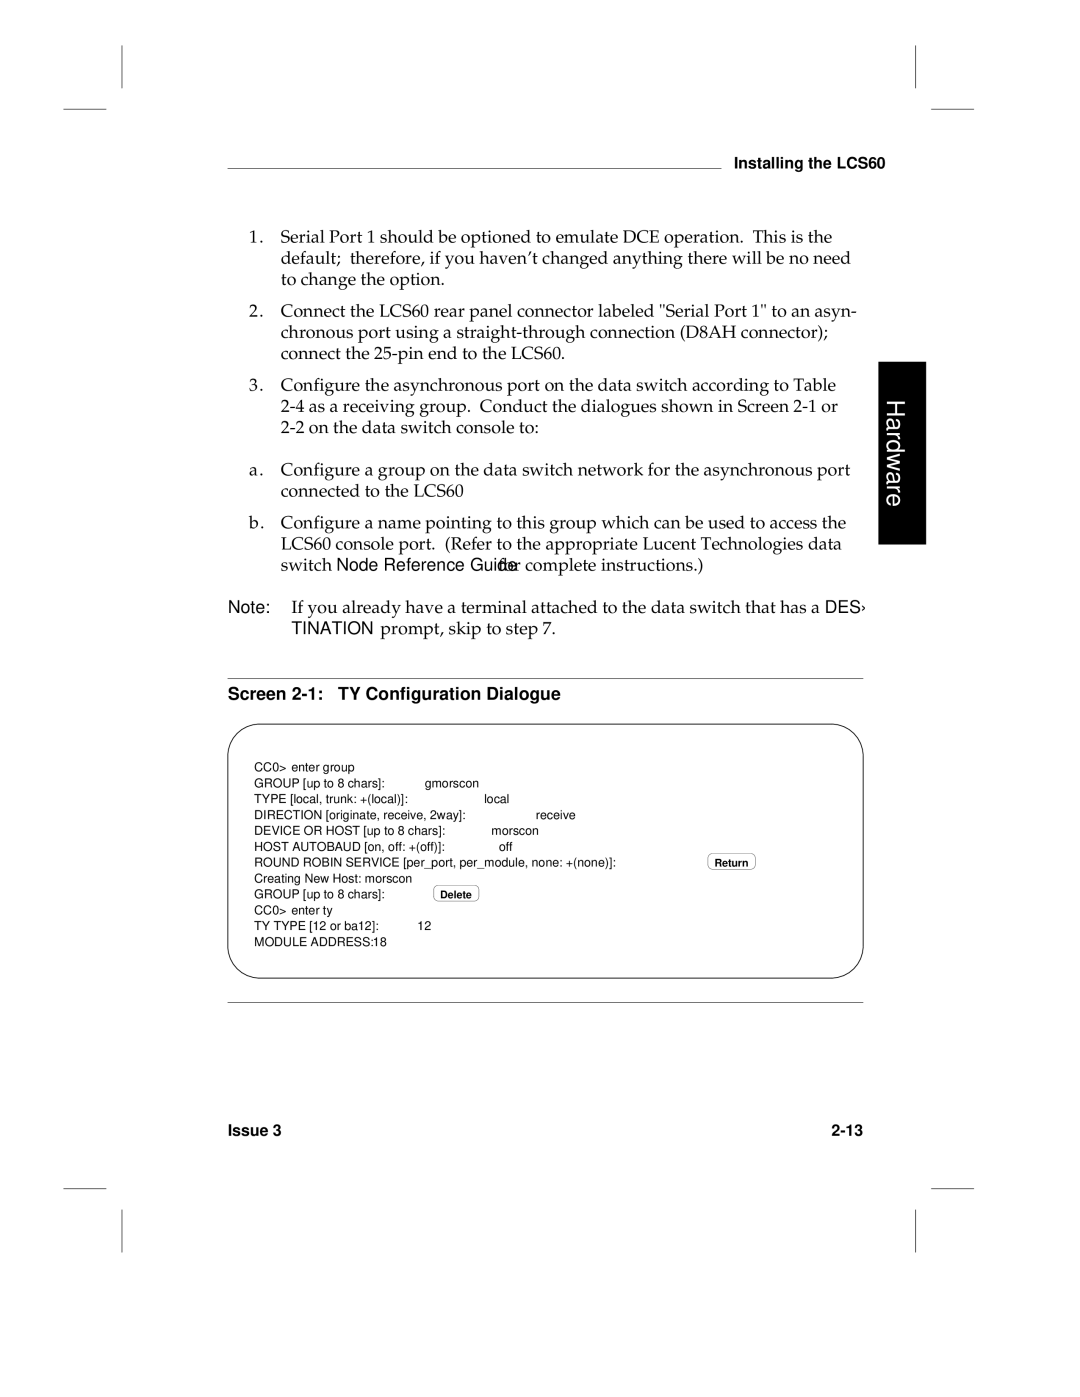
Serial Port Optioning DTE/DCE
MVME712M Module Optioning
Non-Default Optioning
RS-232 Interface
Direct Connection to the LCS60
Connection through a Data Switch
Module Address
Screen 2-1 TY Configuration Dialogue
CC0 enter group
CC0 enter ty
Screen
Screen 2-2 MSM Configuration Dialogue
CC0 enter msm
CC0 restore msm
Asynchronous Terminal Data Switch
Connection through StarKeeper II NMS
Connection through Modems
System Console Connections through StarKeeper II NMS
Routing the Optical Fiber Cable
Connecting the Fiber Interface
Installing the CPM-HS Module and Optical Fiber Cable
LCS60
Define the Local Address for the LCS60
Dialogues Enter Group Name
Morse
Level Enter local Type Enter mnemonic
Name of the LCS60
Directory entry
Configure the CPM-HS Module
Service state
Address
Power-Up Procedures
Power and Grounding
LCS60 Rear Panel AC Connections
Etc/shutdown -g0 -y
Power-Down Procedures
Reboot
Verify LCS60 Console Connection
Verify Fiber Connection
Ethernet
Configure the LCS60
Configure the LCS60 as directed in Chapters 3 through
LAN Connections
LAN Connections
Starting the LCS60
Base Level Backup
Table of Contents
Example Network
Preliminary Hardware Requirements
LCS60 Software
Preliminary Configuration Requirements
Step
Initial Setup
Specific Services
Initsetup
Screen 3-1 LCS60 Top Directory
== morse
LCS60 ID
Software KEY Configuration Parameters
LCS60 Software
⎜ Service Command
Protocol and Services Commands
Srvsetup
Configure Protocols and Gateway Services srvsetup
PROTOCOL/SERVICES to be Started When Booting
Configure Protocols and Gateway Services srvsetup
== tcpasy
LCS60 and Service Session Parameter Configuration Menu
== asytcp
LCS60 Software
LCS60 Software
LCS60 Software
Reserved IP Addresses for Slip and PPP Services
LCS60 Software
Virtual Node Number Virtual Network Zone Name
Configure Address and Zone for Appletalk Virtual Network
TCP/IP Ethernet Interface Configuration Menu
Virtual Network Number
== m-net0
== morse-e0
== ethernet
IPX Configuration Management
Ethernet Configuration Parameters
Virtual PPP Configuration Parameters
Configure Default Route, DNS, and Snmp
NEW
Default Route dftroute
Default Route Functions
Domain Name Server dns
Domain Name System DNS Configuration
Snmp Manager snmp
Simple Network Management Protocol Snmp Configuration
Starting the LCS60
Base Level Backup
Configuration Commands Config Directory
Configuration Changes
Administrative/Maintenance Commands Config Directory
Administrative and Maintenance Commands
Administrative and Maintenance Commands
LCS60 Configuration and Connection For PPP Service
Administration
Table of Contents Issue
Shows an example network using PPP service
LCS60 Configuration and Connection for PPP Service
Configuring PPP Service for IP, IPX, and AppleTalk
Screen 4-1 Configure IP Network Security Group Example
Enter the lcsadm interface Add the PPP service
Enter protocol from Config or config protocol from Top
Screen
Screen 4-2 Configure Reserved IP Address Example
PPP
Screen 4-3 Configure IPX Parameters Example
Screen
Virtual PPP Configuration Parameters
Screen 4-4 Configure AppleTalk Virtual Network Example
== Research Lab
Screen 4-5 Configure the Ethernet Interface Example
PPP Service Connection Dialstrings
PPP
Privately Administered Static IP Address
Reserved IP Address
Destination mlkway/earth/morse.ppp..-uhartnell
Dynamically Assigned IP Address
For example
Following screen shows how to check
Show Session Examples
All
TopSession# show ppp 1.1 ip
Call Trace Example
Peer
# pg /usr/adm/lcs/ppp.log
Related Commands
Log File
PPP
LCS60 Configuration and Connection For Slip Service
Table of Contents Issue
Shows an example network using Slip service
LCS60 Configuration and Connection for Slip Service
Configuring Slip Service
Screen 5-1 Configure IP Network Security Group Example
== Library
Screen 5-2 Configure Reserved IP Address Example
Techs Quit
Screen 5-3 Configure the Ethernet Interface Example
== m-net0
Header Compression in Chapter
Slip Service Connection Dialstrings
Used
Privately Administered IP Address
IP address is requested. This is not required when a NAC is
Identifies the user either user name or numeric ID for whom
Reserved IP Address
Destination mlkway/earth/morse.slip..154.12.23.11
Destination mlkway/earth/morse.slip..-uhartnell
Destination mlkway/earth/morse.slip
Following screen shows an example of the stop slip command
Stop Example
# trace slip
Errors
For Slip connection errors, refer to Appendix C
Top# stop slip
# pg /usr/adm/lcs/slip.log
∙ ping ∙ netstat
Slip
Arap Service Connection Dialstring
LCS60 Configuration and Connection For Arap Service
Table of Contents Issue
Shows an example network using Arap service
LCS60 Configuration and Connection for Arap Service
Configuring Arap Service
Virtual Node Number
Screen 6-1 Configure AppleTalk Virtual Network Example
Screen
Destination mlkway/earth/brown.arap
Arap Service Connection Dialstring
Show Service Example
CRC
Show Session Example
Top session
# pg /usr/adm/lcs/arap.log
∙ atping ∙ atnetstat ∙ atlog
Arap
Service Ports Trace TCP/Async Error Messages Log Files
Gateway Services
Table of Contents Issue
Shows an example network using gateway services
LCS60 Configuration and Connection for Gateway Service
Gateway
Enter a number in the range 1024
== telnet
Screen 7-1 Gateway Service Configuration Example
TCP-TO-ASYNCHRONOUS Gateway Service Configuration Menu
== directory
Nohup
SID
Press Return to continue ==
== wimsey
== socket
Disabled
Telnet Service
Access to Gateway Services Dialstrings
An example is shown in the following screen
Inactivity Timeout Option
Hosts daytime TCP service, the user would specify port
Port
Return to Destination Option
Are accessed by the telnet and/or socket service
User Information
Destination earth/brown.telnet Telnet open
Async-to-TCP Gateway Service
Destination earth/brown.telnet..moon
TCP-to-Async Gateway Service
$ telnet brown
Uucp Feature
Data Switch to LCS60 to LAN
For tcpsock would be
# lcsadm Top # config srvports
LAN to LCS60 to Data Switch
Example Uucp Service Using SunOS
Usr/etc/rfsaddr -h 60name
Example Uucp Service Using NCR
TopPorts disable
Service Ports
Following screens show a variety of port commands
Conn
Error Messages
Trace TCP/Async
Following screen shows a typical trace
⎜ Log File Information Directory
Gateway Services Log Files
Log Files
Lcsadm Interface
Typical Administrative Tasks
System Console Remote Administration
Basics Logging On
Status Error Messages
Backup and Restore Operations
Network Access Password Option
Logging On
Basics
# cd /etc/opt/dk/srvtab
Remote Administration
System Console
Edit the file lcsadm Delete the # sign from the line
# lcsadm
Lcsadm Interface
# dkcu mlkway/earth/morse.lcsadm
Need information e.g., help start
Common Commands
This command exits the lcsadm interface
Help
Top# manager
Initial System Setup initsetup
Top Directory Commands
Screen 8-1 Top Directory
Stop ? ⎪ dkhost ⎪ ipx ⎪ tcpip ⎪ atalk ⎪ slip ⎪ ppp ⎪ snmp ⎪
Routed ⎪ asytcp ⎪ tcpasy ⎪ arap ⎪ all
Start/stop Command Dependencies
Session Directory Commands
Screen 8-2 Session Directory
Following commands are available from the Session directory
TopSession# show ppp 1.1 atalk
Name trace Synopsis
Screen 8-3 Ports Directory
Ports Directory Commands
Disable port# port#2
Top service
Service Directory Commands
Screen 8-4 Service Directory
Following commands are available from the Service directory
Flush service-type service-type
Manager Directory Commands
Top manager
Following commands are available from the Manager directory
Screen 8-5 Manager Directory
Screen 8-6 Server Directory
Following commands are available from the Server directory
Arap Ppp Slip Asytcp Atmgr Tcpasy Lcm
Config Directory Commands
Top config
Screen 8-7 Config Directory
Name subnet Synopsis subnet
LCS60 ID Software KEY Configuration Parameters
Administration
Typical Administrative Tasks
YES LCS60
Log Level Example
Change the Default Route Example
System Console Parameters- Autobaud
Following screen illustrates the summary commands
System Console Configuration Parameters
Summary Output Examples
Backup and Restore Operations
Generic vs. Variable Files
Screen 8-8 LCS60 Backup and Restore Configuration Menu
# lcsadm config backup
LCS60 Backup and Restore Configuration Menu
To Back Up to Tape
Backup/Restore Tape Local Mode
Local and Remote Modes
Tape Backup Management Menu
Screen 8-9 Backup/Restore Menu
Screen 8-10 Tape Backup Management Menu
BACKUP/RESTORE Menu
To Restore from Tape
To List the Contents of a Tape
Centralized Backup/Restore Remote Mode
Security Authorizing Clients and Servers
Centralized BACKUP/RESTORE Menu -- Server
Access to Backup/Restore Functions Clients Servers
Screen 8-11 Centralized Backup/Restore Menu Server
Changing a Client to a Server
Defining Backup/Restore Servers on a Client
Screen 8-12 Centralized Backup Server Definition Menu
Centralized Backup Server Definition Menu
== mlkway/earth/brown
Defining Backup/Restore Clients on the Server
Screen 8-13 Centralized Backup Client Definition Menu
Centralized Backup Client Definition Menu
Changing a Server to a Client
Backup or Restore Functions
Screen 8-14 Centralized Backup Operations Menu
Backup/Restore Functions
From a Server
Screen 8-15 Centralized Backup Operations Menu Server
Centralized Backup Operations Menu -- Server
== backup1
== brown
Restore from server example follows
Creating a Tape
Network Access Password Option
Screen 8-16 Tape Backup Management Menu Server
Tape Backup Management Menu -- Server
$ telnet
# useradd -u444 nap # passwd nap
Status
Deleting the Network Access Password
Changing the Network Access Password
New password will become effective immediately
LCS60 Status Report
Error Messages
Hardware Error Messages
Error Messages from the LCS60 Fiber Interface
Console Error Messages
Optical connection between the receiver on the Vmedkhs
Switch. Try manually restarting the interface
When the condition has been cleared
Switch network through the CPM-HS. This condition should be
Server Error Messages
Call Error Messages
# pg /var/opt/dk/log/dksrvlog.morse
Lucent Technologies Data Switch Server Log File
Additional Log Files
⎜ Log File
⎜ tcplisten.log ⎜ TCP-to-Async service
Log Files
Administration
Reload System Software
Installing an Upgrade on a Remote Upgrade Client
After the Dump is Completed
Vmedkhs Diagnostics Connection Verification
Memory Dump
Seagate ST11200N
Unix System Software Installation
Reload System Software
Seagate ST5660N
?RETURN
Screen 9-1 How to Enter System Responses
NCD
1GB Scsi Seagate
Continue with the dialogue as shown in the screen below
Do not enter bo 0
# pkgadd -d /dev/rmt/ctape1
UFS Utility Fixes Tape Installation
Screen 9-2 UFS Utility Fixes Maintenance Tape Installation
Remove the tape once you have completed the installation
# pkgrm inet
Inet Package Removal
Screen 9-3 inet Package Removal
Indicates that the inet package has already been removed
LCS60 Application Software Installation
Screen 9-4 LCS60 Application Software Installation
Important Notice
System is Being Shut Down NOW
# /etc/shutdown -g0 -y
Unixr MP
Removing the LCS60 Application Software
# pkgrm lcs60
Screen 9-5 LCS60 Application Software Removal R2.0 Example
Vendor AT&T-LC
Upgrade
# pkginfo -l lcs60p
Installing an Upgrade on a Remote Upgrade Client
Remote Upgrade
Remote Upgrade Installation Menu
# pkgadd -d /var/spool/pkg
⎜ a
Processor Board Firmware Update
⎜ N
⎜ B
⎜ 0D
Processor Board Firmware Update
⎜ Reset Local System CPU Y/N?
Bugset
Screen 9-6 set and env Commands
Processor Diagnostics MVME197
Mask
Ecdm
HEX
Lanc
Vmedkhs Diagnostics
CC0 rem cpm CC0 diag cpm
Screen 9-7 Example diag cpm for CPM-HS Module
CC0 res cpm CC0 display conn mod
Diagnostic Exits
Connection Verification
LCS60 to Data Switch Connected Host Verification dkcu
Dkcu mlkway/earth/morse
LCS60 to Data Switch Verification Loopback Test dkcu
LCS60 to Local Ethernet Host Verification ping
Dkcu mlkway/earth/watson
Memory Dump
Screen 9-8 Service Menu
At the root prompt, remove the tape from tape drive
After the Dump is Completed
Cd /stand Echo unix ⎪ cpio -oBc /dev/rmt/ctape1
Srvtab
Originating Group Security
Table of Contents Issue
Server Table
Srvtab
These fields are described below
System Field
⎜ hyphen Null generally login ⎜ arap
Service Field
⎜ File Service
Table A-1 Server Table Flags
Flags Field
Table A-1
User Field
Table A-2 User ID Mapping Options
Program Field
Initial Parms Field
Table A-3 Program Arguments Specification
Table A-3
Server Table Scanning Rules
Server Table Validation and Matching
Modifications to the Server Table
Appendix a
Alarms to StarKeeper II NMS
Configuration of the StarKeeper
Table of Contents Issue
Diskette or Tape Installation
Configuration of the StarKeeper II NMS
For HP
For
Hardware
Then execute the following four commands
Enter i Return when you see the following
Enter /usr/bin/installpkg then enter F to install
Support for AT&T 6386 into the disk drive when instructed
At Release enter
StarKeeper II NMS Configuration Commands
To indicate that StarKeeper
If you are ready for StarKeeper
Alarms to StarKeeper II NMS
Description The inetinit process is not executing
Action Reboot the system cd / /etc/shutdown -y -g0
Description The tlid process is not executing
L600730 Process ipxd is down
StarKeeper II NMS
Slip Sessions
User Error Messages
Table of Contents Issue
Access denied
Cable Error Message
Outgoing Call Error Messages
Auto dialer failed to initiate call. Try again
Address too long
All channels busy
All trunk channels busy
Could not complete your call. Try again
Dial to vlp error
Dialer error
Dkserver Cant open line. Call System Administrator
Dkserver Cant push your streams module
Dkserver Dksrvtab not readable. Call System Administrator
Dkserver Cant chroot. Call System Administrator
Error During Call SETUP. Call System
Endpoint hung up
Host configuration mismatch. Call Network Administrator
Host protocol error
Dkserver Call on a busy device or call collision, try again
Insufficient CIR at module
Network congestion--Call forward error. Try again later
Network congestion--Call timeout. Try again
Network congestion--Connection error. Try again later
Network hung up
Network routing error
No diagnostic channel
Open channel error
Remote node not answering
Service mismatch
SIM no access
Receive window too small
Incoming Error Messages
Slip Sessions
Ip address IP address is invalid
Ipaserrno=error number
Slip is temporarily disabled
Missing -s %h option in dksrvtab4 slip file
Mtu=MTU size, must satisfy 296 = mtu =
Seagate ST5660N Drive
Reload System Software Unix System Software Installation
Table of Contents Issue
Unix System Software Installation
If you have a Seagate ST11200N drive, refer to for Unix Sys
Screen D-1 How to Enter System Responses
Appendix D
Add the following line to the file
NCD
See note below
Return
Appendix D
Manual Pages
Table of Contents
Statlcs Telnet
Table of Contents Issue
Atping1M
Atlog Atlog 1M
Atlog -d loglevel -t enprz0
Atnetstat 1M
Atnetstat Atnetstat 1M
Atping -dsec net.node packetsize count
Atping 1M
Usr/etc/atping Usr/etc/atlog Usr/etc/atnetstat
Atping Atping 1M
˜ !cmd ˜ $cmd ˜ %take from to
Dkcu 1C
˜ ˜ Send the line ˜ . . . to the remote system
Opt/dk/bin Directory in which this command resides
Transmit a Break to the remote system
Opt/dk/sbin
Common Signaling Channel device for interface
Dkmaint 1M
Dkmaint r i interface c channel
Wwsize
FTP
FTP
Append local-file remote-file
Account passwd
Allbinary
Disconnect
Binary
Debug
Macdef mname
Macls mname
Macdel mname
Prompt
Nmap inpattern outpattern
Ntrans inchars outchars
Open host port
Rename remote-file new-name
Proxy ftp-cmd
Put local-file remote-file
Quote arg
Site arg
Rstatus file
Runique
Sendport
Verbose
System
Umask mask
Chmod1, umask1
Netrc4, services4
Join addr
Ifconfig Ifconfig 1M
Broadcast addr
Hostgroups
Netstat1 Inetinit.cf4
Metric n
Mtu mtu
Netmask mask
Ifstat Ifstat 1M
Ifstat -adfstz-linterval config file cntrlr num
Etc/ifstat.conf
Linterval
Ifstat Ifstat 1M
Count
Iftrace 1M
Iftrace gdpbhrtn f diskfile i count keywords
Diskfile
Keywords
Iftrace Iftrace 1M
Ipxping1M
Ipxnetstat 1M
Ipxnetstat -ir dv -p rip ⎪ ipx interval
Etc/lcs/ipxas.cf Usr/etc/ipxnetstat
Usr/etc/ipxping Usr/etc/ipxnetstat
Ipxping Ipxping 1M
Ipxping networknode packetsize count interval
Netstat -AainrsSv-p protocol interval
Netstat
Named1M, route1M, routed1M
Hosts4, networks4, protocols4, services4
Help
Nslookup
Nslookup host server nslookup server
Host server
Nodebug
Server host lserver host
Noaaonly
Nod2
Root=host
Timeout=x
Norecurse
Retry=x
Named1M Resolver3 Named.boot4, resolv.conf4
Ping -r-vhost packetsize count
Netstat1 Ifconfig1M
Ping 1M
Long Names
Symbolic Links
Pull Pull 1C
Pull L destination filename ... directory
Multiple Interfaces
Push lxho9 /tmp/two ! a/b D/e
Push Push 1C
Push lxho9 a/b c a/d/e /tmp/one
Creates files /tmp/one/b, /tmp/one/c, and /tmp/one/e, while
Symbolic Links
Local machine will be used as the file modification time
Route flush net⎪host
Route 1M
Route Route 1M
Usr/etc/statlcs
Statlcs 1M
Statlcs -t
Crmod
Telnet
Telnet -ec-8 host port
Linemode
Help command ? command
Negotiate command option
Escape c
Options
Transnvt command
Open -ec-8host port
Telnetd4
Slip Service Examples
Introduction Client Software Configuration
PPP Service Examples
Connection via Modem
Arap Service Example
All users
Client Software Configuration
Users with a NAC security server
Client Packages
Mac Connection CCL Script
@ORIGINATE
Screen F-1 CCL Script Example
Screen F-1
Exit
USERID, Password
CCL and Modem Hints
Nj/exch/system.ppp
Be sure you dont have conflicts with existing label numbers
PPP Service Examples
Windows 95 IPX over PPP
Modem
PC Configuration
Figure F-1 Windows 95 IPX Over PPP Example Screens
Destination mlkway/earth/morse.ppp
PPP Connection
Screen F-2 Sample LCS60 dialup.scr
Screen F-2
Figure F-3 PC/TCP Example Screens
14400 154.12.22.81
Connection
InterPPP
User Information
Figure F-5 Network Control Panel
Figure F-7 IP Address Screen
Figure F-9 AppleTalk Status Window
Figure F-8 PPP Connection Screen
ChameleonNFS
Slip Service Examples
Figure F-11 Custom Setup Window
TYPE=SLIP SLIP1
Default
Screen F-3 slip.ini File Fragment
TYPE=SLIP SLIP0
Connection via Modem
Arap Service Example
Information
Figure F-15 Arap Remote Access Setup Modem Example
Figure F-16 Arap Remote Access Status Screen Example
User Information
Report Fields
General Parameters
Table of Contents Issue
General
Glossary
Network
Interface
Internet
IP Network
AppleTalk Network/Zone atalkas
Parameters
Ethernet Interface etherif
DNS Resolver dns
Define Service Sessions maxsessions
SLIP/PPP Service ipas/ipx
TCP-to-Asynchronous Gateway Services srvports
Subnetwork Configuration subnet
Sesid Session ID number
Report Fields
Session Directory
Show Arap
Show Slip
Time Idle Time
Char Mode
Show Async/TCP
Connect
Show PPP Link, IP, IPX, AppleTalk
Peer Addr
Magic
Proto Comp
Addr Comp
Trace Arap
Trace Async/TCP
Trace Slip
Trace PPP
Show Statistics
Show Configurations
Ports Directory
Show
Service Directory
Summary
Max
Cfg
Use
Cap
Psid #
Service Name
Manager Directory
Server Directory
Server Name #
Inuse
Startup Time
Index
Index Issue
Index
Backup, 8-18,see Backup/restore
Async-to-TCP gateway service
Authentication
Autoboot reset
Network security group, 4-3,5-3
PPP, F-2 Mac, F-1
Data switch, G-1
Data switch
Installation
D8AH connector, 2-13,2-18
Server log file
Index
Dialstrings
Ifconfig, E-19
Index
Maintenance, 9-1,D-1
Local backup/restore
Login, A-3
Configuration, F-1,F-22
Example, F-13
NAC
Index
RS-232 connections, 2-4,2-9 to
Routing IP packets
SID
Index
Restore from
How to enter, 9-2,D-2
Backup to
List contents
Version
LCS60 console connection
Index