Installation Manual
Page
Setting up
Pick an installation spot
Power tips
Unpacking
Attaching the 2nd paper cassette
Unpacking
Installing 2nd paper cassette
Joining Scanner unit and Printer unit
Affixing the Function icon label
Installing the printing supplies
Installing the drum cartridge
Installing the toner bottle
Plug in and power up
Turn off the transport mode
Paper size and type input
Loading paper
Paper size and type input for 1st cassette
Paper size input for the 2nd paper cassette
Select paper
Plain
Copy Ready 100% Set
Initial setting
Clearing stored settings
Entering initial settings
Tone
1Head Office
Fax Ready
Affixing the labels
Changing paper size of the 2nd paper cassette
North American Version Letter European Version A4
Page
D84-90510-60
EasyStart Initial setting
Clearing stored settings
Entering initial settings
Language settings
1Muratec
How to set the document
How to set the document
Acceptable document size
Things not to put in your fax
Basic copy features
Adjust image contrast
Copy Features
Some guidelines
Select document type
When scanning the document using the FBS Flatbed scanner
When scanning the documents using the ADF
Scanning the document
Reset the settings
Select paper
Rotate copy
Interrupt
Basic procedure
Reduce/Enlarge with a preset rate
Reduce / Enlarge
Auto Reduce/Enlarge
Zoom Copy
When setting your document on the FBS glass
When setting your documents in the ADF
Sorting
Sort
Using the bypass tray
When using the standard paper size
When using the non standard paper size
When using the special sized paper
Advanced copy features
Quick index for major functions Copy mode
Reduce / Enlarge Erase Center
Reverse black and white area Last copy job
Mix length copy Duplex Copies
Combine
Pages 1 sheet Pages -- 1 sheet
Combine
Line
Repeats Features Copy
Image Repeat
Repeats
Mode
Repeat
Select Repeat using the cursor key, and then press Enter
Repeat
Features
Series Copies
Erase center
Copy
Erase border
TopUp Copy
TopUp Copy
Erase Border
Adjust the binding margin
Binding Margin
Directional magnification
Directional ratio% magnification
Positive / Negative
Directional size inch magnification
% H. ---%
Nega/Posi
Using Last Job feature
Last copy job
Erase the document for Last Job
Last Job
Mix Length Setting complete Paper Zoom Sort
Mixed length copy
Acceptable document size
Mix Length
How to set the document
Duplexed copies
Making single copies from 2-sided documents
DuplexCopy
Use cursor to select doc.type
Making duplex copies from two 1-sided documents
Sided
Making duplex copies from 2-sided documents
Making duplex copies from facing pages of the book
Two facing pages -- One 2-sided sheet
Same as original book
Making two facing pages into one 2-sided sheet
DuplexCopy Setting complete Paper Zoom Sort
Making duplex copies the same as the original book
Booklet Setting complete
Booklet copies
Making a booklet copy from eight 1-sided documents
Booklet
Changing the default copy settings
Erase border setting
Accessing the default copy setting mode
Erase Border Setting
Erasing center setting
Binding margin setting
Erase Center Setting
Margin Setting
User settings for copy mode
Sorting copy setting
Copy scan setting
Width of the separator line
Auto reset mode
Last Job Hold Time
Image Compression Mode
Cassette for copying
Cassette for Copy
Norm make copies faster
Print the copy settings
This page intentionally blank
Basic fax features
Resolution, grayscale and contrast
Entering a pause character when dialing
Getting
Fax
TTI select
Select scanning size to be sent
Scan Size
Scanning width
Using memory transmission
ScanningCancelPressSTOP
Sending a fax
Sending a fax from the ADF
Sending a fax from the FBS glass
Yes
Sending a fax using monitor/call or a handset
Fax Features Getting Started
Overseas transmission mode
Transmission
Canceling Commands
Redialing
Redialing manually
All redials failed
Tel Ready mode
Fax Ready mode
Receiving faxes
Reception modes
Fax/Tel Ready mode
Tel/Fax Ready mode
Ans/Fax Ready mode
Using an answering machine with your fax machine
Using as a Phone
Advanced fax features
Autodialer
Autodialer basics
Using one-touch numbers
Entering a one-touch number
Press MENU, A, Enter
01123-4567
Alt.No
GroupNo
Erasing a one-touch number
Changing a one-touch number
01New York Office
04London Office
Inserting and deleting a one-touch number
04Paris Office
Using speed-dial numbers
Printing a list of one-touch numbers
One-touch fax dialing
One-touch phone dialing
Entering a speed-dial number
Location
Changing a speed-dial number
LocationNew York Office Alt.No GroupNo.1 Cancel Erase
Erasing a speed-dial number
Inserting and deleting a speed-dial number
Speed Dial
Fax dialing via speed-dial
Printing a list of speed-dial numbers
004London Office
Using call group
Phoning via speed-dial
Send a fax via call group
G01
Printing a group directory
If an EasyDial call fails
If it was a fax call …
If it was a regular phone call …
Press Redial
Delayed broadcasting
Broadcasting
Broadcasting basics
Making changes to broadcasts
Delayed transmission
Setting up a delayed transmission
Batch transmission
Creating or modifying a batch box
Fax Features
Printing a list of batch boxes
Erasing an empty batch box
Storing a document for batch transmission
Printing a list of documents stored in batch boxes
Printing a document stored in a batch box
Erasing a document stored in a batch box
Press Document
Reviewing or canceling a command for faxing
Reviewing or canceling parts of a broadcast
Fax Features Getting
Job Review
View the result of fax transaction
Printing a delayed command list
Printing a stored document
View the reserved copy jobs
View the reserved printing jobs for out-of-paper reception
Printing a communication result
Out-of-paper Rx
Duplexed transmission
Special features
Duplex Tx
Mixed length transmission
Enlarge transmission
Polling Duplex Tx Code Tx
Auto H.LTR
Using the Fax & Copy function
Fax & Copy
Polling
Regular polling
Continuous polling
Press MENU, D, Enter
Not Stored
PrintDoc EraseDoc Enter
Transferring documents Fax forwarding
Printing a list of your transfer patterns
FeaturesFax
Start Time
Cover
Entering the cover page message
Turning the cover page on
Printing the cover
Features Getting Started
Separate each received document Separator
Select Prt on Sep Page then press Enter
Separator
Setting the activity journal
Setting the reports TCRs and RCRs
Setting the printing order of the activity journal
What the reports tell you
ReportTypeTCR
Numbering pages
Report OFF
OneLine + distinctive ring detection
Set DRD
ExitEnter Set DRD Use cursor to select on or OFF
Enter Set DRD Use cursor to select item
Power of QuadAccess
Call request
Code an introduction
Code communication
Creating or modifying an F-Code box
Box Name
To create or modify an F-Code box
Security Box
OverwriteDocOFF
Password Px Protect
Getting Started
Auto Print Enter
To set the Overwrite Doc
Auto Print
Sender
Using a security box
Printing a list of F-Code boxes
Printing a list of documents stored in F-Code boxes
Printing a document you receive
Using a bulletin box
Erasing a document stored in a bulletin box
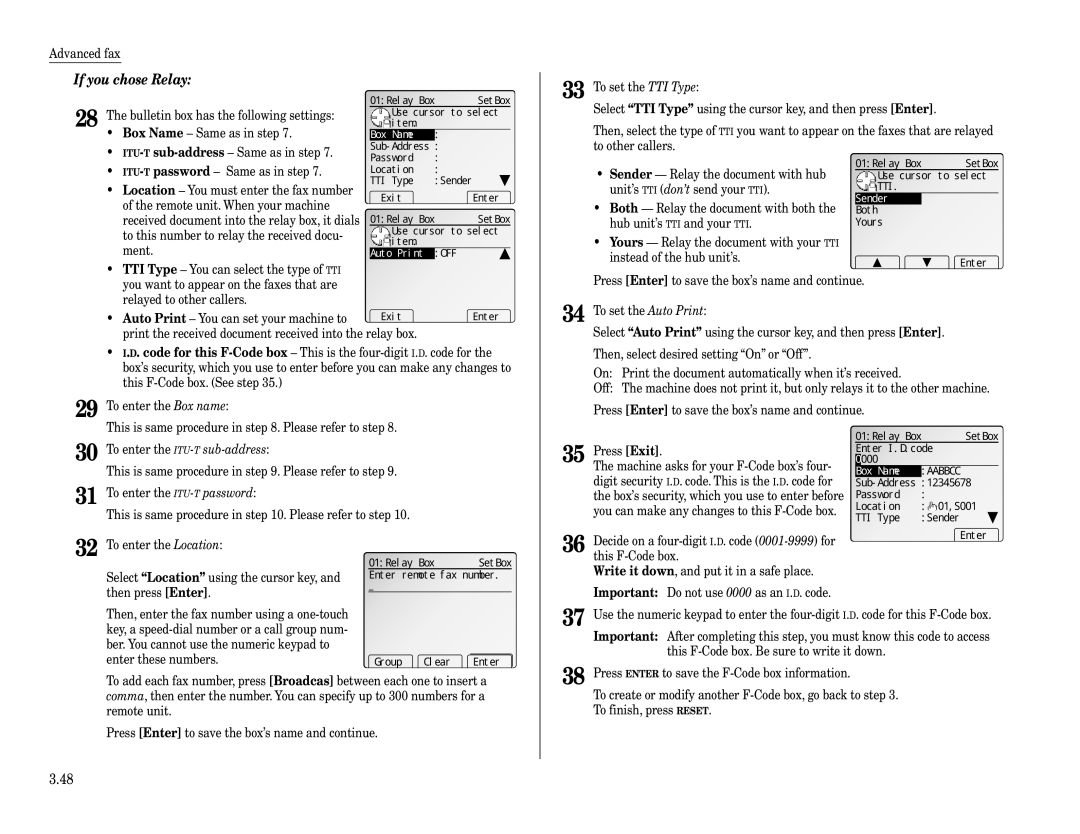
Using a relay box
Erasing an empty F-Code box
02Bulletin Box
03Not stored
Code transmission and polling
Code transmission
Code polling
Enter sub-address
Features Getting Started
Using the power of programmable one-touch keys
Programming a delayed transmission
Programmable one-touch keys
Enter fax number Clear
Delayed Tx Enter Trnsmit Time
Programming a broadcast / group
Tone
Tain time each day you press
Programming regular polling
Select Polling and press Enter
Code Tx Enter sub-address SubAddress Password
Programming a batch transmission
Programming an F-Code transmission
Prog.One-Touch Select p-one-touch.79-84
FCodePolling Enter sub-address SubAddress Password
Programming F-Code polling
12345678
Enter Trnsmit Time 00/1705 Clear Enter
Erasing a programmable one-touch key
Printing a list of your programmable one-touch keys
Code Polling
Prog.One-touch OK to erase?
Fax dialing with programmable one-touch
Security features
Passcode
Security reception
Activating security reception
Masking the PIN
Activating the PIN mask
Security Rx Enter protect passcode Security Rx will be OFF
Mode1 Mode2 Enter
Autodialing while using the PIN mask
Dialing from the numeric keypad while using the PIN mask
Setting security transmission
Performing batch transmission while using the PIN mask
If you’ve specified Mode 1 or Mode
Tx Time Clear
Setting for use with a closed network
Setting Block Junk Fax
Printing a list of blocked numbers list
Block Junk Fax
Fax Features Getting Started
Changing the default fax settings
Settings for transmission
Scan settings
Setting ECM
Resol. Normal
Memory transmission
Quick Memory transmission
Memory Tx
Quick Memory Tx
Setting the confirmation stamp
Default setting OFF
Image rotate transmission
Image Rotate Tx Use cursor to select on or OFF
Settings for reception
Print settings
Print reduction rate
Reduction margin
Setting the number of rings
Adjusting the print settings
Print Settings Use cursor to select item
Default setting 2 time
Cassette for fax reception
Press MENU, J, 2, 3, Enter
Cassette for Rx Use cursor to select cassette
2nd Cassette on ExitEnter
Changing redial settings
Settings for dialing
Changing the dialing pause length
Settings for operation
Adjust the monitor speaker’s volume
Printing your fax settings
Printing a program list Panel auto reset time
This page intentionally blank
Common settings
Setting the Soft Key
Soft Keys
Stamp
Combine Margin
Page
Common Settings
Macros
Programming the Macro key
Macros
Erasing a Macro key
Printing a list of your Macro keys
Setting the speed for Macros
Copying or fax dialing with the Macro key
Macros
Very Fast
Machine settings
Accessing the machine setting mode
Confirm the Counter for total printed pages
Protect passcode
Sleep mode
Sleep Mode
Copy protect
Soft Key
Auto power off mode
Adjust the sound settings
Auto Power Off Mode
Sound Settings
Mid
Fax Mid
Copy
Type
Printing of the machine setting list
Settings for printer controller Option
Paper for list printing
Bin tray Option
Getting Started Common Settings
Print the list of documents stored in memory
Energy saving release time
EnargySave ReleaseTime
Department codes
Entering a department name
Entering a department code
Department Codes
Turning the department code setting on and off
Select the department mode
Mode Department Codes Use cursor to select
Turning department code protection on and off
Sending a fax using a department code
Making a copy using a department code
Printing the department code list for fax
Clearing the department code list for fax
Copy charge setting
Printing the department code list for copy
Copy Dept. List
Clearing the department code list for copy
Dept. List
Getting Started
Just in case
Clearing paper jams
If an original document jams
Case
Just
If a printout jams
When the paper jammed inside the machine
If the platen cover is blinking on the LCD
Getting Started Just in Case
Cassette Optional Large capacity cassette
Bypass tray
Optional duplex unit
Optional 2-Bin tray or the optional shift tray
Print quality problems
Printouts have irregularities
Printouts have white and/or black lines
Printouts have black lines or multiple streaks
Printouts have toner smudges
Cleaning tips
Corrective cleaning
Caring for your machine
Curing frequent jams in the ADF
Cleaning the FBS
If you have unsatisfactory printout quality
Event of a power failure
Power failure report
Power failure during the machine is working
During power failure
Troubleshooting
Alarm
LCD error messages
Copy
Fax
Please set Fax/Tel Mode
PIN is not stored
Set Indiv Frwd #s first
Supply paper for fax doc
Common
Symptom Check for/What to do
Machine is not functioning as designed
Symptom Possible cause/What to do
Symptom Possible cause/ What to do
If you cannot make clear copies
Errors
Error reports
Kinds of error codes
Specific errors
What error messages can mean
Check Message printouts
Common questions
We’re here to help you
General questions
Sending faxes
Reports
Working with your answering machine
Receiving faxes
How your fax machine works
Appendix and index
Specifications
Main unit
Fax communication
Option
Combination chart for copy functions
ADF FBS & ADF
Mix Length document
Glossary
Answering machine See TAD
Getting Started Appendix Index
Halftone See Grayscale
Military format See 24-hour format
REN See Ringer equivalence number
Obligations
Limited warranty
Exclusions
Index
Electronic phone book
AI.12
AI.13
AI.14
Appendix Index
AI.16
MML item number D84-90560-60 MAI order number OMMFX2530