English Español
Miniket Photo
Utilice únicamente baterías aprobadas
Contents Índice
Setting the Miniket Photo Ajuste de la Miniket Photo
Getting Started Introducción
Contents Índice
Music Mode
Movie Mode Modo Movie Video
Modo Music Música
Voice Mode
PC Cam mode
PictBridge mode
Storage Mode
Contents Índice
Please note the following precautions for use
Tenga en cuenta las siguientes precauciones de uso
Notas referentes a la condensación de humedad
Avisos y precauciones de seguridad
Notas relacionadas con la Miniket Photo
Notas referentes a la batería
Precautions Regarding Service
Precautions Regarding Replacement Parts
Nota referente al objetivo
Notas referentes a la pantalla LCD
Features
Getting to know your Miniket Photo
Introducción a la Miniket Photo
Características
Accessories Supplied with the Miniket Photo
Basic Accessories
Optional Accessory Accesorios opcionales
Accesorios básicos
Rear & Left View
Vistas posterior y lateral izquierda
Botón Menu
Altavoz incorporado Botón de pantalla Pantalla LCD
Vistas frontal e inferior
Name of Each Part LCD Display
Name of Each Part LCD Display
Nota
Music Mode
Music Mode Modo Música
OSD Presentación en pantalla en modo Grabar voz
How to Use the Battery Pack
Battery Pack Installation / Ejection
Uso de la batería
Instalación y extracción de la batería
Maintaining the Battery Pack
Mantenimiento de la batería
Using Time / Image Capacity According To Modes
Otros usuarios y condiciones
Batería
Battery Using AC Adapter Using USB Charging
Uso de carga USB
Charging the Battery Pack Carga de la batería
Turn off the Miniket Photo by pressing the Power button
Apague la Miniket Photo pulsando el botón Power
Notas
Power Indicator
Colour of the LED indicates the state of power or charging
Getting Started Introducción
Indicador de encendido
Using the Mode Dial
Utilización del Dial de modo
Getting Started
Introducción
Using the Shortcut Buttons
Turn the Mode Dial to set the desired
Mode Press the Power button to turn on
Utilización de los botones de acceso directo
Using the Joystick Utilización del Joystick
Pulsando el joystick Joystick
Confirm your selection by pressing the joystick OK
Confirme su selección pulsando el botón OK
Structure of Folders and Files
Estructura de carpetas y archivos
Recording Time and Capacity
Tiempo y capacidad de grabación
Using a mini SD card Optional Accessory
Name of Each Part mini SD card
Ejecting a mini SD card
Inserción de una tarjeta Mini SD
Selecting the Memory Type
Selección del tipo de memoria
Getting Started Introducción
Setting Miniket Photo
Setting the Miniket Photo
Setting Memory Ajuste de la memoria
Ajuste de la Miniket Photo
Select Memory Type by moving the joystick left / right
Turn the Mode Dial to the Settings mode
Photo
La Miniket Photo
El joystick a la izquierda / derecha
Formatting the Memory Formateo de la memoria
Visualización de espacio en memoria
Viewing Memory Space
Select Memory Space by moving the joystick left / right
Adjusting the LCD Monitor Ajuste de la pantalla LCD
Adjusting the LCD Brightness
Ajuste del brillo de la pantalla LCD
Select LCD Brightness by moving the joystick left / right
Setting Date/Time Ajuste de fecha y hora
Setting Date/Time Ajuste de fecha y hora
Ajuste del formato de fecha
Setting Date Format
Select Date Format by moving the joystick left / right
Off
Setting the System Ajuste del sistema
Setting the NTSC/PAL
Setting the Beep Sound
Ajuste del sonido Beep
Seleccione Beep Sound Sonido Beep
Select Beep Sound by moving the joystick 4 left / right
Setting the Shutter Sound Ajuste del sonido del obturador
Select Shutter Sound by moving the joystick left / right
Off Turn the shutter sound off On Turn the shutter sound on
Obturador
Photo Settings menu appears
Selecting Language
Selección de idioma
English
Select Mode Display by moving the joystick left / right
Setting the Mode Display
Ajuste de la visualización del modo
Setting the Auto Shut Off
Ajuste de apagado automático
Resetting the Miniket Photo
Reinicialización de la Miniket Photo
Photo Mode
Photo Mode Capturing
Modo Photo Foto Captura
Capturing Images
Captura de imágenes
Zooming In and Out
Acercamiento y alejamiento de las imágenes
Viewing Photo Files on the LCD Monitor
Photo Mode Viewing Modo Photo Foto Visualización
Visualización de archivos de fotos en la pantalla LCD
Photo Mode Viewing
Enlarging a Photo File Zoom Move the W/T zoom switch to
Modo Photo Foto Visualización
Viewing Multiple Photo Files / Enlarging a Photo File
View mode
File No Cancels cropping
You can enlarge and crop a photo
You can display multiple images on one LCD screen
Photo Mode Modo Photo Foto
Setting the Flash Turn the Mode Dial to Photo mode
Miniket Photo Press the Shortcut 2 button
Visualización de foto
Setting the Macro Turn the Mode Dial to Photo mode
Through Off Macro Super Macro
Through Off 2 sec 10 sec
Macro Super Macro
Using the Scene Modes Utilización de los modos de escena
Setting the Photo Size Ajuste del tamaño de foto
Move the joystick left / right to select Photo Size
Press the Menu button to exit the menu
Pulse el botón Menu para salir del menú
Setting the Photo Quality
Ajuste de la calidad fotográfica
Move the joystick left / right to select Photo Quality
Super Fine / Fine / Normal
Setting the Metering Method Ajuste el método de medición
Move the joystick left / right to select Metering.4
Setting the Capturing Options
Setting the Self Timer Ajuste del temporizador
Setting the Multi Shot Ajuste de multi disparo
Aparece la pantalla del menú
Mueva el joystick a la izquierda / derecha
Disparo
Setting Digital Effects
Ajuste de efectos digitales
Effect
Move the joystick left / right to select Digital
Adjusting the Exposure Exposure Compensation
Regarding EV setting in Scene modes, refer to
De liberación del obturador
No aparecerá ningún icono cuando se defina en
Regarding ISO setting in Scene modes, refer to
Move the joystick left / right to select ISO
100
200
Setting the White Balance Ajuste del balance de blancos
Setting
Setting the Macro Mode Ajuste del modo de macro
Pulse el botón Power ENC. para encender la
Setting the Flash Ajuste del Flash
Shadow, indoors, and in backlight situations
En sombra y en situaciones con luz de fondo
Acceso directo consulte la página
Supported Functions According to the Capturing Modes
Funciones admitidas según los modos de captura
Setting the Sharpness Ajuste de nitidez
Soft
Setting the Focus Method Ajuste del método de enfoque
Varios puntos
Setting the Anti-Shake Function Image Stabilisation
Ajuste de la función Anti-Shake EISEstabilización de imagen
Setting the Digital Zoom Ajuste del zoom digital
Optical zoom limit will automatically apply digital
Grainy picture
Down, and then press the joystick OK
Setting the Imprint Option
Ajuste de la opción Imprint Estampar
Using the Shortcut Buttons
Setting the Viewing Options
Ajuste de las opciones de visualización
Protecting Photo files Turn the Mode Dial to Photo mode
Switches to Photo view mode Press the Shortcut 3 button
Cancel cancela la eliminación
Each press of the Shortcut 3 button will toggle
Move the zoom switch to W Wide
Press the Shortcut 3 button again
Protección de archivos de foto en vista múltiple
Pulse el botón Acceso directo
Files
Select Selected photo files will be deleted
Aparece el icono en los archivos seleccionados
Eliminación de archivos de fotos
Deleting Photo Files
Then press the joystick OK
Protecting Photo Files
Protección de archivos de fotos
Rotating a Photo File Rotación de un archivo de foto
You can rotate a saved photo
Move the joystick left / right to select Rotate
Pulse el botón Menu para salir del menú Notas
Resizing Photos Cambio del tamaño de las fotos
You can resize a saved photo to be smaller than
File to resize Press the Menu button Menu screen appears
Down and then press the joystick OK
Setting the Slideshow Ajuste de la presentación
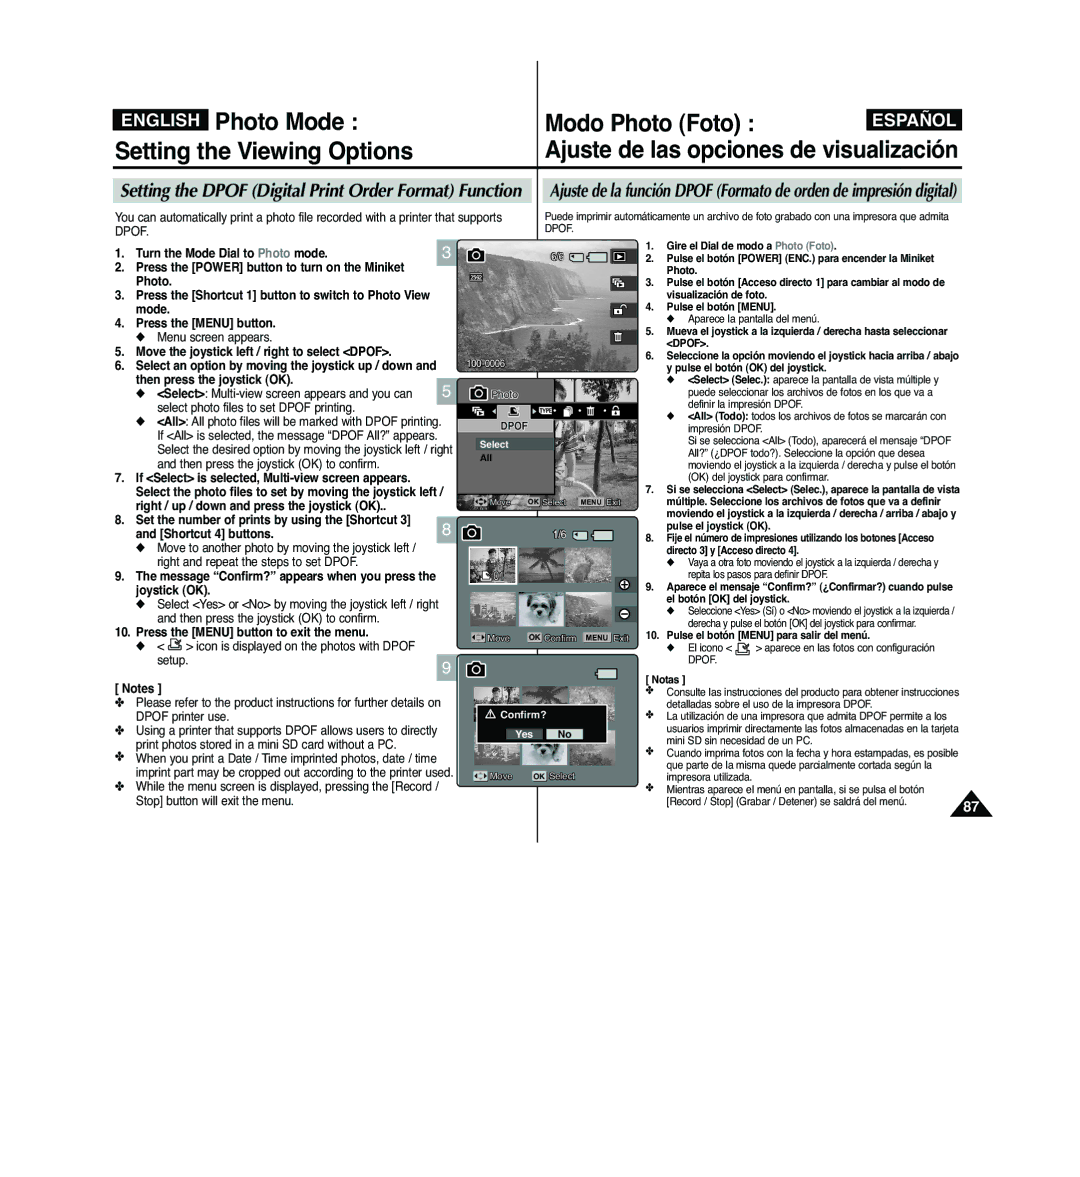
Setting the Dpof Digital Print Order Format Function
Photo Mode
Modo Photo Foto
Copying Photo Files Copia de archivos de fotos
If Select is selected, Multi-view screen
Movie Mode
Ajuste de las opciones de grabación
Movie Mode Recording a Movie
Modo Movie Video
Grabación de un vídeo
Recording a Movie Grabación de un vídeo
Move the W/T zoom switch to T
Acercar zoom
Movie Mode Playing a Movie
Reproducción de un vídeo
Playing a Movie on the LCD Monitor
Reproducción de un vídeo en la pantalla LCD
Movie Mode Modo Movie Video
Setting the Program AE Turn the Mode Dial to Movie mode
Between the Movie Record / View modes
Ajustes de Programa AE Gire el Dial de modo a Movie Video
English Movie Mode Modo Movie Video
Setting the White Balance
Ajuste del balance de blancos
Photo La Miniket Photo Press the Shortcut 3 button
Setting the Program AE
Ajustes de Programa AE
Program AE refer to
Aparece la pantalla de grabación de vídeo
Any recording
Balance
Move the joystick up / down to select an
Option, and then press the joystick OK
Hasta seleccionar Digital Effect Efecto
Setting the Digital Effects Ajuste de efectos digitales
Digital
Program AE to Auto
Define Program AE Programa AE en Auto
Move the joystick left / right to select Macro
Hasta seleccionar Macro
Ajuste de la calidad del vídeo
Setting the Movie Quality
Quality
Available options are 320x240
Setting the Movie Size Ajuste del tamaño del vídeo
Las opciones disponibles son 640x480
Move the joystick left / right to select Self
Setting the Wind Cut Ajuste de anti viento
Functions Availability
Press the Shortcut 1 button again
Vídeo
Pulse el botón Acceso directo Slideshow begins. Refer to
Se inicia la presentación consulte la página
Deleting a Movie File Turn the Mode Dial to Movie mode
Protecting a Movie File
Between Unlocked and Locked
OK.5
Movie Mode
Modo Movie Video
Multiple movie files can be selected using Joystick OK
Deleting Movie files in Multi-View
Selected files Icon appears on the selected files
Selected movies are deleted
You can delete saved movie files
Deleting Movie Files Eliminación de archivos de vídeo
Pulse el botón Menu para salir del menú Notas
Protecting Movie Files
Protección de archivos de vídeo
Protection or format the memory
Selected files
Setting the Slideshow
Hasta seleccionar Slide Diapositiva
Move the joystick left / right to select Slide Movie
On Encendido define repetir la
Copying Movie Files Copia de archivos de vídeo
Music Mode
Reproducción de archivos de música
Modo Music Música
Defina en el PC el tipo de memoria que desea
How to Connect Earphones
Playing Music Files
Music Mode
Setting the Music Play Options
Modo Music Música Ajuste de Español
Las opciones de reproducción de música
Modo Music Música Ajuste de
Between
It helps so as not to disturb listening
Cada pulsación del botón Acceso directo Cambiará entre y
Aparece un icono que indica el modo seleccionado
Move the joystick left / right to select Repeat
Normal / Pop / Jazz / Classic
Setting the Equaliser Ajuste del ecualizador
Normal / Pop / Jazz / Classic Clásico
No to cancel deletion
English Music Mode
Deleting Music Files Eliminación de archivos de música
No to cancel protection. Press
Protecting Music Files Protección de archivos de música
Format the memory
Select files to protect
Modo Voice Voz
Voice Mode Recording Voice Files
Modo Voice Voz
Grabación de archivos de voz
Recording Voice Files Grabación de archivos de voz
Playing Voice Files Reproducción de archivos de voz
It moves to Voice Play mode Viewing the Voice File List
Modo Voice Voz Ajuste de
Las opciones de reproducción de voz
Miniket Photo Press the Shortcut 1 button
Delete Deletes the selected file Cancel Cancels the deletion
Cancel cancela la eliminación
All All voice files will play through in order
Deleting Voice Files Eliminación de archivos de voz
Press the Shortcut 4 button
Modo Voice Voz Ajuste de
Voice Mode Setting the Voice Play Options
Protecting Voice Files Protección de archivos de voz
An icon indicating selected file is to be copied appears
Aparece la pantalla de grabación de voz
PC Cam mode
Using the PC Cam Function
Using the PC Cam Function
Utilización de la función PC Cam Cám. WEB
PictBridge mode
To cancel printing, press the Shortcut 1 button again
Modo PictBridge
Printing with PictBridge
Impresión con PictBridge
Storage Mode
Utilización del dispositivo almacenador de datos
Using as a Mass Storage Device
Copy files into the destination folder Windows XP
137
140
142
145
Connecting to a PC Conexión a un PC
English Miscellaneous Information
Información diversa
Recommended System Requirements
Para instalar el software
Installing DV Media Pro
Instalación de DV Media Pro
Installing Video Studio Insert the CD
Installing DV Media Pro 1.0 / Video Studio
Instalación del programa DV Media Pro 1.0 / Video Studio
Conexión a otros dispositivos
Connecting to a PC Using USB Cable
Conexión a un PC utilizando el cable USB
Press the Shortcut 1 button to switch to Movie view mode
Connecting to a TV Monitor
Select a movie file to play
Connecting to a VCR
Source where you connected the Miniket Photo
Conexión a un aparato de vídeo
Source to the VCR
Printing Dpof files in the mini SD card
Printing with Dpof Impresión con Dpof
Impresión de archivos Dpof en la tarjeta mini SD
After using the Miniket Photo
Después de utilizar la Miniket Photo
Cleaning the Body
To Clean the Exterior of the Miniket Photo
Limpieza de la carcasa
Limpieza exterior de la Miniket Photo
Información sobre la batería
Regarding the Battery
Quede ninguna carga
Using Abroad
Utilización en el extranjero
Resolución de problemas
Checklist
Self-Diagnosis Display
Pantalla de autodiagnósticos
148
Using the Menu
Uso del menú
Recorder
Música
De voz
Grabador
SpecificationsEspecificaciones
Product design and specifications are subject to change
Index
Índice alfabético
55,92,113,122
66,97
~11 Self Diagnosis Display ....147,148
Sensibilidad ISO
España Spain
Contact Samsung World Wide
Region Country Customer Care Center Web Site
English Español