Section 5: Printer Configuration
LCD DISPLAY |
| DEFINITION | |
|
| ||
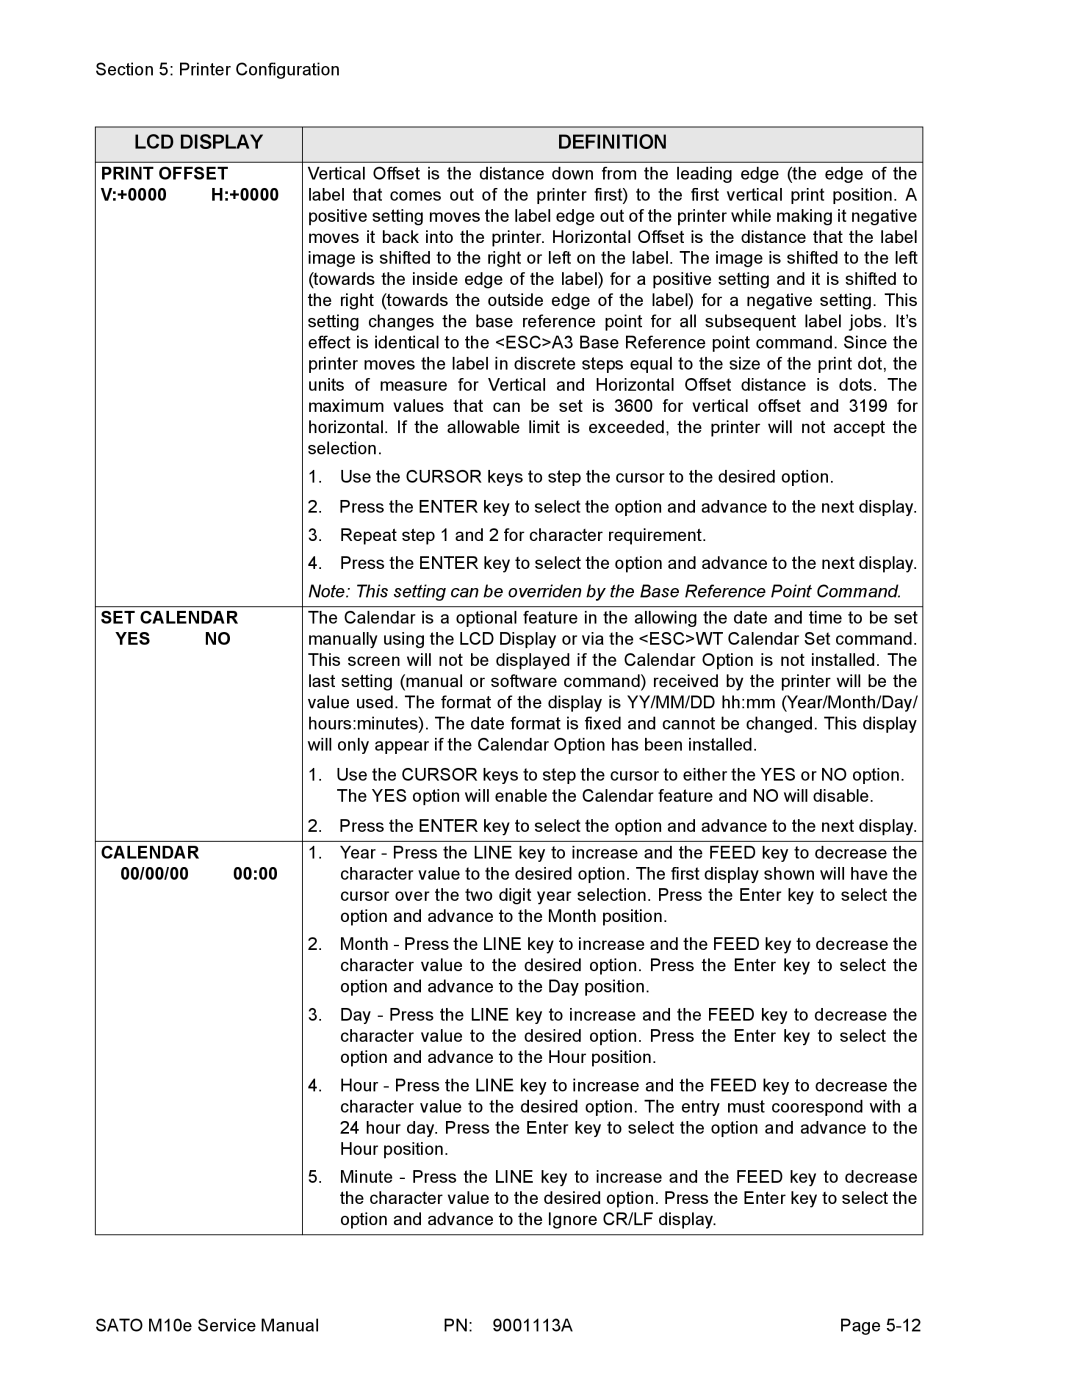
PRINT OFFSET | Vertical Offset is the distance down from the leading edge (the edge of the | ||
V:+0000 | H:+0000 | label that comes out of the printer first) to the first vertical print position. A | |
|
| positive setting moves the label edge out of the printer while making it negative | |
|
| moves it back into the printer. Horizontal Offset is the distance that the label | |
|
| image is shifted to the right or left on the label. The image is shifted to the left | |
|
| (towards the inside edge of the label) for a positive setting and it is shifted to | |
|
| the right (towards the outside edge of the label) for a negative setting. This | |
|
| setting changes the base reference point for all subsequent label jobs. It’s | |
|
| effect is identical to the <ESC>A3 Base Reference point command. Since the | |
|
| printer moves the label in discrete steps equal to the size of the print dot, the | |
|
| units of measure for Vertical and Horizontal Offset distance is dots. The | |
|
| maximum values that can be set is 3600 for vertical offset and 3199 for | |
|
| horizontal. If the allowable limit is exceeded, the printer will not accept the | |
|
| selection. | |
|
| 1. | Use the CURSOR keys to step the cursor to the desired option. |
|
| 2. | Press the ENTER key to select the option and advance to the next display. |
|
| 3. | Repeat step 1 and 2 for character requirement. |
|
| 4. | Press the ENTER key to select the option and advance to the next display. |
|
| Note: This setting can be overriden by the Base Reference Point Command. | |
|
| ||
SET CALENDAR | The Calendar is a optional feature in the allowing the date and time to be set | ||
YES | NO | manually using the LCD Display or via the <ESC>WT Calendar Set command. | |
|
| This screen will not be displayed if the Calendar Option is not installed. The | |
|
| last setting (manual or software command) received by the printer will be the | |
|
| value used. The format of the display is YY/MM/DD hh:mm (Year/Month/Day/ | |
|
| hours:minutes). The date format is fixed and cannot be changed. This display | |
|
| will only appear if the Calendar Option has been installed. | |
|
| 1. | Use the CURSOR keys to step the cursor to either the YES or NO option. |
|
|
| The YES option will enable the Calendar feature and NO will disable. |
|
| 2. | Press the ENTER key to select the option and advance to the next display. |
|
|
|
|
CALENDAR |
| 1. | Year - Press the LINE key to increase and the FEED key to decrease the |
00/00/00 | 00:00 |
| character value to the desired option. The first display shown will have the |
|
|
| cursor over the two digit year selection. Press the Enter key to select the |
|
|
| option and advance to the Month position. |
|
| 2. | Month - Press the LINE key to increase and the FEED key to decrease the |
|
|
| character value to the desired option. Press the Enter key to select the |
|
|
| option and advance to the Day position. |
|
| 3. | Day - Press the LINE key to increase and the FEED key to decrease the |
|
|
| character value to the desired option. Press the Enter key to select the |
|
|
| option and advance to the Hour position. |
|
| 4. | Hour - Press the LINE key to increase and the FEED key to decrease the |
|
|
| character value to the desired option. The entry must coorespond with a |
|
|
| 24 hour day. Press the Enter key to select the option and advance to the |
|
|
| Hour position. |
|
| 5. | Minute - Press the LINE key to increase and the FEED key to decrease |
|
|
| the character value to the desired option. Press the Enter key to select the |
|
|
| option and advance to the Ignore CR/LF display. |
|
|
|
|
SATO M10e Service Manual | PN: 9001113A | Page |
