Chapter 4 Installing the Cisco CSR 1000V in VMware ESXi Environments
Deploying the Cisco CSR 1000V OVA Template to the VM
The following restrictions apply to the BDEO tool:
•You can deploy the .ova file directly onto an ESXi host. The BDEO tool is not supported for Citrix XenServer, KVM, or Microsoft
•Beginning with Cisco IOS XE Release 3.12S, the CSR 1000V OVA provides the option to select multiple
•The customization options under the “Virtual Machine Hardware”, “Virtual Machine Description”, and “Cisco IOS XE Configuration” are only used when constructing a new OVA with an .iso file as input
While the following procedure provides general guidance for how to deploy the Cisco CSR 1000V, the exact steps that you need to perform may vary depending on the characteristics of your VMware environment and setup.
Step 1 Download the .ova file from the Cisco CSR 1000V software installation image package: Step 2 Extract the BDEO shell script tool from the OVA package.
For example, you could use the following Linux command:
tar xvf [file.ova] bdeo.sh README-BDEO.txt
Step 3 Run the BDEO shell script with the
All of the commands below are optional except for the
Note The default values may vary depending on the Cisco CSR 1000V version.
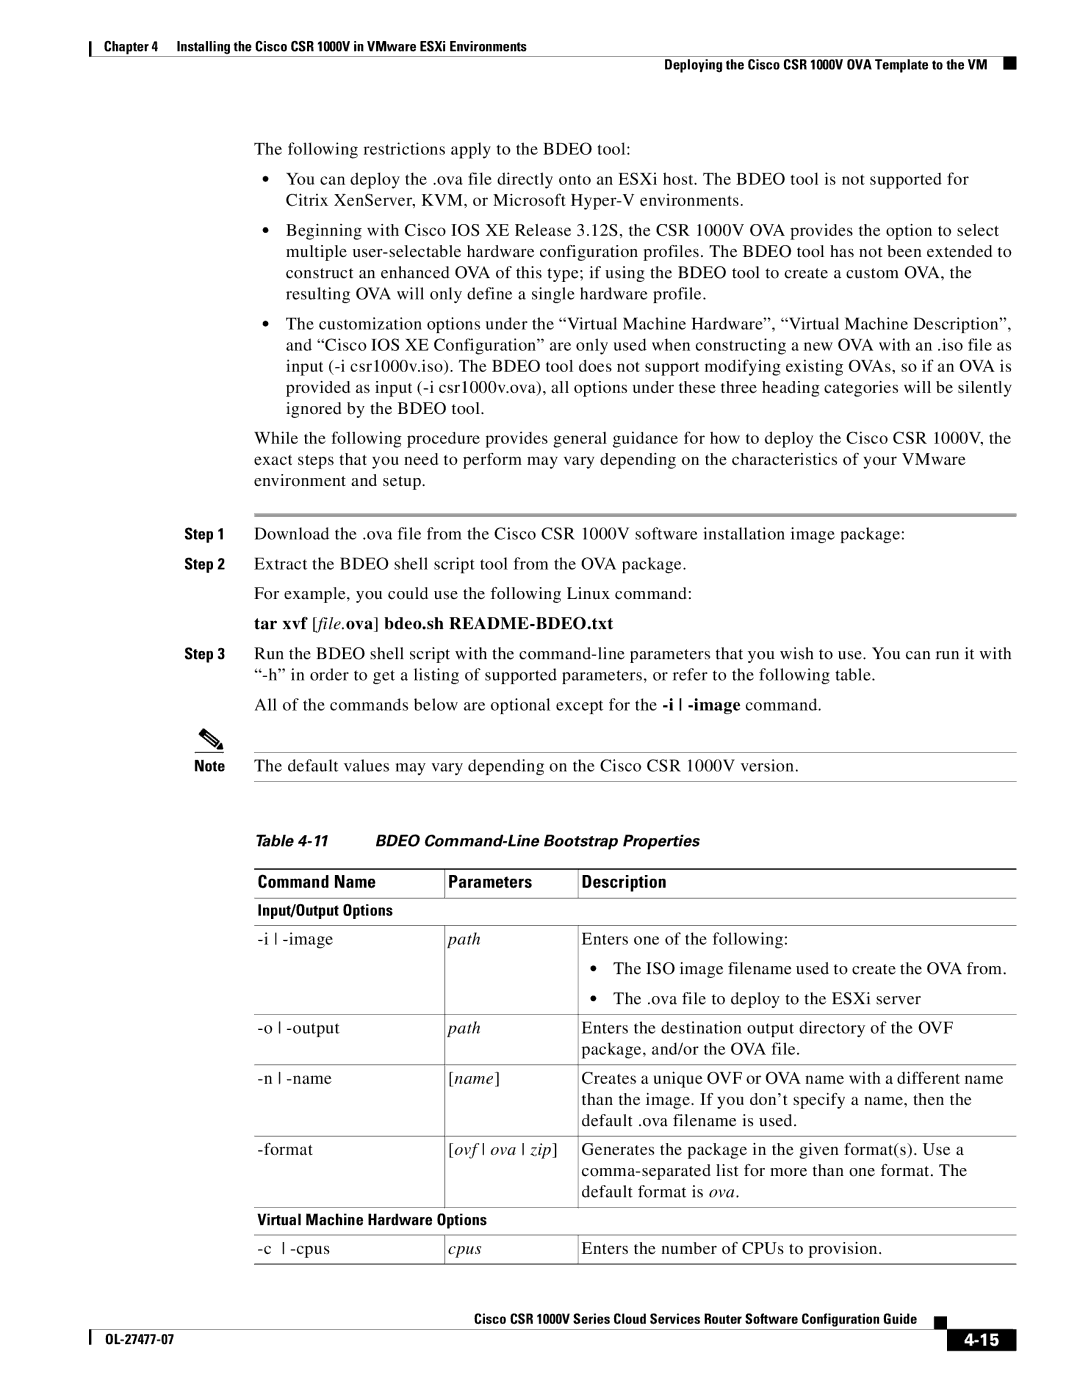
Table
|
| Command Name | Parameters | Description | |||
|
|
|
|
|
|
|
|
|
| Input/Output Options |
|
|
|
|
|
|
|
|
|
| |||
|
| path | Enters one of the following: | ||||
|
|
|
| • The ISO image filename used to create the OVA from. | |||
|
|
|
| • The .ova file to deploy to the ESXi server | |||
|
|
|
|
| |||
|
| path | Enters the destination output directory of the OVF | ||||
|
|
|
| package, and/or the OVA file. | |||
|
|
|
|
| |||
|
| [name] | Creates a unique OVF or OVA name with a different name | ||||
|
|
|
| than the image. If you don’t specify a name, then the | |||
|
|
|
| default .ova filename is used. | |||
|
|
|
|
| |||
|
| [ovf ova zip] | Generates the package in the given format(s). Use a | ||||
|
|
|
| ||||
|
|
|
| default format is ova. | |||
|
|
|
|
|
|
|
|
|
| Virtual Machine Hardware Options |
|
|
|
| |
|
|
|
|
| |||
|
| cpus | Enters the number of CPUs to provision. | ||||
|
|
|
|
|
|
| |
|
|
| Cisco CSR 1000V Series Cloud Services Router Software Configuration Guide |
|
| ||
|
|
|
| ||||
|
|
|
|
|
|
|
|
|
|
|
|
|
| ||
|
|
|
|
| |||