Caméscope DVD
DVD-kamkorder
Caméscope DVD 3,5 pouces
Large écran LCD 2,7 po, format 16/9e 112 000 pixels
Voice Plus
Kamkorder za 3 1/2 palčne plošče DVD
Consignes de sécurité
Précautions
Advertencias de seguridad
Previdnostni ukrepi
Pomembne informacije o uporabi
Avant D’UTILISER LE Camescope
Pred Uporabo Tega Kamkorderja
Naredite varnostne kopije pomembnih podatkov
Propos DE CE Manuel D’UTILISATION
Marques Apposees EN Regard DES Titres
Remarques Concernant LA Marque DE Commerce
TEM Uporabniškem Priročniku
Précautions d’utilisation
Previdnostni ukrepi pri uporabi
Remarque Importante
Pomembna Opomba
Evitez d’exposer le caméscope DVD à la suie ou la vapeur
Evitez d’exposer le caméscope DVD aux pesticides
Evitez de toucher l’objectif du bloc de capteur laser
Stel de geheugencamcorder niet bloot aan roet of stoom
Table des matières Vsebina
Uvod V Osnovne Funkcije
Priprava
DVD Avant DE Debuter L’ENREGISTREMENT
Mode Camescope DVD Montage DES Images Videos
DVD GEST. Disque
Table des matières Inhoudsopgave
Connexion AUX Peripheriques AV
Vzdrževanje
Dodatne
Informacije
Uvod v osnovne funkcije
Enregistrement d’images vidéo sur un disque DVD
Snemanje na DVD-ploščo
Dolgotrajno snemanje
Etape 2 Enregistrement
suite se nadaljuje
Introduction aux
Fonctionnalités de base
Finalisé
DVD Zaključen
KAJ JE Priloženo Vašemu DVD-KAMKORDERJU
Accessoires Fournis Avec Votre Camescope DVD
’apparence des articles varie selon le modèle utilisé
VUE Avant ET DE Droite
Spoznajte svoj DVD- kamkorder
Pogled OD Spredaj in Z Desne
VUE DE Gauche ET Dessous Pogled Z Leve in OD Spodaj
Votre caméscope DVD Kamkorder
Familiarisez-vous avec
VUE Arrière ET Dessus Pogled OD Zadaj in OD Zgoraj
Préparatifs
Priprava
Battery
Holder
Comment Tenir LE Camescope DVD Držanje DVD-KAMKORDERJA
Préparatifspriprava
Chargement DU BLOC-PILES
Polnjenje Baterije
Chargement du bloc-piles
Propos des blocs-piles
Entretien du bloc-piles
Propos de l’autonomie du bloc-piles
Baterijski paket
Power switch
Chargement du
Bloc-piles
Témoin de charge
Bloc-piles
Temps d’enregistrement en continu sans zoom
Baterija
Čas neprekinjenega snemanja brez primika/odmika
Utilisation du caméscope DVD avec l’adaptateur CA
Uporaba DVD-kamkorderja s pretvornikom AC
Défaillance du caméscope DVD
Le non respect de cette procédure peut provoquer une
Mise sous/hors tension du caméscope DVD
Sélection des modes de fonctionnement
Vklop in izklop DVD-kamkorderja
Izbira načinov delovanja
Préparatifs Priprava
Temoins D’ECRAN Indikatorji Zaslona
Mode de lecture du caméscope DVD
Način predvajanja DVD- kamkorderja
Mode enregistrement d’ appareil photo numérique
Način snemanja digitalne
Kamere
Stby veille ou enregistrement
Mode lecture d’appareil numérique vidéo
Mode lecture d’appareil numérique photo
Način predvajanja digitalne kamere video
3 45
Utilisation DU Levier DE Commande
Preparación
Utilisation DE LA Touche D’ECRAN
Uporaba Gumba Prikaz
Utilisation DU Viseur Uporaba LCD-ZASLONA
Utilisation DE L’ECRAN LCD
Uporaba Okularja
Le levier de commande
Commande
Choix de la langue d’affi chage à l’écran
Izbira jezika zaslonskega prikaza
Activation/désactivation de l’horodatage
Réglage de la date et de l’heure Nastavitev datuma in časa
Vklop/izklop prikaza datuma in časa
Mode caméscope DVD Način DVD-kamkorderja
Pred snemanjem
Insertion ET Retrait DE Disque
Vstavljanje in Odstranitev Plošče
Pri uporabi nove plošče formatiranje nove plošče
Pickup lens
Avertissement
Pozor
Duree D’ENREGISTREMENT
ČAS Snemanja
Snemanje Videa
Enregistrement D’IMAGES Vidéo
Pritisnite gumb začetek/konec snemanja
Mode caméscope DVD enregistrement/lecture
Pour annuler le mode EASY.Q
Touche Menu, levier de commande
Preklic načina EASY.Q
Touches indisponibles durantl’opération EASY.Q
Appuyez sur le levier de commande
Nastavite stikalo shranjevanja načina na
Paličico
Pritisnite krmilno paličico
Zoom PRIMIK/ODMIK
Zoom avant
Zoom arrière
Primik
Lecture DE Videos Predvajanje Videa
Krmilno paličico navzdol
Opérations de lecture diverses
Réglage du volume
Različne operacije predvajanja
Sur le levier de commande
Suppression D’IMAGES Brisanje Slik
Edit
Qu’est-ce qu’une liste de lecture ?
Liste DE Lecture Seznam
Kaj je seznam?
Création d’une liste de lecture Ustvarjanje seznama
De commande et sélectionnez « Back » Retour
Mode caméscope DVD
Urejanje videa
Suppression d’image vidéo d’une liste de lecture
Brisanje videa s seznama
Brisanje razdelka videa s seznama
« Partial Delete » Suppr. part
FINAL. Disque
Mode caméscope DVD gest. disque
Zaključevanje Plošče
Gest. disque Upravljanje plošč
Lecture sur un ordinateur à l’aide d’un lecteur
Redvajanje na osebnem računalniku z DVD- ogonom
Lecture d’un disque finalisé sur un lecteur/graveur DVD
NON FIN. Disque Preklic Zaključevanja Plošče
+RW
Formatage D’UN Disque +RW Format Plošče
DVD+RW disc
Pour renommer le disque
Informations Relatives AUX Disques Informacije O Plošči
Preimenovanje plošče
Insertion ET Ejection D’UNE Carte Memoire
Vstavljanje in Izmet Pomnilniške Kartice
Label-pasting portion
Sélectiond’une carte mémoireadéquate
Usable memory cards
Remarques concernant l’utilisation de l’appareil
Opombe glede uporabe
Duree D’ENREGISTREMENT ET Nombre D’ Images
ČAS Snemanja in Število Slik
’ENREGISTREMENT DE Videos Snemanje Videa
Choisissez la touche démar./arrêt de l’enregistrement qui
Nastavite stikalo za odpiranje/zapiranje objektiva
Appuyez sur la touche de démar./arrêt de l’
Prise DE Photos Fotografiranje
Nastavite stikalo načina shranjevanja na Card
Nastavite stikalo načina shranjevanja na Card
Visionnage DES Photos Ogled Fotografij
Réglez la fonction diaporama en affi chage continu
Za neprekinjeni prikaz nastavite funkcijo diaprojekcije
’index des vignettes de photos s’ouvre
Le levier de commande
Krmilno paličico
fich. ou « All Files » Ts les fich. , puis appuyez sur
Utilisation du levier de commande
Utilisation des éléments Uporaba elementov De menu Menija
Manipulation DES Menus Upravljanje Menijev
Utilisation de la touche Menu Uporaba gumba Menu
Elements DE Menu
Eléments du menu d’enregistrement
Elementi Menija
Snemanje elementov menija
Utilisation des éléments de menu
Uporaba elementov menija
Eléments du menu de lecture
Predvajanje elementov menija
Scene Mode AE Mode ScèneAE
Elements DU Menu D’ENREGISTREMENT
Snemanje Elementov Menija
Scene ModeAE
White Balance Bal. blancs
White Balance
Exposure Exposition
Exposure
Anti-ShakeDIS Anti vibr.DIS
Anti-ShakeDIS
Conditions de grossissement extrême
Onemogoči funkcijo Jih ni
Digital Effect Effet numér
Digital Effect
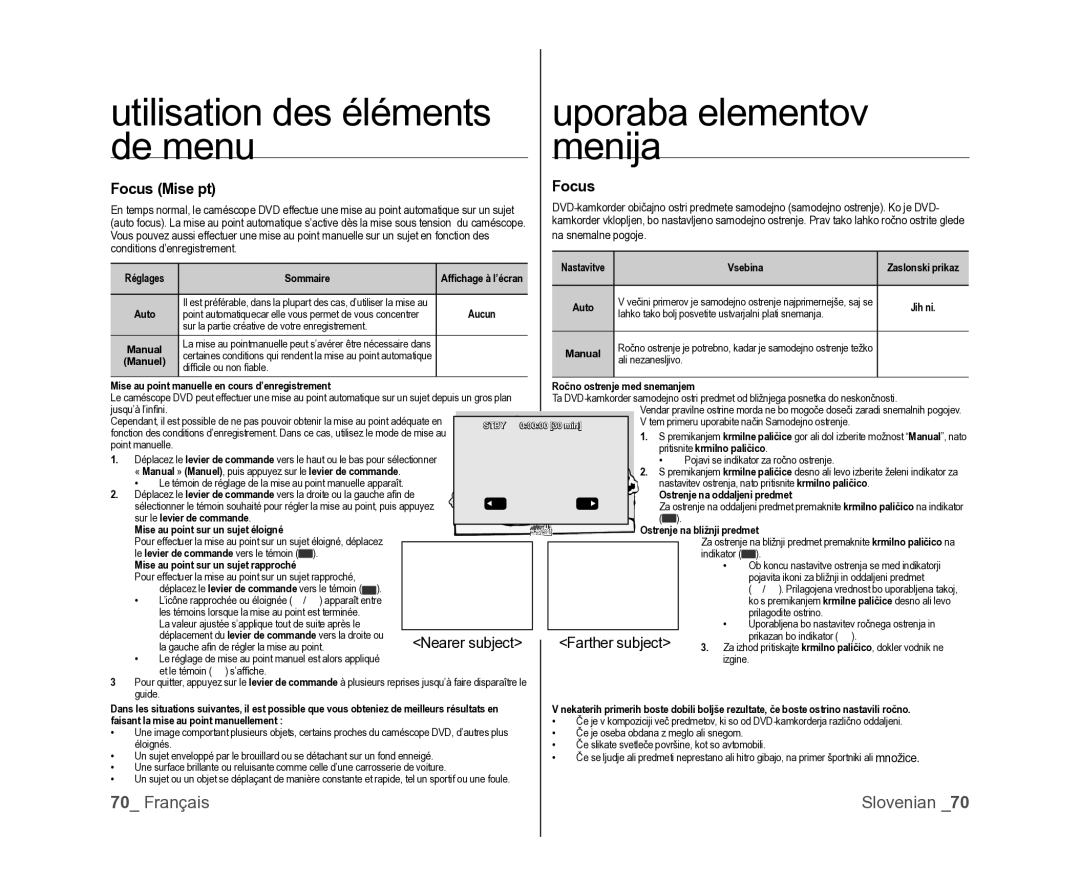
Focus Mise pt
Nearer subject
Ročno ostrenje med snemanjem
Ostrenje na oddaljeni predmet
Appuyez sur le levier de commande
Shutter obturateur
Shutter
Réglage manuel de la vitesse de l’obturateur
Quality Qualité
Wide
Quality
Wind Cut Supp. Vent
Back Light Contre jour
Wind Cut
Back Light
Light Éclair. VP-DX102/DX105 i uniquement
Nite
Light samo za VP-DX102/DX105
Guideline Repére
Guideline
Digital Zoom Zoom numérique
Digital Zoom
Nastavitve Vsebina Zaslonski prikaz
Kratni
Reset
File No. N de fichier VP-DX103 i /DX104/DX105 i uniquement
File No. samo za VP-DX103i/DX104/DX105i
Réglages Sommaire
Elements DU Menu DE Lecture
Predvajanje Elementov Menija
Reglage DES Elements DE Menu
Nastavitev Elementov Menija
Date/Time Date/heure
Date/Time
LCD Brightness Luminosité LCD
LCD Colour Couleur LCD
Beep Sound Signal sonore
Auto Power Off Arrêt auto
Auto Power Off
Beep Sound
TV Display Affichage TV
USB Connect Conn. USB VP-DX103 i /DX104/DX105 i uniquement
Remote samo za VP-DX102/DX104/DX105i
TV Display
Default Set Rég. par déf
Default Set
Menu Colour Coul. menu
Transparency Transparent
Reinit. tt, puis appuyez sur le levier de commande
Set All ali Reset All, nato pritisnite krmilno paličico
Parametres D’IMPRESSION Dpof Dpof Nastavitev Tiskanja
Sélectionner « Print Mark Dpof » Voyant D’Imp.DPOF
Impression EN Direct Avec Pictbridge
Neposredno Tiskanje S Pictbridge
Réglage de l’option d’impression de l’horodatage
Impression à l’aide du format Dpof
Možnost tiskanja datuma/časa
Uporaba nastavitve Dpof za tiskanje
Connexion a UN Televiseur
Connexion aux Povezava z napravami Périphériques AV
Priklop NA Televizor
Prikaz slike glede na razmerje televizijskega zaslona
Servez-vous du levier de commande
Commande
Utilisation DE Voice Plus Uporaba Dodajanja Zvoka
ALI Zunanje Vsebine NA Ploščo Samo ZA VP-DX100i
VP-DX100i/DX103i/DX105i Uniquement
DV Media PRO
Configuration DU Systeme
Sistemske Zahteve Računalnika
Installation DU DV Media PRO
Namestitev DV Media PRO
Installation d’application Quick Time
Namestitev aplikacije Quick Time
DirectX 9.0, Video Codec
DV Driver, DirectX 9.0, Video Codec
Raccordement DU Cable USB
Débranchement du câble USB
Vključitev USB-KABLA
Odklop USB-kabla
Photo images Movie images Setting data
Si vous utilisez Windows XP/Vista
Si vous utilisez la version Windows
Uporaba sistemov Windows XP/Vista
Format d’image
Zgradba map in datotek na pomnilniški kartici
Format slike
Transfert DE Fichiers DU Camescope DVD Vers Votre Ordinateur
Prenos Datotek Z DVD-KAMKORDERJA NA VAŠ Osebni Računalnik
Connexion à un ordinateurVP
640 x 480 VGA točk za povezavo USB
Entretien
Précautions de rangement
Nettoyage du caméscope DVD
Opozorila glede shranjevanja
Dodatne Informacije
Nettoyage et manipulation du disque
Čiščenje in upravljanje plošče
Support de stockage
LCD-zaslon
Ecran LCD
Baterije
Description des types de disque
Vzdrževanje in dodatne informacije
Opis vrste plošče
Utilisation DU Caméscope DVD À L’ÉTRANGER
Uporaba DVD-KAMKORDERJA V Tujini
Dépannage
Odpravljanje težav
Cartes mémoire VP-DX103 i /DX104/DX105 i uniquement
Pomnilniške kartice samo za VP-DX103 i /DX104/DX105
PictBridge VP-DX103 i /DX104/DX105 i uniquement
PictBridge samo za VP-DX103 i /DX104/DX105
Sporočilo Obvešča, da … Ukrep
Upoštevajte, preden pošljete svoj kamkorder na popravilo
Symptômes et solutions
Simptomi in rešitve
Cartes mémoire VP-DX103i/DX104/DX105i uniquement
Enregistrement
Pomnilniške kartice samo za VP-DX103i/DX104/DX105i
Snemanje
De démar./arrêt de l’
Enregistrement et le
Stikalo načina shranjevanja na Card
Gumb začetek/konec
Réglage de l’image en cours d’enregistrement
Prilagajanje slike med snemanjem
Lecture sur le caméscope DVD
Predvajanje na DVD-kamkorderju
Connexion à un ordinateur
Povezava z računalnikom
Fonctionnement global
Menu
Splošno delovanje
Meni
Tehnične podrobnosti
Modelnaam VP-DX100i/DX100H/DX102/DX103i /DX104/DX105i
Soit à vous adresser au revendeur à qui vous lavez acheté
08 25 08 65 65 € 0,15/Min Fax 01 48 63 06
Samsung
Conforme à la directive RoHS
Skladnost s predpisom RoHS